


5
User’s Guide
Us
er’
s
Guide
HDR 24/96 Back Panel
Note:
Note:
Note:
Note:
Note: Do not
confuse the
Remote jack
with the
Ethernet jack!
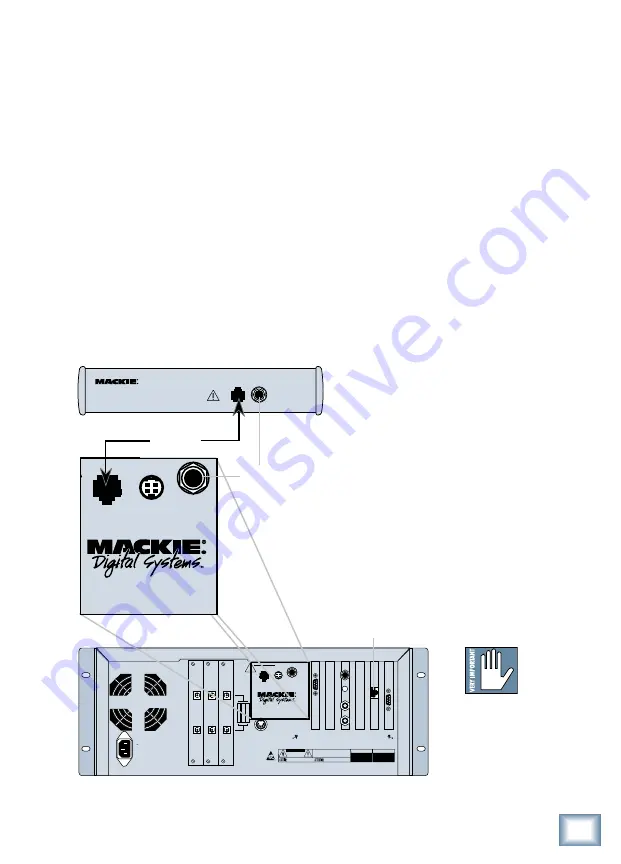
Plug It In
You can do this with the HDR24/96 powered on or powered off, it
doesn’t matter.
1. Plug the supplied 25' cable into the “To HDR” jack on
the back of the Remote 24.
2. Plug the other end into the “Remote” jack on the back of
the HDR24/96.
Footswitch
A must-have for performer-engineers: use a footswitch to punch in
and out on-the-fly, stop and start the transport, jump to the next
cue, create new cues, or select the next take. The footswitch jack
function is assigned in the
HDR24/96 General Setup
window. This TS 1/4" jack -
and a jack on the back of
the HDR24/96 - accepts a
momentary, normally open
footswitch, available at any
reputable footswitch
emporium. For double the
fun, you can use
footswitches in the Remote
24 and HDR24/96 at the
same time.
Remote
Cable
FOOT SW
TO HDR
REMOTE JACK
REMOTE 24
DO NOT PLUG INTO
ETHERNET
WARNING
Remote24 Back Panel
Footswitch
120VAC
50/60 Hz 475W
KEYBOARD
TA
PE 17
-24
TA
PE 9
-16
TA
PE 1–
8
RISK OF ELECTRIC SHOCK
DO NOT OPEN
REPLACE WITH THE SAME TYPE FUSE AND RATING.
DISCONNECT SUPPLY CORD BEFORE CHANGING FUSE
UTILISE UN FUSIBLE DE RECHANGE DE MÊME TYPE.
DEBRANCHER AVANT DE REMPLACER LE FUSIBLE
WARNING:
TO REDUCE THE RISK OF FIRE OR ELECTRIC SHOCK, DO NOT
EXPOSE THIS EQUIPMENT TO RAIN OR MOISTURE. DO NOT REMOVE COVER.
NO USER SERVICEABLE PARTS INSIDE. REFER SERVICING TO QUALIFIED PERSONNEL.
CAUTION
SERIAL NUMBER
MANUFACTURING DATE
AVIS:
RISQUE DE CHOC ELECTRIQUE — NE PAS OUVRIR
24 TRACK 24 BIT DIGITAL AUDIO
HARD DISK RECORDER/EDITOR
CONCEIVED, DESIGNED, AND MANUFACTURED BY MACKIE DESIGNS INC • WOODINVILLE • WA 98072 • USA
MADE IN USA • FABRIQUE AU USA • PATENTS PENDING COPYRIGHT ©1998 THE FOLLOWING ARE TRADEMARKS OR
REGISTERED TRADEMARKS OF MACKIE DESIGNS INC.: "MACKIE.", MACKIE DIGITAL SYSTEMS AND THE "RUNNING MAN" FIGURE.
WARNING:
SHUT OFF POWER
TO UNIT BEFORE INSTALLING
OR REMOVING CARDS!
REMOTE
VIDEO
SYNC
ACC 1
ACC 2
ETHERNET
MIDI
HDR 24
/96
MOUSE
FOOT
SWITCH
OPT • 8
OUTPUT
INPUT
OPT • 8
OUTPUT
INPUT
OPT • 8
OUTPUT
INPUT
DO NOT
NOT PLUG INTO
ETHERNET
WARNING
WARNING
24 TRACK 24 BIT DIGITAL AUDIO
HARD DISK RECORDER/EDITOR
REMOTE
HDR 24
/96
MOUSE
FOOT
SWITCH
DO NOT
NOT PLUG INTO
ETHERNET
WARNING
Ethernet Jack


