background image

DC16 Owner’s Manual

40

Channel Editing

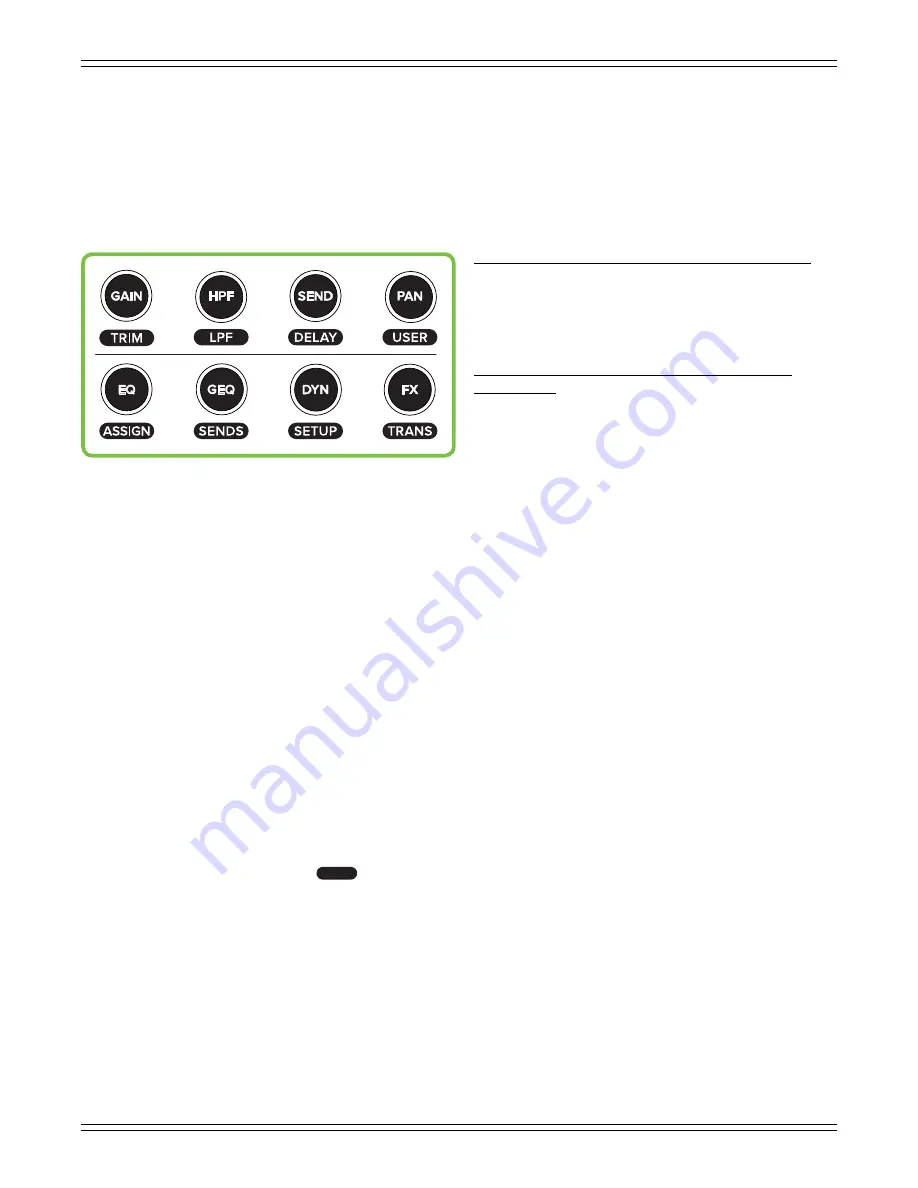
The channel editing buttons are conveniently located in the upper-left corner of the DC16 to the left  

of the channel IDs and above the groups selector section. The channel editing buttons give you fast  

access to all of the channel processing. These buttons – in conjunction with the channel displays  

and editing encoders – open up a world of possibilities. Please read on...

ALL Channel Editing – top row BUTTONS (left to right):

•   GAIN / TRIM 

•   HPF / LPF 

•   SEND / DELAY 

•   PAN / USER – NYI

SELECTED Channel Editing – bottom row BUTTONS 

(left to right):

•   EQ / ASSIGN – NYI 

•   GEQ / SENDS – NYI 

•   DYN(amics) / SETUP 

•   FX / TRANS(port) – NYI

You may have noticed that the buttons are split between “ALL” channel editing (top row of buttons) and 

“SELECTED” channel editing (bottom row of buttons). While it may not seem like it on the surface, there  

is indeed a method to the madness:

ALL Channel Editing

 allows adjustment of the selected parameter across ALL channels simultaneously.  

For example, with gain engaged, all mic pre gains (and/or digital trim) of all channels are available for  

adjustment via the channel display editing encoders.

If the control is not present on a particular channel, only the channel name and icon will be displayed.

SELECTED Channel Editing

, on the other hand, allows adjustment of the selected group of parameters  

for the SELECTED channel. For example, with EQ engaged, all EQ parameters of the selected channel  

are available for adjustment via the channel display editing encoders.

One important note before we get started. It looks like there are only eight buttons – and theoretically  

there are – but each button has a second function as indicated in the text of the horizontally-lined  

capsule-shaped design [ 

   ] underneath each button. This text represents what function may  

be selected (and subsequently updated) when pressing and holding the ALT button while pressing  

the button. The ALT button is a modifer; more information about it may be found on page 57.

Now let’s take a brief look at each of these features starting with the top row of buttons...

Summary of Contents for DC16

Page 1: ...OWNER S MANUAL OWNER S MANUAL...

Page 2: ...structions may cause harmful interference to radio communications However there is no guarantee that interference will not occur in a particular installation If this equipment does cause harmful inter...

Page 3: ...anel Introduction 18 Talkback Mic Input 18 1 8 Stereo In Jack 18 1 4 Monitor L R Outputs 18 1 4 Footswitch Jack 19 Dante A B 19 Force Update Button 20 Wi Fi Control 20 iPad Control and Charging USB In...

Page 4: ...annel Editing GAIN TRIM Button 41 HPF LPF Button 42 SEND DELAY Button 43 PAN USER NYI Button 44 Selected Channel Editing EQ ASSIGN NYI Button 45 GEQ SENDS Button 46 47 DYN amics Setup Button 48 70 FX...

Page 5: ...on 58 LOCK Button NYI 59 Smart Bridge 60 iPad Setup 61 Controllers 61 DC16 Slot 62 Position 62 Follow Mode 63 Follow Mode 63 Current Selected Channel 63 Selected Channel History 63 Fixed View 64 Advan...

Page 6: ...imize having to electronically leaf back and forth looking for the whole story This guide provides the following resources A general overview of the DC16 s facilities and features Dissection by dissec...

Page 7: ...eam 3 Plug signal sources into the DL32R such as Microphones plugged into the mic inputs Line level sources such as keyboards drum machines or MP3 players plugged into the line level inputs 4 Connect...

Page 8: ...ing signals between the DL32R and DC16 You will almost unequivocally desire to auto route Dante so push the Yes encoder to confirm Or press the No encoder if you prefer to customize the Dante routing...

Page 9: ...on 8 Set the volume of the source input starting with channel one 9 Adjust the channel s mic pre gain until the meters on that channel bounce between green and yellow Engage phantom power if needed 10...

Page 10: ...4 is unlikely as it s used on more complicated systems such as broadcasting or two FOH engineers That said we ll show you a more common setup besides a single FOH DC16 connected to a single DL32R Her...

Page 11: ...flexibility in any professional environment Why Use Dante Why use Dante There simply isn t enough space here to explain all of the benefits of Dante but here s a small sampling Automatic configuration...

Page 12: ...rd signal flow routing Notice how the DC16 iPad L R Dante 1 2 OUT is auto routed to the DL32R Return 3 4 Dante 30 31 IN Talkback is routed from Dante 3 to Dante 32 Then on the return it leaves the DL3...

Page 13: ...DC16 Owner s Manual 13 The same exact thing shown on the previous page is outlined below now Instead of the signal flow though it s the Dante routing DC16 OUT to DL32R IN DL32R OUT to DC16 IN...

Page 14: ...y the Main L R is routed to Dante 29 30 and the Monitor L R is routed to Dante 31 32 See below All four are patched simultanously but a screen shot combining both the Main L R and Monitor L R is impos...

Page 15: ...ways to record shows including DL32R USB output to hard drive DL32R USB output to laptop Stereo recording to iPad But there is a fourth option though which is Dante routing to other recording equipmen...

Page 16: ...1 setup so we need to do the same in Master Fader See below All Dante to Mic Pre settings are patched but a single screen shot showing all is impossible Basically what we re doing here is sending outp...

Page 17: ...diate levels may be painfully loud with some headphones BE CAREFUL Always turn the phones knob all the way down before connecting headphones soloing a channel or doing anything new that may affect the...

Page 18: ...connected to the 1 4 input on the rear panel More information on the next page 1 4 Footswitch Jack The talkback level is controlled by the Talkback knob as seen on the previous page Because the talkb...

Page 19: ...tton on the top panel of the DC16 will illuminate green indicating just how engaged it is Talkback will disengage when pressure on the footswitch is released Any one button on off footswitch will work...

Page 20: ...re update if instructed by Tech Support Thank you for listening Save any current show to your iPad before forcing an update or you may lose it The show and your sanity Wi Fi Control The DC16 comes equ...

Page 21: ...of this switch to turn it off As a general guide the Wi Fi router should be turned on first then the DL32R followed by the DC16 and external power amplifiers or powered speakers As such the DC16 and...

Page 22: ...on As a reminder the information detailed on the following pages is how to use and control the DC16 There is little to no explanation regarding Master Fader For that we urge you to read and review the...

Page 23: ...the LR mute or aux mute depending on the setting of Use LR Mute for that aux Engaging a mute button provides the same result as sliding a fader all the way down As seen to the right mute buttons illu...

Page 24: ...Ds will illuminate As seen above left and on the previous page the level meter LEDs illuminate green yellow and red when the signal crosses the values listed next to each LED Mix Select LEDs If they a...

Page 25: ...ame and user name in your selected colors no less and PARAMETER name and graphic The parameter value is also displayed when being updated Ch 3 gain level 27 dB in this example 2 To edit the parameters...

Page 26: ...king Group As seen below two buttons are for switching banks and two are for switching channels BANK Buttons These buttons shift the currently shown channels returns FX subs VCAs OR masters left or ri...

Page 27: ...els that you want to view hiding the rest This improves organization and allows for faster navigation Pressing the VIEW button will present all view groups in each of the four displays as noted below...

Page 28: ...channels may be assigned and unassigned to view groups simply by utilizing the assign modifier button More details in the Modifiers section on pages 57 59 While view groups may be displayed and select...

Page 29: ...sets Pressing the MUTE button will present all mute groups in each of the four displays as noted below Additionally the mute groups button LED illuminates red when engaged and the text of mute groups...

Page 30: ...oups may be displayed and selected via DC16 the names will still need to be created using Master Fader Additional information regarding mute groups is documented quite thoroughly in the Master Fader R...

Page 31: ...ys Now the mix selector section already displays a lot of information even before any buttons are pushed so let s discuss that first Then we can get into the specifics of each button s function The DC...

Page 32: ...MIXES mode and in MASTERS mode For now let s stay in MIXES mode We ll get into MASTERS soon pages 38 39 As seen below page 1 of the mixes displays LR and A1 A6 This customization is relatively simple...

Page 33: ...10 was also changed from it s default green to red As mentioned previously the mix selector LEDs change to the color of the selected output letting you know that the channel faders now control the lev...

Page 34: ...r their colors were changed from their default purple to yellow Rev2 Spring and light green Dly Tape Echo The mix selector LEDs change to the color of the selected output letting you know that the cha...

Page 35: ...r LEDs change to the color of the selected output letting you know that the channel faders now control the level of that input to the selected output As such the master fader now controls the level of...

Page 36: ...t was renamed to Perc The mix selector LEDs change to the color of the selected output letting you know that the channel faders now control the level of that input to the selected output As such the m...

Page 37: ...and auxes mix selector LEDs are displayed in the color of the selected matrix default is white but the subs will be displayed in the color of the sub default is blue The faders now control the level...

Page 38: ...the masters are all presented on a single page so the page up and page down buttons have no function Also unlike the mix selector the masters list can t be customized The DC16 s masters selector below...

Page 39: ...ewhere be it an input or output This is especially useful when an output is soloed and you switch to adjust a different channel on a different output Pressing this button will clear all solos on all i...

Page 40: ...across ALL channels simultaneously For example with gain engaged all mic pre gains and or digital trim of all channels are available for adjustment via the channel display editing encoders If the cont...

Page 41: ...button selects the digital trim of all channel inputs Trim is a digital level control at the top of the channel s processing It affects all input sources to the channel whether analog or digital and...

Page 42: ...tage The HPF button s LED illuminates white when engaged LPF Button ALT HPF This button selects the LPF frequency of all outputs There are no LPF on inputs Low pass filters are utilized to cut out hig...

Page 43: ...EDs is not illuminated then the DC16 is at the very top Aux 1 or very bottom Dly of the sends list There will always be a minimum of one channel editing page button LED illuminated when the channel se...

Page 44: ...ected the encoder will control the LR pan as seen above An unlinked aux selected the encoder will not function and the pan screens will be blank as seen below A linked aux selected the encoder will co...

Page 45: ...changed by rotating and or pushing the encoders below the channel displays A visual representation may be seen on the DC16 channel displays and the EQ screen on Master Fader Do you notice the differe...

Page 46: ...D illuminated in order to cover all 31 GEQ bands An example of the page 1 GEQ parameters is displayed above and page 2 may be seen below The GEQ button s LED illuminates white when engaged FOH TB GEQ...

Page 47: ...ing page button LED illuminated as page 1 covers all of the auxes see above and page 2 covers the FX Once the down arrow channel editing page button is pressed the channel s FX levels will be displaye...

Page 48: ...the encoders on off below the channel displays A visual representation may be seen on the DC16 channel displays and the dynamics screen on Master Fader Do you notice the different colors in the image...

Page 49: ...er Fader Simply utilize the editing page buttons to scroll through the FX and previously mentioned bank or channel buttons to scroll through the other channels There will always be one channel editing...

Page 50: ...atures starting in the upper left corner with the gain and trim encoder GAIN Encoder This encoder adjusts the level of the mic pre gain of the selected input Gain adjusts the input sensitivity of the...

Page 51: ...annel s input routing screen on Master Fader Polarity Invert Button This button turns polarity on and off of the selected input The polarity button LED illuminates orange on channels that have polarit...

Page 52: ...incremental adjustments are dependent on if the selected gate is modern or vintage A visual representation of the changes may be seen on the dynamics screen on Master Fader GATE RANGE Encoder ALT GATE...

Page 53: ...ts the pan or balance of the selected input group and Main L R The pan balance is changed by rotating the encoder As with Master Fader what s panned is dependent on what s selected In other words with...

Page 54: ...e that there will only be one of each snapshot indicator If no snapshots have been stored then Default will be the currently selected snapshot and the New snapshot will be highlighted While snapshots...

Page 55: ...ton will store the current state of the console the faders EQs gates and compressors etc that you just set to a new snapshot or as a replacement Here pressing the store button once causes the button s...

Page 56: ...subgroup aux send and or matrix and is set up via Master Fader s I O patch MONITOR Knob This knob controls the level for the monitor bus with the level ranging from a low of off up to a maximum of 10...

Page 57: ...what parameter is available for change There are other horizontally lined capsule shaped designs placed above and below some of the buttons and encoders throughout DC16 but these are not blank Instea...

Page 58: ...r Main L R button puts the console into assignment mode for the Main L R The SEL button LEDs of channels that are already assigned to the Main L R will flash indicating that they are assigned to the M...

Page 59: ...chosen mute group will flash indicating that they are assigned to that mute group From here you re able to assign and unassign channels to the selected mute group simply by pressing the channels SEL b...

Page 60: ...ntegrated but not permanently This means that each iPad may be removed for wireless mixing Simply return the iPad to its spot on the Smart Bridge when not needed wirelessly The Follow Mode and Surface...

Page 61: ...for an additional iPad each connected to a CHARGING USB port also on the rear panel of DC16 Please note that each iPad s home button is located on the right hand side You will almost inevitably run in...

Page 62: ...n the previous page the DC16 Slot was set at none But simply tapping the A iPad automatically changes the DC16 Slot from None to FOH DC16 although that may be changed via the DC16 Slot pull down menu...

Page 63: ...re in the EQ channel view updating the band 1 gain Now push the band 3 button and rotate the Q encoder You re still on the same channel and same channel view Now that you re an expert on Current Selec...

Page 64: ...fferent views Advanced The previously listed Follow Modes will probably be all you ever need or use but there is an advanced pull down menu to real dial in a personal Follow Mode based on the selected...

Page 65: ...ge is called such because well because it really is a Smart Bridge The title of this section is Surface To Wireless Mixing and this has everything to do with the Smart Bridge and Follow Mode Follow Mo...

Page 66: ...readily available on iPad B aka the 1st History Selected Channel just as stated above BUT what was once on iPad B moves to iPad C since it s set to 2nd History Selected Channel This cycle then repeats...

Page 67: ...atever channel and whatever view you decide These views will not change no matter how many buttons are touched or encoders are turned A change will only occur when A it s made on the actual iPad or B...

Page 68: ...ce again iPad A is set to the Current Selected Channel But here iPad B is set to 1st History Selected Channel taking on the history of whatever was previously viewed on iPad A Then iPad C is set to Fi...

Page 69: ...ds on the Smart Bridge how can you get a fourth view Easy The iPads are already displaying a single channel s EQ dynamics and input routing but simply pressing the SELECTED channel FX button located i...

Page 70: ...is DL32R DL32R Select Refresh Mixer list Do it Exit Renaming the DL32R has already been described in detail in the Master Fader Reference Guide in the Tools Devices section but did you know that each...

Page 71: ...ightness How bright do you want engaged buttons Press or rotate the encoder until you see the choice you prefer between Low Mid High Default Meter Brightness How bright do you want the meters This inc...

Page 72: ...seconds after your last edit showing you the full names colors and icons for easy channel identification A few notes regarding this example First 10 seconds was selected for the example Feel free to...

Page 73: ...place to calibrate the faders Press the encoder to begin fader calibration The channel display will present In progress during fader calibration and Do it when finished When wrapped up the faders wil...

Page 74: ...s connected to the L R monitor jacks One button footswitch connected to the footswitch jack Ethernet cable from the router to the Wi Fi Control jack Lightning cables from the Control and Charging jack...

Page 75: ...A D A Bit Depth 24 bit 0 dBFS Reference 22 dBu Frequency Response All inputs to all outputs 0 1 dB 20 Hz to 20 kHz Stereo Input Connector 1 8 Unbalanced Input Impedance 10 k Max Input Level 16 dBu Tal...

Page 76: ...alanced Max Output Level 21 dBu Analog Headphone Out Connector 1 4 TRS Stereo Max Output Level 18 dBu into 600 19 5 dBu max into 100 k DC16 IPad Connectivity Connection USB A for Lightning iPads Conne...

Page 77: ...1 Wireless including Charging Port Any Lightning iPad device iPad 2 and or iPad 3rd generation Future iPad devices1 Control Application Mackie Master Fader App2 Requires Master Fader V4 5 For optimal...

Page 78: ...trademarks of Apple Inc registered in the U S and other countries All other marks are Registered Trademarks or Trademarks of LOUD Technologies in the United States and other countries DC16 and DL32R...

Page 79: ...DC16 Owner s Manual 79 DC16 Dimensional Drawings...

Page 80: ...DC16 Owner s Manual 80 DC16 Dimensional Drawings Continued...

Page 81: ...r Our favorite question Is it plugged in Make sure the AC outlet is live check with a tester or lamp Our second favorite question Is the rear panel power switch in the ON position Are all the lights o...

Page 82: ...the LAN port and not the WAN port Did you connect and then power on the Wi Fi router BEFORE turning on the DC16 DL32R Leave Master Fader and then return by pressing the Home button on the iPad Force q...

Page 83: ...to obtain any warranty service For full terms and conditions as well as the specific duration of the Warranty for this product please visit www mackie com warranty The Product Warranty together with...

Page 84: ......

Reviews: