Publication: MAN3002G
MAC Equipment, Inc.
10
Sample Maintenance Schedule
Weekly
1.
Check and record magnehelic (or photohelic) gauge readings on all
filters. Adverse operating conditions can be detected by a change in
pressure drop.
2.
Check for dust in clean air outlet from filter.
3.
Check filter hoppers for continuous discharge of dust.
4.
Open petcock to check for moisture in the compressed air header.
5.
Listen to the diaphragm valves and verify that each row of bags is
being cleaned.
6.
Check fan and motor bearings for excessive heat or vibration.
7.
If pressure pneumatic conveying equipment is used to dispose of
dust, check the positive displacement pump for vibration,
overheating, and proper lubrication. Also, compare reading on the
pressure gauge with previous readings. Clean air-inlet filter or
replace as necessary. It is important to follow the manufacturer's
recommendation on equipment of this nature.
8.
Check explosion vent(s) (if provided) for damage (broken bolts or
damaged panel).
Monthly
(or at manufacturer's recommended intervals)
1.
Check the filter bags for signs of excessive wear or damage.
2.
Drain condensation from air reservoir. Check the compressed air
dryer and filter for proper operation.
Six Months
1.
Check for evidence of moisture or dust buildup inside the filter
housing.
2.
Check operation of solenoids and diaphragm valves.
3.
Check oil in all gear motors. Do not overfill.
4.
Check belt tension on all V-belt drives.
Bag Replacement
The filter bags are the heart of the filter and need a program of
inspection, cleaning, and replacement to maintain high operating
efficiency.
1.
Shut down the system, and lockout-tagout the electrical and
compressed air service.
2.
Open the service door.
3.
Loosen the clamp around the bag. Remove the bag.
4.
Inspect the cage for rust or damage and replace if necessary.
5.
Reinstall clean filter bags as described in the section titled
"Installation".
Bag Cleaning
Natural fiber fabrics (wool or cotton) are subject to shrinkage when wet
with water. These fabrics must be dry cleaned. Synthetic filter fabrics
(Orlon, Dacron, Nomex, polypropylene, and Teflon) should also be dry
cleaned.
1.
Thoroughly vacuum clean the filter bags to remove the bulk of the
dust.
2.
Dry clean the bags using a standard dry cleaning procedure. Use
pure dry cleaning solvent. Do not use dry cleaning detergents and/or
additives that require the addition of water, as these may cause
fabric shrinkage.
3.
Dry the bags. Drip drying is the recommended drying method.
Tumble drying, if used, must be done at low temperatures.
Industrial dry cleaning establishments are available in many cities. These
companies specialize in filter bag cleaning and will normally provide the
most satisfactory results.
Venturi Replacement
Replacement of the venturis is accomplished from inside the filter as
described below.
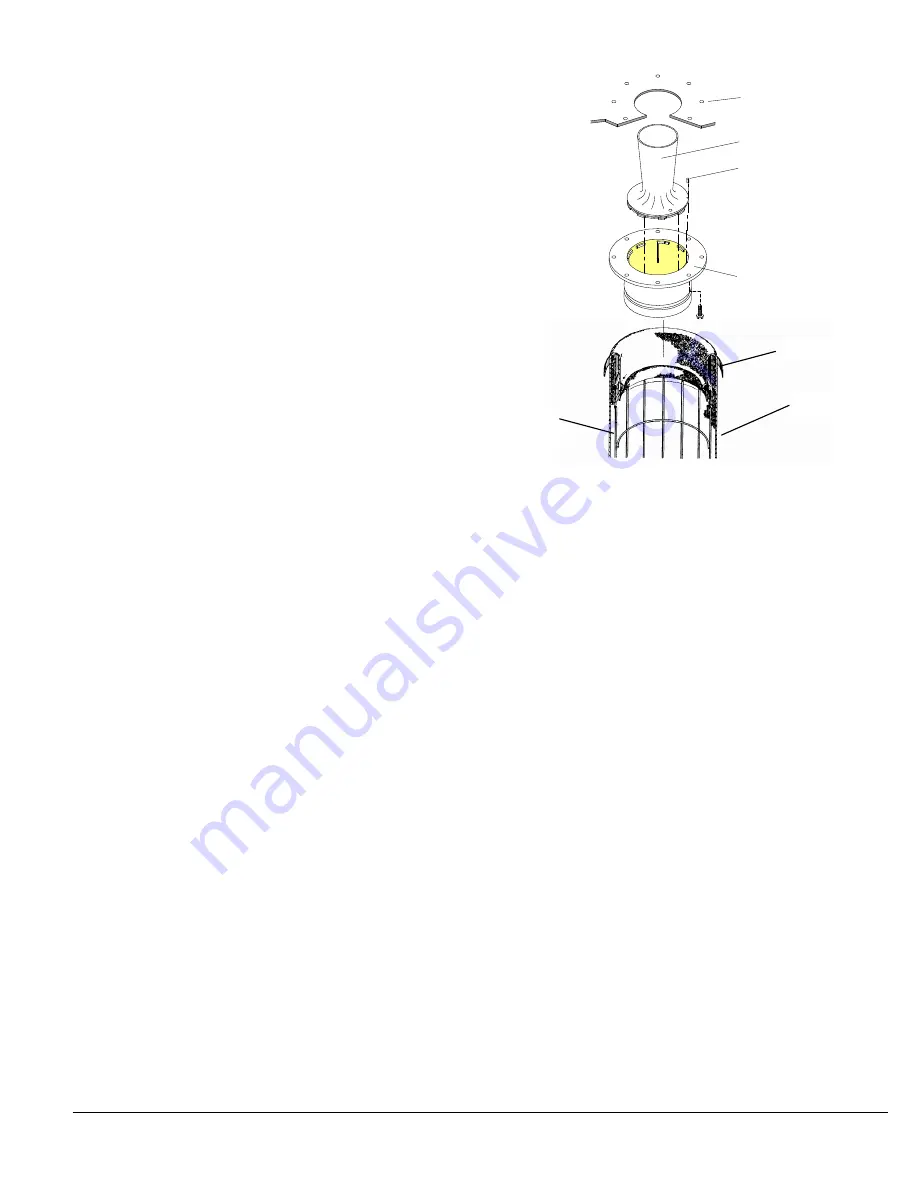
Refer to Figure 6-1 for replacement of the standard nylon venturis.
TUBESHEET
VENTURI
ROLL PIN
BAG CUP
Figure 6-1 Replacement of Standard Nylon Venturi
1.
Shut down the system, and lockout-tagout the electrical and
compressed air service.
2.
Open the service door.
3.
Loosen the clamp around the bag. Remove the bag and cage for
the venturi to be replaced.
4.
Unscrew/unbolt the bag cup from the tubesheet. The exact method
of fastening the bag cup to the tubesheet may vary from filter to filter
and may include self tapping screws, bolts, or other fasteners.
5.
Press out the roll pin which locks the venturi in the bag cup. Twist
the venturi clockwise to release it from the bag cup, and remove.
6.
Before reassembling, clean any residue of sealant from the surface
of the tubesheet and bag cup.
7.
To reassemble, follow the above steps in reverse order. Use a new
roll pin to lock the venturi to the bag cup. Apply a thin bead of
silicone sealant to the bag cup before attaching to tubesheet.
8.
Reinstall cage and clean filter bags as described in the section titled
"Installation".
BAND CLAMP
FILTER BAG
CAGE
Summary of Contents for AVR
Page 2: ......
Page 15: ...Publication MAN3002G MAC Equipment Inc 12 ...
Page 16: ...Publication MAN3002G MAC Equipment Inc 13 ...
Page 17: ...Publication MAN3002G MAC Equipment Inc 14 ...
Page 18: ...Publication MAN3002G MAC Equipment Inc 15 ...
Page 19: ...Publication MAN3002G MAC Equipment Inc 16 ...
Page 20: ...Publication MAN3002G MAC Equipment Inc 17 ...
Page 24: ......
Page 25: ......


