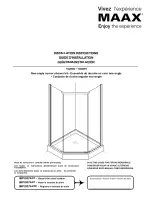
MAAX 102886 Installation Instructions Manual Download Page 11

11

10017660

Fig. A

3

3

LEFT SIDE

CÔTÉ GAUCHE

IZQUIERDA

RIGHT SIDE

CÔTÉ DROIT 

DERECHA

INSIDE

INTÉRIEUR

INTERIOR

OUTSIDE

EXTÉRIEUR

EXTERIOR

Small side of panel upright 

on OUTSIDE of shower

Le petit bord du montant est à 

l’EXTÉRIEUR de la douche

Lado angosto de la guía de panel 

hacia el EXTERIOR de la ducha

Fig. B

remarque  :  les  illustrations  montrent 

une  installation  contre  des  murs 

carrelés. 
la procédure d’installation est la même 

pour une installation contre un ensemble 

de murs optionnels.

Insérez les montants muraux (3) dans les 

montants  des  panneaux  fixes,  comme 

indiqué. Fig. A
Quand  vous  orientez  les  panneaux  fixes, 

notez  que  les  petits  bords  des  montants 

sont à l’extérieur de la douche.Fig. B

Veuillez noter que les motifs des panneaux 

de  verre,  si  applicable,  doivent  être  vers 

l’extérieur.

please note: throughout the instructions, 

installation is shown against a tiled wall. 

the  installation  procedure  is  the  same 

for installation against an optional wall 

kit.

Insert the wall channels (3) into the backs 

of the panel uprights of the fixed panels, as 

shown. Fig. A
When orienting the fixed panels, make sure 

that  the  small  sides  of  the  panel  uprights 

are on the outside of the shower. Fig. B

Please  note,  if  the  glass  panels  have  a 

pattern, the pattern should go to the outside.

advertencia: las ilustraciones muestran 

una  instalación  contra  una  pared 

enlosada. 
El  procedimiento  de  instalación  es  el 

mismo que para una instalación contra 

un juego de paredes opcional.

Introduzca los canales de pared (3) en las 

guías de los paneles fijos, como se muestra 

en el dibujo. Fig. A
Cuando oriente los paneles fijos, recuerde 

que  el  lado  angosto  de  las  guías  de  los 

paneles debe quedar del lado de afuera de 

la ducha. Fig. B
Nota:  si  los  páneles  de  vidrio  tienen  un 

diseño, el lado con el diseño debe de ser 

instalado hacia afuera.

3. 

Fixed panels preparation • préparation des panneaux fixes  

• preparación de los paneles fijos

4. 

door preparation • préparation de la porte • 

l

preparación de la puerta


Commencez  par  décider  si  vous  voulez 

que la porte ouvre à gauche (charnières à 

droite) ou à droite (charnières à gauche). 
Veuillez  noter  que  la  porte  s’ouvre  vers 

l’extérieur,  il  doit  donc  y  avoir  assez  de 

place pour cela. 

First decide whether you want the door to 

open on the left (right-side hinging) or open 

on the right (left-side hinging). 
Please  note,  the  door  opens  out  so  there 

must be enough room for it to swing freely 

without impediments.

Primero, decida si la puerta abrirá desde la 

izquierda (bisagra a la derecha) o desde la 

derecha (bisagra a la izquierda). 
Tenga en cuenta que la puerta se abre hacia 

afuera, de modo que deberá dejar espacio 

suficiente para que se abra libremente sin 

obstáculos. 

Summary of Contents for 102886

Page 1: ...rver pour un uSage ult rieur conServe eSte manual como referencia read all instructions carefully before proceeding lire toutes les instructions attentivement avant de commencer l installation leer de...

Page 2: ...2 10017660...

Page 3: ...the installation of our units It is important to closely follow the step by step instructions to ensure proper installation of your shower introduction 3 Before you begin 4 General considerations 5 Wa...

Page 4: ...rk If necessary disassemble sections of the unit before moving it retaining all nuts and bolts To protect the unit during installation we recommend laying a piece of cardboard on the base if the unit...

Page 5: ...e un angle de 90 et verticaux la base doit pouvoir tre pos e directement contre les poteaux de cloison et non un mur fini Check local building codes before installing new drain pipe the drain pipe sho...

Page 6: ...6 10017660 parts and components liste des pi ces et composantes piezas y Componentes 11 11 12 12 3 3 13 13 22 22 20 20 15 15 23 23 4 5 6 15 15 23 23 22 22 21 27 19 27 19 21 8 7 14 10 9 14 10 9 1 2...

Page 7: ...llo no 10 24 de 1 2 de largo 6 N A 15 10 24 barrel bolt Boulon cylindrique no 10 24 Cerrojo pasador no10 24 4 N A 16 3 32 drill bit F ret 3 32 Broca de 3 32 1 N A 17 Door pull Poign e de porte Tirador...

Page 8: ...au de drainage doi avoir un diam tre interne d environ 2 po et un diam tre externe de 2 3 8 po pour assurer une parfaite adaptation du joint d tanch it au tuyau et pr venir les fuites rEMarQuE si le d...

Page 9: ...er installation to fill gaps to either side of the base and in front of the lip of base Please note if a separate wall surround unit is also being installed additional drywall plaster tiles may also n...

Page 10: ...ble installation it is suggested that the base be nestled in a bed of mortar type material please note if you are installing the shower unit over tiled walls the tiled wall must be finished to the bas...

Page 11: ...tern the pattern should go to the outside advertencia las ilustraciones muestran una instalaci n contra una pared enlosada El procedimiento de instalaci n es el mismo que para una instalaci n contra u...

Page 12: ...ni res gauche Bisagra a la izquierda Right side hinging Charni res droite Bisagra a la derecha Pivot block mounting holes on right Trous de montage des blocs pivots droite Orificios de montaje del blo...

Page 13: ...will be shown Ces instructions illustrent un montage charni res droite a lo largo de las instrucciones se mostrar n las bisagras del lado derecho 15 23 22 10 14 9 8 instructions de montage des rondell...

Page 14: ...hts of the fixed panels should be extended to contact the wall Use a level to plumb the wall channels and draw a pencil line on the inside of the wall channel to mark its position on the wall Fig A Re...

Page 15: ...los orificios marcados para el montaje Fig B Para instalar sobre azulejos utilice una broca para trabajo de alba iler a de 1 4 Con un punz n centrador haga un corte en la superficie de la cer mica a l...

Page 16: ...e panel entre en el canal de pared opuesto Fig A Centre la ducha sobre la base Instale los pernos con extremo semiesf rico y los cojinetes pivote ajustables en cada uno de los bloques Fig B Aseg relos...

Page 17: ...e 3 32 drill bit provided drill holes through each of the six holes in the panel uprights and into the wall channels Fig A Secure the shower to the wall channels with 6 x 1 2 long screws Fig B Aseg re...

Page 18: ...e glass door panel Finish installing door panel as shown in Fig B A Tilt the glass door panel to the side and swing the glass clamp under and behind the rail B With the glass clamp inside the shower i...

Page 19: ...gasket the outside of the U shaped part will rest on the metal sill Cut off excess at top Instale el junta de estanqueidad inferior Fig A Instale el junta de estanqueidad del lado de la manija en el...

Page 20: ...top of the adjustable pivot bushing Fig A Turning the adjustable pivot bushing as shown in Fig B will move the handle side of the door in and out by changing the pivot point of the glass clamp When p...

Page 21: ...e centrado entre los dos paneles fijos Esto se logra girando con un destornillador Phillips el tornillo de ajuste ubicado en las abrazaderas para vidrio G relo en sentido horario para mover la puerta...

Page 22: ...to get more sealing pressure Instale el junta de estanqueidad del lado de la bisagra en el borde del lado de la bisagra del panel de la puerta de vidrio La parte en forma de U del junta de estanqueida...

Page 23: ...r unit Around screwheads Apply silicone sealant to these locations on the outside of the shower unit Along seams between shower and walls Along seams between wall channels and panel uprights Along sea...

Page 24: ...empo Los paneles transl cidos la base o plato de ducha y las paredes pueden limpiarse con un detergente suave aclar ndolos despu s y sec ndolos con una gamuza o pa o suave Utilice un limpiacristales p...

Page 25: ...or any other person MAAX reserves the right to modify this warranty at any time it being understood that such modification will not alter the warranty conditions applicable at the time of the sale of...

Page 26: ...nt du retrait ou du remplacement de tout produit l ment ou pi ce faisant l objet de la pr sente garantie MoiNs d iNdiCatioN CoNtrairE auX pr sENtEs MaaX N oFFrE auCuNE GaraNtiE EXprEssE ou iMpliCitE N...

Page 27: ...t ou d installation de ce qui pr c de est fournie par l utilisateur d montrant que la d faillance est survenue ou a t d couverte pendant la p riode de garantie et 4 une personne autoris e d un service...

Page 28: ...2008 MaaX Bath inc priNtEd iN CaNada iMpriM au CaNada iMprEso EN CaNada 2010 11 19 10017660 www maax com technical services service technique servicio t cnico t 1 877 361 2044 F 1 888 361 2045...

Reviews: