46
47
Sequencer edit
Values:
Each row contains a set of 8 steps and each step has its largest part showing its
current value (e.g. note number, CC value, step length, velocity and gate length). These values
can be edited by turning the front panel push-dials and/or by using screen controls.
By default, the Sequencer page shows the first 8 steps (i.e. 1-8): if you want to reach and
control the following steps, you can just press the Backward/Forward arrows.
Steps
: each step has an inner little box on its bottom-left corner with a letter ‘S’ on note/CC
rows or ‘J’ on the step length row. This option allows you to edit secondary values:
•
on the note/CC rows, it controls the step Status (which creates a rest if turned OFF)
•
on the step length row, it controls the Jump value (which causes the step to be ignored if
turned ON, directly jumping to the next step)
These step values can be edited by tapping the front panel push-dials and/or by using screen
controls.
Legato:
on note/parameter rows, each step has an inner little box on its bottom-right corner
with a letter ‘L’, which stands for ‘legato’.
On a note row if Legato is on, the Note Off message of the selected step will be triggered
after the Note On of the following step.
On a CC row if Legato is on, the parameter will slew to the next step value allowing you to
create a smooth transition between steps.
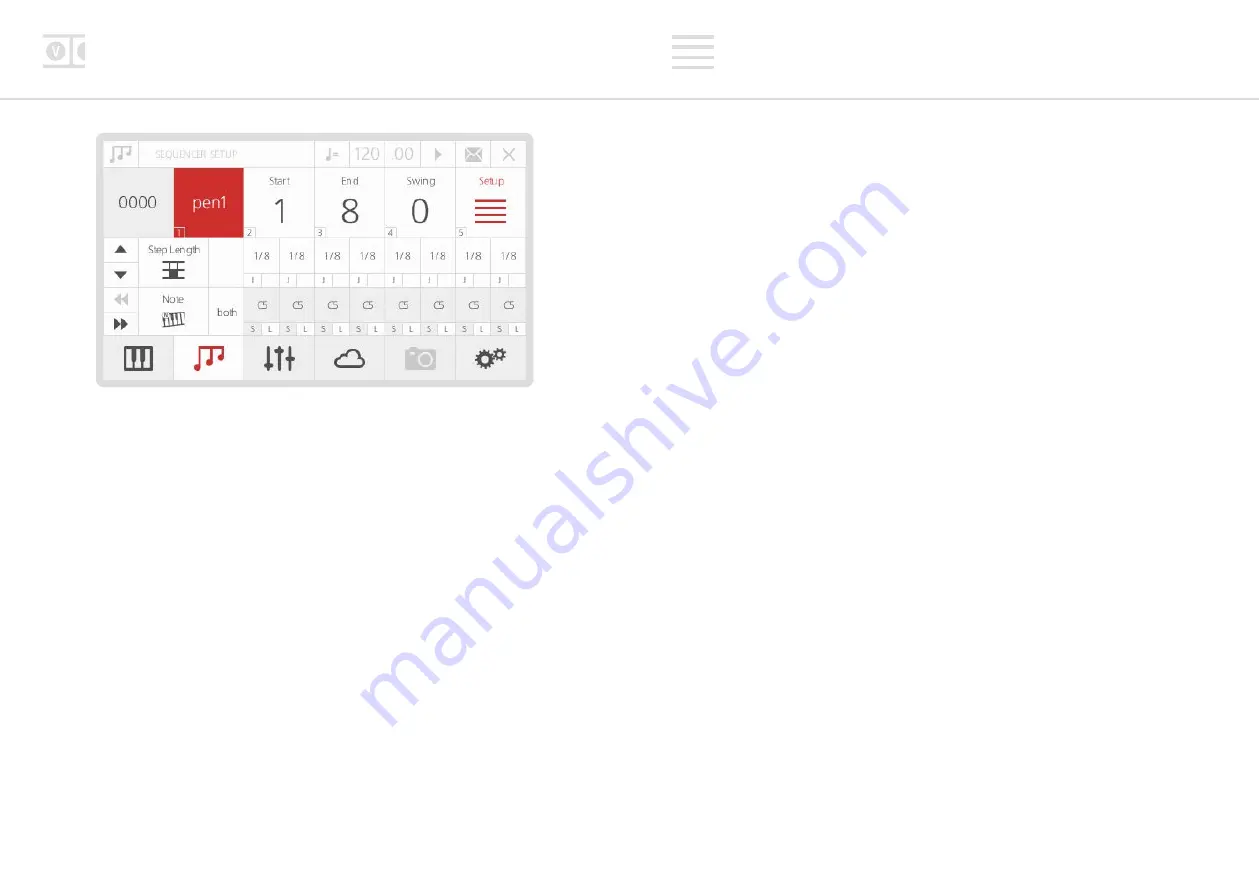
Sequencer setup
The Setup sub-menu page contains the following options:
1. Mode:
allows you to set the direction mode of the sequence. You can use either the
dedicated button or the screen controls to change the value of this parameter.
The available Mode options are similar to those of the arpeggiator (see end of this
chapter)
2. Start:
the start step of the sequence
3. End:
the end step of the sequence
4. Swing:
allows you apply swing to the sequence. A positive value delays the even step,
however a negative value brings the even step forward in time
To exit the Setup page, select the Setup button again, or just type ‘5’ (or also ‘0’) with the
keypad, provided that nothing is selected.
Please note that the sequencer panel push-dials and LEDs will always mirror the sequence
grid display on the LCD when the Seq LED is lit up. As previously explained, the dials are used
to edit the upper row parameter values and the buttons are used to edit the secondary step
values.
The red LEDs are used to signify whether a step is on for the Note/CC rows (i.e. reading that
value). Blue LEDs are used to signify whether jump is on for the step length row (i.e. skipping
that step).
To Save a sequence, just press the 4th ‘menu button’ (D). If you were already in the Sequencer
page, it automatically recognises that you are going to save a sequence (instead of a patch) -
from now on, the procedure is identical to Patch Storage (see chapter 1).
Please note that patches and sequences are totally independent of each other. This means that
when you save/load a new patch, 001 will not save/load a sequence together with it: to do
that, you need to save both in a Performance (see ‘Performance Storage’ section, chapter 6).


