


13
Pro Keys 88 • User Guide
English
MIDI Clock Buttons
The four MIDI Clock Buttons (from left to right respectively) are Start, Stop and the two Tempo buttons, ‘-’ and ‘+.’ These buttons allow
you to control any MIDI-connected external MIDI sequencer. For this to be possible, you need to set your external sequencer to
“slave mode” to synchronize to incoming MIDI Clock Messages. Different hardware and software MIDI applications have different
methods of setting up synchronization. Please consult the user documentation for your MIDI applications to determine exactly how
MIDI Clock synchronization is achieved. It is not possible to transmit MIDI Time Code (MTC) data from the ProKeys 88, only MIDI
Clock (MC). Please note that if you want to use the ProKeys 88 to control your MIDI application, the application must support MIDI
Clock synchronization.
The ProKeys 88 is not able to respond to external MIDI Clock Messages sent from a different device. In other words, the ProKeys 88
always acts as the “master” clock device to which other devices will “slave” for sync.
Pressing Start Button will cause the external sequencer to begin playback from the current song position.
Pressing the Stop Button will cause a sequencer to cease playback. It is also possible to reset the sequencer back to a ”zero”
playback position by pressing this button twice.
The Tempo Control varies the rate at which MIDI Clock Messages should be sent out. This determines the tempo at which your
sequencer plays back. When either button is pressed, the new tempo in BPM (beats per minute) will be displayed on the LED
display. The default tempo is 120BPM. For more information on MIDI Clock commands, please see page 14.
Tap Tempo
It is possible to tap in a tempo using the Sustain Pedal. This is achieved by holding down both the Tempo Buttons and tapping on
the Sustain Pedal. The rate at which the timing clock messages are sent will be updated every four taps.
Examples
The ProKeys 88 as a MIDI Controller
First and foremost, the ProKeys 88 MIDI controls allow you to access
sounds and banks of sounds on an external synth and control the starting,
stopping and speed of an external sequencer.
Since the 14 Instrument Buttons can have a Program value and Bank
number assigned to them, it is possible to set up the Instrument Buttons
to access your favorite sounds on an external synth.
Note that the range of Program and Bank Message values is 000-127. The range of MIDI channels is 1-16.
It is also possible to set the MIDI channel that any instrument is transmitting on. When you press the Split Button or Layer Button, the
second instrument is assigned a different channel from the main instrument. This allows you to control up to three MIDI instruments
at the same time. These assignments are remembered across power cycles.
In order for you to control different MIDI instruments at the same time, you must always ensure the instruments are not assigned
to the same MIDI channel.
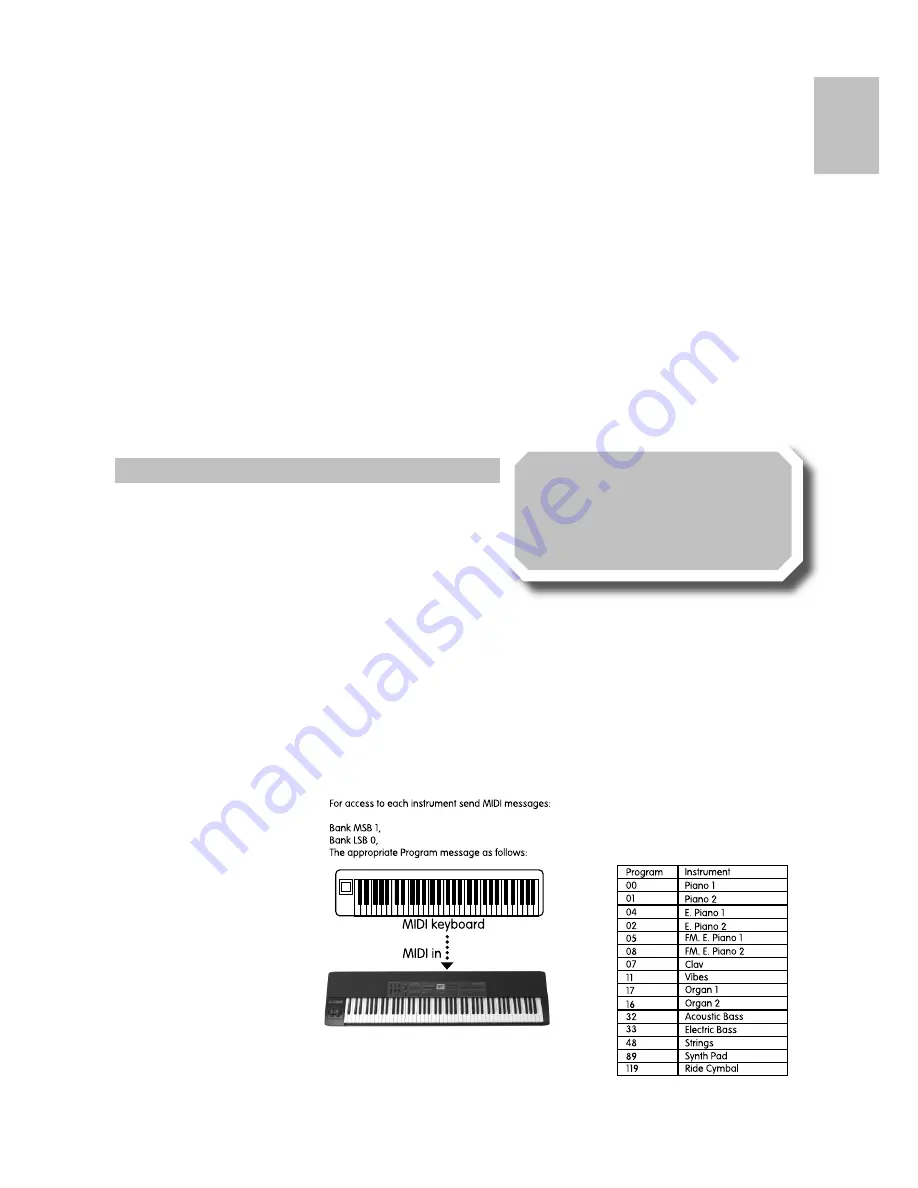
The ProKeys 88 as a Synthesizer
The 14 internal instruments of your
ProKeys 88 can be accessed by
sending a ‘Bank MSB 1 or 0’ MIDI
message to any MIDI In port, and
an appropriate Program Change
Message, with an appropriate
Program number as seen on page
18. This will not change, regardless
of the Program and Bank number
that the user assigns to be sent out
by any of the sound buttons used to
access the internal sounds.
For example to access the Grand
Piano sound on the ProKeys 88
from a MIDI keyboard connected
to the MIDI In port of your ProKeys
88, you should send Program 000,
Bank LSB 000, Bank MSB 001 from
the connected MIDI keyboard.
Performance Tip #8
Hybrid E. Piano
– Try layering the Wurly (E. Piano 2)
with the Clav for a unique timbre. Turn down the Clav
volume one third and add chorus to give the sound more
animation.