background image

FI 

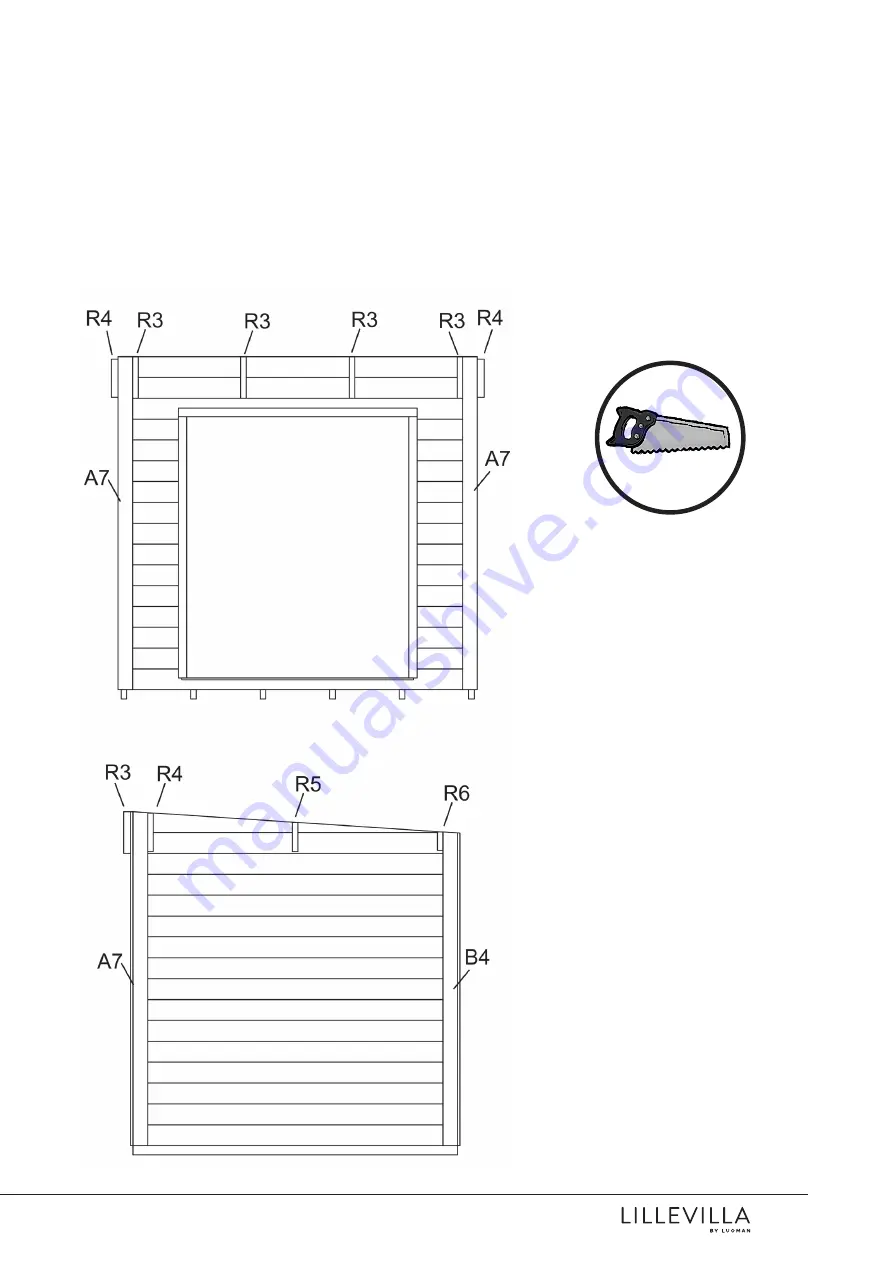
Sahaa nurkkatolpat ja nurkkalaudat 

oikeaan mittaan ja kulmaan, kun seinät 
ovat valmiit. Asenna räystäiden tuet 
R3, R4, R5, R6 seiniin. Kiinnitä alimmat 
seinälaudat perustuspuihin (esiporaa!).

EN 

Cut the corner posts and corner 

boards to length and angle after the 
walls are finished. Fix the supports for 
the eaves R3, R4, R5, R6 to the walls. 
Fasten the lowest wall boards to the 
foundation beams (pre-drill!)

DE

 Nun befestigen Sie die Eckblenden 

und kürzen Sie ein. Anschließend 
befestigen Sie die Abstandshalter 
R3, R4, R5, R6 für die Kranzblenden. 
R3,R4 & R6 werden direkt an 
den Eckblenden befestigt(siehe 
Zeichnung). Jetzt befestigen Sie 
noch die untersten Wandbohlen mit 
den Fundamenthölzern, aber bitte 
vorbohren!

ES

 Una vez terminadas las paredes, 

corte los postes esquineros y los 
tablones esquineros a la longitud y 
ángulo adecuado. Fije los soportes 
de los aleros R3, R4, R5, R6 a las 
paredes. Sujete las tablas de la pared 
inferiores a las vigas de cimentación 
(¡pretaladre!).

PT

 Corte as colunas de canto e os 

painéis de canto no comprimento 
e ângulo após as paredes serem 
concluídas. Fixe os suportes para os 
beirais R3, R4, R5, R6 nas paredes. 
Prenda os painéis de parede mais 
baixos nas vigas de fundação (antes 
da perfuração!).

21

ID 6387, Versio 2, Pvm 2/11/2019, Lillevilla 566

Summary of Contents for Lillevilla 566

Page 1: ... mm 4 8 m2 28 mm Lillevilla 566 2300 x 2100 mm 28 mm PYSTYTYSOHJE ASSEMBLY INSTRUCTIONS AUFBAUANLEITUNG INSTRUCCIONES DE MONTAJE INSTRUÇÕES DE MONTAGEM FI EN DE ES PT ID 6387 Versio 2 Pvm 2 11 2019 Lillevilla 566 ...

Page 2: ...assaololle eivät päde mikäli Asiakas ei ole noudattanut pystytysohjeita Asiakas on muokannut osia Pakkausta ei ole säilytetty asianmukaisella tavalla toimituksen jälkeen Pystytettyä tuotetta ei ole asianmukaisesti pintakäsitelty välittömästi pystytyksen jälkeen Perustusta ei ole tehty ohjeiden mukaan Takuu on voimassa jos Osassa on valmistusvirhe Osa ei sovellu sille takoitettuun käyttöön Osa ei v...

Page 3: ... de garantia Condições de garantia para este produto As condições que se seguem serão aplicadas a todos os nossos produ tos A garantia será anulada se O cliente não tiver respeitado as instruções de montagem O cliente tiver feito alterações nas peças A embalagem não tiver sido corretamente armazenada após a entrega ao cliente O produto montado não tiver sido submetido a um tratamento imediato com ...

Page 4: ...r immediately if something is missing or defective Please sort the parts near the planned building area leaving enough space for working 1 Check contents of the package 2 Use the part list at the end to register any missing or damaged parts 3 Contact your retailer if necessary The timbers are packed in plastic and sealed with plastic rims Recycle the plastic rims and protecting beams underneath ac...

Page 5: ...ntagem das paredes para uma melhor identificação das peças Verifique o conteúdo da embala gem em comparação com a lista de peças e contacte imediatamente o seu revendedor caso falte alguma peça ou alguma esteja danificada Ordene as peças próximo da zona de construção prevista deixando espaço suficiente para trabalhar 1 Verifique o conteúdo da embalagem 2 Utilize a lista de peças para fazer o inven...

Page 6: ...l will not move during frozen ground conditions We recommend placing the foundation on for example a compacted and evened out bed of gravel Regardless of type of foundation it should be made sure that the subfloor construction is well ventilated The foundation for the optional terrace must be level with the base for the cabin and be prepared carefully If needed seek advice from an expert or have a...

Page 7: ...e de cimentación de losa de hormigón Con ello se reparte el peso de la estructura en una gran superficie y cuando el trabajo se ha realizado correctamente se adapta a cualquier tipo de suelo Cuando se utiliza una estructura de pilares el espacio entre las vigas de cimen tación no debe ser mayor de 80 cm Si la caseta incluye una terraza separada su base de cimentación deberá realizarse con el mismo...

Page 8: ...to the building or a safety risk to its user Regularly inspect the condition of the protection treatment and re new it when necessary Inspect the bottom rails of the doors win dows and their frames end surface of timbers and parts stressed by hard weather or usage related wearing Check the functioning of doors and windows and adjust hinges when necessary Check the silicon seals of doors and window...

Page 9: ...ec ción La negligencia en el control y el mantenimiento puede provocar daños en la caseta y constituir un peligro para la seguridad de sus usuarios Es muy importante comprobar exhaustivamente el tratamiento exterior y su renovación cuando sea necesario Compruebe muy especialmente las puertas y las ventanas así como las partes inferiores de los marcos de carpintería los extremos de las tablas y dem...

Page 10: ...Lillevilla 566 Pystytysohje Assembly instructions Aufbauanleitung Instrucciones de montaje Instruções de montagem Guide de montage FI EN DE PT ES FR 10 ID 6387 Versio 2 Pvm 2 11 2019 Lillevilla 566 ...

Page 11: ...Lillevilla 566 2300 x 2100 mm Mittapiirrokset Dimensional drawings Zeichnungen mit Bemaßungen Dibujos dimensionados Desenhos dimensionais Plans côtés 11 ID 6387 Versio 2 Pvm 2 11 2019 Lillevilla 566 ...

Page 12: ...Lillevilla 566 2300 x 2100 mm Mittapiirrokset Dimensional drawings Zeichnungen mit Bemaßungen Dibujos dimensionados Desenhos dimensionais Plans côtés 12 ID 6387 Versio 2 Pvm 2 11 2019 Lillevilla 566 ...

Page 13: ...n Sie diese Anleitung vor dem Aufbau bitte vollständig durch Lea atentamente hasta el final las instrucciones de montaje antes de empezar Leia todas as instruções de montagem antes de iniciar a mesma Lisez toutes les instructions de montage avant démarrer le montage FI Hirsien asennussuunta perustuspuiden asettelu ja lattian kiinnitys EN The assembling direction of logs and laying the foundation b...

Page 14: ...nt indicatifs et la numérotation applique uniquement à ce modèle FI Asenna perustuspuut ja tarkista ristimitta Kiinnitä perustuspuut perustuksiin tarvikkeet eivät sisälly EN Install the foundation beams and check the cross measurements Fasten the foundation beams to the foundations accessories not included DE Montage der Fundamentbalken Passen Sie das Kreuzmaße an Befestigen Sie die Fundamentträge...

Page 15: ...ie auf der Zeichnung dargestellt Als Anmerkung es entsteht ein kleiner Spalt zwischen dem Fußboden Brett und der späteren Wandbohle ES Monte los tablones de madera para el piso sobre las vigas de cimentación como se muestra en los esquemas Aparecerá un pequeño espacio entre el piso y las tablas de la pared a montarse más tarde PT Instale as tábuas do pavimento nas vigas de fundação como mostrado n...

Page 16: ... dass alle Wandbohlen einwandfrei in ihren vorgesehenen Platz gehen und gleichzeitig wachsen Achten Sie darauf dass die Erste Wandbohle der Seitenwand 17mm nach unten überstehen muss ES Comienza a construir las paredes sobre las vigas de la estructura Fija todas las maderas de la pared a los pilares de las esquinas como se muestra detalladamente en el dibujo Comprueba regularmente que las paredes ...

Page 17: ... and secure them temporarily DE Stellen Sie die Wände C an Ihren Bestimmungsort und sichern Sie die Wände vorrübergehend ES Coloque las paredes C en su lugar y asegúrelas temporalmente PT Coloque as paredes C no lugar e fixe as temporariamente 17 ID 6387 Versio 2 Pvm 2 11 2019 Lillevilla 566 ...

Page 18: ...tehen die beiden Seitenwände gleich stabiler Danach folgt die Vorderwand Seite A Nach einigenLagen der Wandbohle A2 installieren Sie bitte den Türrahmen ES Continúe instalando la pared trasera B y después la pared delantera Después de montar algunas tablas de la pared A2 monte el marco de la puerta en su sitio PT Continue com a instalação da parede B traseira após a parede frontal Após alguns pain...

Page 19: ...n zu einem späteren Zeitpunkt eingesetzt werden ES Coloca primero el marco en su lugar la puerta se puede levantar más tarde PO Monte a estrutura primeiro no lugar a porta pode ser erguida mais tarde FR Montez le cadre en premier La porte pourra être montée plus tard FI Ruuvaa ovenkarmit jokaiseen seinälautaan EN Screw the door frame to every wall board DE Schrauben mit Jeder Wandbohle ES Atornill...

Page 20: ...ngles C2 with screws 6x90mm DE Bitte befestigen Sie nun die Pfetten K1 durch die beiden Giebel C2 mit den Schrauben 6x90mm ES Monte las vigas del tejado K1 y fíjelas mediante los frontones C2 con tornillos de 6x90mm PT Instale as vigas do teto K1 e fixe as por meio dos triângulos de empena C2 com parafusos 6x90mm 20 ID 6387 Versio 2 Pvm 2 11 2019 Lillevilla 566 ...

Page 21: ...zblenden R3 R4 R6 werden direkt an den Eckblenden befestigt siehe Zeichnung Jetzt befestigen Sie noch die untersten Wandbohlen mit den Fundamenthölzern aber bitte vorbohren ES Una vez terminadas las paredes corte los postes esquineros y los tablones esquineros a la longitud y ángulo adecuado Fije los soportes de los aleros R3 R4 R5 R6 a las paredes Sujete las tablas de la pared inferiores a las vi...

Page 22: ...Katon asennus Roof assembly Dachmontage Instalación del tejado Instalação do telhado L installation du toit 22 ID 6387 Versio 2 Pvm 2 11 2019 Lillevilla 566 ...

Page 23: ...23 ID 6387 Versio 2 Pvm 2 11 2019 Lillevilla 566 ...

Page 24: ...ckbretter und Eckpfosten werden auf Länge geschnitten und die Schmiege nachdem dem Wände aufgebaut sind Schrauben 3 5x40 ES Corta los entarimados en la longitud correcta y termina en un ángulo siguiendo la inclinación del techo Fijar con tornillos 3 5x40 PT Serre as pranchas no comprimento certo com as extremidades em ângulo seguindo a inclinação do telhado Fixar com parafusos 3 5x40 24 ID 6387 Ve...

Page 25: ...lgen Sie die Verlegeanweisung des Herstellers ES Antes de la colocación de las ripias compruebe otra vez que todo esté bien escuadrado y que la puerta se abra correctamente Empiece la colocación de las ripias a partir del borde delantero El lado ranurado de las ripias siempre debe quedar hacia el exterior Todas las ripias del techo deben fijarse canto contra canto dejando 1 o 2 mm de espacio entre...

Page 26: ...nges first to the doors and then to the frame DE Befestigen Sie die Bänder der Tür als Erstes ES Sujete primero las bisagras a las puertas y después al marco PT Prenda as dobradiças primeiro nas portas e então na moldura 26 ID 6387 Versio 2 Pvm 2 11 2019 Lillevilla 566 ...

Page 27: ... antes del ensamblaje para así protegerlos contra la humedad que sube del suelo PT Recomendamos a utilização de um revestimento para telhado do tipo betumado ou chapa para telhados de duas águas Para os modelos de teto plano recomendamos um revestimento para telhado tipo betumado autocolante ou tela EPDM Siga as instruções do seu fornecedor de materiais para telhado A madeira utilizada nos produto...

Page 28: ...28 ID 6387 Versio 2 Pvm 2 11 2019 Lillevilla 566 ...

Page 29: ...29 ID 6387 Versio 2 Pvm 2 11 2019 Lillevilla 566 ...

Page 30: ...tuseinä Support for fascia board front wall Halterung für Krantzbrett Vorderwand Soporte para teja Räystäslaudan tuki sivuseinät Support for fascia board side walls Halterung für Krantzbrett Seitenwände Soporte para teja Räystäslaudan tuki sivuseinät Support for fascia board side walls Halterung für Krantzbrett Seitenwände Soporte para teja Räystäslaudan tuki sivuseinät Support for fascia board si...

Page 31: ...lanche de rive 36 x 60 x 270 4 R3 Suporte para o beiral Support pour planche de rive 36 x 60 x 250 2 R4 Suporte para o beiral Support pour planche de rive 36 x 60 x 190 2 R5 Suporte para o beiral Support pour planche de rive 36 x 60 x 120 2 R6 Suporte para o beiral Support pour planche de rive 28 x 28 x 290 4 R7 Porta tipo P direita Porte type P côté droit 32 x 735 x 1714 1 O1 Porta tipo P esquerd...

Page 32: ...te Oy Lapuantie 626 61450 Kylänpää Switchboard 358 6 474 5900 asiakaspalvelu luoman fi www lillevilla com Jälleenmyyjätiedot Retailer information Angaben zum Händler Datos del minorista Informações do revendedor Informations du détaillant Pidä numero tallessa Keep the number Bewahren Sie die Nummer auf Conserve el número de garantía Guarde o número de garantia Le numeró de garantie 32 ID 6387 Vers...

Reviews: