


Quick Start Guide of Network Video Recorder
9
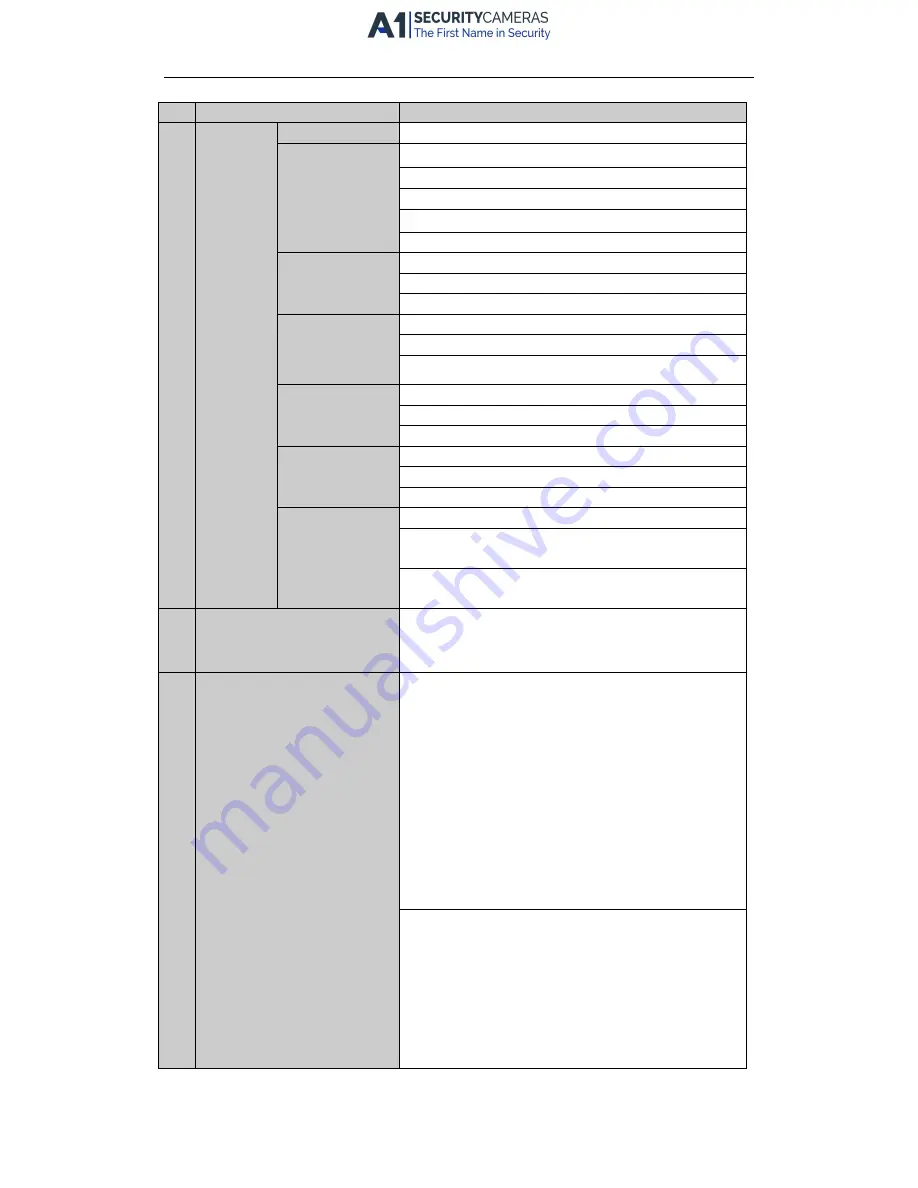
No.
Name
Function Description
Exit and back to the previous menu.
5/JKL/EDIT:
Enter numeral “5”;
Enter letters “JKL”;
Delete characters before cursor;
Check the checkbox and select the ON/OFF switch;
Start/stop record clipping in playback.
6/MNO/PLAY:
Enter numeral “6”;
Enter letters “MNO”;
Playback, for direct access to playback interface.
7/PQRS/REC:
Enter numeral “7”;
Enter letters “PQRS”;
Open the manual record interface.
8/TUV/PTZ:
Enter numeral “8”;
Enter letters “TUV”;
Access PTZ control interface.
9/WXYZ/PREV:
Enter numeral “9”;
Enter letters “WXYZ”;
Multi-channel display in live view.
0/A:
Enter numeral “0”;
Shift the input methods in the editing text field. (Upper and
lowercase, alphabet, symbols or numeric input).
Double press the button to switch the main and auxiliary
output.
4
SHIFT
Switch between the numeric or letter input and functions of the
composite keys. (Input letter or numbers when the light is out;
Realize functions when the light is red.)
5
Control Buttons
Directional buttons:
In menu mode, the direction buttons are used to navigate
between different fields and items and select setting
parameters.
In playback mode, the Up and Down buttons are used to speed
up and slow down record playing, and the Left and Right
buttons are used to move the recording 30s forwards or
backwards.
In the image setting interface, the up and down button can
adjust the level bar of the image parameters.
In live view mode, these buttons can be used to switch
channels.
Enter:
The Enter button is used to confirm selection in menu mode; or
used to check checkbox fields and ON/OFF switch.
In playback mode, it can be used to play or pause the video.
In single-frame play mode, pressing the Enter button will play
the video by a single frame.
And in auto sequence view mode, the buttons can be used to
pause or resume auto sequence.
Available from A1 Security Cameras
www.a1securitycameras.com email: [email protected]


