background image

(8) Technically maximum permissible mass

When working with front loader or rear heavy loaded attachments installed to the 3-point linkage, 

install ballast weights on the counter-part axle to maintain the front and rear weight balance of the 

tractor. If not, front or rear axle can be strained by the overloaded weight.

When working with the front loader, place the attached rear weight to the highest position and turn 

the down speed control knob to the “lock” position.

All models

Remarks

Technically total maximum 

permissible mass

4500kg (9921 lb)

without consideration of the load 

capacity of the tires

Front axle (*)

2000kg (4409 lb)

Rear axle

2500kg (5512 lb)

Rear axle

2500kg (5512 lb)

Maximum permissible mass is measured with only the front or rear wheels on the 

scales inclusive of ballasts and with mounted equipments in the raised position. 

Do not exceed the maximum permissible mass above. Overloaded condition may 

invalidate the warranty and may exceed the load rating of the tires.

If the load capacity of the tire is lower than maximum permissible mass of the front 

axle, the maximum load on the front axle meets the load capacity of the tire.

(

See page 4-15

)

DO NOT change the setting pressure of the relief valve arbitrarily to increase the 

lift capacity of the front loader or 3-point linkage. It can cause fatal damage to the 

Caution

*  includes front mounted equipment or loader in the raised position but without load in the bucket. 

Restrict operation

: In case of driving speed does not exceed 8km/h (5 mph) and standard 

front/rear wheel track (

See next page

), Intermittent maximum permissible load of the front axle can 

be ;

3200kg (7055 lb) for all models - without consideration of the load capacity of the tires.

- 13

hydraulic system and front axle.

Summary of Contents for U5010

Page 1: ...S TRACTOR OPERATOR S MANUAL INNOVATIVE TECHNOLOGY PARTNER U5010 U5020 U5030 OPERATOR S MANUAL PO Box 70 Battleboro NC 27809 Tel 252 984 0700 Fax 252 984 0701 www lstractor com www lstractorusa com U SERIES P NO 00000000 DATE 2009000 ...

Page 2: ...ator Protective Structure OPS 1 11 1 3 Long term storage 1 Preparation for storage 1 12 2 Check Maintenance during storage 1 13 3 Preparation for Reuse 1 13 1 4 Notices for Use Disposal related to Environment Preservation 1 14 1 5 Symbols 1 15 1 6 Safety Decals 1 Handling and Maintenance of Safety Decals 1 16 2 Safety Decals and attaching position 1 16 2 The Name of Each Part 1 Frame type 2 1 1 Fr...

Page 3: ...ng levers and pedals 1 Shuttle lever 3 8 2 Throttle lever 3 9 3 Throttle pedal 3 9 4 Clutch pedal 3 9 5 Brake pedals 3 10 6 Parking brake lever 3 10 7 Main gear shift lever 3 10 8 Range gear shift lever 3 11 9 Creeper gear lever if fitted 3 11 10 PTO gear lever 3 11 11 PTO mode switch 3 12 12 PTO switch 3 12 13 Four wheel drive lever 4WD 3 13 14 Differential lock pedal 3 13 15 Seat adjustment 3 14...

Page 4: ...6 7 Handling the Turbocharger if fitted 4 6 4 3 How to handle new tractor 1 Check points 4 7 2 Notices in handling new tractor 4 7 4 4 Attaching equipment 1 3 point linkage 4 8 2 Adjustment of Lift rod and upper link 4 9 3 Reference of implement installation part 4 9 3 Reference of implement installation part 4 9 4 Reference of PTO shaft 4 10 5 PTO safety cover and protection cap 4 10 6 Hitch and ...

Page 5: ...ng Radiator and Radiator screen 5 10 8 Tire air pressure damage 5 10 9 Tightening state of bolt and nut of each part 5 11 10 Adjustment of Clutch pedal play Mechanical type 5 11 11 Adjustment of brake pedal play 5 11 5 7 Every 50 hour check 1 Lubricating grease nipple 5 12 2 Checking Transmission oil 5 13 3 Checking Front axle oil capacity 5 13 4 Battery check 5 13 5 Air cleaner Dry type 5 13 6 Cl...

Page 6: ...es 5 25 5 11 Troubleshooting 5 29 6 Air conditioning System 6 1 The name of each part of cooling and heating system 6 1 6 2 How to use air conditioner and heater 1 How to operate air conditioner and heater 6 2 2 Air direction control 6 2 6 3 Every 6 month check 1 Checking refrigerant amount 6 3 2 Cleaning condenser and Radiator screen 6 4 3 Checking leakage 6 4 4 Belt tension adjustment 6 4 6 4 Ev...

Page 7: ...oblems caused by maintenance or repair with non genuine parts It must be requested to use the genuine parts When cleaning the tractor by using high pressurized water do not inject water directly to the electronic parts wiring air intake pipe hot engine or muffler inside bonnet Maintenance and repair of the tractor is performed by skilled technical experts with the proper tools authorized by the ma...

Page 8: ...ervice or parts from your dealer Dealer will need chassis serial number engine serial number and also running hours displayed on the instrument panel See Fig 1 3 Fig 1 1 Chassis No Fig 1 2 Fig 1 3 Engine No Hour meter 1 1 1 1 2 Terminology When reading this Operator s Manual refer to the right figure for the discrimination of the front rear left right direction Front Rear Right Left ...

Page 9: ...d to operate this tractor Only educated operators can use the tractor after learning the usage of controls for moving stopping turning and other operating Suitable Clothes Protect Entanglement When checking or operating the tractor wear tight fitting clothes and safety equipment instead of loose or long clothes Also slippers high heel shoes are not suitable for operation Wear the low shoes or work...

Page 10: ...product life failure and serious injury Restrict Maintenance If you repair or change some components and settings arbitrary the performance of the tractor can NOT be guaranteed and may void the warranty And also maintenance of the heavy weighted parts without special tools can cause serious injury If it is required to check or repair the tractor due to trouble or if you have any questions for the ...

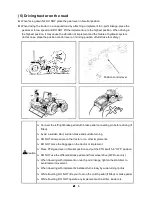
Page 11: ...mmediately Especially check if safety protection structures or covers are attached originally and the bolts are tightened well Before starting check again if there are other workers or children around the tractor and implements and keep a safe distance Start engine and operate the tractor after sitting on the driver s seat correctly with seat belt fastened Place the shuttle lever transmission gear...

Page 12: ... a sharp curve Especially when you drive the tractor with implements make the turning radius wider DO NOT start or stop the tractor suddenly Engage the clutch and brake softly If not front wheels can level can be increased Wear suitable ear protectors in high noise level conditions When working with equipment in the field Vibration may intensity from the equipment may be increased To reduce the ha...

Page 13: ...ful materials wear a safe On a downhill operate the throttle pedal and brake pedal slowly and DO NOT drive while the transmission gear is in NEUTRAL To climb a steep slope drive tractor slowly in reverse up the slope rather than forward It is When crossing a high ridge let down the implement and go straight across the ridge at low speed When connecting the implements to the front rear of the tract...

Page 14: ...r failure and serious injury Make sure to use towing hitch or authorized draw bar Warning When installing the implement having big hydraulic cylinders or lines check oil level in tractor transmission housing after installing the implements Caution If tractor needs to be towed for a short distance Use the hitch or drawbar or front towing hook Do not connect to other structures such as rear axle ROP...

Page 15: ... engine and remove the ignition key Apply the parking brake vehicle must have signs and lights required by local regulation to avoid collision with a vehicle When fixing the tractor Do not hook or connect chains to the 4WD shaft steering cylinder tie rod or front axle These can be damaged by the chain or excessive strain In case of turbocharger engine where fitted cover the exhaust outlet to prote...

Page 16: ...grounded battery clamp first and assemble it last If not It can Warning Before removing hydraulic pipe or hose and other parts check if the system pressure is removed The leakage of pressurized oil can cause a fatal physical injury Use the proper protection equipment When connecting or disconnecting the hydraulic quick coupler lower the implements to the ground after checking that hydraulic pressu...

Page 17: ...e full protection against all working conditions i e falling objects low hanging wires and branches in the forest orchard or construction area etc NEVER enter or operate these hazardous area without certified Operator Protective Structure installed The Protective Structure and interconnecting components are a certified system Any damage Fire corrosion or modification will weaken the structure and ...

Page 18: ...t check its concentration Fill the fuel tank full with fuel Loosen all drive belts and clean the air cleaner Loosen the rubber plug if fitted under the clutch chamber to drain water Remove the battery clean the cover and smear the terminals with grease Place the battery in a ventilated place not less than 10 C 50 F and away from direct sunlight Lift rod Lift arm 1 1 1 1 12 away from direct sunligh...

Page 19: ...t of reach of children 3 Preparation for Reuse When using first after long term storage check each part as below Check the damaged part or loosen part Check the leakage of fuel coolant engine oil transmission and front axle oil Check the level and density of the engine coolant Check the level of engine transmission rear and front axle oil and fuel For further information refer to the section 5 Lub...

Page 20: ...ir pollution 2 When you replace various oils engine transmission anti freeze solution directly do not throw the exhausted waste oil to any place This may pollute the soil and water seriously and also is prohibited legally If violating you would be responsible for that by civil or criminal case The waste oil must be disposed according to the environment laws 3 Use the product according to the Opera...

Page 21: ...l light Headlights downward Side lights Headlights upward Work light Light switch Emergency lights Cruise drive Optional Cruise drive release optional Fuel level Fuel filter Transmission oil pressure Engine oil pressure Engine coolant temperature Diesel engine preheat Direction indicating light 1 1 1 1 15 Position control Down Draft control Deep Draft control Shallow Work light Emergency lights Cy...

Page 22: ... cause the death or serious injury If the decals are dirty wash them with soap water and wipe with soft rags Do not use the thinner acetone as it may erase the instructions use the thinner acetone as it may erase the instructions If the decal is detached or damaged replace it with a new one on original position When cleaning the tractor with pressurized water the decals can be detached When replac...

Page 23: ... 3 Position Frame 5 Position PTO cover 6 Position Remote valve 4 Position Fuel tank 11 Position Pillar 9 Position Pillar 8 Position Air Cleaner 10 Position Pillar 7 Position Cooling fan 1 1 1 1 17 12 Position Clutch Steel cover PowerShuttle ...

Page 24: ...2 The Name of Each Part Safety Frame R O P S 1 Frame U5020 U5030 Option Seat STD No Armrest OPT Armrest Instrument panel Steering wheel Driver s Seat Headlight Bonnet Hood 2 2 2 2 1 Fuel Tank Sub step ...

Page 25: ... 2 Cabin U5020C U5030C Cabin Option Seat STD No Armrest OPT Armrest Instrument panel Steering wheel Driver s Seat Head light Bonnet Hood 2 2 2 2 2 Fuel Tank Sub step ...

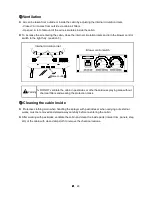
Page 26: ...Start Turn signal light switch Hazard warning light indicator Light switch Horn switch Shuttle lever PTO switch PTO MODE switch 3 3 3 3 1 Because the safety switch for start is engaged start the tractor after pressing clutch pedal If the tractor is not in use the ignition key should be removed Notice Cold start aid indicator 3 Cold start aid indicator If placing the key switch on ON position the c...

Page 27: ...the radiator cap It may cause a danger of a burn due to the escape of hot coolant or steam After the coolant is cooled down sufficiently open the radiator cap with protective gloves and clothing If the needle of engine coolant temperature gauge indicates red zone Stop the engine immediately and check the coolant level and after engine cools down If necessary add coolant Clean the radiator screen i...

Page 28: ...it is abnormal In this case contact your authorized dealer for check 9 Battery charging indicator If the indicator is ON while the engine stops this means Normal If the indicator is ON while the engine is running this means there is trouble in the charging system In this case contact your authorized dealer for check and repair 10 Fuel filter warning indicator U5020 U5020C U5030 U5030C U5020 U5020C...

Page 29: ... headlights to low beam not to disturb on coming cars Notice 12 Horn switch If you press the horn switch horn sounds Hazard warning light switch 13 Hazard warning light switch This is used to warn in case of emergency status If you press the triangle switch all turn signal lights front rear left right shall be blinking If you use the hazard warning lights for a long time it may cause a increase of...

Page 30: ... of switch and the work light shall be ON OFF Press the lower side OFF in the figure of switch and the work light shall be OFF Front work light switch Rear work light switch Grille work light switch option This is used to turn on the work light of the front grille ON Press the switch upper side Symbol in the When driving on the road at night do not let the rear work light stay ON It may cause a di...

Page 31: ...e socket for power withdrawal for the charging of cigarette lighter jack or cellular phone In case of using cigarette lighter jack option If you push the cigarette lighter jack the heating coil generates heat and shall be used as alternative of lighter In case of using as power supply 12V Use the cellular phone charger less 10A Caution When using a cigarette lighter jack cares must be taken not to...

Page 32: ... for PTO operation For further information See page 3 12 PTO operation indicator This indicator will be ON when applying the parking brake See page 3 10 Parking brake indicator PTO pressure indicator 21 PTO pressure indicator This indicator will be ON when the hydraulic pressure of the PTO system is lower then suitable value And then the PTO shaft shall be stopped automatically to protect the PTO ...

Page 33: ... PTO gear lever if fitted Creeper gear lever if fitted 3 3 3 3 8 1 Shuttle lever This is used to select forward reverse If you push the lever forward it runs forward and if you pull the lever back it runs backward Before backing up lower the engine rpm and check behind you before you back up The operation of shuttle lever must be done after the tractor has stopped completely Don t operate shuttle ...

Page 34: ...sion clutch for starting engine and shifting Throttle pedal 3 3 3 3 9 DO NOT ride your foot on the clutch pedal while driving the tractor As the start safety switch is installed for the operator s safety if you don t press the pedal completely it does not start Caution transmission clutch for starting engine and shifting transmission gear Depress the clutch pedal quickly and fully and release it s...

Page 35: ...e left right brake pedal push the brake pedal hard and at the same time pull the parking brake lever up the parking brake shall be applied When parking or stopping temporarily use the parking brake 7 Main gear shift lever Main gear shift lever is available to operate 4 speed ranges If using range gear shift lever together with shuttle lever the transmission of forward 16 speeds and reverse 16 spee...

Page 36: ...eeper is disengaged OFF As the revolution force of wheel axle is very high when working in creeper speed range the machine may not stop even if you press the brake pedals In this case press the clutch pedal to cut off the power and operate the brake pedals Caution Creeper gear lever Creeper range Standard 10 PTO gear lever if fitted 540 750 1000 rev min and Neutral position is available 3 3 3 3 11...

Page 37: ...See page 3 11 2 Select the PTO mode switch to AUTO or Manual position 3 Push and turn the PTO switch to engage PTO the PTO operation indicator shall be ON 4 If you want to stop the PTO temporarily while operating push the PTO switch in OFF position The PTO operation shall be OFF ON PUSH AND TURN OFF PUSH PTO operation indicator 3 3 3 3 12 Before attaching or checking the PTO driven equipment Alway...

Page 38: ...edal When the forward movement does not work because one wheels are slipping press the differential lock pedal More effective in the following cases Wet ground Plough work If pressing this pedal you can not turn as both rear wheels turn together If depressing the brake pedal and releasing the differential pedal it will be released automatically If not released press the one side brake pedal down s...

Page 39: ...ked Adjust the seat suspension to fit the weight of operator if fitted DO NOT put your hand under the seat while sitting It may cause a injury by seat suspension Caution 16 Tilt steering wheel Pull the tilt lever upward to release the steering column and tilt the steering wheel to desired position And push the tilt lever downward to lock the steering column in place and check to make sure column d...

Page 40: ...2 Hydraulic lift Control The hydraulic lift system is operated by the position control and draft control lever If the engine stops the operation of steering wheel becomes hard to turn and causes steering not to work But this does not mean a failure If you turn the steering wheel while driving the steering wheel does not return back automatically Notice 3 If it sounds abnormal when operating the st...

Page 41: ...ode is used for the implement which receives the draft load In this case operate the lever as follows 1 Remove the draft sensor stopper of upper link bracket 2 Move the position control lever forward fully Down and the implement lets down by its own weight 3 The volume of load that the hydraulic valve receives shall be determined according to the position of In working by draft control In working ...

Page 42: ...hen changing the blades of tiller or removing grass stop the engine and turn the down speed control knob to right slightly to lock The valve knob may turn twice Warning 4 Remote control lever and Quick coupler By using the remote control valve the implement i e dump trailer hydraulic conversion plough etc attached to the tractor shall be operated by the hydraulic pressure Push the remote control l...

Page 43: ...ystick diagonally loader and bucket shall be operated at the same time Then small loads move first When you want to float bucket lower the loader and push forward the lever at floating position After finishing work pull the lever and place it in neutral position To prevent accidents push and lock the locking lever when you do not use joystick lever When the loader is at the high position do not pl...

Page 44: ... When the auto lift up switch is pulled back the implement does NOT moved by position control lever Auto lift up switch down up Auto lift down switch When driving on the road lift up the implement by using the position control lever And lock the down speed control knob When lifting up or down the implement by using auto lift control switches do not approach the implement And before using the switc...

Page 45: ...let valve option 7 Independent PTO valve 8 In line filter option 11 Drop speed control valve 12 Hydraulic lift control valve 13 Safety valve 14 Hydraulic lift cylinder 3 3 3 3 20 4 Power steering unit 5 Hydraulic lift pump 8 In line filter option 9 Auto leveler valve option 10 Remote control valve 14 Hydraulic lift cylinder 15 Oil tank Transmission case ...

Page 46: ...valve 7 In line filter option 8 Auto leveler valve option 11 Hydraulic lift control valve 12 Safety valve 13 Hydraulic lift cylinder 3 3 3 3 21 4 Power steering unit 5 Front loader valve Front outlet valve option 9 Remote control valve 10 Drop speed control valve 14 Oil tank Transmission case ...

Page 47: ...and fold it down Be careful of the possibility that your head hand or shoulder might be hurt by sudden folding results from the weight of the safety frame at this moment 3 Fit the pin into the hole in order to fix the safety frame 4 Fix it completely by fastening the safety frame bolts tightly After standing the safety frame up again fasten bolts and nuts tightly bolt Pin bolt 3 3 3 3 22 Warning D...

Page 48: ...e original packaging and make sure that they are carefully sealed The charcoal filters last for approximately 50 hours of work They must however be replaced each year If when working with pesticides toxic odors are noted stop the work immediately and replace the filters with new one These filters must never be washed or cleaned with compressed air Discarded filters must not be thrown away Take dis...

Page 49: ... circulation inlet Blower control switch Blower outlet Warning DO NOT ventilate the cabin in pesticides or other hazardous spraying area without charcoal filters and wearing the protection mask Cleaning the cabin inside Protective clothing worn when handling the sprayer with pesticides or when carrying out external works must be removed and stored away carefully before re entering the cabin After ...

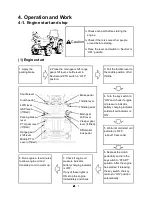
Page 50: ... cold start aid indicator is OFF Throttle pedal Brake pedal Shuttle lever Clutch pedal Throttle lever Range gear Main gear shift lever Parking brake lever Creeper gear lever if fitted Differential 4WD lever GSP lever if fitted PTO gear lever if fitted 4 4 4 4 1 indicator is OFF about 10 seconds 6 Depress the clutch pedal fully and turn the key switch to START position After the engine has started ...

Page 51: ...engine life shall be reduced When storing the tractor in the cold weather the battery must be removed and 2 Start in cold weather Push the throttle lever to the middle position of full throttle Start the engine after cold start aid indicator goes OFF If fitted If engine runs rough push the throttle pedal down 2 3 times for a while Mechanical type If engine runs smoothly carry out warming up for 5 ...

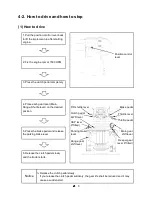
Page 52: ...rake pedal and release Throttle pedal Brake pedal F R shuttle lever Clutch pedal 4WD lever Throttle lever Main gear Parking brake GSP lever if fitted 4 4 4 4 3 5 Press the brake pedal and release the parking brake lever 6 Release the clutch pedal slowly and the tractor starts Release the clutch pedal slowly If you release the clutch pedal suddenly the gear life shall be reduced and it may cause a ...

Page 53: ...moving parts have stopped Apply the parking brake 1 Press the clutch and brake pedal Place the shuttle lever main gear shift lever in Neutral and PTO switch to OFF and release the clutch pedal 2 Push the position control lever forward to lower implements to the ground Turn Key switch to OFF position 4 Stopping tractor 4 4 4 4 4 3 Pull the parking brake lever up and take foot off from the brake ped...

Page 54: ...l connecting pin before driving if fitted Position control lever 4 4 4 4 5 Avoid a sudden start sudden brake and sudden turning DO NOT allow people on the tractor or on other implements DO NOT place the baggage on the tractor or implement Place PTO gear lever in Neutral position and put the PTO switch in OFF position DO NOT use the differential lock pedal and front wheel drive 2WD use only When tr...

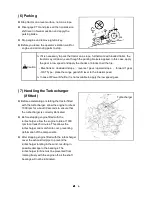
Page 55: ...se of Power Shuttle it is not available to apply the low speed gear Caution Turbocharger 7 Handling the Turbocharger if fitted Before accelerating or starting the tractor fitted with the turbocharger allow the engine to idle at 1000 rpm for about 30 seconds to ensure that the turbocharger is correctly lubricated Before stopping engine fitted with the turbocharger allow the engine to idle at 1000 r...

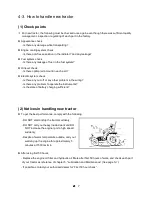
Page 56: ...uddenly DO NOT carry out heavy loaded work and DO NOT increase the engine rpm to high speed suddenly Oil level check Is there optimal oil amount in each part Electric system check Is there any cut off or any other problem in the wiring Is there any problem to operate the instruments Is the state of battery charging sufficient 4 4 4 4 7 suddenly Despite of warm temperature outside carry out warming...

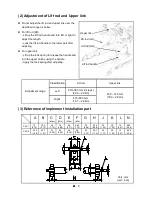
Page 57: ...he weight of implements to be 1 Lift rod RH 3 Lower link 5 Upper link 2 Stabilizer 4 Lift rod LH 6 Lift rod pin 4 4 4 4 8 3 point linkage must be fixed on the suitable position according to the weight of implements to be attached Warning Before attaching detaching implements place PTO switch in OFF position and PTO gear lever in Neutral and apply the parking brake When attaching detaching implemen...

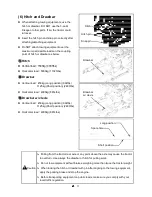
Page 58: ...r adjusting Lift rod LH Lift rod RH Upper link Lift rod handle Adjustment range Classification Left Right Lift rod 510 580 mm 3 steps 20 0 22 8in 475 580 mm 18 7 22 8in Upper link 458 720 mm 18 0 28 3in 3 Reference of implement installation part 19 0 74 A B C G H J L N CAT 1 CAT 2 19 3 0 75 25 7 Max 683 26 8 825 12 0 47 12 39 1 53 49 35 1 53 45 22 4 0 88 28 7 22 0 86 28 44 5 1 75 52 69 2 71 86 76 ...

Page 59: ... safety cover and protection cap Attach the PTO cover when using the universal joint When PTO is not used apply grease and insert the shaft protection cap PTO shaft protection cap PTO safety cover PTO shaft dimension Unit inch 3 0 in 1 5 in 0 3 in 1 1 in 1 3 8 in 4 4 4 4 10 Warning When contacting to the rotating shaft it may cause a serious injury Do not touch shaft which is rotating Do not remov...

Page 60: ...ition 992lbs 1125kg Short position 2480lbs Horizontal load 4000kg 8814lbs Drawbar w clevis Vertical load 450kg Long position 992lbs 1125kg Short position 2480lbs Horizontal load 4000kg 8814lbs Drawbar w clevis Spare hole Long position 4 4 4 4 11 Pulling from the tractor rear axle or any point above the axle may cause the tractor to overturn Use always the drawbar or hitch for pulling work Do not t...

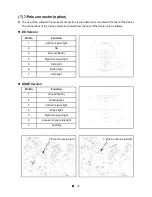
Page 61: ...ear of the tractor are as follows EC Version Pin No Function 1 Left turn signal light 2 NA 3 Ground Earth 4 Right turn signal light 5 Side light 6 Brake light 7 Side light ASAE Version Pin No Function 1 Ground Earth 2 Working light 3 Left turn signal light 4 Brake light 5 Right turn signal light 6 License number plate light 7 Auxiliary 4 4 4 4 12 7 Pole Connector EC 7 Pole Connector ASAE ...

Page 62: ... of ballasts and with mounted equipments in the raised position Do not exceed the maximum permissible mass above Overloaded condition may invalidate the warranty and may exceed the load rating of the tires If the load capacity of the tire is lower than maximum permissible mass of the front axle the maximum load on the front axle meets the load capacity of the tire See page 4 15 DO NOT change the s...

Page 63: ...55 4 in 68 6 in Front wheel Unit mm inch Rear wheel track U5010 1256 STD 1558 mm 49 4 61 3 in U5020 1326 STD 1718 mm 52 2 67 6 in U5030 1426 STD 1666 mm 56 1 65 6 in STD Standard wheel track Rear wheel Unit mm inch 4 4 4 4 14 U5010 U5020 U5030 When adjusting the wheel track pay attention to the direction of tire lugs if it shows shape when looked behind it is correct Notice 1256 49 4 1266 49 8 145...

Page 64: ...2 4 235 KPa 34 1 psi 2240 4938 lb 2 14 9 28 8PR 1 8 177 KPa 25 6 psi 3760 8289 lb Optional Tire 1 280 85R20 1 6 157 KPa 22 8 psi 2240 4938 lb 2 380 85R28 1 6 157 KPa 22 8 psi 4120 9083 lb 1 300 70R20 1 6 157 KPa 22 8 psi 2120 4674 lb 2 380 70R28 1 6 157 KPa 22 8 psi 3500 7716 lb 1 280 70R 16 2 5 245 KPa 35 6 psi 2240 4938 lb 2 380 70R 24 1 6 157 KPa 22 8 psi 3300 7275 lb 1 29x12 50 15 2 1 206 KPa ...

Page 65: ...f the front wheel track is adjusted or front tires are replaced with new tires having bigger diameter or width or one of the front equipments is attached the steering angle must be adjusted as below Steering stopper Locking nut Tie rod sides to be contacted with the cast Check all the possible interferences by combinations of the steering and oscillation of the front axle 5 Tighten the locking nut...

Page 66: ...U5020C 1 2 3 4 1 1 2 3 4 2 1 2 3 4 3 1 2 3 4 4 1 15 0 71 1 37 0 85 1 61 1 00 2 15 1 33 2 61 1 62 3 10 1 92 3 64 2 26 4 87 3 02 5 77 3 58 6 84 4 25 8 04 4 99 10 77 6 69 14 93 9 27 17 71 11 00 20 81 12 93 27 88 17 32 0 95 0 59 1 13 0 70 1 32 0 82 1 77 1 09 2 15 1 33 2 55 1 58 2 99 1 85 4 01 2 49 4 75 2 95 5 63 3 49 6 62 4 11 8 86 5 50 12 29 7 63 14 57 9 05 17 13 10 64 22 94 14 25 Range gear shift Ma...

Page 67: ...26 3 88 8 39 5 21 11 63 7 22 13 79 8 56 16 20 10 06 21 70 13 48 Range gear shift Main gear shift 1 2 3 4 1 1 2 3 4 2 1 2 3 4 3 1 2 3 4 4 Forward 0 19 0 11 0 22 0 13 0 26 0 16 0 35 0 21 0 43 0 26 0 50 0 31 0 59 0 36 0 79 0 49 0 94 0 58 1 12 0 69 1 31 0 81 1 76 1 09 2 44 1 51 2 89 1 79 3 39 2 10 4 55 2 82 O Note Engine rated speed 2600 rpm dynamic load radius 590mm 23 22in 4 4 4 4 18 Reverse 0 93 0 ...

Page 68: ...93 16 90 10 50 22 64 14 06 O N Forward 1 16 1 38 1 62 2 17 2 63 3 12 3 67 4 92 5 82 6 90 8 11 10 87 15 07 17 87 20 99 28 12 Running speed Unit Km h Mile h Creeper Option Forward Reverse 1 16 0 72 1 38 0 85 1 62 1 00 2 17 1 34 2 63 1 63 3 12 1 93 3 67 2 28 4 92 3 05 5 82 3 61 6 90 4 28 8 11 5 03 10 87 6 75 15 07 9 36 17 87 11 10 20 99 13 04 28 12 17 47 O F F 0 94 0 58 1 11 0 68 1 31 0 81 1 75 1 08 ...

Page 69: ...5 Lubrication and Maintenance 5 1 Checking Each Part 1 Checking parts 5 5 5 5 1 ...

Page 70: ...e 0 25 mm 0 01in 17 18 3 Point linkage Clutch pedal play Grease Proper amount 20 30 mm 0 78 1 18in 16 Front axle holder Steering arm Grease Proper amount 12 13 14 15 Hydraulic oil filter Transmission oil Front axle oil Steering cylinder See page 5 3 See page 5 3 Grease Proper amount 47 ℓ 12 4gal 10 ℓ 2 6gal 11 Nozzle injection pressure See page 5 21 5 5 5 5 2 First replacement Replacement Check Ad...

Page 71: ...o 200 Transmission oil common use for Hydraulic lift hydraulic steering device 47 ℓ 12 4gal API GL4 ISO VG 46 68 LSTH570 LS Tractor T M Hyd oil Manufacturer GS Caltex or S OIL TOTAL Co Ltd Front axle oil 10 ℓ 2 6gal API GL4 SAE 80W EPK 80W90 Manufacturer S OIL TOTAL Co Ltd Grease Front axle arm holder Steering cylinder pin 3 point linkage Proper amount NLGI 2 CALTEX MAHWAK Multi purpose or CALTEX ...

Page 72: ...ck transmission rear axle hydraulics oil level Check front axle oil level Check and adjust parking brake Check torque of exhaust manifold bolts Check and adjust V belts and tension Tighten all cooling system hose connections 5 4 First 50 hour check If you open the hood while the engine is running it can cause serious damage by the intended or unintended access to the rotating shaft pulley V belt c...

Page 73: ...Indicator When this indicator turns on the PTO shaft shall PTO Pressure indicator 5 5 5 5 5 When this indicator turns on the PTO shaft shall be stopped automatically to protect the PTO clutch At this time turn the PTO switch OFF and turn it ON again to restart the PTO If the PTO system pressure is normal the PTO shall rotate continuously if not the PTO shaft shall be stopped again after 5 6 second...

Page 74: ...4gal U5030 Fuel amount Cleanness of radiator screen Amount of Engine oil Operation of Indicators Tire air pressure and damage Condition of air cleaner primary element 5 5 5 5 6 Check Check before starting engine or 5 minutes later after stopping engine If the oil is between Max and Min scale of the oil gauge it means proper amount It must only be performed while engine is stopped Spring Fall Summe...

Page 75: ...which may cause poor starting Thus it is preferred to use diesel for winter time only During mid winter mix diesel oil with kerosene as shown on the right Check Check the fuel gauge and if insufficient fill the fuel tank with fuel If the engine stops after finishing work fill the fuel tank with fuel As the temperature drops down the humidity in the fuel tank is condensed and may mix with the fuel ...

Page 76: ... OFF despite of operation of switch of head light or indicating light 1 Check the corresponding fuse in the fuse box 2 If there is no problem in the fuse check the bulb of the corresponding light or change it Horn switch Turn signal light switch 5 5 5 5 8 Brake light tail light 12V 21W 5W Work light 12V 35W Instrument panel light LED Warning indicators LED Indoor light cabin type 12V 10W Use the b...

Page 77: ...d clean inside the filter element with a clean damp cloth Do not assemble a wet filter element Do not dry the wet filter element by using the compressed air Do not start the engine if air filter element is not assembled Notice Fig 2 Pressed air Fig 1 Primary element Safety filter element 5 5 5 5 9 Filter assembly Clean the inside of the air cleaner housing using a clean damp cloth taking care not ...

Page 78: ... Check the air pressure or the damage of the tires daily Always use the correct pressure for each axle and If the tire is damaged change it with a new one Ensure tire pressures are not lower than the correct values to prevent blown tires bead wear internal damage irregular wear and short service life Do not over inflate the tires as this may lead to damage in the event of impact and in extreme con...

Page 79: ...ed 3 After adjusting the pedal play tighten the locking nut 4 Check if the clutch is disengaged completely 11 Adjustment of Brake pedal play Normal distance 40 50mm 1 57 1 96 in If the pedal play distance is over 50mm 1 96 in adjust it as below 1 Loosen the locking nut and turn brake rod to adjust 2 If brake rod is tightened the pedal play shall be reduced and if brake rod is loosened it shall be ...

Page 80: ... 1 Lubricating grease nipple Steering cylinder pins LH RH Front axle holder Steering arm LH RH 3 point linkage 5 7 Every 50 hour check Grease nipple Grease nipple Grease nipple 5 5 5 5 12 Grease nipple ...

Page 81: ...oil injection inlet clear the cap Warning 3 Checking Front axle oil capacity Open the plug of checking inlet and check if there is oil leakage If insufficient pour the oil into injection inlet check the state by using the checking inlet 5 10 minutes later after injecting For adding oil refer to Lubricants and Capacity table See page 5 3 Normal capacity 10ℓ 2 6gal Injection inlet Checking outlet 5 ...

Page 82: ...he dust from the upper surface through the element to the underside Hold the nozzle at least 12 in 300mm from the element to prevent damage to the filter media Cabin air filter Bolt Filter cover Clean all filter chambers with a damp lint free cloth Re install the filter elements Re install the filter cover and tighten the bolts The filters are made of specially treated media with a rubber sealing ...

Page 83: ...the oil filter to the bracket attach it so that it can be turned by 1 revolution after the packing and filter case are contacted Engine oil injection Attach the drain plug and tighten the normal torque normal torque 4 0Kg m 28 93ft lbs Inject the oil into oil injection inlet by normal capacity Oil injection inlet Drain plug U5030 5 5 5 5 15 capacity Engine oil capacity 7 0 ℓ 1 8gal U5010 U5020 9 0...

Page 84: ...r the eyes and hands If the oil penetrates the skin go to see a doctor quickly 3 Replacing Fuel filter cartridge 1 Loosen the drain plug and drain the fuel inside of the filter 2 Disconnect electric wire of the fuel filter sensor 3 Remove the element from the body 4 Remove the fuel filter sensor from the element and assemble it to the new element 5 Attach the element to the body Drain plug Body El...

Page 85: ...sion crank axle pulley alternator pulley Standard approx 10 12mm 0 39 0 47in if pressed by 98N 22 04 lb Adjusting plate Bolt Insert the filter element by pushing it deeply into the filter housing Remove the dust of the evacuator valve and clean the inside of the cover Assemble the cover with the evacuator valve placed downward Do not start the engine or close the hood if the filter element is not ...

Page 86: ...ollow Normal value B A 0 5 mm 0 0 2 in Unscrew the lock nuts of the tie rod If you turn the tie rod clockwise at right hand side B A shall be increased After checking that Toe in is correct tighten the lock nuts A Lock nut Lock nut FRONT B Tie rod 5 5 5 5 18 ...

Page 87: ...n the clutch or housing drain plug under the axle housing and drain the oil completely Clean the metal powder attached to the drain plug Insert the copper washer to the plug and tighten it completely Inject the oil as much as the oil level stays between low limit and high limit Normal capacity 47 ℓ 12 4gal The contaminated oil may reduce the durability of transmission and cause the failure of hydr...

Page 88: ... When supplying water attach the overflow pipe and supply the water up to the inlet of radiator For aux tank supply the proper amount of water separately Anti freeze is added to new tractor water After passing the first winter after purchasing 5 5 5 5 20 After passing the first winter after purchasing change the engine coolant Anti freeze If the density of anti freeze in the engine coolant is low ...

Page 89: ...ure 14 7 MPa 2133psi U5010 U5020 17 7 MPa 2560psi U5030 6 Replacing Cabin air filters Before servicing the filters switch off the blower and close all cabin doors and windows Unscrew the bolts under the roof and remove the cover and filter element as shown in the right figure Clean both filter chambers with a damp lint free cloth Replace the cabin air filters with a new one Re install the filter c...

Page 90: ...ed the air from the high pressure pipe Notice Air bleeding of fuel filter 1 Loosen the fuel filter air bleed plug by spanner 5 5 5 5 22 1 Loosen the fuel filter air bleed plug by spanner 2 Press the priming pump several times attaching some fabric to the air bleed plug part If no bubbles from the air bleed plug the process is completed 3 Tighten the air bleed plug Air bleed plug Manual pump If the...

Page 91: ...emove the air 3 If no bubbles in the fuel from the air bleed bolt place the starting switch OFF and fasten the air bleed bolt again Tight torque 19 6 29 4 N m 14 54 21 81ftㆍ ㆍ ㆍ ㆍlbs Air bleed bolt Cover the bleeding fuel with a rag so that it does not flow to other components Notice 5 5 5 5 23 ...

Page 92: ...lts in the damage of tractor or injury Notice Fusible Link Fusible link check and replacement Fusible link is attached to the wiring of right side of the engine Cabin fuse box Cabin type 5 5 5 5 24 If fusible link is damaged remove the connector from the wiring As fusible link is a device to protect the electric system and wiring if damaged check if there is trouble in the electric system and chan...

Page 93: ...rm water apply grease Caution The gas generated from the battery is explosive comply with following instructions Keep cigarettes sparks and flames away from battery Use a flashlight to check battery electrolyte level or indicator Never check battery charge by placing a metal object across the terminals Use a voltmeter or hydrometer 5 5 5 5 25 voltmeter or hydrometer Always remove grounded battery ...

Page 94: ...ngine and apply parking brake and remove the ignition key before replacing the battery Put on eye protection and globes to protect human body from poisonous sulfuric acid before handling the battery Always remove grounded battery clamp first and assemble it last If not It can cause an explosion by spark Keep all flames and sparks away and DO NOT smoke while you charge the battery Replaced old batt...

Page 95: ... during the charging 7 Unplug charge cord and remove charger cables 8 Attach battery to the tractor Put on eye protection and globes to protect human body from poisonous sulfuric acid before handling the battery Always remove grounded battery clamp first and assemble it last If not It can cause explosion by spark Keep all flames and sparks away and DO NOT smoke while you charge battery Detach batt...

Page 96: ...ted from the battery can be exploded by spark DO NOT connect the negative cable of auxiliary battery to the negative terminal of tractor battery Make sure to connect to the engine block Keep all flames and sparks away and DO NOT smoke while you charge battery Connecting order of jumper cables Black cable tractor battery auxiliary battery 3 Connect one end of black cable to terminal of auxiliary ba...

Page 97: ...replace The start motor turns but the engine does not start The battery is weak Bad ground Improper viscosity of engine oil Air in fuel system Fuel filter clogged Error in engine body Fuel cock closed Charge or replace Tighten the ground Replace the oil with proper viscosity Bleed the air Wash or replace the filter Repair Open the cock Engine revolution is irregular Air in fuel system Fuel filter ...

Page 98: ...ad adjustment of valve gap Bad injection timing Lack of fuel supply Air cleaner clogged Repair Repair Repair Repair Check fuel system Clean or replace Engine oil pressure indicator is ON during operation Lack of engine oil Low viscosity of engine oil Warning light switch error Fault of oil pump Oil filter element clogged Supplement Replace the proper oil viscosity Replace Repair Replace element Ab...

Page 99: ...ulic System Lift arm does not raise Hydraulic filter clogged Hydraulic pump failure Control valve failure Cylinder or cylinder related parts broken Clean the filter or replace Repair or replace Repair or replace Repair or replace Oil leakage Connecting part loosened Oil seal damaged Pipe cracked Tighten Replace Replace If lever is placed on the raising position and relief valve sound off Upper lim...

Page 100: ...ump Low speed Wearing or failure Relief valve Valve spool clogged Setting pressure too low Apply regular torque Adjust RPM or Repair Repair or replace Repair or replace Reset or adjust Cylinder does not work smoothly as steering wheel movement Air in steering line if not used for a long time Air in suction pipe Piston seal damaged Bleed air Repair Replace Steering wheel turns to the opposite direc...

Page 101: ...ectric System Headlight does not ON Light bulb cut off Fuse blown Replace Check the cause and replace Horn does not sound Switch failure Abnormal wiring Horn failure Replace Repair Replace Turn signal Light does not work Light bulb cut off Bad connection Fuse blown Replace Tighten terminals Check the cause and replace Cold start aid indicator does not ON option Relay or timer damaged Bad connectio...

Page 102: ...ompressor Condenser Receiver dryer 6 6 6 6 1 퀵커플러 Receiver dryer Cooler hose Quick coupler Maintenance of the air conditioning system components Compressor Receiver drier Condenser Heater evaporator unit and connection parts must be performed in the designated dealer DO NOT disassemble the components arbitrary Caution ...

Page 103: ...f you turn the switch clockwise blue the cool air blows and if counter clockwise the warm air blows Operation lamp Air conditioner switch Blower control switch Heater control switch 2 Air direction control Available to control the air direction by turning the blower outlet or by adjusting the guide direction For internal circulation open the Internal circulation inlet When operating the air condit...

Page 104: ...sure pipe has hardly temperature difference pipe is hot and low pressure pipe is a little cold but there is a temperature difference It shows almost transparent bubble but it becomes transparent soon by changing the engine rpm It shows the flow of bubble always It may be transparent or white bubble It shows the flow of fog somewhat The bubble does not shown even if the engine runs idle 6 6 6 6 3 P...

Page 105: ...elt tension adjustment Check the belt tension is proper and If necessary adjust the tension by compressor adjusting bolt Tension approx 10 mm 0 39 in when pressed by 98N 22 04 lbs Check the damaged part of the belt and if necessary after checking the pulley alignment replace it by a new one the refrigerant amount Belt Compressor 6 6 6 6 4 6 4 Every year check 1 Compressor check Check the oil leaka...

Page 106: ...ged Clean or replace 3 Air conditioning is insufficient despite of the normal operation of compressor and blower Low and high pressure is low Leakage of refrigerant Contact the dealer Low and high pressure is high Refrigerant overcharged Contact the dealer Condenser or radiator screen was clogged Clean condenser and the screen Air is in air conditioning line Contact the dealer 6 6 6 6 5 Expansion ...

Page 107: ... of magnet clutch was shorted or cut off Contact the dealer Compressor failure Contact the dealer Wiring cut off or poor connection such as ground Check and repair 5 The warm airflow does not blow The amount of warm water is small Check and add the engine coolant Heater line is clogged or distorted Check and repair Poor operation of the thermostat of engine coolant Repair or replace 6 6 6 6 6 ...

Page 108: ...am Heater evaporator Fan motor Evaporator core Expansion valve Heater core Hot water Control panel Engine Compressor 6 6 6 6 7 Compressor Fan Radiator Condenser Quick coupler Receiver dryer Heater lose Cooler hose Line ...

Page 109: ...6 7 Air conditioner wiring diagram 6 6 6 6 8 ...

Page 110: ...e control THERMOSTAT 6 8 Specification Blower control Electric OFF 3138 KPa 455 psi ON 588 KPa 85 psi 200 KPa 29 psi Operating pressure of Pressure switch High pressure Low pressure DKV 11C VANE ROTARY 110 5 cc rev 6 74 in rev Φ 125 Model ASRN60PD M16 R 134a 850 900 g Model Capacity PULLY diameter Compress or Receiver dryer Refrigerant 6 6 6 6 9 29 98 31 74 oz Refrigerant ...

Reviews: