background image

Lovibond

®

 PFX

i


Series Operator’s Instruction Manual V1.6 

Page 39 of 53 

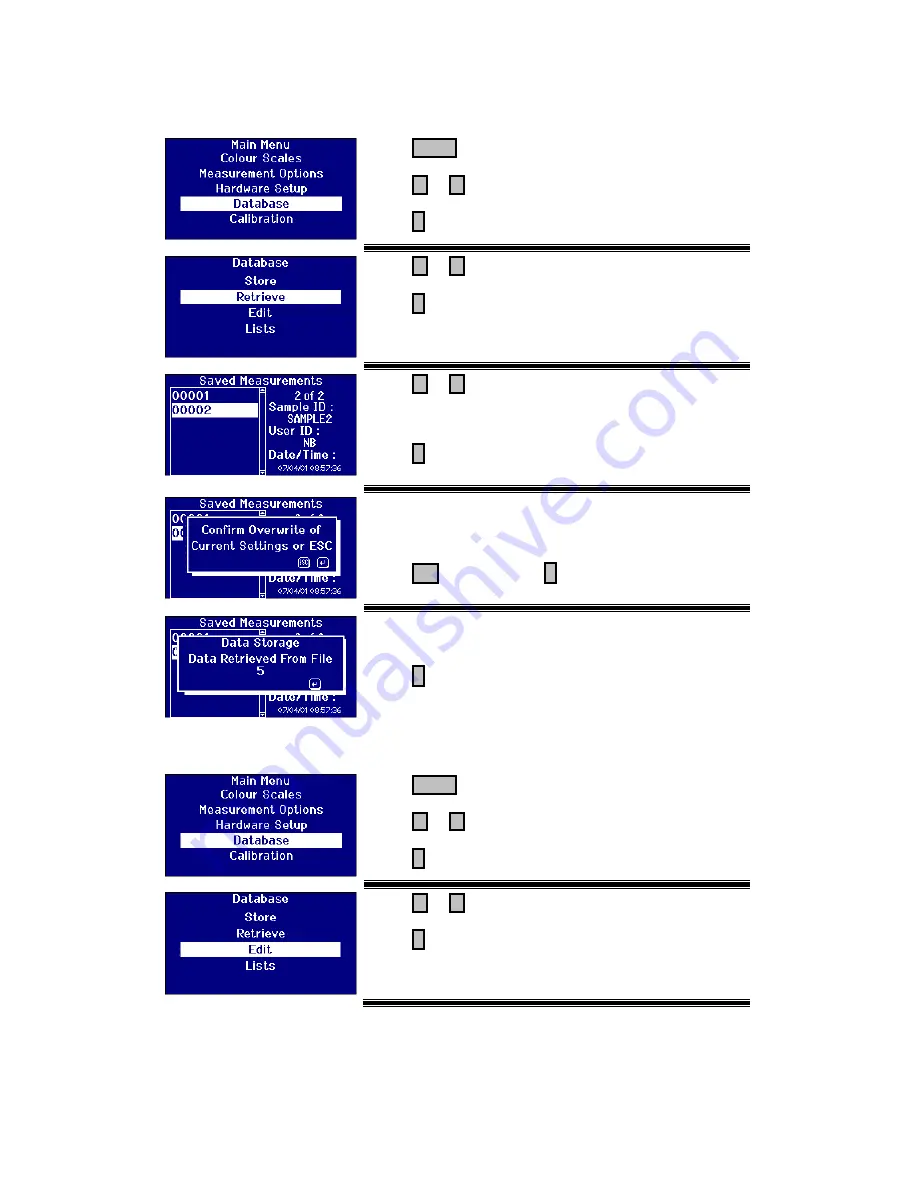
Retrieve a Measurement 


Press 

MENU  

 
Press 


or 


 to move the Highlight bar to 

“Database”. 

 
Press 

 to select. 


Press 


or 


 to move the Highlight bar to 

“Retrieve”. 


Press 

 to select. 


Press 


or 


 to move the Highlight bar to select the 

saved measurement. The details of the measurement are 
shown on the right hand side of the display.


Press 

 to select the highlighted measurement. 


If the current instrument settings are different from that of 
the saved measurement, confirmation is required to 
change the settings to that of the saved measurement. 
 

Press  Esc  to exit or press  

  to accept. 


The Software will show a confirmation screen to show that 
the Measurement has been retrieved OK. 
 

Press 

 to exit. 


Edit a Stored Measurement 


Press 

MENU  

 
Press 


or 


 to move the Highlight bar to 

“Database”. 

 
Press 

 to select. 


Press 


or 


 to move the Highlight bar to 

“Edit”. 


Press 

 to select. 


Summary of Contents for PFXi 195

Page 1: ...Operator s Instruction Manual V1 6 Page 1 of 53 Lovibond PFXi Series OPERATOR S INSTRUCTION MANUAL The Tintometer Limited Solar Way Solstice Park Amesbury Wilts SP4 7SZ Telephone 44 1980 664800 Email...

Page 2: ...ting the Default Gateway 18 General Settings 18 Setting the Event Log 19 Setting the Beeper 19 Setting the Display Sleep Time 19 Measurement Options 20 Measurement Settings 20 ID Settings 20 CIE Setti...

Page 3: ...ing a Sample to a Standard 35 Understanding Off Hue 36 Database Functions 38 Store the Current Measurement 38 Retrieve a Measurement 39 Edit a Stored Measurement 39 Remote Calibration 41 Maintenance 4...

Page 4: ...ring that this product is disposed of correctly you will help prevent potential negative consequences for the environment and human health which could otherwise be caused by inappropriate waste handli...

Page 5: ...the display Examples Select menu item Press any key to continue Caution and safety signs Caution Refer to manual Warning Hot surface User responsibility The responsible body should be made aware that...

Page 6: ...gh precision spectrophotometric colorimeters which are designed for objective colour measurement of clear liquids or transparent solids They are easy to use automatic instruments which overcome the su...

Page 7: ...tical solutions YG Y OY OR BR Chlorophyll A B AOCS Cc 13d 55 Direct measurement of content in parts per million 0 100 ppm EBC Colour Analytica Beers malts and caramels and similarly coloured liquids B...

Page 8: ...vents and petroleum spirits 0 500 mg Pt l Rosin US Naval Stores ASTM D 509 Rosins varying in colour from yellow to reddish orange XC D FF Saybolt Color ASTM D 156 ASTM D 6045 JIS K 2580 Light coloured...

Page 9: ...ter 880 P 880 P Heater 880 S 880 S Heater 880 IP17 880 IP17 Heater 880 CIE 880 CIE Heater 950 950 Heater 950 P 950 P Heater 995 995 Heater 995 P 995 P Heater 5 Volt Halogen Lamp Conformance Filter W60...

Page 10: ...lead and accessories are all included in the packaging Installation Place the instrument on a bench near a mains voltage supply which is free from excessive voltage fluctuations The external power su...

Page 11: ...ion Manual V1 6 Page 11 of 53 The Instrument Rear View 1 USB port 4 24 Volt power input 2 RS232 port 5 ON OFF switch 3 Local area network RJ45 Port Front View Key 1 Lamp access panel 4 Keypad 3 LCD di...

Page 12: ...the measurement of a sample 2 Esc Exits a menu and commits any changes made 7 Zero Initiates a baseline measurement 3 Enter Used to select items from the menu 8 Del Deletes characters during user inp...

Page 13: ...lowing languages English French German Spanish Italian Portuguese Chinese Russian and Japanese The instrument can be changed to any of these languages at any time The displayed language will automatic...

Page 14: ...red if a mistake is made Press Esc to exit without changing the value or press to accept the value and return to the previous screen If the value was changed the display will now reflect the change ma...

Page 15: ...o move to the next menu item Setting the Decimal Separator The format for the decimal separator can be either or This option is only used to format data sent to a printer or computer The option set sh...

Page 16: ...ues Static The network administrator will provide an IP address for the instrument that should be entered Press or to move the Highlight bar to IP Allocation Press or to scroll through the list of opt...

Page 17: ...ss or to move the highlight bar to Subnet Mask Press to change the value Use the numeric keys and the to enter the value required Press Del to delete the last character entered if a mistake is made Th...

Page 18: ...lue Use the numeric keys and the to enter the value required Press Del to delete the last character entered if a mistake is made The format for an IP Address is xxx xxx xxx xxx where the maximum value...

Page 19: ...ll remain silent with this option switched off Press or to move the Highlight bar to Beeper Press or to scroll through the list of options The options are On or Off Setting the Display Sleep Time The...

Page 20: ...y value or enter up to a 4 character string When the User ID is set to Required the user must enter at least one character to proceed Press or to move the Highlight bar to User ID Press or to scroll t...

Page 21: ...They do not have an effect on the other colour scales Press or to move the highlight bar to CIE Settings Press to select Changing the Observer Press or to move the highlight bar to Observer Press or t...

Page 22: ...he highlight bar to Path Length Press to select Selecting Cell Path Length from the List Press or to move the highlight bar to Cell Path Length Press or to scroll through the list of path lengths User...

Page 23: ...against the sample measurement and its value can be printed it is good practice to keep this information as it allows other users to see how a measurement was made The Brix value is used solely for t...

Page 24: ...xt item Brix Value Press or to move the highlight bar to Brix Value Press or to scroll through the list of options Options are Default or Manual Entering a default value for Brix Press or to move the...

Page 25: ...of Measurements to Average Press or to move the highlight bar to No To Average Press to change the value Use the numeric keys and the to enter the value required Press Del to delete the last character...

Page 26: ...te the last character entered if a mistake is made Press Esc to exit without changing the value or press to accept the value and return to the previous screen Press or to move the highlight to the nex...

Page 27: ...ptions are On or Off Press or to move the highlight bar to Log File Port Press or to scroll through the list of options Options are Internal or RS232 Setting the Heater only available on heated versio...

Page 28: ...ight bar to Set Temp C Press to change the value Use the numeric keys and the to enter the value required Press Del to delete the last character entered if a mistake is made Press Esc to exit without...

Page 29: ...scale required Press to select or deselect a colour scale an X before the colour scale name indicates that the scale has been selected Press or to move the Highlight to the next item or Press Esc to l...

Page 30: ...at least every 4 hours by pressing the ZERO key When the baseline measurement is completed the instrument will go back to the screen that was displayed before ZERO was pressed Sample Preparation Where...

Page 31: ...delete the last character entered if a mistake is made Press Esc to exit or Press to accept the value If User ID has been selected the following screen will appear Use the Alpha numeric keys to enter...

Page 32: ...character entered if a mistake is made Press Esc to exit or press to accept the value The progress bar shows the status of the measurement When the measurement has been completed the screen will show...

Page 33: ...result Use or to scroll through the selected colour scales or press F2 to switch the display between text and graphical display of the result Other Colour Scales Use or to scroll through the selected...

Page 34: ...f the instrument the RS232 settings are Baudrate 19200 Data Bits 8 Stop Bits 1 Parity None Handshaking None To print the result shown onscreen press Func then press 0 To print all the scales selected...

Page 35: ...Series Operator s Instruction Manual V1 6 Page 35 of 53 Converting a Sample to a Standard At the Main Menu Press Func Enter 1then Press Enter The values for the sample will now have been copied over t...

Page 36: ...er The diagram below shows a representation of the Gardner scale If the measured sample has a hue similar to that of one of the colour standards then the user will find it easy to make a match in the...

Page 37: ...ust be considered as those coming into colour measurement with automatic instruments who have never used the visual instruments might not have a comprehension of the colours of that colour scale Autom...

Page 38: ...unctions Store the Current Measurement Press MENU Press or to move the Highlight bar to Database Press to select Press or to move the Highlight bar to Store Press to select The software will show a co...

Page 39: ...right hand side of the display Press to select the highlighted measurement If the current instrument settings are different from that of the saved measurement confirmation is required to change the se...

Page 40: ...the measurement is shown in the edit box Use the Alpha numeric keys to enter the value required To get to the letters you want you ll need to press the keypad one two or three times For example to ge...

Page 41: ...e sample chamber and press Read Once all the solutions have been measured the Data is sent back to the Calibration Server The Data is compared to the ISO 17025 calibration data for the solutions If th...

Page 42: ...place the cell into the instrument then press READ The progress of the measurement will be shown on the progress bar in the display Each solution in the calibration pack will be requested in turn and...

Page 43: ...s or to move the Highlight bar to Instrument Settings Press to select Press or to move the highlight bar to Lamp The lamp can be switched on and off to test the lamp After the lamp has been changed th...

Page 44: ...15 mm 60 59 70 W600 OG 15 20 mm 60 59 80 W600 OG 20 25 mm 60 59 90 W600 OG 25 65 59 90 W600 B 25 33 mm 60 60 10 W600 OG 33 65 60 10 W600 B 33 40 mm 60 60 20 W600 OG 40 65 60 20 W600 B 40 50 mm 60 62...

Page 45: ...ecified on the certificate of calibration supplied with each standard Colour Scale Nominal Certified Value Order Code Accreditation AOCS Tintometer Colour 0 3R 2 0Y 5 13 42 40 ISO 9001 AOCS Cc 13j 97...

Page 46: ...water Dust and dirt which gathers in the optical viewing system and can settle on the lens and correction filter If dirty the optical viewing system can be dismantled and the components cleaned with...

Page 47: ...mple As a guide it is advisable to restrict the colour intensity of the sample to less than a total of 30 40 Lovibond units Using a shorter path length cell can reduce colour intensity Subjectivity of...

Page 48: ...the PFXi whilst holding down the F1 on the instrument A dialog will appear on the LCD screen with the text Enter Function No Enter 8192 and press enter on the instrument keypad The Firmware Upgrade s...

Page 49: ...instrument type and serial number are correct Click on the Load File button and navigate to the new flash file PFXi_100xx flash The file will take a few seconds to load When the file has loaded correc...

Page 50: ...programming When programming is complete the LCD screen will display Restart Instrument Update Successful Turn off the instrument power and restart Confirm that the software version is correct on the...

Page 51: ...ion Manual V1 6 Page 51 of 53 Appendix 2 Registering your Instrument To Register your instrument go to www Tintometer com and select Colour Measurement and then select Members from the menu bar To reg...

Page 52: ...he fields have been filled with the required data Click Create User Information about the instrument can now be entered The Serial Number of the instrument can be found on the label at the rear of the...

Page 53: ...the end of the process a confirmation of registration is provided The instrument is now registered By selecting an instrument it is possible to view its calibration history and print out calibration c...

Reviews: