Lomography DIANA+ Instructions For Use Manual Download Page 3

INSTRUCTIONS FOR USE

HOLD ON JUST A MINUTE

We can only imagine the intense excitement that grips you. Who the hell wants to read through an 
instruction manual when the Diana+’s alluring plastic curves are calling your name? But please 

– fight this temptation and digest this entire manual before you get started. There’s all kinds of 
crucial info to make your first Diana+ photo shoot the very best that it can be. 

GETTING STARTED AND FORMAT SELECTION

Your Diana+ uses 120 film. Before you do anything, you’ll need to decide what format you’d like 
to shoot. You can choose amongst three sizes of images with your Diana+. Each size requires 
a plastic mask (or lack of one), and a specific film format setting. The specifications are as fol

-

lows:

12 large square shots: (5.2x5.2cm) / no frame mask / 12-shot setting
16 small square shots: (4.2x4.2cm) / small frame mask / 16-shot setting
Endless panorama: (4.6x4.6cm) / small frame mask / 16-shot setting

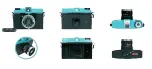
The “frame masks” refer to the two small black plastic frames included with your camera. Turn the 

Rear Door Switch 

[1]

 to “Open” and slide the Rear Door


[2]

 off the camera. In the middle, you’ll 

see the Mask Mount 

[5]

, which is the area directly behind the lens. You can easily snap the frame 

masks into place here. Use the small frame mask for 16 small shots, the panoramic frame mask 
for Endless Panorama (more about that later!) and no frame mask for 12 large shots. 

Once you’ve loaded the frame mask, you’ll need to set the Film Format Switch 

[4]

 on the back 

of the Rear Door to either 12 or 16 shots. Just slide it up or down with your fingers, and match 
it to the specifications listed above. Once your format is set, it’s time to load a fresh roll of 120 
inside!

LOADING THE FILM

Remove the Rear Door 

[2]

. Insert the fresh film roll into the left side. The film has holes on the top 

and bottom of its spool – which will match with plastic posts on the top and bottom of the cam

-

era. Thread the film across to the right side Take-Up Spool 

[3]

. You should only thread it in a little 

bit – about a half-inch or two centimeters. With the Rear Door 

[2]


still off, turn the Advance Wheel 

[6] 

counterclockwise, and ensure that the film is transporting and threading smoothly by turning 

two or three complete revolutions. If you’ve got a lot of slack - or if the film is transporting at an 
angle - then STOP, take out the film spool, and rewind it with your hands. Then give it another try. 
If your film is loaded incorrectly, then it could scratch, fold, or break inside your camera. 

Once you’re sure that the film is properly loaded, then replace the Rear Door

 [2]

, turn the Rear 

Door Switch


[1]

 to “Lock,” and look through small red window on the Film Format Switch 

[4]

120 film has its shot numbers printed on the back, so you can use this window to count your 
exposures. As you advance, you’ll see a fragment of the word “Start” and then a sequence of 
symbols (usually a few circles or dashes that go from large to small) which countdown to the first 
exposure of “1.” Stop there, as you’re now ready to shoot.  

SHUTTER AND APERTURE SETTINGS

The Diana+ is a fully manual camera which allows you to control how fast the shutter fires and 
how wide it opens. The Shutter Speed Switch 

[8]

, located on the top of the Lens 

[11]

 has two 

settings: “N” and “B.” “N” is for normal daytime shots, and fires the shutter at approximately 
1/60 of a second.  “B” allows you to keep the shutter open for as long as you like – which is great 
for nighttime and low-light images. For a sharp image, the camera must be held still whenever 
you’re firing on the “B” setting! The best method is to screw a tripod into the Diana +’s handy 
Tripod Mount 

[15]

. Otherwise, try to press it against something flat and hold it steady while you 

shoot. As the format is square, it doesn’t matter whether the camera is held horizontally or verti

-

cally. 

On the bottom of the Lens


[11]

 is the Aperture Setting 

[9]

. This controls how wide the shutter 

opens. There are four settings available. Three of them match the outdoor weather conditions: 
sun, partial clouds, and full clouds. The forth one, designated as “P,” is for pinhole shots – which 

we’ll discuss a little later. 

On the bottom of the Lens

 [11]

 is the Aperture Setting 

[9]

. This controls how wide the shutter 

opens. There are four settings available. Three of them match the outdoor weather conditions: 
sun, partial clouds, and full clouds. The forth one, designated as “P,” is for pinhole shots – which 

we’ll discuss a little later. 

With ISO 400 Speed Film
- In daylight, choose “N” for the shutter speed and match the aperture setting to the actual light 
condition outside (ex. choose sun if it is sunny.)
-  For a lit indoor setting, set the shutter to “B” and the aperture to cloudy. Shoot for about one 

second or a little less.

- For night shooting, set the shutter to “B” and the aperture to cloudy. A brightly lit city street 
needs about 20 seconds, and a really dark moonlit scene might need around a minute.

With ISO 100 Speed Film
- In daylight, choose “N” for the shutter speed and choose an aperture that’s one step darker. 
(ex. choose partial clouds on a sunny day.) 
- Double the shooting time of 400 speed film (ex. shoot indoor scenes for about 2 seconds). 

FOCUS & SHOOTING

Okay, your film is advanced to number 1, and your shutter & aperture settings are in place. Take 
a look at your subject and estimate the distance between you and them. The Focus Ring 

[10] 

is around the Lens


[11]

 and has three settings: 1-2 meters (3-6.5ft), 2-4 meters (6.5-13ft), and 4 

meters (13ft) to infinity. Rotate the Focus Ring 

[10]

 to the proper distance. And here’s a tip – the 

Focus Ring 

[10]

 rotates out and moves closer to your subject as the focus setting gets closer. 

You can handily compose your shot through the Diana+’s square Viewfinder 

[13]

. As you can 

imagine,  the  Viewfinder  is  not  super-precise.  It’s  a  little  more  correct  for  the  16-shot  format. 
When shooting 12 shots per roll, the actual image area is a bit larger than what the Viewfinder 
shows. But don’t give it too much thought – the squnity Viewfinder and composition “surprises” 
are all a part of Diana shooting. 

Fire your very first Diana+ photo by pressing down the Shutter Release


[7]

. Press it once for day

-

2

3

Summary of Contents for DIANA+

Page 1: ......

Page 2: ...INSTRUCTIONS FOR USE GEBRAUCHSANWEISUNG MODE D EMPLOI ISTRUZIONI PER L USO MANUAL DE INSTRUCCIONES 2 8 14 20 26 32 39 43 ...

Page 3: ...exposure of 1 Stop there as you re now ready to shoot SHUTTER AND APERTURE SETTINGS The Diana is a fully manual camera which allows you to control how fast the shutter fires and how wide it opens The Shutter Speed Switch 8 located on the top of the Lens 11 has two settings N and B N is for normal daytime shots and fires the shutter at approximately 1 60 of a second B allows you to keep the shutter...

Page 4: ...light With ISO 400 film you ll need about 2 seconds in bright sunlight 30 seconds in the shade 6 15 min utes in a lit indoor scene and about 1 2 hours at night Given these long exposure times any thing moving in front of the lens will be blurred This can be very cool for daytime shots of people walking cars speeding by dogs barking etc You ll notice that shots taken indoors or at night have strong...

Page 5: ...ilm You ll need full sunlight to shoot ISO 100 or slower on the N setting 4 My images are overlapping each other Check your film formatting You most likely have the camera set to 16 but have no mask placed inside 5 My images are totally black Oops that sounds a lot like you left the lens cap on 6 A lot of Diana images are dark in the corners an effect called vignetting Why aren t mine You re proba...

Page 6: ...n Wenn du vorspulst siehst du das Wort Start und dann eine Reihe von Symbolen üblicherweise ein paar Kreise oder Striche die im mer kleiner werden diese sind der Countdown zum ersten Bild 1 Stoppe das Vorspulen und sei bereit zum ersten Schuss VERSCHLUSSZEIT UND BLENDEN EINSTELLUNGEN Die Diana ist eine voll mechanische Kamera die dir erlaubt die Verschlusszeit und Blendenöff nung selbst zu kontrol...

Page 7: ... Das daraus resultierende Bild hat einige charakteristische Merkmale 1 Ein weiches verträumtes Bild 2 Extrem weitwinkelige Perspektive mit klaren Linien keine Fischauge Verzerrung 3 Sonderbare Langzeitbelichtungs Effekte auch tagsüber Weil Pinholes so klein sind haben sie eine relative lange Belichtungszeit um auch genügend Li cht hineinzulassen Mit einem ISO 400er Film braucht man ca 2 Sekunden b...

Page 8: ...ie bevor du abdrückst gegen dein Gesicht 3 Meine Fotos bei Tageslicht sind ganz dunkel Eventuell hast du die Blende auf Pinhole eingestellt statt auf sonnig Wenn das Foto nur zu dunkel ist dann verwende einen schnelleren Film Du brauchst starkes Sonnenlicht um mit ei nem ISO 100 Film zu schießen oder einen langsameren auf der N Einstellung 4 Meine Bilder überlappen sich Überprüfe das Filmformat Wa...

Page 9: ...es de pose sont imprimés sur le dos des pellicules 120 donc tu peux utiliser cette fenêtre pour compter les poses En avançant tu verras le mot Start en partie et puis une suite de symboles en général des circules ou des tirets qui s élargissent au fur à mesure et qui font une sorte de compte à rebours avant la première pose numéro 1 Arrête toi là puisque maintenant tu es prêt à prendre une photo P...

Page 10: ...its par un labo photo professionnel Si tu n en as pas un dans ton quartier il faudra fouiner sur Internet le plus possible c est qu il y ait un labo auquel tu peux envoyer ta pellicule STÉNOPÉ OU PHOTO PAR TROU D AIGUILLE Les sténopés datent du début de la photographie Au lieu de l objectif la lumière rentre par un trou minuscule L image qui en résulte à quelques caractéristiques particulières 1 U...

Page 11: ...utiliser le mode N pour les prises de jour 2 Mes prises de nuit sont très floues et complètement dingues Pour des prises longues et nettes il faudra que l appareil reste complètement immobile Utilise un trépied si tu en as un sinon pose l appareil sur une surface plate ou retiens ta respiration et tiens l appareil contre ton visage 3 Mes prises de jour sont très sombres Tu as probablement mis l ap...

Page 12: ...rossa sopra o sotto l interruttore per il formato della pellicola 4 Le pellicole da 120 mm hanno ogni fotogramma numerato posteriormente quindi puoi utilizzare questa finestra per contare i tuoi scatti Man mano che prosegui vedrai un frammento della parola start seguito da una se quenza di simboli solitamente cerchi o freccette di grandezza decrescente che rappresentano un conto alla rovescia fino...

Page 13: ...a bobina d avvolgimento 3 e sarà sufficiente aprire lo sportello posteriore 2 per rimuoverla Estrai la pellicola finita e sigillala con il pezzetto di cartoncino posizionato in fondo alla pellicola stessa Alcune pellicole sono dotate di cartoncino adesivo per le altre basterà leccarlo In en trambi i casi sarà comunque un piacere Nel lato sinistro della macchina ora c è una bobina di plastica vuota...

Page 14: ...uratore su B Per gli scatti diurni assicurati che sia impostato su N 2 Le foto che prendo di notte risultano troppo slavate ed incomprensibili Quando fai lunghe esposizioni devi fare in modo che la tua macchina resti il più ferma possibile Usa un cavaletto fotografico se ne possiedi uno Altrimenti appoggiala a qualcosa di liscio o trat tieni il respiro ed appoggiala al tuo viso prima di scattare 3...

Page 15: ...o OBTURACIÓN Y TIEMPOS DE APERTURA La cámara Diana es una cámara totalmente mecánica y te permite controlar tú mismo los tiempos de obturación y apertura La palanca para la velocidad de obturación 8 está en la parte superior a la lente 11 y tiene dos posibilidades de ajuste N y B N se utiliza normalmente con luz día normal y abre la cortinilla aprox 1 60 seg La posición B te permite mantener la co...

Page 16: ... Debido a que las pinoles son muy pequeñas tienen unos tiempos de exposición relativamente largos para que pueda entrar la luz suficiente Utilizando una película de 400 ASA se ncesitan aprox 2 segundos en plena luz de día 30 segundos a la sombra 6 15 minutos en un espacio in terior iluminado y 1 2 horas en tomas nocturnas Todos los movimientos que se produzcan del ante de la lente quedarán distors...

Page 17: ...tán totalmente oscuras Posiblemente hayas ajustado la apertura en pinhole en vez de en sol O si la foto está sólo un poco oscura intenta con una película un poco más rápida Para trabajar con 100 ASA necesitas mucha luz del sol o una película más lenta con la posición en N 4 Mis fotos se montan Comprueba el formato de la película Seguramente hayas ajustado el formato 16 pero sin poner la máscara 5 ...

Page 18: ...32 33 ...

Page 19: ...34 35 ...

Page 20: ...36 37 ...

Page 21: ...38 39 ...

Page 22: ...40 41 ...

Page 23: ...42 43 ...

Page 24: ...44 45 ...

Page 25: ...46 47 ...

Page 26: ...ooklyn NY 11201 USA T 1 718 522 4353 F 1 718 522 4468 info usa lomography com Lomography Society Korea 1F 362 14 Seogyo dong Mapo gu 121 838 Seoul South Korea T 82 2 522 0255 F 82 2 523 0255 shop lomography co kr Lomographic Society Asia Hong Kong No 2 G F Po Yan Street Sheung Wan Hong Kong T 852 2525 5417 F 852 2525 5467 info lomographyasia com Lomographic Society Japan 3 13 23 Minami Aoyama 3rd ...

Reviews: