background image

6. Easy Internet Setup with Web Wizard  

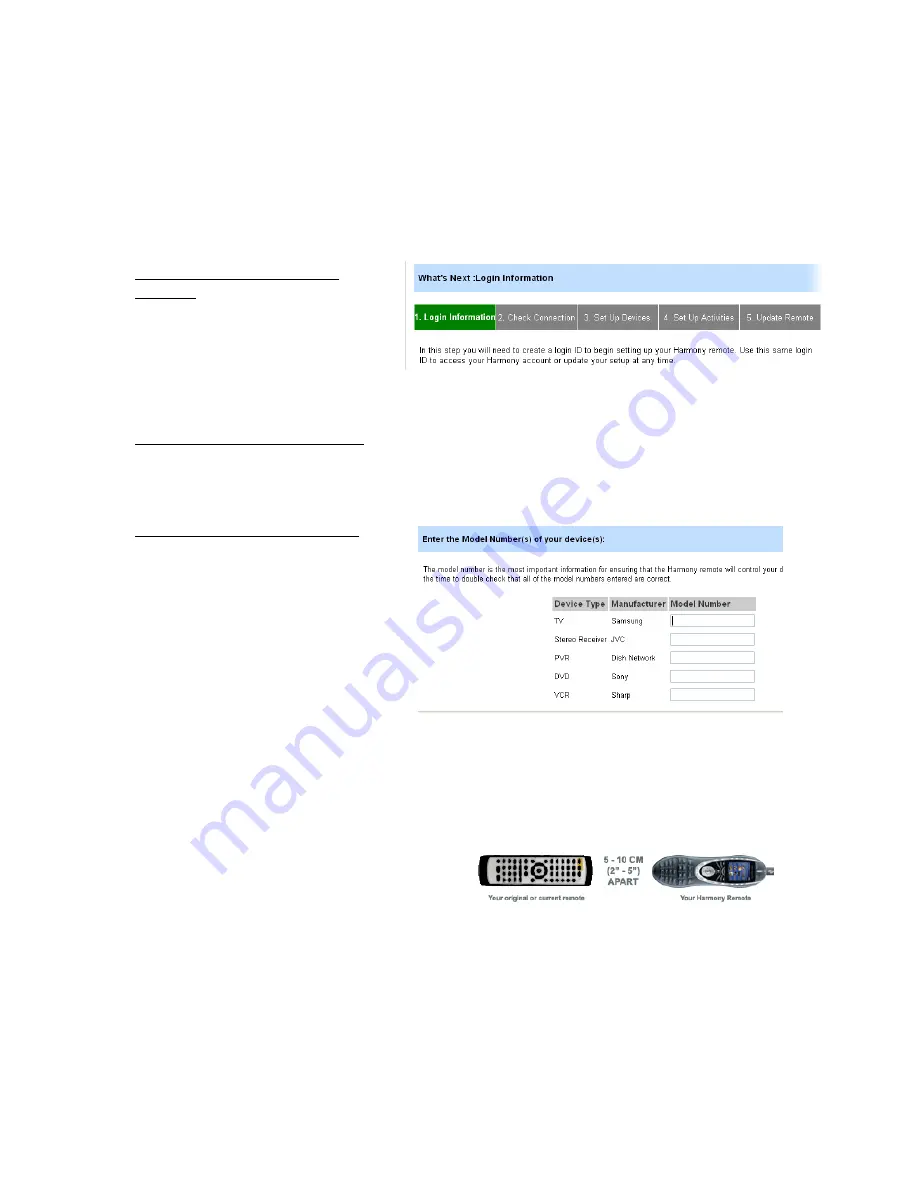
The Harmony remote control setup is a five-step process, estimated to take approximately 20-30 
minutes the first time. First, install the software and drivers from the CD, and follow the on-
screen instructions. The software will connect you with the Harmony Web site, at which point it 
will ask you to set up an account. The progress of your setup process will be shown on screen 
intermittently throughout the setup process in the form of a grey and green status bar (see 
below). 


Step 1: Creating a Harmony 
Account  

At the end of software installation, 
you will be taken automatically to the 
Harmony Web site (if not, please visit 
www.logitech.com/harmony and click 
on New User Login).  You will be asked to create a User ID and a password, which you will be able 
to use to log in each time you want to update your Harmony remote control.  
  

Step 2: Testing the Connection 

At this point, the Web interface will ask you to plug in the Harmony 880 remote with the 
provided mini-USB cable into the computer’s USB port. This is simply to make certain the 
hardware is functioning properly, and is able to upload and download information. 
 

Step 3: Setting Up the Devices 

During this step, the wizard helps 
identify the various entertainment 
components you wish to control with 
the Harmony 880 remote. First, you be 
asked to select the kinds of c
you are using and brand names in pull-
down menus. After making your 
selections, press 

Next

. The following 

screen asks for the specific model 
numbers of the components you 
selected. The model numbers provided are then compared with the component information 
stored in the Harmony database. At this point, the Harmony database will move all of the 
matching information into your online account, and make it ready for download (

Step 5

). If 

there is no record of your particular component models in the database, the wizard will launch 
the 

Device Tutor

.  

omponents 

 
The 

Device Tutor

 will ask you to point the 

original component remote toward the 
back of the Harmony 880 remote, where 
there is a infrared receiver in the 

Learning 

Port

. You will be instructed to press a few 

buttons. This process allows the Harmony remote control to learn the exact kinds of codes 
needed to control the component. These codes are then uploaded into your account, where it is 
stored before being downloaded at the end of the process.  


The Logitech Harmony 880 Remote Reviewer’s Guide 
Summer 2005 
Page 14 

Summary of Contents for Harmony 880 Guide

Page 1: ......

Page 2: ...System Requirements 13 5 1 Price 13 5 2 Product Specifications 13 5 3 Warranty 13 5 4 System Requirements 13 6 Easy Internet Setup with Web Wizard 14 7 Using the Logitech Harmony 880 15 7 1 The One Bu...

Page 3: ...m harmony Customer Support 1 866 826 5722 customerservice harmonyremote com Press relations contact not for publication Nathan Papadopulos Marketing Communications Manager Logitech Harmony Remotes Voi...

Page 4: ...e face the challenge of clutter with their coffee tables lined with a half dozen or more remotes 2 2 The Opportunity The opportunity to create a single remote to control an entire home entertainment s...

Page 5: ...atch high definition TV on a cable system with a DVR the TV high definition receiver satellite and DVR box may all have to be powered and set to the appropriate inputs which could require pressing 10...

Page 6: ...ess that teaches the Harmony remote about the component This involves pointing the component s original remote control toward the sensor in the back of the Harmony remote and pushing a short sequence...

Page 7: ...he activity based buttons are easy for everyone to understand not just for the master of the entertainment center the Harmony remote is simple to use for all family members even the babysitter Customi...

Page 8: ...ard television to 16 9 ratio for movies and HDTV Enhanced DVR Control The Harmony 880 remote s central key layout is optimized for use with DVR systems such as TiVo A circular directional control make...

Page 9: ...e of devices Access to user database that includes tens of thousands of devices and an intuitive Web interface makes it simple to program Set up wizard for easy setup Wizard makes setup simple even fo...

Page 10: ...g command Use the right arrow button to display more commands 7 DEVICE Lists all devices in the entertainment system on the screen LCD and allows you to select and fully control any device 8 Menu Butt...

Page 11: ...nd even the babysitter to use With an intuitive Web interface and USB connection it s also easy to set up and update The Harmony 880 remote can control any device that has an infrared receiver Its col...

Page 12: ...with new components User needs to press an elaborate sequence of buttons to launch any Activity Macro based programmable remotes with touch screens Phillips Sony Universal Electronics Home Theater Mas...

Page 13: ...roof of purchase A one year repair exchange warranty for factory assembly defects only not normal wear and tear over time including UV light acts of nature rain animals as examples buyer s remorse com...

Page 14: ...able to upload and download information Step 3 Setting Up the Devices During this step the wizard helps identify the various entertainment components you wish to control with the Harmony 880 remote F...

Page 15: ...n the right and the devices the make up the system on the left Remote Once you have finished the first four steps your account is filled with all of the information the remote needs to completely cont...

Page 16: ...vity doesn t launch correctly use the Help button a series of questions to help troubleshoot 7 2 Using the Help Button The Harmony 880 remote s Smart State Technology trac the state of each component...

Page 17: ...system For example some of the more advanced capabilities include 8 1 Customizing the LCD Screen The Harmony 880 remote s color LCD screen can be customized in several different ways to suit personal...

Page 18: ...armony account and go to the home page Click Customize on the Watch DVD Activity Click on Change the behavior of buttons On the left you ll see the names of the buttons Next to it you ll see the funct...

Page 19: ...long the device takes to warm up and respond to any more signals after Power Inter key Delay How long the device needs to accept one signal and be ready for the next Input Delay How long the device ta...

Page 20: ...een Once the new configuration is downloaded into the remote you can access the new activity by pressing the More button on the top of the controller Then it s just one click of the custom Background...

Page 21: ...DVD players and these devices all require infrared remotes So an advanced remote control needs to be able to work with the current systems and components that respond to infrared as well as with the c...

Page 22: ...devices designed for new applications and specific purposes such as gaming multimedia or audio and visual communication over the Internet Further Logitech s retail business includes personal periphera...

Page 23: ...of pen and paper with the power of the digital world of the personal computer 10 1 Logitech Warranty Policies Satisfaction Guaranteed Anyone who is not completely satisfied with the Logitech Harmony 8...

Reviews: