background image


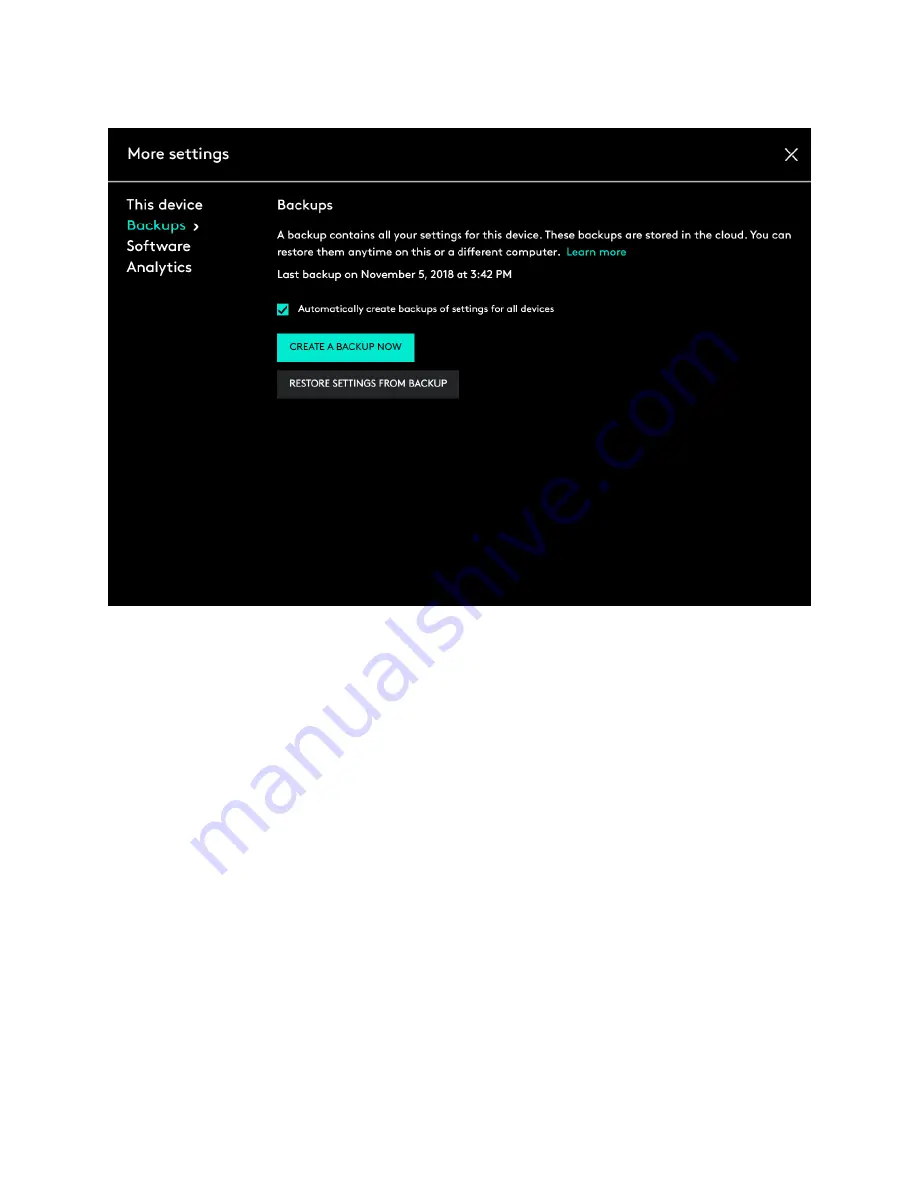
AUTOMATIC BACKUP OF SETTINGS - 

If the 

‘Automatically create backups of 

settings for all devices’

 checkbox is enabled, any settings you have or modify for all of 

your devices on that computer are backed up to the cloud automatically. The checkbox is 
enabled by default. You can disable it if you don’t want the settings for your devices to 
be backed up automatically. 


‘CREATE A BACKUP NOW’ button - 

This button allows you to backup your current 

device settings yourself, if you need to fetch them later. 


‘RESTORE SETTINGS FROM BACKUP’ button - 

This button lets you view and 

restore all the available backups you have for that device that are compatible with that 
computer, as shown above. 

The settings for a device are backed up for every computer that you have your device connected 
to and have Logitech Options that you are logged into. Every time you make some modifications 
to your device settings, they get backed up with that computer name. The backups can be 
differentiated based on the following: 

1.


Name of the computer. (Eg. John’s Work Laptop) 

2.


Make and/or model of the computer. (Eg. Dell Inc., Macbook Pro (13-inch) etc.) 

3.


The time when the backup was made. 

The desired settings can then be selected and restored accordingly. 

Summary of Contents for 920-007580

Page 1: ...ional Follow the guidelines in the guidelines PDF file below to maximize your comfort and lessen the chance of injury Download the Comfort_Guidelines PDF The guidelines are written in the following la...

Page 2: ...hen you are logged into Logitech Options with a verified account your device settings are automatically backed up to our cloud by default You can manage the settings and the backups from the Backups t...

Page 3: ...TTINGS FROM BACKUP button This button lets you view and restore all the available backups you have for that device that are compatible with that computer as shown above The settings for a device are b...

Page 4: ...l the buttons of your mouse Configuration of all the keys of your keyboard Point Scroll settings of your mouse Any application specific settings of your device WHAT SETTINGS ARE NOT BACKED UP Flow set...

Page 5: ...permission prompts on macOS Catalina For official macOS Catalina support please upgrade to the latest version of Logitech Options 8 02 or later Starting with macOS Catalina 10 15 Apple has a new polic...

Page 6: ...itech Options and Logitech Options Daemon If you already clicked Deny do the following to allow access manually 1 Launch System Preferences 2 Click Security Privacy then click the Privacy tab 3 In the...

Page 7: ...ences click the lock at the bottom left corner to unlock 3 In the right panel check the boxes for Logitech Options and Logitech Options Daemon 4 After you check the boxes select Quit Now to restart th...

Page 8: ...and then follow steps 2 4 from above Screen Recording Access Screen recording access is needed to capture screenshots using any supported device You ll be presented with the prompt below when you fir...

Page 9: ...acy tab 3 In the left panel click on Screen Recording and follow steps 2 4 from above System Events prompts If a feature requires access to a specific item like System Events or Finder you will see a...

Page 10: ...omation and then check the boxes under Logitech Options Daemon to provide access If you are unable to interact with the checkboxes please click the lock icon on the bottom left corner and then check t...

Page 11: ...nder Launching Logitech Control Center LCC from Options requires access to System Preferences The following are the user permissions the software needs for you to get complete functionality for your O...

Page 12: ...nd then check the boxes System Events prompts If a feature requires access to any specific item such as System Events or Finder you will see a prompt similar to the screenshot below the first time you...

Page 13: ...to allow access manually 1 Launch System Preferences 2 Click Security Privacy 3 Click the Privacy tab 4 In the left panel click Automation and then check the boxes under Logitech Options Daemon to pr...

Page 14: ...attempting to pair again or pair to another Android 7 x device does not work If you are experiencing this issue please try the following 1 Boot your Andriod 7 x device into Safe Mode This typically in...

Page 15: ...can continue to use its functionality with our software To allow KEXT loading please open System Preferences and navigate to the Security Privacy section On the General tab you should see a message a...

Page 16: ...d Ideally Secure Input should only be enabled while the cursor is active in a sensitive information field such as when you enter a password and should be disabled right after you leave the password fi...

Page 17: ...ivity Monitor from Applications Utilities folder 2 Search for PID which has secure input enabled Once you know which application has Secure Input enabled close that application to resolve the issues w...

Page 18: ...k in browser Back in browser Home Prev track Prev track Prev track Prev track Play Pause Play Pause Play Pause Play Pause Next track Next track Next track Next track Mute Mute Mute Mute Volume down Vo...

Page 19: ...rease brightness Page down Page down Page down Decrease brightness Requires installation of Logitech Options Re pair a Bluetooth device to the K380 keyboard You can easily re pair a device with your K...

Page 20: ...ell phones o Garage door openers Try to rule out these and other possible problem sources that might be affecting your keyboard Keyboard frequently loses connection If your keyboard frequently stops w...

Page 21: ...and reattach the compartment door TIP Install Logitech Options to set up and receive battery status notifications You can get Logitech Options from this product s Download page Switch devices with th...

Page 22: ...ell Wireless 370 adapter and then click Properties 3 In the Properties window click the Power Management tab and uncheck Allow the computer to turn off this device to save power 4 Click OK 5 Restart y...

Page 23: ...if a Bluetooth keyboard mouse or trackpad is not detected as connected to your Mac 4 Click OK Connect the K380 keyboard to an iPad or iPhone You can connect your keyboard to an iPad or iPhone running...

Page 24: ...to the right of the button rapidly blinks blue 7 On your iPad or iPhone in the Devices list tap Logitech Keyboard K380 to pair it 8 Your keyboard may pair automatically or it may request a PIN code t...

Page 25: ...uetooth pairing Most Logitech products are equipped with a Connect button and will have a Bluetooth Status LED Usually the pairing sequence is started by holding down the Connect button until the LED...

Page 26: ...creen instructions to finish pairing NOTE It may take up to five minutes for Windows to download and enable all drivers depending on your computer s specifications and your internet speed If you have...

Page 27: ...eady for 5 seconds The light then turns off to save energy iOS 1 Open Settings and click Bluetooth 2 Tap on the Logitech device you want to connect to from the Other Devices list 3 The Logitech device...

Reviews: