background image

INSTALLATION

10

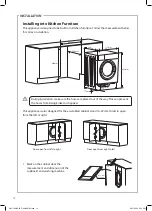
Installing into Kitchen Furniture

This appliance is designed to be built into kitchen furniture. Follow the measurement below 

for correct installation.

830mm

600mm

580mm

550mm

595mm

825mm

17.5mm

152.5mm

During installation, make sure the hoses are placed out of the way. This can prevent 

the hoses from being kinked or trapped.

This appliance is also designed for the assembled cabinet door (16-22 mm thick) to open 

from the left or right.

Door open from left to right

Door open from right to left

1.  Mark on the cabinet door the 

measurement and dimension of the 

cupboard and washing machine.

Door Drill 

Template

LIW714W20_IB_Final200729.indd   10

LIW714W20_IB_Final200729.indd   10

29/7/2020   5:33 PM

29/7/2020   5:33 PM

Summary of Contents for LIW714W20

Page 1: ...ny part of the washing machine It may cause a short circuit or electric shock Keep burning objects such as candles or cigarettes away from the washing machine They may cause a fire or damage Keep flammable substances well away from the washing machine for example kerosene gasoline benzene paint thinner and alcohol or clothing soaked with these They may cause an explosion or a fire This washing mac...

Page 2: ...e Do not touch the mains lead or mains plug with wet hands It may cause an electric shock Check the mains plug regularly for dirt If dirt accumulates on the mains plug it could cause a fire To prevent this unplug the cable and clean the mains plug with a dry rag If you disconnect the mains plug hold onto the mains plug not the cable Pulling the cable may cause an electric shock or a fire Do not us...

Page 3: ...hazards involved Children shall not play with the appliance Cleaning and user maintenance shall not be made by children without supervision Children should be supervised to ensure that they do not play with the appliance Children of less than 3 years should be kept away unless continuously supervised Do not touch the laundry inside the washing machine until the drum has completely stopped Even if ...

Page 4: ...gnated collection point for the recycling of waste electrical and electronic equipment The separate collection and recycling of your waste equipment at the time of disposal will help conserve natural resources and ensure that it is recycled in a manner that protects human health and the environment For more information about where you can drop off your waste for recycling please contact your local...

Page 5: ...7kg Integrated Washing Machine Instruction Installation Manual LIW714W20 LIW714W20_IB_RC_Final200909 indd 1 LIW714W20_IB_RC_Final200909 indd 1 9 9 2020 7 17 PM 9 9 2020 7 17 PM ...

Page 6: ...LIW714W20_IB_Final200729 indd 2 LIW714W20_IB_Final200729 indd 2 29 7 2020 5 33 PM 29 7 2020 5 33 PM ...

Page 7: ...irst Use 17 Wash Setting 17 Standard Washing 17 Removing Washing Once programme is finished 17 Selecting the Programme 18 Delay Start the Programme 19 Important Information 20 Washing Delicates Wool and Silk Programmes 20 Adding Delicate Laundry Items to the Drum 20 Which Detergent to Use 20 How to Set the Child Lock 20 Muting Turning On the Sound 20 Maintenance Cleaning the Washing Machine 21 Cle...

Page 8: ...Hints and Tips 23 Questions and Answers 25 Error Codes 26 Specifications 26 LIW714W20_IB_Final200729 indd 4 LIW714W20_IB_Final200729 indd 4 29 7 2020 5 33 PM 29 7 2020 5 33 PM ...

Page 9: ... 2 Screw A x 8 Screw B x 6 Spacer x 2 Levelling Tool Kit Thank youfor purchasing your new product We recommend that you spend some time reading this instruction manual in order that you fully understand all the operational features it offers Read all the safety instructions carefully before use and keep this instruction manual for future reference If items are missing or damaged please contact Par...

Page 10: ...ace to avoid excessive vibrations and noise Don t install your washing machine in direct sunlight or in a place where temperatures can reach freezing Ò Ò Ò Sloping surface Unstable Bumpy surface The ventilation openings in the base of the washing machine must not be obstructed by carpet Start by tilting the washing machine backwards One person should stand behind it holding the rear of the top pan...

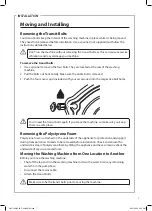
Page 11: ...e you move the washing machine Shut off the tap and run the washing machine to drain the water Drain any remaining water from the pump hose Disconnect the mains cable Attach the transit bolts To remove the transit bolts 1 Use a spanner to loosen the four bolts They are located at the rear of the washing machine 2 Pull the bolts out horizontally Make sure the entire bolt is removed 3 Push the four ...

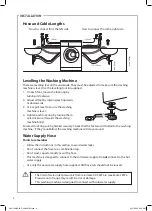
Page 12: ... securely Check that the feet are still bolted to the washing machine if they re unbolted the washing machine will move around Water Supply Hose Points to remember Follow the instructions in this section to avoid water leaks Don t connect the hose to a combination tap Don t twist squash modify or cut the hose This machine is designed to connect to the cold water supply Do not connect to the hot wa...

Page 13: ...Don t twist pull out or bend the drain hose Your washing machine should be no more than 85cm from the drain outlet The water drain hose should be mounted at a height of minimum 60 cm maximum 100 cm from the ground Draining to a sink or wash basin Secure the drain hose in position so it can t drop out of the basin Don t block the basin s drain outlet and make sure that the drainage through it is su...

Page 14: ...e placed out of the way This can prevent the hoses from being kinked or trapped This appliance is also designed for the assembled cabinet door 16 22 mm thick to open from the left or right Door open from left to right Door open from right to left 1 Mark on the cabinet door the measurement and dimension of the cupboard and washing machine Door Drill Template LIW714W20_IB_Final200729 indd 10 LIW714W...

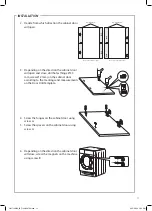
Page 15: ... Drill Template 4 Screw the hinges on the cabinet door using screw A 5 Screw the spacers on the cabinet door using screw A 6 Depending on the direction the cabinet door will close screw the magnets on the machine using screw B 2mm 12mm 35mm 12mm 16 22 mm Door Drill Template Door Drill Template Door open from left to right Door open from right to left LIW714W20_IB_Final200729 indd 11 LIW714W20_IB_F...

Page 16: ...et s go through the checklist to ensure that the installation has been done correctly Questions Checkbox Transit bolts Have you removed them and attached the cover caps properly Polystyrene foam Have you removed all the polystyrene foam from the underside of the appliance Levelling feet Adjustable Feet Are they bolted securely to the washing machine Feet Cushions Are they standing flat Power suppl...

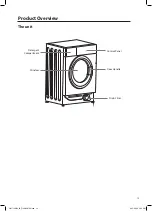
Page 17: ...13 Product Overview The unit Detergent Compartment Control Panel Door Handle Drain Filter Window LIW714W20_IB_Final200729 indd 13 LIW714W20_IB_Final200729 indd 13 29 7 2020 5 33 PM 29 7 2020 5 33 PM ...

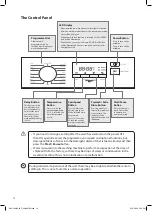
Page 18: ...at the lock state DOOR LOCKED icon will be illuminated The door can be opened only after the light turns off During initial start up and use of the unit there may be a slight smell while the motor is settling in This is not a fault this is normal operation Delay Button This button is used to delay the wash Press continuously to select the time you want to start the wash i e the wash will begin aft...

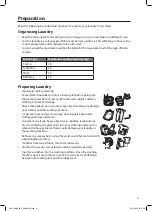
Page 19: ...age your clothes and the washing machine Tie up any loose strings on laundry close zippers and reverse clothing with zips inside out To prevent any large heavy objects e g buckles large buttons etc from hitting the glass door turn your clothing inside out or remove the heavy objects These could damage your laundry or the washing machine Remove any surplus hair animal fur sand and other materials w...

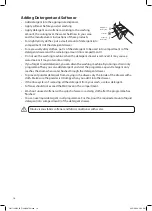
Page 20: ...me Then you can add detergent and start the programme again Detergent only reaches the drum when water flushes through the detergent drawer To prevent powder detergent from staying in the drawer dry the inside of the drawer with a cloth Make sure the powder isn t lumpy when you add it into the drawer If the rinse cycle isn t removing all the detergent from your wash use less detergent Softener sho...

Page 21: ...mpleted Before First Use Before washing your clothes for the first time run a full wash programme first 1 Connect the machine to the mains power supply and the water supply 2 Put a small amount of detergent in the detergent drawer Close the drawer 3 Press the Power button 4 Select a wash programme 5 Press the Start Pause button Removing Washing Once programme is finished Linen Rapid 45 Jeans Open ...

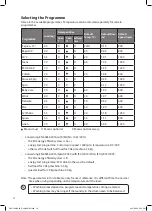
Page 22: ... 5 X O 30 0 50 600 Mix 7 0 O O 40 1 20 800 Synthetic 3 5 O O 40 3 18 1200 Sports 3 5 O O 40 1 11 800 Linen 7 0 O O 40 3 49 1400 Means must O Means optional X Means not necessary Concerning EN 60456 2016 with EU No 1061 2010 the EU energy efficiency class is A energy test programme Cotton spin speed 1400 rpm temperature 60 C 40 C others as the default half load for 7 0kg machine 3 5kg Concerning EN...

Page 23: ...onal X Means not available Delay Start the Programme 1 Select a wash programme 2 Press the Delay button repeatedly to set the delay hours for the programme to start 0 24 hr 3 Press the Start Pause button to confirm and commence the delay function To cancel the delay function before the programme starts press the Delay button repeatedly until 0 hr while the programme is running press the Power butt...

Page 24: ... you use and the amount of foam that develops in the main wash cycle How to Set the Child Lock The Child Lock prevents children from accidentally changing a wash programme 1 Switch on the washing machine 2 When the washing machine is in operation press and hold the Temp and Speed buttons at the same time for 3 seconds to set the child lock The Child Lock icon will light to indicate that the child ...

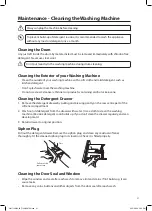
Page 25: ...ners or products containing alcohol or kerosene Cleaning the Detergent Drawer 1 Remove the detergent drawer by pulling and pressing gently on the rear centre part of the softener compartment 2 Wash out old detergent from the drawer with water Use a cloth to clean the washing machine Residue detergent soon builds up if you don t clean the drawer regularly and can develop mold 3 Return drawer to ori...

Page 26: ...filter to remove it 3 Remove any lint and debris before carefully replacing the filter 4 Turn the filter to screw back into place about 50 C Cleaning the Drain Filter Preventing a Frozen Water Supply Hose If your washing machine is delivered in freezing weather conditions leave it at room temperature for 24 hours after you ve set it up before using it This ensures there s no ice blocking the water...

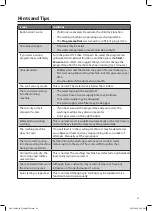
Page 27: ...ter may be clogged There s only a small amount of water If you have paused the programme and you restart the washing machine may drain some water Don t pour water in through the door Water adds up during washing This is normal water is supplied automatically as the level lowers and with heavy loads the water may fill up repeatedly The washing machine does not spin If a small load is in the washing...

Page 28: ...r There s an unusual noise or vibration Check that there s nothing metal in the drum Make sure the transit bolts used in transportation have been removed Check that the washing machine feet have been levelled correctly Check that the washing machine is on a flat stable surface There s a noise when the water drains away This is normal it s the pump starting and stopping The electricity supply cuts ...

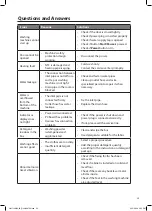
Page 29: ...ed firmly Outlet hose has water leakage Fix the inlet pipe Replace the drain hose Indicator or display does not light Power is disconnected PC board has problems Harness has connection problem Check if the power is shut down and power plug is connected correctly If not please call the service line Detergent residues in the box Washing powder is dampened and agglomerated Clean and wipe the box Use ...

Page 30: ... Door lock problem Check if the door of the washing machine is closed Check if the clothes are pinned by the door Others Please call the service line if there is any other issue Specifications Model LIW714W20 Rated Voltage 220 240 V Rated Frequency 50 Hz Maximum Energy Rated Power Input 1950 W Dimensions of the Product 825mm H x 595mm W x 550mm D Weight of the Product approx 63 kg Washing Capacity...

Page 31: ...LIW714W20_IB_Final200729 indd 27 LIW714W20_IB_Final200729 indd 27 29 7 2020 5 33 PM 29 7 2020 5 33 PM ...

Page 32: ...IB LIW714W20 200909V2 LIW714W20_IB_RC_Final200909 indd 28 LIW714W20_IB_RC_Final200909 indd 28 9 9 2020 7 17 PM 9 9 2020 7 17 PM ...

Page 33: ...14 13 12 11 10 9 8 7 6 5 4 3 1 2 16 15 14 13 12 11 10 9 8 7 6 5 4 3 1 2 A2 EU_A2 FG80 U14_C2006E PM17 EU A2 FG80 U14 C2006E 安装定位纸 尚芳娟 周义华 郝彦龙 王 颖 叶德新 A A 1 1 1 15 8 18 EU_A2 FG80 U14_C2006E PM17 1 1 技术要求 1 尺寸及式样按图纸所示 2 本品应符合美的企标QMY J11 001 产品中限制使用有害物质的标准 白卡纸 33 5mm 33 5mm 172 9mm 337 1mm 5 5mm 23mm 5 5mm 23mm 191 6mm 337 1mm 240mm Top Left Open Right Open 655mm 29mm 29mm 29mm 29mm 3 5 m m 3 5 m m ...

Reviews: