background image

GB-33

Pr

epar

ation

Connec

tions

Initial 

Setup

U

sing 

the 

Fea

tur

es

DVR 

(Dig

ital 


Video 

Rec

or

der)

U

sing 

the 

Fea

tur

es


via 

USB 

por

t

U

sing 

the 

DVD 

Fea

tur

es

H

in

ts 

and 

Tips

, Specifica

tion 


and 

Saf

et

W

ar

nings

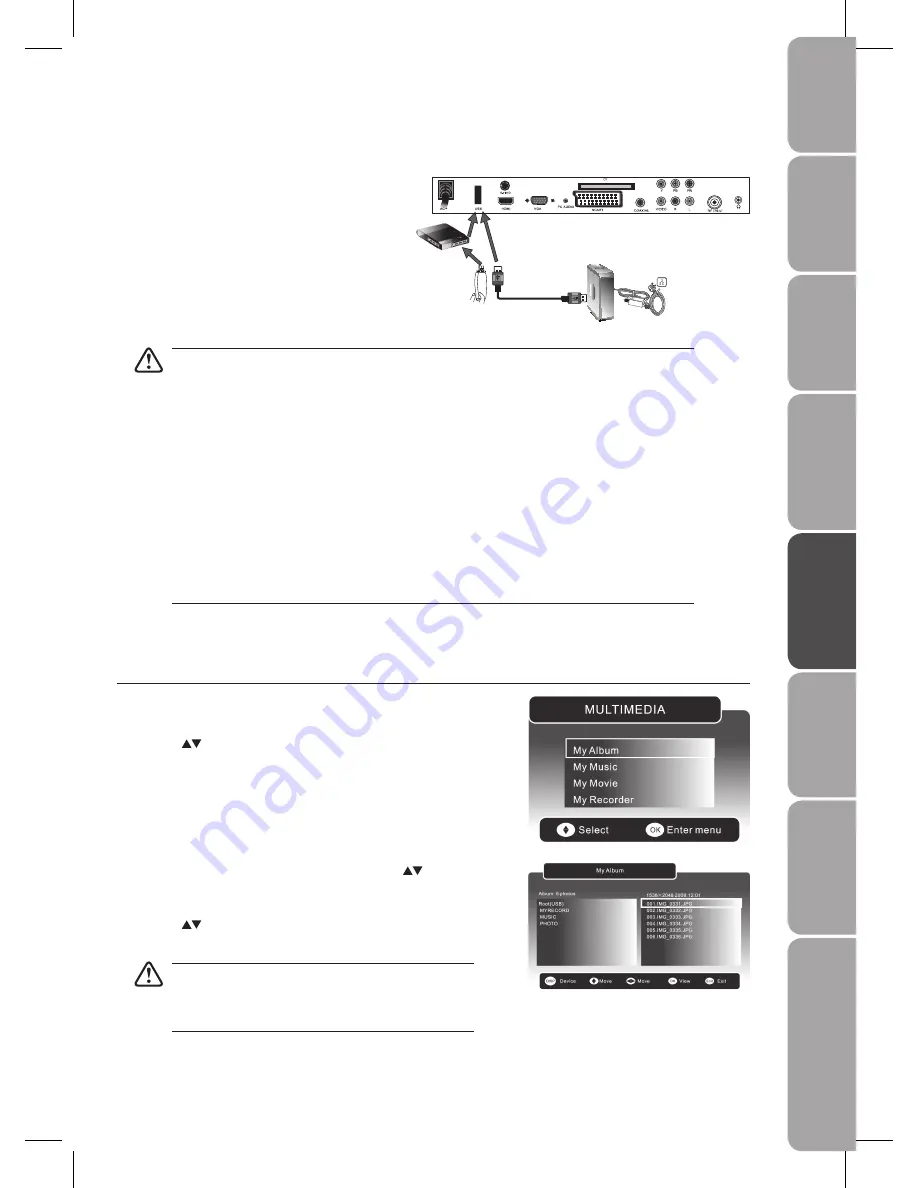
Before Using the Features via USB Port

Switch off the TV before connecting any USB storage 

1. 

device.

Connect your USB storage device to the TV via the 

2. 

USB port.

Switch on the TV now. 

3. 

• 

If a hard disk is used, make sure its mains adapter is connected to the mains supply.
If a USB hub is used, make sure its mains adapter is connected to the mains supply as the total current 

• 

consumption may exceed 500mA.
If a USB hub is used, you may refer to the 

• 

Recording Device

 on page 37 for details on selecting the 

active device when several USB storage devices are connected.
The maximum supported storage space of the hard disk is 1 TB.

• 

The file system only supports FAT32 format.

• 

If you want to store the video streaming of a DTV programme, the transfer rate of the USB storage device 

• 

must not be less than 5MB/s, otherwise the picture and sound of the programme will be affected and 
a warning statement will be shown on the screen. If this happens, please upgrade your USB storage 
device.
The TV screen will be blank temporarily as it will take time to start up and stabilise the connected hard 

• 

disk. This is normal and the starting time may vary depending on the brand and the memory size of the 
connected hard disk.
Disconnect the USB storage device if it is not in use.

• 

Rear View of TV

USB Cable

Adapter

Portable 

hard Disk

USB Hub

USB

My Album

Press the 

1. 

SOURCE

 button and select DTV mode, then press the 

MEDIA


button.

Press the 

2. 

 buttons and then press the 

OK

 button to select 

My Album

Press the 

3. 

BLUE

 button to open the directory. Press the 

 buttons to select 

your desired folder, then press the 

OK

 button to enter the folder. All picture 

files will be listed on the right.

Press the 

4. 

 buttons to select the picture file and then press the 

OK

 button 

to view.

If the current folder has no photos, press the 

OK

 button or 

the 

MENU

 button to select 

ROOT (USB)

 to return to the root 

directory. 
File format supported: JPEG/BMP.

Using the Features via USB Port

Summary of Contents for L24DVDB19

Page 1: ...incorporates the latest technology to enhance your viewing experience We recommend that you spend some time reading this instruction manual in order that you fully understand these features You will also find some hints and tips to help you resolve any issues Read all the safety instructions carefully before use and keep this instruction manual for future reference ...

Page 2: ...ecting the Aerial 15 Initial Setup 15 Turning the TV On for the First Time 15 Selecting the Input Source 16 Channel Selection 16 Volume Adjustment 16 Customising the PICTURE Setting 17 Picture Mode 17 Using the Features 17 Customising the SOUND Setting 18 Sound Mode 18 Stereo Dual Sound Reception Analogue TV Mode 18 Speaker Sound Output Selection DTV Mode 18 Customising the FUNCTION Setting 19 Vid...

Page 3: ...r Programming 41 Using the DVD Features 42 Using the Built in DVD Player 42 Compatible Disc Types 42 Supported Formats 42 Region Code 42 Basic DVD Playback Functions 43 Playing the DVD 43 Menu Playback for DVD 43 Stopping Playback 43 Previous Next for DVD CD JPEG discs 43 Forward Backward for DVD CD JPEG discs 43 Pause for DVD CD JPEG files 43 Repeat for DVD CD JPEG discs 43 Info for DVD CD JPEG d...

Page 4: ...spose it please do so according to local regulations The following items are included TV with TV Base TV Base s part number I 01 526302031 Remote Control AAA Batteries x 2 part number I 14 000000564 and E 17 101570001 AV Cable part number E 14 113150013 Instruction Manual part number I 08 995247700 Quick Start Guide part number I 08 015247700 If items are missing or damaged please contact Partmast...

Page 5: ... and must be protected at all times when removing the base stand Be sure that no hard or sharp object or anything that could scratch or damage the LCD display comes into contact with it DO NOT exert pressure on the front of the TV at any time because the screen could crack Disconnect all cables connected to the TV 1 Lay the TV down on a flat surface with the back side 2 facing up Please make sure ...

Page 6: ...luminate blue when the timer programming has started in the standby mode 3 POWER ON OFF Switch on the POWER ON OFF switch to turn the TV to standby mode 4 Press to insert and eject disc DVD mode 5 Press to start playback or pause DVD mode 6 VOL Adjust the volume Select and adjust setting in OSD menus 7 CH Select a channel Select sub menu of OSD menu 8 MENU Displays the OSD on screen display menu 9...

Page 7: ...ween this TV and any HDMI device such as a set top box Blu ray player and A V receiver 5 VGA PC AUDIO Connect to a PC or other devices with a VGA interface 6 CI Common Interface Slot Allows the insertion of a Common Access Module Refer to page 29 for details 7 SCART Connect to camcorders VCR DVD Player or other AV devices with SCART output jack 8 COAXIAL Connect to the audio jack on the digital st...

Page 8: ...s feature 6 FAV Display the Favourite Channel List FAV Switch between your favourite channels 7 0 9 Number Button Select a programme Select numbered items in a menu 8 Select and switch to a channel that is higher than Channel 9 Analogue TV mode 10 For example for track 23 press 10 twice followed by 3 DVD mode 9 Return to previous viewing channel 10 MEDIA Enter the Multimedia Setup Menu 11 REC One ...

Page 9: ...st with the programme TV DTV mode DVD MENU Displays the OSD on screen display menu DVD mode 23 INDEX Press to select the page number of the Index from teletext TV mode GOTO Press to skip to a specific location on a DVD CD DVD mode 24 SIZE To enlarge the picture on the TV in teletext TV mode ZOOM Zoom in zoom out the displayed frame DVD mode 25 REVEAL Reveal hidden information such as the answer to...

Page 10: ...ire personal injury or damage to property Use only the types of the batteries which are indicated in this manual When the batteries are exhausted the remote will not function Replace both batteries at the same time with new ones Do not install new batteries with used ones and do not mix different types of batteries Do not dispose of used batteries as domestic waste Dispose of them in accordance wi...

Page 11: ...button on the remote control to display the Source List Use the buttons to select AV and press the OK button or the button Not all A V devices have the ability to connect to a TV Please check your A V devices user guides for compatibility Satellite Receiver Rear View of TV AV Cable included Video Camera VCR DVD Player Recorder Set top Box Game Console Yellow VIDEO Yellow VIDEO Red R Red R White L ...

Page 12: ...he TV Press the 3 I button on the top panel of the TV or the button on the remote control to turn on your TV Press the 4 SOURCE button on the remote control to display the Source List Use the buttons to select YPBPR and then press the OK button or the button Connecting an A V Device with SCART Cable Use a SCART cable to connect the external A V 1 device s SCART socket to the TV s SCART IN jack Plu...

Page 13: ...ay Properties set the screensaver as 4 blank instead The TV will not be in standby mode now even though the PC computer is not in use Connecting an A V Device with HDMI Cable This TV can accept High Definition Multimedia Interface HDMI This TV SET supports HDCP High Bandwidth Digital Content Protection Protocol When you connect to the output of an HD ready player Blu ray Disc Player Game Console S...

Page 14: ...ices user guide for compatibility Connecting a Coaxial Audio Receiver For better sound quality you may want to play the DVD audio through your multi channel audio receiver DVD mode Use an audio cable to connect the audio receiver s 1 audio COAXIAL IN jacks to TV s COAXIAL OUT jack Plug the connected devices into the mains socket 2 before switching on the POWER ON OFF switch at the bottom of the TV...

Page 15: ...rn the TV on The red LED indicator will turn blue Always disconnect the TV from the mains socket when not in use for a long period of time The I button on the top panel of the TV or the button on the remote control is only used for switching the TV into standby it does not disconnect the TV from the mains power To completely disconnect the mains power please remove the mains plug from the mains so...

Page 16: ...lect the channel Alternative In DTV mode press the OK button to enter the Channel List Then use the buttons to highlight and select the channel Press the OK button to confirm the setting Press the FAV buttons repeatedly to select the favourite channel if you have previously preset your favourite channels Alternative Press the FAV button to view the Favourite List Then use the buttons to highlight ...

Page 17: ... change the following settings Picture Mode Cycles among display types Personal Standard Movie Mild Game Alternative Press the P MODE button to select the display type directly Brightness Increase or decrease the amount of white in the picture for Personal mode Contrast Adjusts the difference between light and dark levels in the picture for Personal mode Colour Controls the colour intensity for Pe...

Page 18: ...tomatically Press the 4 MENU button to save the settings and return back to the previous menu Press the 5 EXIT button to exit the menu Stereo Dual Sound Reception Analogue TV Mode When a programme is selected press the NICAM button to display the sound information for the selected station Broadcast On Screen Display Mono Stereo Dual MONO STEREO DUAL I DUAL II DUAL I II Mono sound selection If the ...

Page 19: ...ollowing selection will allow you to view the picture in full screen Zoom The following selection will allow you to view the picture without any alteration while filling the entire screen However the top and bottom of the picture will be cropped 4 3 16 9 Customising the FUNCTION Setting Video Size Allows you to watch the screen in various picture formats For analogue TV Mode Auto Full 4 3 14 9 Zoo...

Page 20: ... be set automatically when receiving a digital signal Time must be set before using Sleep Timer OSD Timer function Press the 1 MENU button and then use the buttons to select the FUNCTION menu and then press the button Press the 2 buttons to select SLEEP TIMER Press the 3 buttons to select a period of time after which the TV automatically switches to standby mode 15 30 45 60 75 90 105 120 min OFF T...

Page 21: ...to turn On or Off during weak or no signal conditions Press the 1 MENU button and then use the buttons to select the FUNCTION menu and then press the button Press the 2 buttons to select BLUE SCREEN Press the 3 buttons to turn it ON or OFF Press the 4 MENU button to save the setting and return back to the previous menu Press the 5 EXIT button to exit the menu Child Lock Child Lock is designed to p...

Page 22: ...ess the 7 MENU button to save the setting and return back to the previous menu Press the 8 EXIT button to exit the menu Key Locked Key Locked is designed to prevent children from pressing the buttons on the TV The Lock System must be set to On for this function to operate If the Key Locked is set to On all buttons on the TV will be locked All TV operations can be controlled by the remote control o...

Page 23: ... Select to delete the tuned channels in the TV Search Program Perform search automatically for analogue and digital TV programmes Installation Allows you to set up your TV if you have not previously done so or if you have moved house Press the 1 MENU button and then use the buttons to select the FUNCTION menu and then press the button Press the 2 buttons to select INSTALLATION and then press the O...

Page 24: ...ng Analogue TV Mode Country Allows you to select the country where you are using the TV Press the 1 MENU button and then use the buttons to select the TV menu and then press the button Press the 2 buttons to select COUNTRY Press the 3 buttons to select the country UK Italy Spain France Germany and Other You may now proceed to the Auto Tuning or Manual Tuning 4 Auto Tuning Use this to automatically...

Page 25: ...d system Auto Fine Tune AFT To fine tune the channel automatically when the signal is weak Manual Tuning Performs manual search for analogue TV programmes Press the buttons shortly to adjust channel frequency and press for a long time to begin searching Press the 3 MENU button to save the setting and return back to the previous menu Press the 4 EXIT button to exit the menu Channel Edit Allows you ...

Page 26: ...channel and then press the OK button Key in the character by press the b OK button on the remote control Press c the buttons and then the button to select OK displayed on the screen when finished Press the 4 MENU button to save and return back to the previous menu Press the 5 EXIT button to exit the menu Customising the TV Settings DTV Mode Auto Tuning Use this to automatically find and store all ...

Page 27: ...nu Channel Edit Allows you to edit DTV programmes in the Channel List Press the 1 MENU button and then use the buttons to select the DTV menu and then press the button Press the 2 buttons to select CHANNEL EDIT and then press the OK button or the button To Lock 3 Press the a BLUE button on the remote control Press b the buttons to highlight a channel Press the c OK button to lock the channel Press...

Page 28: ...ying the password window When recording a locked or rated programme the recorded programme will be locked unless you enter the password before the recording is finished If you wish to play the locked programme you should enter the password Press the 1 MENU button and then use the buttons to select the DTV menu and then press the button Press the 2 buttons to select RATING Press the 3 buttons to se...

Page 29: ... or remove the Common Access Module as this may damage the interface and cause a malfunction This feature is not available in all countries To insert the Common Access Module Before you insert the Common Access Module 1 ensure that the TV is switched off and the viewing card is inserted in accordance with the Service Provider s instructions Insert the Common Access Module into the slot 2 Flip the ...

Page 30: ...ased on the VGA mode Clock Control the signal clock which can improve the image stability based on the VGA mode Auto Adjust Allows you to synchronise VGA signal automatically Press the 4 MENU button to save the settings and return back to the previous menu Press the 5 EXIT button to exit the menu Customising the TV Settings HDMI and YPbPr Modes Allows you to adjust the displayed content Press the ...

Page 31: ... watching a TV programme press the TEXT button twice The text will be superimposed over the TV programme Page search while watching TV Press the CANCEL button while watching TV with teletext enter the page number you want by using the 0 9 buttons The top line of the text page will appear while the text searches for your page When the page is found the number will remain in the top left hand corner...

Page 32: ... information such as programme listings start and end times for all available services In addition detailed information about the programme is often available in the EPG the availability and amount of programme information will vary depending on the particular broadcaster This function can be used only when the EPG information is broadcast by broadcasting companies The EPG displays the programme d...

Page 33: ...ice must not be less than 5MB s otherwise the picture and sound of the programme will be affected and a warning statement will be shown on the screen If this happens please upgrade your USB storage device The TV screen will be blank temporarily as it will take time to start up and stabilise the connected hard disk This is normal and the starting time may vary depending on the brand and the memory ...

Page 34: ...ous menu Press the 9 EXIT button to exit the menu Press the 5 MEDIA button to return to Thumbnail view Press the buttons to navigate in the thumbnail view Press the OK button to select the photo you want to view Press the 6 DISPLAY button to display the function bar Press the RED button to zoom in the picture Press the GREEN button to display the music folder so you can play music at the same time...

Page 35: ...playback Press the GREEN button repeatedly to play the movie frame by frame Press the RED button to resume the playback Press the YELLOW button to set a fast backward speed to view the movie Press the RED button to resume the playback Press the BLUE button to set a fast forward speed to view the movie Press the RED button to resume the playback Press the buttons to view previous next movie Press t...

Page 36: ...he a buttons to select the recorded programme you want to view Press the b GREEN button to preview the recorded programme then press the OK button to play the selected programme If the selected programme was stopped before it had finished the last time you viewed it the DVR PLAY OPTION will pop up Press the buttons to select between Play From Start Play From Last Viewed Press the OK button to conf...

Page 37: ...g Device Press the 2 buttons to adjust the settings Device Type Indicates that a USB device is connected Slot Select the active USB storage device connected to the USB hub slot 1 2 3 4 Partition Select the active partition 1 2 max 15 on the selected USB device Press the 3 RED button to select Format Press the OK button to confirm All data will be lost from the formatted partition Press the GREEN b...

Page 38: ...test record duration is 15 minutes Press the 3 MENU button or the MEDIA button to save the settings and return to the previous menu Press the 4 EXIT button to exit the menu Recording Preference In the 1 DVR SETUP menu press the buttons and then press the OK button to select Recording Preference Hard disk size Approximate hour can be recorded 40 GB 20 hrs 80 GB 40 hrs 160 GB 80 hrs 320 GB 160 hrs 6...

Page 39: ...ift Mode During the normal TV viewing you may press the button to virtually pause the live viewing broadcast programme if you want to go out for a while e g going to the bathroom kitchen When you have returned press the button to play the missed broadcast programme The DVR Time Shift progress bar will be displayed on the screen The progress bar will hide automatically after 3 seconds Press DISPLAY...

Page 40: ... record duration The Record Duration menu will be displayed The longest record duration is 8 hours the shortest record duration is 15 minutes Press the 3 OK button to confirm and start recording The current recording status will be displayed in the top left hand corner of the screen To stop recording press the 4 button and then press the OK button to confirm Recording will stop automatically when ...

Page 41: ...ter Details menu for recording setting CN Input Select the channel no Date Set the recording date Time Set the starting time of recording Duration Set the duration of recording DVR Set YES for programme recording and NO for programme reminder Repeat Set repeat function among Daily Weekly Mon Fri Mon Sat NO Subtitles Set subtitles to be included during recording Press the 4 buttons to select CN Dat...

Page 42: ...D R CD Recordable Audio Video format or JPEG files AUDIO VIDEO JPEG CD RW CD Rewritable Audio Video format or JPEG files AUDIO VIDEO JPEG AUDIO CD Compact Disc Digital Audio AUDIO Supported Formats JPEG The file extensions has to be jpg and not jpeg Pictures encoding must comply with JPEF ISO format This DVD player can only display DCF standard still pictures or JPEG pictures such as TIFF Maximum ...

Page 43: ...ack Press the button to play the next Title Chapter Track If the current track is the first one pressing the button will stop the playback If the current track is the last one pressing the button sill stop the playback For DVD discs the above functions may very due to different DVD disc s structure Forward Backward for DVD CD JPEG discs There are 4 speeds for forward Press the button to toggle bet...

Page 44: ...between different audio modes in sequence For CD discs Stereo MonoL MonoR Some disc may contain multi languages which can be selected by pressing the AUDIO button Repeat A B for DVD CD When playing DVD CD disc press the A B button to repeat certain content Press the A B button on the start point A and the end point B to select the repeat part Press the A B button a third time to cancel the A B but...

Page 45: ...This format is used by some other counries e g USA PAL This is the format used in UK AUTO This format can be used if your TV DVD is capable of both PAL and NTSC formats and this is the default setting PAL format is generally used for TV s in the UK If NTSC is selected with a non compatible television you may experience interference or picture scrolling SCREEN SAVER Screen Saver When the player sto...

Page 46: ...e level set will not be played The parental lock can only be changed after inputting the correct password This function is available only when the discs have ratings encoded on them DEFAULT DEFAULT To restore all setup parameters to the factory settings EXCEPT the password This function is available in stop state or when the tray is opened Using the DVD Language Setup Page If the signal source is ...

Page 47: ...e the disc playback function will not be available Option Description AUDIO OUT SPDIF OFF Set as default there will be no digital audio signal output SPDIF RAW Set as default the digital audio signal output will be in RAW format Normally this mode is used for DTS signal and Dolby digital signal SPDIF PCM Set as default the digital audio signal output will be in PCM format Normally this mode is use...

Page 48: ...ONO STEREO The player will output both left channel and right channel audio MONO L It means that the player will output left channel audio only MONO R The player will output right channel audio only MIX MONO The player will output the average signal of the left channel and right channel audio This setting is used to play Dolby AC 3 encoded 2 channel discs This setting may not be adjustable for som...

Page 49: ...use alcohol benzine paint thinner cleaning fluid or other chemicals Do not use compressed air to remove dust Handling Discs Do not touch the playback side of the disc Do not attach paper or tape to disc Cleaning Discs Fingerprints and dust on the disc cause picture and sound deterioration Wipe the disc from the centre outwards with a soft cloth Always keep the disc clean If you cannot wipe off the...

Page 50: ...ables are connected properly Horizontal Vertical bas or picture shaking Check for local interference such as an electrical appliance or power tool Poor reception on some channels Station or cable channel may be experiencing problems tune to another station Station signal is weak reposition the aerial for better reception Check for sources of possible interference Lines or streaks in pictures Check...

Page 51: ...ne it you should get all the Freeview channels available to you If problems persist you may need to get your aerial checked Talk to your retailer or contact your local aerial installer Why do I get blocking on my digital picture In most cases blocking is caused by a reception problem either the signal is too weak or there is some kind of interference Talk to your retailer or contact your local aer...

Page 52: ...x 480 60 Full 4 3 480I 720 x 480 Full 4 3 576P 720 x 576 50 Full 4 3 576I 720 x 576 Full 4 3 720P 1280 x 720 50 Full 4 3 60 1080I 1920 x 1080 50 Full 4 3 60 Full 4 3 1080P 1920 x 1080 50 Full 4 3 60 Full 4 3 VGA Mode Please check the display settings of your computer before connecting to the TV If the display setting of your computer does not match the TV there may be no video Resolution Vertical ...

Page 53: ...1920 pixels horizontal x 1080 pixels vertical Television System PAL I BG DK SECAM L BG DK Brightness 250 300 cd m2 Contrast Ratio 600 800 1 Inputs Output SCART 1 HDMI 1 PC VGA IN 1 PC AUDIO IN 1 S VIDEO 1 YPbPr 1 CI 1 USB 1 DVD 1 AV IN 1 AUDIO IN RCA 1 L R COAXIAL 1 RF IN 1 Speaker Power 3 W 3 W Head phone 3 5mm 1 Power Source 100V 240V 50 60Hz Dimension W x D x H with base 585 x 102 x 427 mm Weig...

Page 54: ...cm at the top Safety Always disconnect the unit from the mains supply before connecting disconnecting other devices or moving the unit Unplug the unit from the mains socket during a lightning storm Mains Cable Make sure the unit or unit stand is not resting on top of the mains cable as the weight of the unit may damage the mains cable and create a safety hazard If the mains cable is damaged it mus...

Page 55: ...l Never let anyone especially children push anything into the holes slots or any other openings in the case this could result in a fatal electric shock DVD Class 1 Laser Product This unit utilises a laser Use of controls adjustments or performance of procedures other than those specified herein may result in hazardous radiation exposure Before moving the unit ensure the disc tray is empty Always r...

Page 56: ...o the environment To preserve our environment dispose of used batteries according to your local laws or regulations Do not dispose of batteries with normal household waste For more information please contact the local authority or your retailer where you purchased the product HDMI the HDMI Logo and High Definition Multimedia Interface are trademarks or registered trademarks of HDMI Licensing LLC T...

Reviews: