background image

22 //ADJUSTABLE BED FRAME - OWNER’S MANUAL

ACTIVATING THE CHILD LOCK

Always activate the Child Lock when children are near the Bed Frame. Proceed as follows:

1.  Press and hold the Child Lock Button for at least three seconds
2.  Ensure that the LED Array shows “L”. This means the Child Lock is active
3.  To de-activate the Child Lock, press and hold the Child Lock Button for at 

least three seconds

IMPORTANT

Wireless Sync Mode allows you to control two Bed Frames with one Remote Control. If  you 
only have one Bed Frame, or if your Remote Control does not support Wireless Sync, conti-
nue reading at the next chapter. 

WIRELESS SYNC MODE

Before you activate Wireless Sync Mode, please ensure:


Both Bed Frames are standing next to each other


The Bed Frames will not collide with each other when moving


Each Bed Frame can be controlled using its own Remote Control

PERFORMING A FLAT POSITION RESET

To perform a Flat Position Reset, press the 

Sleeping Position Button 

for at least 15 seconds, 

then: 

1. 

The Remote Control displays “F” to confirm the input. 

2. 

Press and hold the Sleeping Button again to move the bed to the flat position

3.  The Reset is complete 


If two beds are in Wireless Sync Mode, turn off Wireless Sync and reset each bed separately.


MOVING THE BED FRAME TO A SAVED MEMORY POSITION

Proceed as follows to move the Bed Frame to a saved Memory Position:

1.  Press the Memory Position Button for the Memory Position you wish to 

move to (for less than three seconds)

2.  Wait for the Bed Frame to move to the saved Memory Position

MOVING THE BED FRAME TO THE SLEEPING POSITION

3. 

The Sleeping Position is the Bed Frame’s lowest position. While in the Sleeping Position, all 
Platforms are horizontal. Proceed as follows to move the Bed Frame to the Sleeping Position:

1.  Press the Sleeping Position Button (do not hold the Button)
2.  Wait for the Bed Frame to move to the Sleeping Position

Summary of Contents for SILVERlite

Page 1: ...Document Version 4 April 2019 OWNER S MANUAL ADJUSTABLE BED FRAME...

Page 2: ...reproduce the document are reserved No part of this manual may be reproduced mechan ically electronically or by other means in any form without prior written permission of LOGIC DATA Electronic Softwa...

Page 3: ...nimals are in the proximity of the Bed Frame when operating it Ensure nothing obstructs the Bed Frame s range of motion e g night stands or open windows Do not sit directly on any Platform when operat...

Page 4: ...e or Platforms at any time Exceeding the recom mended maximum load could damage the product and void the warranty Usage outside of the intended use described in this Owner s Manual is only allowed wit...

Page 5: ...WARNING The signal word WARNING indicates a hazardous situation which if not avoided could result in death or serious injury NOTICE The signal word NOTICE indicates a situation that will not lead to...

Page 6: ...y for its intended use as described in these instructions Do not use attachments not recommended by the manufacturer Never operate the Bed Frame if it or any parts have a damaged Cable or Plug are not...

Page 7: ...s or open windows WARNING Moderate risk of death or serious injury in explosive atmospheres Operating the Adjustable Bed Frame in potentially explosive atmospheres may lead to death or serious injury...

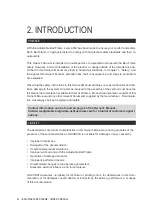
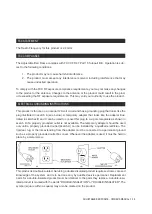
Page 8: ...t all times Product documentation consists of this Owner s Manual and any other relevant documents supplied by the manufacturer Documenta tion must always be kept complete and legible 2 INTRODUCTION L...

Page 9: ...illustrated in sketch A see below A temporary adapter that looks like the adapter illus trated in sketches B and C can be used to connect this plug to a 2 pole receptacle as shown in sketch B if a pro...

Page 10: ...list to ensure all the parts are present and in perfect condition If any part is damaged or missing contact LOGICDATA You can find the relevant contact details at the beginning of the Owner s Manual...

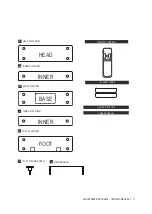
Page 11: ...OWNER S MANUAL QUICK START GUIDE OWNER S MANUAL REMOTE CONTROL 2x AAA BATTERIES HEAD PLATFORM BASE PLATFORM F H 16X PLATFORM SCREW O N RETAINER BAR L INNER PLATFORM M FOOT PLATFORM HEAD BASE INNER FOO...

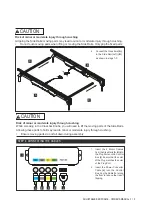
Page 12: ...duct NOTICE Ensure all parts are at room temperature Parts that are too cold or hot may affect assembly CAUTION Risk of minor or moderate injury through cutting Contact with sharp edges may lead to mi...

Page 13: ...s are parallel and roughly 5 feet 150 cm apart Use the labels on the Side Rails to ensure they are oriented correctly Use the Crossbars to determine the position of the Side Rails The Side Rails shoul...

Page 14: ...the Knob counter clockwise until it is hand tight D E REMOVE STRAPPING TAPE REMOVE PROTECTIVE MATERIAL CAUTION Risk of minor or moderate injury through crushing The Side Rails are not secured while th...

Page 15: ...e injury through crushing While screwing in the Crossbar Knobs you will need to lift the moving parts of the Side Rails Allowing these parts to fall may lead to minor or moderate injury through crushi...

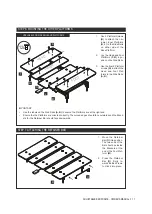
Page 16: ...Platform Screws N to fix the Platform by hand Turn each screw until it is hand tight H A B N STEP 5 MOUNTING THE BASE PLATFORM 1 Lay the Base Platform H upside down across the Bed Frame The Net should...

Page 17: ...de Rails on either side of the Base Platform 2 Lay the Head and Foot Platforms F M in po sition on the Side Rails 3 Use the final 8 Platform screws N to attach the Head and Foot Plat forms to the Side...

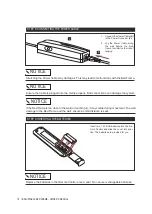
Page 18: ...oo close to the wall or touching it it may collide during movement To avoid damage to the Bed Frame and the wall ensure a small distance is kept STEP 8 CONNECTING THE POWER CABLE NOTICE Stretching the...

Page 19: ...le To lift the Bed Frame 1 Ensure that the Bed Frame has first been moved to the Sleeping Position 2 Stand at opposite sides of the Bed Frame long sides and grip the Base Platform NOTICE Moving the Be...

Page 20: ...stable Bed Frame is supplied with a Remote Control Your Remote Control allows you to operate the Bed Frame from a distance of 23 feet 7 m The Remote Control supplied with your product depends on the m...

Page 21: ...mory Position Button to save the position The Bed Frame will move until the Button is released or the highest lowest position is reached PAIRING THE REMOTE CONTROL You must pair the Bed Frame to a Rem...

Page 22: ...Remote Control PERFORMING A FLAT POSITION RESET To perform a Flat Position Reset press the Sleeping Position Button for at least 15 seconds then 1 The Remote Control displays F to confirm the input 2...

Page 23: ...th Remote Controls blinks for 5 seconds When the blinking stops the two Bed Frames have been paired If the Bed Frames do not move together repeat the steps making sure the Sync Indicator on both Remot...

Page 24: ...technical difficulties contact LOGICDATA using the details on page 2 7 CLEANING AND MAINTENANCE WARNING Moderate risk of death or serious injury through electric shocks Leaving the Bed Frame plugged i...

Page 25: ...es not respond when Buttons are pressed Parts of the Bed Frame re main in an elevated posi tion after a power failure POSSIBLE CAUSE SOLUTION 1 The Bed Frame is not connected properly Check the power...

Page 26: ...tructions in the section Fixing Misalignment to realign the Bed Frames WARNING Moderate risk of death or serious injury to children Operating the Power Converter or performing an Emergency Lowering us...

Page 27: ...his product should not be disposed of with regular household waste Adhere to the disposal procedures for the raw materials and components used Recycle as many parts as possible Careless or incorrect d...

Page 28: ...BLANK PAGE...

Reviews: