background image

User Manual 


CBX-1 / CBX-2 


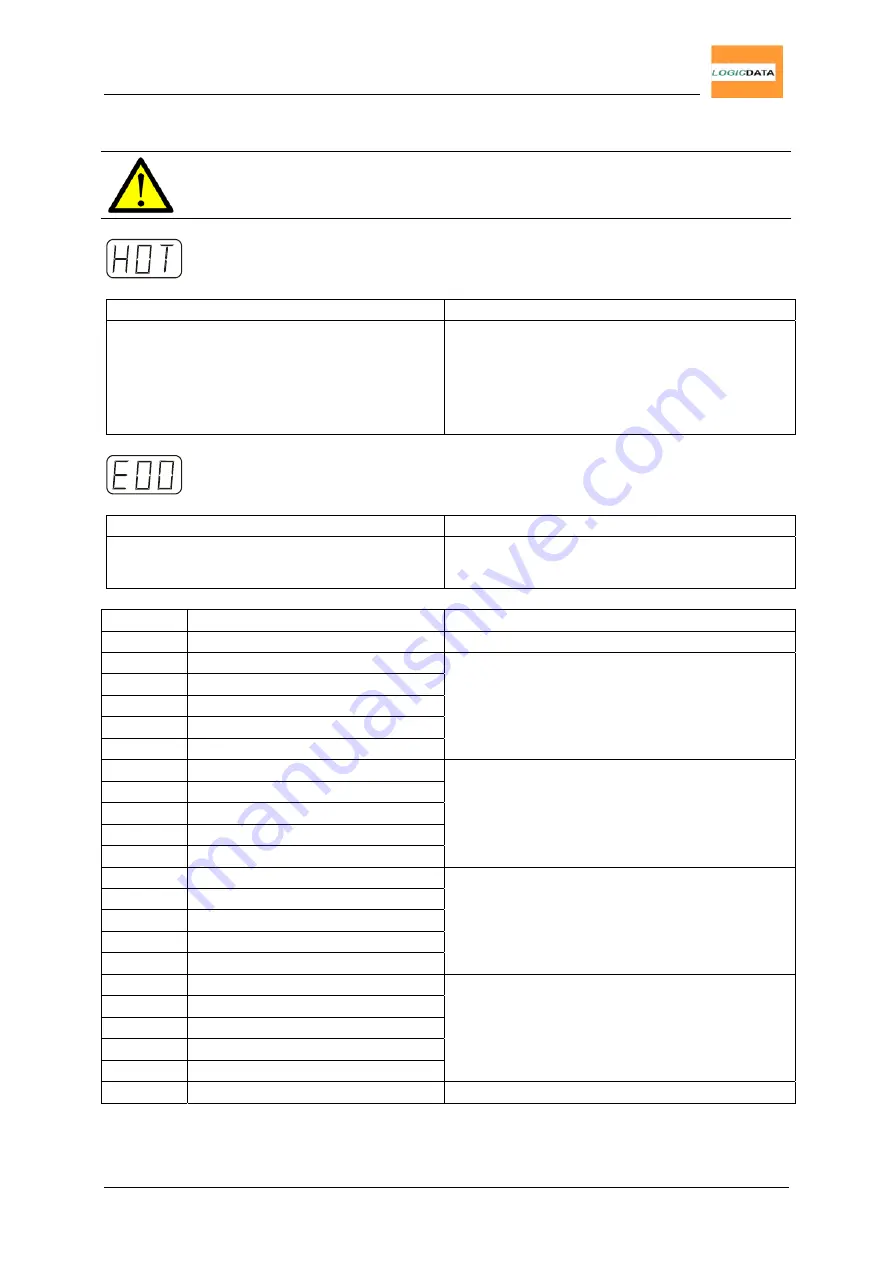
6.2  Displayed Error Messages 


Note:

 Error messages will only be displayed on handsets with a 

display!  


The display reads 

HOT


Cause Solution 

The CBX control box is equipped with 
duty cycle monitoring. If the predefined 
on-time is exceeded, this protection 
mechanism gets activated (refer to 
chapter 4.3.5). 

Wait until the control box has cooled 
down and the displyed 

HOT 

goes out. 

Then, the control box is ready for use 
again. 


The display reads 

E

 + a error code. 


Cause Solution 

An internal error occured. 

Proceed according to the following error 
list:  


Code Description 

Solution 

00 No 

error 


01 

Relay of motor 1 is stuck 

02 

Relay of motor 2 is stuck 

03 

Relay of motor 3 is stuck 

04 

Relay of motor 4 is stuck 

05 

Relay of motor 5 is stuck 

Unplug the control box. Contact our 
customer service. 

06 

Mosfet of motor 1 defective 

07 

Mosfet of motor 2 defective 

08 

Mosfet of motor 3 defective 

09 

Mosfet of motor 4 defective 

10 

Mosfet of motor 5 defective 

Unplug the control box. Contact our 
customer service. 

11 

Motor 1 socket shorted 

12 

Motor 2 socket shorted 

13 

Motor 3 socket shorted 

14 

Motor 4 socket shorted 

15 

Motor 5 socket shorted 

Unplug the control box. 
Eliminate the external short-circuit. 
Put the control box into operation again. 

16 

Motor 1 socket plug detection 

17 

Motor 2 socket plug detection 

18 

Motor 3 socket plug detection 

19 

Motor 4 socket plug detection 

20 

Motor 5 socket plug detection 

Connect a motor to the corresponding 
motor socket. 

21 

Oscillator defective 

Contact our customer service. 


Page 25/29 

Summary of Contents for CBX-1

Page 1: ...Availability and specifications are subject to change without prior notice LOGICDATA assumes no liability for maloperation or improper use of products LOGICDATA will at point of delivery replace repai...

Page 2: ...e CBX control box 13 4 1 Basic Functionality 13 4 1 1 Desk Upwards 13 4 1 2 Desk Downwards 13 4 2 Advanced Functionality 14 4 2 1 Saving a Position 14 4 2 2 Moving to a Saved Position 15 4 2 3 Change...

Page 3: ...y allowed with permission of LOGICDATA The basic functionality is up down movement of the desk doable with any handset 1 2 Functionality CBX 1 CBX 2 The motor control boxes CBX 1 CBX 2 offer following...

Page 4: ...ous Knowledge This user manual is intended for the following audience Assembly personnel which assembles and starts up the height adjustable desks mount control box and motors configure the control bo...

Page 5: ...or life and health of individuals Neglecting this advice may cause dangers to health fatal injury and damage to property Caution This safety instruction warns of dangerous current Neglecting this advi...

Page 6: ...page 29 1 7 Unpacking The CBX motor control comes packaged in a cardboard box Some components are additionally heat sealed in plastic foil To unpack proceed as follows 1 Remove the cardboard and plast...

Page 7: ...ice itself 1 8 1 General Safety Instructions Note Carefully read the user manual before you mount operate the LogicS control box Caution Do not open this unit Risk of electric shock is present Caution...

Page 8: ...ated protection systems a certain bruise hazard may be present Danger Modification of the control box control elements and handsets is prohibited Danger Do not operate the unit in explosion hazardous...

Page 9: ...s 1 pencil 1 drill machine to pre drill the holes Caution Unplug the power cord while mounting the CBX control box To install the control box proceed as follows 1 Position the control box on the desk...

Page 10: ...2 The desk has to be prepared for height adjustment Danger The initial operation of the control box must be carried out by qualified personnel only 3 1 CBX Interfaces The motor control box CBX CBX 1...

Page 11: ...y use various LOGICDATA handsets with th CBX control box For detailed information refer to chapter Optional Products page xx 3 2 1 3 Connect Optional Components If you want to use a squeeze line you c...

Page 12: ...ple The following figure illustrates the interface connections of an example configuration This example configuration consists of c 1 CBX control box d 2 Motor drives hidden in the table legs e Handse...

Page 13: ...varies depending on the used handset Functionality described in this chapter can be accessed with any LOGICDATA handset 4 1 1 Desk Upwards This function allows for an easy upwards height adjustment of...

Page 14: ...ons are equal to the lowest possible desk height lower end position 1 Move the desk to the position you want to save The display reads the actual height of the desk e g 73cm 2 Press the S key The disp...

Page 15: ...the saved position is reached If you release the key before reaching the saved position the desk stops and the saved position will not be reached 2 The desk has reached the saved height Release the p...

Page 16: ...f the desk cannot be changed with this procedure Only the displayed height is being modified 4 2 4 Manual Reset In case of the desk being misaligned or if you want to to use a pre configured control b...

Page 17: ...until the control box clicks once 4 Press key desk up again until the control box double clicks 4 2 6 End Position Alignment The end position alignment procedure has to be carried out on initial opera...

Page 18: ...wer end position at half speed hold the key until the desk hits the mechanical block and the control box clicks 3 Now the control box is ready for normal operation 4 3 2 Safety Area This function caus...

Page 19: ...r to page 4 4 After the pinch protection function has triggered squeeze line the desk automatically moves in the opposite direction for a pre defined distance 4 3 5 Duty Cycle Monitoring The duty cycl...

Page 20: ...BX CBS and CBB control boxes If you decide to use a squeeze line with these control boxes you have to order the pinch protection module separately 4 4 1 ACS CB PINCH Interfaces The ACS CB PINCH module...

Page 21: ...with 2 screws in the holes on the bottom side of the desk top 4 Connect the squeeze line to the interfaced of the module assuming the squeeze line is already mounted to the bottom side of the desk top...

Page 22: ...85 non condensing Storage Humidity 5 90 non condensing Protection Class II Mains Cable 3 m Dimensions L B H mm 203 x 107 x 53 Technial Data CBX 2 XXX 220VA Switching Capacity 10 1 min on 9 min off 220...

Page 23: ...Label The following figure shows the type label and its location on the control box housing Note Specifications on the type label are dependent on the version of the CBX control box see technical data...

Page 24: ...rectly Defective control box Contact our customer service Defective handset Exchange the handset Drives only move in one direction Possible Cause Solution Defective control box Contact our customer se...

Page 25: ...3 Relay of motor 3 is stuck 04 Relay of motor 4 is stuck 05 Relay of motor 5 is stuck Unplug the control box Contact our customer service 06 Mosfet of motor 1 defective 07 Mosfet of motor 2 defective...

Page 26: ...ze Line The squeeze line has to be fixed to the bottom side of the desk top When the squeeze line is pinched e g legs objects during downwards movement of the height adjustable desk the motor control...

Page 27: ...Simple handset with UP DOWN function Robust Cost efficient Compact size HSE OD 2 LD Integrated handset with UP DOWN function Simple installation Without display Embedded in the desk top HSE MDF 2 LD...

Page 28: ...LIGHT Infrared handset Standard No cable Ergonomic design 2 channels 2 motor groups 2 memory positions HSU OD 2 LD Simple handset with UP DOWN function 2 Keys Silver syling Soft Touch keys HSU OD 4M2...

Page 29: ...ions when disposing of the CBX control box Note Dispose of the components ecologically sound separate plastic from electronics parts Same applies to components like squeeze line drives cables etc 7 2...

Reviews: