background image

Start-up

  Navigation in the Menu

In these operating instructions, the arrow buttons on the 

Assist

 Remote Control 

are shown as follows:

In the text, the arrows correspond to: "

".

The OK button on the remote control is shown as 

OK

 in the text.

Call up the 

Setup

 menu.

Select required option.

Previous menu.

Close menu.

Confirm 

OK

.

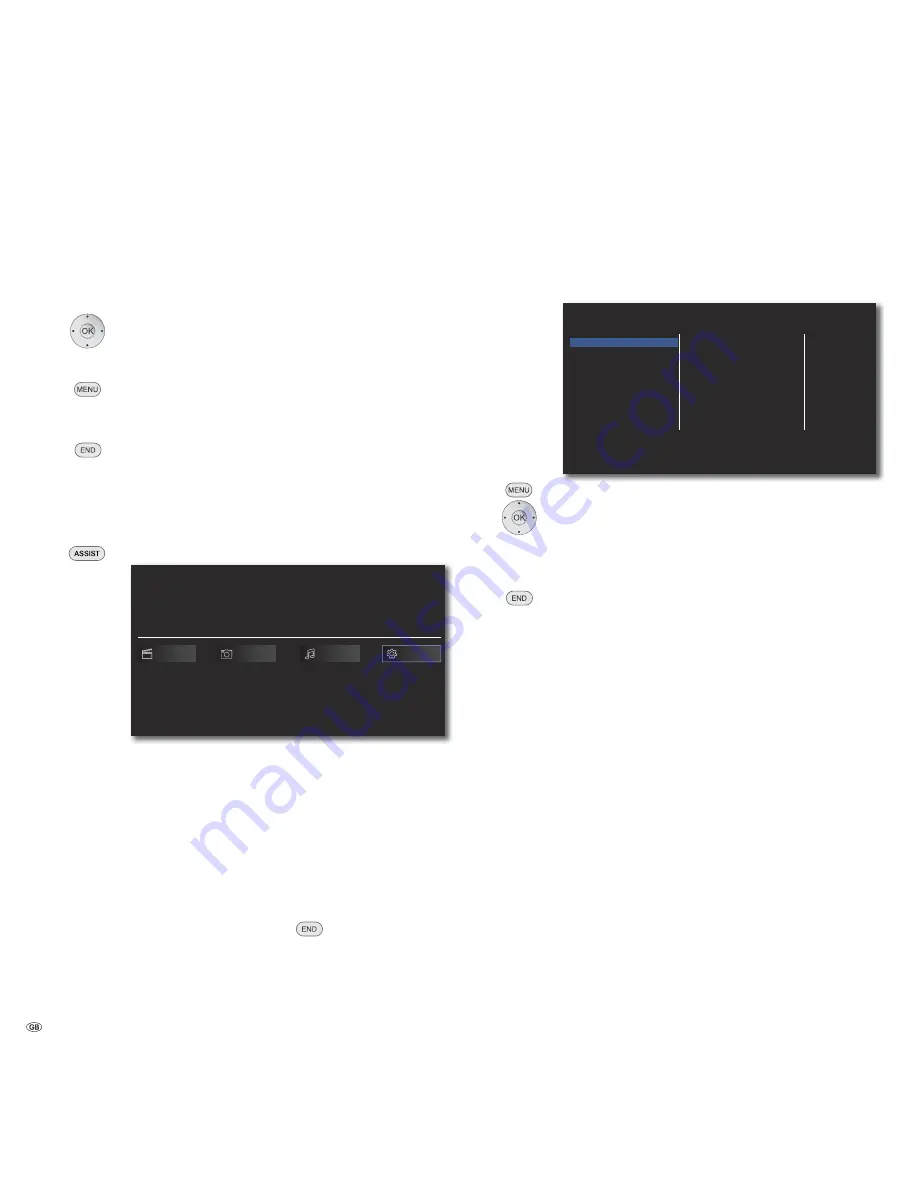
  Home  Menu

The Home Menu of the 

BluTechVision Interactive

 is shown on the screen of the 

TV set connected to it. Here you can select the desired functions.

Call up Home Menu.

BluTechVision Interactive

Movie

Setup

Photo

Music

Select the desired function.

Confirm 

OK

.

 Movie 

Display of 

Movie

 menu (page 29) for playback of 

video files

 Photo 

Display of the 

Photo 

menu (page 32) for photo file 

playback

 Music 

Display of 

Music 

menu (page 31) for playback of 

audio files

 Setup 

Display of 

Setup 

menu (page 14) to make settings

 In order to call up the Home Menu it may be necessary to 

close other open menus with 

.

 The 

Movie

Photo

Music

 menus can be selected when a 

corresponding medium is available.

  Setup  Menu

In the 

Setup

 Menu you can carry out any settings and adaptations of your TV 

set, for example.

TV Aspect Ratio

Resolution

1080p Display Mode

HDMI Color Setting

DISPLAY

LANGUAGE

AUDIO

LOCK

NETWORK

OTHERS

16:9 Original

1080i

50Hz

YCbCr

Call up the 

Setup

 menu.


 Select the desired category.


Select the desired sub-category.


Make the desired setting.

Confirm 

OK

.

Close menu.

 If the blue bar for menu selection appears at the first level 

(left), you will see the current settings in the overview at the 
third level (right).

 - 14

Summary of Contents for BluTechVision Interactive

Page 1: ...233 33997 020 User Guide BluRay Player BluTechVision Interactive...

Page 2: ...ral times Press Search backwards extended then press several times Next Previous Chapter P Volume V Individual frame press several times Slow motion press for a long period then press several times Ot...

Page 3: ...age 29 Select Setup menu page 14 Yellow button Zoom Zoom in page 26 Blue colour button Short Set Marker page 26 Long Show Open Markers page 26 Playback page 24 Short next chapter page 24 Long Search f...

Page 4: ...23 Connecting 10 11 23 Connection options 7 D Device buttons 12 Digital Link HD HDMI CEC 13 Digital Sound Formats 25 Disc Languages 15 Disc Menu 26 27 Disc Playback 25 Display 16 Disposal 33 DivX Reg...

Page 5: ...Switching On Off 13 Digital Link HD 13 Digital Link HD HDMI CEC 13 Navigation in the Menu 14 Home Menu 14 Setup Menu 14 Language Menu 15 Menu Display 16 Menu Audio 17 Menu Lock 18 Network Menu 20 Othe...

Page 6: ...und output Fast forward Stop Playback Pause Rewind IR Receiver Open Close Disc Drawer Screen Resolution On Switching Off in Standby Operating display Mains Socket 2CH AUDIO OUT analogue sound output s...

Page 7: ...ay discs Playback from Audio CDs CD R and CD RW Discs Playback from DVD Video DVD ROM and DVD RW Discs DVD Upscaling 720p 1080p Operation using drive buttons on the device and Assist remote control Me...

Page 8: ...device up so that the infrared signal of the remote control can directly reach the display of the Player or if this is not possible refer to Digital Link HD HDMI CEC page 13 Do not place any strong a...

Page 9: ...ion Interference with the internal workings of the unit Do not place any burning candles or anything filled with a liquid such as vases on the unit Do not cover ventilation slits with magazines or bla...

Page 10: ...ve to a network connection e g Switch or DSL Router with a connection to the internet Plug the small connector of the mains cable into the socket behind the unit page 6 and then plug in the large conn...

Page 11: ...r your audio equipment you need to make an audio connection between the audio equipment and the BluTechVision Interactive It is preferable to use an optional digitally compatible audio cinch cable and...

Page 12: ...t 99 The corresponding LED Display flashes twice Sound functions It can be set on which devices the buttons with the sound functions V sound off and sound mode should work Press the device button TV a...

Page 13: ...n HDMI and TV operation Pressing the TV button briefly switches back to TV mode With the TV button press briefly in TV operation you switch back to the last station watched and terminate the device co...

Page 14: ...f the Photo menu page 32 for photo file playback Music Display of Music menu page 31 for playback of audio files Setup Display of Setup menu page 14 to make settings In order to call up the Home Menu...

Page 15: ...NETWORK OTHERS Call up the Setup menu Select option LANGUAGE Select the option Display Menu Select required language Confirm OK Close menu Disc Languages Select a language for the menu the sound and t...

Page 16: ...the video signal at the socket HDMI OUT and COMPONENT VIDEO OUT Select Resolution option Auto Recordings in wide screen format appear with black bars at the top and bottom of the screen 576i Output i...

Page 17: ...y Digital Plus Dolby True HD DTS and DTS HD decoder is connected to the BluTechVision Interactive If the option HDMI is set to PCM Multi Ch the audio may under certain circumstances be outputted as PC...

Page 18: ...ew password Confirm OK Password deletion Select option Password Select Delete option Confirm OK Use number buttons to enter the current four digit Password Confirm OK If you have forgotten the passwor...

Page 19: ...ode can be found on the Blu Ray disc or on the accompanying material Confirm OK 255 The disc is played completely 0 bis 254 Only the scenes of the disc inserted are played which comply with the assign...

Page 20: ...Server Primary Secondary CONNECTION SETTING Confirm OK Your BluTechVision Interactive now tries to create a connection to the internet router in your home network It uses the above standard settings I...

Page 21: ...router in your home network using the set parameters A corresponding message appears that a permanent IP Address has been allocated Setting Wired Static IP completed For the connection test press Test...

Page 22: ...THERS Select option BD Storage Clear Built In Storage The built in storage integrated in the BluTechVision Interactive storage is deleted USB Storage BD LIVE data if a USB storage connected to the Blu...

Page 23: ...ode Audio Video Movie 12 cm 5 Audio CD Audio CD CD DA Audio 12 cm 5 CD RW CD R Audio CD CD DA Audio Handling Discs Do not touch the recorded side of the disc Hold the disc by the edges to avoid touchi...

Page 24: ...d has to be entered refer to Rating on page 18 Search BD DVD V DivX CD Select the search direction and speed Press for a long time Rewind Repeated pressing increases the reverse playback speed Press f...

Page 25: ...wice briefly to return to the previous title Select Chapter Track BD DVD ALL If a title has several Chapters Tracks you can select another Chapter another Track as follows P or P during playback to se...

Page 26: ...te selected marker Overlay close markers Zoom BD DVD V With the Zoom function you can increase the size of the video image and then navigate within the zoomed in picture during playback Overlay open Z...

Page 27: ...User setting Default Close Picture Mode Mode Contrast Brightness Sharpness Saturation Red Green Blue Cyan Magenta Yellow Dynamic Contrast Block NR Mosquito NR Black Level 25 25 25 25 25 25 25 25 25 25...

Page 28: ...he currently used BD LIVE storage page 22 If the internal storage of your BluTechVision Interactive is not adequate you can also connect an external USB Storage medium with 1GB free storage space Sele...

Page 29: ...Files Playback of Video Files Call up Home Menu Select the Option Movie in the Home Menu Confirm OK If both a disc and a USB Storage are available a selection menu appears Select desired medium Confi...

Page 30: ...file names then while playing back a DivX file it is possible that no subtitles are shown If the sound and video track are not synchronous either sound or video is played HD movie files that are conta...

Page 31: ...7 MB Music First Screen off on Last Pages View Musik Photo Movie Title1 mp3 04 12 Title1 mp3 Title2 mp3 02 56 Title3 mp3 3 22 Title4 mp3 4 43 Title5 mp3 3 31 Select type of repeat Red Button Screen Of...

Page 32: ...ockwise 90 not available during slide show Zoom Switch on zoom mode Setup Set transition effects and display duration Close Hide info menu Slide show Play Start continue slide show 1 5 Slide Show Musi...

Page 33: ...e www loewe int de Support User guide library This is especially recommended after a software update Environment Environmental Protection Cardboard box and packaging In line with national regulations...

Page 34: ...de The Disc is dirty Clean the disc The disc has not been inserted with the playable side facing down Insert the disc with the playable side facing down The disc has not been inserted in the groove Pl...

Page 35: ...Analogue surround sound DHCP Abbreviation for Dynamic Host Configuration Protocol DHCP allows auto matic assignment of IP addresses with the aid of a DHCP server DHCP server Network service which take...

Page 36: ...de Trade Register Municipal Court Coburg No HRB 42243 VAT ID No DE 193216550 WEEE Registration number DE 41359413 Issue 12 09 3rd edition Loewe Opta GmbH Kronach All rights reserved including transla...

Page 37: ...adjik 8471 Tagalog 8476 Tamil 8465 Telugu 8469 Thai 8472 Tongalese 8479 Czech 6783 Turkish 8482 Turkmenian 8475 Twi 8487 Ukrainian 8575 Hungarian 7285 Urdu 8582 Uzbek 8590 Vietnamese 8673 Volap k 8679...

Page 38: ...L Largo del Perlar 12 37135 Verona VR Italia Tel 39 045 82 51 611 Fax 39 045 82 51 622 Email info loewe it PL Trading pz 2004 Ltd 27 Aliat Hanoar St Givataiim 53401 Israel Tel 972 3 57 27 155 Fax 972...

Reviews: