8
7
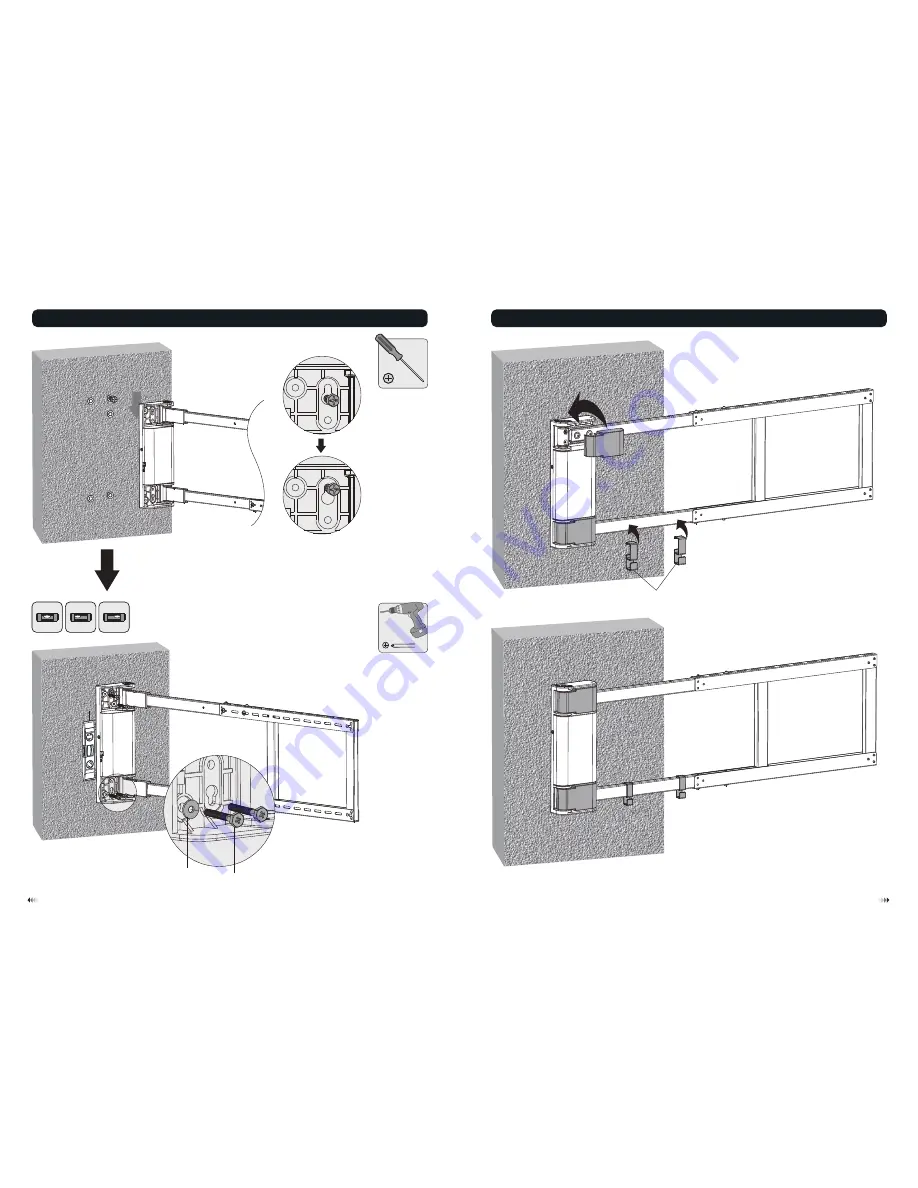
5. Installing the Decorative Covers and the Cable Clips
C
X
√
Screw the wall
mount onto
the wall
H
W-C
W-A
Page 1: ...NING function Please follow step1 through step4 in turn if the user need to LEARN more buttons Learn Power button on the TV remote Press and hold for 5 seconds until LED light on the matched remote control stays on and then press The buzzer will sound once the red LED light on the IR receiver will stay on then press and hold button on the matched remote control until the buzzer sounds twice then r...
Page 2: ...ing bracket was designed to be installed and utilised ONLY as specified in this manual Improper installation of this product may cause damage or serious injury This product should only be installed by someone with good mechanical ability who has basic building experience and fully understands this manual Make sure that the supporting surface will safely support the combined weight of the equipment...
Page 3: ... must verify that the supporting surface will safely support the combined weight of the equipment and all attached hardware and components 4a ForWood StudWall Mounting Drill pilot holes 3 X X 2 1 Find and mark the exact location of mounting holes 3 W A X 7mm 4 X X X TV L 2 260mm W A 7mm 2 Opening Hard the Swing Arm 1 Separating the Decorative Covers from the Wall Mount 3 Position the Swing Arm 90 ...
Page 4: ... all attached hardware and components WARNING 4b For Solid Brick and Concrete Mounting Drill pilot holes 2 1 Mark the exact location of mounting holes W A W B 7mm W A W B W C W A X X Screw the wall mount onto the wall Reverse installation Forward installation Tighten the screw leaving a 7mm space from the wall H H H 7mm ...
Page 5: ...8 7 5 Installing the Decorative Covers and the Cable Clips C X X Screw the wall mount onto the wall H W C W A ...
Page 6: ...kets as close as possible to the middle of the screen Note Choose the appropriate screws washers and spacers if necessary according to the type of screen or or M C M D M E M F M G M G M D M E M F M H M D M E M F M G M H 6 1 For Flat Back Screens TV TV TV 6 Installing the Adapter Brackets M A M B M C M F Remove the screws on the adapter brackets and keep the screws for later use ...
Page 7: ...ment 90 or 90 or 7 Hooking the TV onto the Wall Mount Hook the TV over the swing arm Reinstall the bottom screws to secure the adapter brackets to the swing arm Important Make sure the TV is correctly hooked before releasing the TV To avoid the little tilt caused by weight you can tighten the adjustment screws to help level the TV H ...
Page 8: ... 5 seconds and repeat four times The system will start automatic positioning First positioning TV wall mount with flat against the wall then positioning TV wall mount with 90 of lateral rotation until the TV remote control 9 Placing the IR Receiver Peel the backing paper Place the IR receiver into desired position Make sure nothing will obstruct the transmission from where the TV will be viewed Do...