background image

Chapter3

Advanced Configuration

16

Dual-Band Wreless-N Ggabt Router wth Storage Lnk

Flter  Multcast 

Multicasting  allows  for  multiple 

transmissions  to  specific  recipients  at  the  same  time.  If 

multicasting  is  permitted,  then  the  Router  will  allow  IP 

multicast  packets  to  be  forwarded  to  the  appropriate 

computers.  This  feature  is  selected  by  default.  Deselect 

this feature to disable it.

Flter  Internet  NAT  Redrecton 

This  feature  uses 

port  forwarding  to  block  access  to  local  servers  from 

local  networked  computers.  Select 

Flter  Internet  NAT 

Redrecton

 to filter Internet NAT redirection. This feature 

is not selected by default.

Flter IDENT (Port 11) 

This feature keeps port 113 from 

being scanned by devices outside of your local network. 

This feature is selected by default. Deselect this feature to 

disable it.

Web Filters

Flters 

Select to filter Proxy, Java, ActiveX, and Cookies.

Click 

Save Settngs

 to apply your changes, or click 

Cancel 

Changes

 to cancel your changes.

Security > VPN Passthrough

The 

Security > VPN Passthrough

 screen allows you to enable 

VPN  tunnels  using  IPSec,  PPTP,  or  L2TP  protocols  to  pass 

through the Router’s firewall.

Security > VPN Passthrough

VPN Passthrough

IPSec  Passthrough 

Internet  Protocol  Security  (IPSec)  is 

a suite of protocols used to implement secure exchange 

of packets at the IP layer. To allow IPSec tunnels to pass 

through the Router, keep the default, 

Enable

PPTP  Passthrough 

Point-to-Point  Tunneling  Protocol 

(PPTP)  allows  the  Point-to-Point  Protocol  (PPP)  to  be 

tunneled through an IP network. To allow PPTP tunnels to 

pass through the Router, keep the default, 

Enable

L2TP  Passthrough 

Layer  2  Tunneling  Protocol  is  the 

method  used  to  enable  Point-to-Point  sessions  via  the 

Internet on the Layer 2 level. To allow L2TP tunnels to pass 

through the Router, keep the default, 

Enable

.

Click 

Save Settngs

 to apply your changes, or click 

Cancel 

Changes

 to cancel your changes.

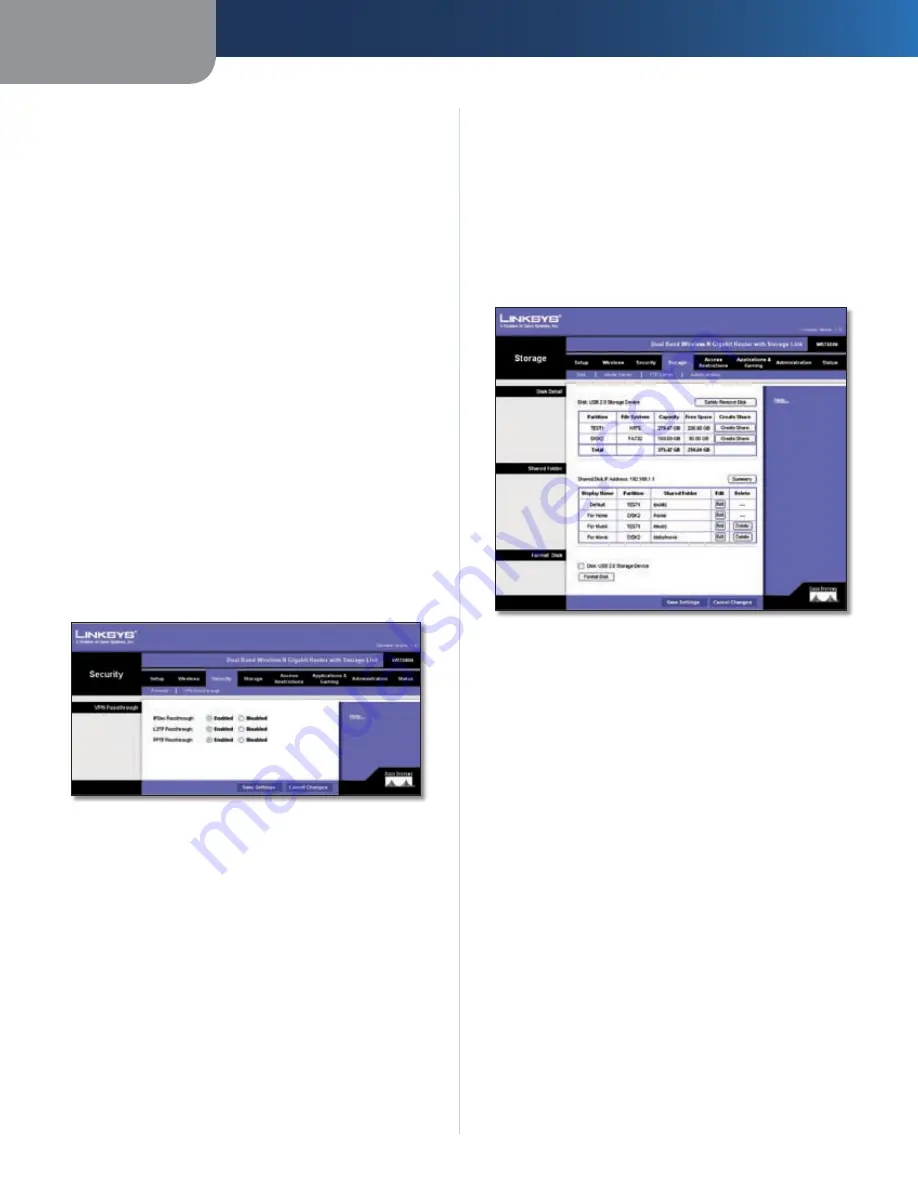
Storage > Disk

An external USB hard drive or USB disk must be connected 

to the USB Port of the Router to use the storage feature. 
The 

Disk

 screen describes the disk currently attached to 

the Router. Using this screen, you can format a blank disk, 

safely remove a disk, or erase a disk.

Storage > Disk

Disk Detail

If  a  formatted  disk  is  attached  to  the  Router,  you  can 

view the Partition, File System, Capacity, and Free Space 

information  for  each  partition  of  the  disk.  Click 

Create 

Share

 to create a shared folder. 

Safely  Remove  Dsk  1 

Before  physically  disconnecting 

a  disk  from  the  Router,  click 

Safely  Remove

  first.  This 

prevents the possible loss of data, if the disk is removed 

while data is transferring to or from the disk.
If  you  click 

Create  Share

,  the 

Shared  Folder 

screen 

appears. 

Summary of Contents for WRT160N - Wireless-N Broadband Router Wireless

Page 1: ...USER GUIDE Dual Band Wireless N Gigabit Router with Storage Link Model No WRT160N ...

Page 2: ...es a noteworthy website address or e mail address Online Resources Website addresses in this document are listed without http in front of the address because most current web browsers do not require it If you use an older web browser you may have to add http in front of the web address Resource Website Linksys www linksys com Linksys International www linksys com international Glossary www linksys...

Page 3: ...ge Disk 16 Storage Media Server 17 Storage FTP Server 18 Storage Administration 19 Access Restrictions Internet Access 20 Applications and Gaming Single Port Forwarding 21 Applications and Gaming Port Range Forwarding 21 Applications Gaming Port Triggering 22 Applications and Gaming DMZ 22 Applications and Gaming QoS 23 Administration Management 26 Administration Log 26 Administration Diagnostics ...

Page 4: ...tations 39 Obtaining Warranty Service 39 Technical Support 40 Appendix E Regulatory Information 41 FCC Statement 41 FCC Radiation Exposure Statement 41 Safety Notices 41 Wireless Disclaimer 41 Avis de non responsabilité concernant les appareils sans fil 41 User Information for Consumer Products Covered by EU Directive 2002 96 EC on Waste Electric and Electronic Equipment WEEE 42 ...

Page 5: ...cted to 10 100 Internet Green Orange The Internet LED lights up green when there is a connection made through the Internet port A flashing LED indicates network activity over the Internet port The LED lights up orange when it is connected to Gigabit and lights up green when it is connected to 10 100 USB Green The USB LED indicates when an external USB hard drive or USB flash disk is connected to t...

Page 6: ...o guess 3 Enable MAC address filtering Linksys routers give you the ability to enable Media Access Control MAC address filtering The MAC address is a unique series of numbers and letters assigned to every networking device With MAC address filtering enabled wireless network access is provided solely for wireless devices with specific MAC addresses For example you can specify the MAC address of eac...

Page 7: ...r s default IP address 192 168 1 1 in the Address field Then press Enter A password request screen will appear Non Windows XP users will see a similar screen Leave the User name field blank The first time you open the web based utility use the default password admin You can set a new password from the Administration tab s Management screen Click OK to continue Password Screen Setup Basic Setup The...

Page 8: ...inutes Keep Alive Redial Period If you select this option the Router will periodically check your Internet connection If you are disconnected then the Router will automatically re establish your connection To use this option select Keep Alive In the Redial Period field you specify how often you want the Router to check the Internet connection The default Redial Period is 30 seconds PPTP Point to P...

Page 9: ...eed to specify here User Name and Password Enter the User Name and Password provided by your ISP Optional Settings Some of these settings may be required by your ISP Verify with your ISP before making any changes Optional Settings Host Name Domain Name These fields allow you to supply a host and domain name for the Router Some ISPs usually cable ISPs require these names as identification You may h...

Page 10: ...You can enter up to three DNS Server IP Addresses here The Router will use these for quicker access to functioning DNS servers WINS The Windows Internet Naming Service WINS manages each PC s interaction with the Internet If you use a WINS server enter that server s IP Address here Otherwise leave this blank DHCP Reservation Click DHCP Reservation if you want to assign a fixed local IP address to a...

Page 11: ...t IP address is displayed here Because it is dynamic it will change Status The status of the DDNS service connection is displayed here Update To manually trigger an update click Update Click Save Settings to apply your changes or click Cancel Changes to cancel your changes TZO com Setup DDNS TZO E mail Address TZO Password and Domain Name Enter the settings of the account you set up with TZO Inter...

Page 12: ...e and the destination This feature is Disabled by default Static Routing Select Route Entry number To set up a static route between the Router and another network select a number from the drop down list A static route is a pre determinedpathwaythatnetworkinformationmusttravel to reach a specific host or network Enter the information described below to set up a new static route Click Delete This En...

Page 13: ...default Auto Standard Channel 5GHz Select the channel for Wireless A and Wireless N 5GHz networking If you selected Wide 40MHz Channel for the Radio Band setting then the Standard Channel will be a secondary channel for Wireless N 5GHz If you are not sure which channel to select keep the default Auto DFS Standard Channel 2 4GHz Select the channel for Wireless B Wireless GandWireless N 2 4GHz netwo...

Page 14: ...ue is 1812 Shared Key Enter the key shared between the Router and the server Key Renewal Enter a Key Renewal period which instructs the Router how often it should change the encryption keys The default Key Renewal period is 3600 seconds WPA2 Personal Security Mode WPA2 Personal Encryption WPA2 supports two encryption methods TKIP and AES with dynamic encryption keys Select the type of algorithm AE...

Page 15: ...ey Enter the key shared between the Router and the server Encryption Select a level of WEP encryption 64 bits 10 hex digits or 128 bits 26 hex digits The default is 64 bits 10 hex digits Passphrase Enter a Passphrase to automatically generate WEP keys Then click Generate Key 1 4 If you did not enter a Passphrase enter the WEP key s manually Tx Key Select a key from the drop down menu WEP WEP is a ...

Page 16: ...t checkbox for any device you want to add to the MAC Address Filter List Then click the Add button To retrieve the most up to date information click the Refresh button To exit this screen and return to the Wireless MAC Filter screen click the Close button Wireless Client List MAC 01 50 Enter the MAC addresses of the devices whose wireless access you want to control Click Save Settings to apply you...

Page 17: ...milliseconds The Beacon Interval value indicates the frequency interval of the beacon A beacon is a packet broadcast by the Router to synchronize the wireless network DTIM Interval This value between 3 and 255 indicates the interval of the Delivery Traffic Indication Message DTIM A DTIM field is a countdown field informing clients of the next window for listening to broadcast and multicast message...

Page 18: ...is a suite of protocols used to implement secure exchange of packets at the IP layer To allow IPSec tunnels to pass through the Router keep the default Enable PPTP Passthrough Point to Point Tunneling Protocol PPTP allows the Point to Point Protocol PPP to be tunneled through an IP network To allow PPTP tunnels to pass through the Router keep the default Enable L2TP Passthrough Layer 2 Tunneling P...

Page 19: ...artition If your hard 1 2 3 4 drive is formatted with multiple partitions it will delete them and create a single partition Click Save Settings to apply your changes or click Cancel Changes to cancel your changes For more information click Help Storage Media Server An external USB hard drive or USB disk must be connected to the USB Port of the Router to use the storage feature Storage Media Server...

Page 20: ...FTP Port Enter the FTP Port number to use The default port is 21 Access This section lets you add FTP folders that can be accessed through the FTP client Click Specify Folder to Access to add a FTP folder to the Access table If you click Specify Folder to Access the FTP Folder screen appears FTP Folder Screen FTP Folder Screen To add an FTP folder Enter a display name that will appear in the Acces...

Page 21: ...User the User Account screen appears User Account User Account Screen To add a new user Enter a user name for the new user Enter the full name and description for the new user Enter a password and enter it again in the Confirm Password field Select Admin or Guest from the Group Member drop down menu You can create a new group in the Group Management section Click Save Settings to save the new chan...

Page 22: ...ess can be managed by a policy Use the settings on this screen to establish an access policy after Save Settings is clicked Selecting a policy from the drop down menu will display that policy s settings To delete a policy select that policy s number and click Delete To view all the policies click Summary Deny or Allow If you select Deny the PC on the Edit List will be denied Internet Access by the...

Page 23: ...rotocol setting Then click Modify To delete an application select it from the Application List Then click Delete Click Save Settings to apply your changes or click Cancel Changes to cancel your changes 5 6 7 8 Applications and Gaming Single Port Forwarding The Single Port Forwarding screen allows you to customize port services for common applications When users send these types of requests to your...

Page 24: ...the computer that sends the matching data is remembered by the Router so that when the requested data returns through the Router the data is pulled back to the proper computer by way of IP address and port mapping rules Applications and Gaming Port Triggering PortTriggering Application Enter the application name of the trigger Triggered Range For each application list the triggered port number ran...

Page 25: ...s in your network must support Wireless WMM If you would like to disable this feature select Disabled Otherwise keep the default Enabled NoAcknowledgement IfyouwanttodisabletheRouter s Acknowledgement feature so the Router will not re send data if an error occurs then keep the default Enabled Otherwise select Disabled Internet Access Priority In this section you can set the bandwidth priority for ...

Page 26: ...l appear in the Summary list Online Games Online Games Games Games Select the appropriate game If you select Add a New Game follow the Add a New Game instructions Priority Select the appropriate priority High Medium Normal or Low Click Add to save your changes Your new entry will appear in the Summary list Enter a Name Enter any name to indicate the name of the entry Port Range Enter the port rang...

Page 27: ...ice MAC Address Enter the MAC address of your voice device Priority Select the appropriate priority High Medium Normal or Low Click Add to save your changes Your new entry will appear in the Summary list Summary This lists the QoS entries you have created for your applications and devices Priority This displays the bandwidth priority of High Medium Normal or Low Name This displays the application ...

Page 28: ...et Remote Upgrade Select Enabled to be able to upgrade the firmware remotely from the Internet Allowed Remote IP Address Select Any IP Address or manually enter an IP address to allow remote access to the web based utility from the Internet Remote Management Port Enter the port number that will be open to outside access to access the Router s web based utility You will need to enter the Router s p...

Page 29: ... to open the Traceroute Test screen Enter the address of the PC whose connection you wish to test and click Traceroute The Traceroute Test screen will show if the test was successful Click Close to return to the Diagnostics screen Traceroute Test Administration Factory Defaults The Administration Factory Defaults screen allows you to restore the Router s configuration to its factory default settin...

Page 30: ...up Basic Setup screen Select Release IP Address or Renew IP Address as appropriate to release or renew a DHCP lease Click Refresh to update the on screen information Status Local Network The Local Network screen displays information about the local network Status Local Network Local Network Local MAC Address The MAC Address of the Router s local interface is displayed here Router IP Address This s...

Page 31: ...ireless BOnly Wireless A Only or Disabled used by the network Net work Name SSID Displayed here is the name of the wireless network or SSID Radio Band Displayed here is the Radio Band setting selected on the Basic Wireless Settings screen WideChannel DisplayedhereistheWideChannelsetting selected on the Basic Wireless Settings screen Standard Channel Shown here is the Standard Channel setting selec...

Page 32: ...odem and then insert the setup CD into your computer Click Setup and follow the on screen instructions 1 2 3 When you double click the web browser you are prompted for a username and password If you want to get rid of the prompt follow these instructions Launch the web browser and perform the following steps these steps are specific to Internet Explorer but are similar for other browsers Select To...

Page 33: ...ction to the Router Connect an external USB hard drive or USB flash disk to the USB port of the Router Proceed to the next section How to Access the USB Storage How to Access the USB Storage Follow the instructions for your Windows operating system XP or Vista Instructions forWindows XP Click Start Click Search Click Search 1 2 3 1 2 Click Computers or people Click Computers or People Click A comp...

Page 34: ...r admin Click OK Login Screen The Default shared folder of your USB storage appears To access your USB storage double click Default Double click Default 6 7 8 To map the Default shared folder to your computer right click Default Click Map Network Drive Click Map Network Drive Keep the default Drive letter or select the letter you want to use from the Drive drop down menu Click Finish Map Network D...

Page 35: ...rage double click the Default shared folder You can use the Default shared folder as another drive on your network NOTE Repeat steps 1 11 to map the USB storage to each XP computer on your network Instructions forWindowsVista Click Start Click Network Click Network 11 1 2 You will be notified if file sharing is turned off Click the message Click the Message Click Turn on network discovery and file...

Page 36: ...earch field and press the Enter key Double Click WRT600N Computer Category In the User name and Password fields enter admin Click OK Login Screen The Default shared folder of your USB storage appears To access your USB storage double click Default Double Click Default 5 6 7 To map the Default shared folder to your computer right click Default Click Map Network Drive Click Map Network Drive Keep th...

Page 37: ... device you can create shared folders user groups and user accounts Follow the instructions in this section How to Access theWeb Based Utility Toaccesstheweb basedutility launchthewebbrowseron your computer and enter the Router s default IP address 192 168 1 1 in the Address field Then press Enter A password request screen will appear Non Windows XP users will see a similar screen Leave the User n...

Page 38: ...reen click Save Settings to apply your changes or click Cancel Changes to cancel your changes Click Close to close the screen How to Create a User Group Click the Storage tab Click the Administration tab 4 5 6 7 1 2 In the Group Management section click Create New Group Storage Administration The Group Account screen appears In the Group Name field enter a name for the new group Group Account In t...

Page 39: ...cription for the new user In the Password and Confirm Password fields enter a password From the Group Member drop down menu select the appropriate group If you want to disable the user account select Account Disabled On the UserAccount screen click Save Settings to save the new changes or click Cancel Changes to cancel the changes Click Close to close the screen On the Administration screen click ...

Page 40: ...AM RF Pwr EIRP in dBm 2 4 GHz Wireless N 16 5 1 5 dbm Typical 5 GHz Wireless N 14 5 1 5 dbm Typical Receiver Sensitivity in dBm 5 GHz Wireless N 73 dBm Typical 2 4 GHz Wireless N 80 dBm Typical Antenna Gain in dBi 2 4 GHz Wireless 3 6 dBi Typical 5 GHz Wireless 3 7 dBi Typical UPnP Supported Security Features WEP WPA WPA2 WEP Key Bits Up to 256 Bit Encryption Environmental Dimensions 7 48 x 5 71 x...

Page 41: ...This limited warranty shall not apply to such third party software or service offerings This limited warranty does not guarantee any continued availability of a third party s service for which this product s use or operation may require TO THE EXTENT NOT PROHIBITED BY LAW ALL IMPLIED WARRANTIES AND CONDITIONS OF MERCHANTABILITY SATISFACTORY QUALITY OR FITNESS FOR A PARTICULAR PURPOSE ARE LIMITED T...

Page 42: ...custom duties VAT and other associated taxes and charges Repairs or replacements not covered under this limited warranty will be subject to charge at Linksys then current rates Technical Support This limited warranty is neither a service nor a support contract Information about Linksys current technical support offerings and policies including any fees for support services can be found at www link...

Page 43: ...uce the potential for harmful interference to co channel mobile satellite systems the maximum antenna gain of 3 7 dBi permitted for devices in the bands 5250 5350 MHz and 5470 5725 MHz to comply with the e i r p limit and the maximum antenna gain of 3 7 dBi permitted for devices in the band 5725 5825 MHz to comply with the e i r p limits specified for point to point and non point to point operatio...

Page 44: ... Evropská směrnice 2002 96 ES zakazuje aby zařízení označené tímto symbolem na produktu anebo na obalu bylo likvidováno s netříděným komunálním odpadem Tento symbol udává že daný produkt musí být likvidován odděleně od běžného komunálního odpadu Odpovídáte za likvidaci tohoto produktu a dalších elektrických a elektronických zařízení prostřednictvím určených sběrných míst stanovených vládou nebo mí...

Page 45: ...ημα από το οποίο αγοράσατε το προϊόν Français French Informations environnementales pour les clients de l Union européenne La directive européenne 2002 96 CE exige que l équipement sur lequel est apposé ce symbole sur le produit et ou son emballage ne soit pas jeté avec les autres ordures ménagères Ce symbole indique que le produit doit être éliminé dans un circuit distinct de celui pour les déche...

Page 46: ...Ha elavult berendezéseinek felszámolásához további részletes információra van szüksége kérjük lépjen kapcsolatba a helyi hatóságokkal a hulladékfeldolgozási szolgálattal vagy azzal üzlettel ahol a terméket vásárolta Nederlands Dutch Milieu informatie voor klanten in de Europese Unie DeEuropeseRichtlijn2002 96 ECschrijftvoordatapparatuurdie is voorzien van dit symbool op het product of de verpakkin...

Page 47: ...ia pomôže zabrániť prípadným negatívnym dopadom na životné prostredie a zdravie ľudí Ak máte záujem o podrobnejšie informácie o likvidácii starého zariadenia obráťte sa prosím na miestne orgány organizácie zaoberajúce sa likvidáciou odpadov alebo obchod v ktorom ste si produkt zakúpili Slovenčina Slovene Okoljske informacije za stranke v Evropski uniji Evropska direktiva 2002 96 EC prepoveduje odl...

Reviews: