background image

Instant RAID

4.  In the left section of the Utility window, highlight the Instant RAID 

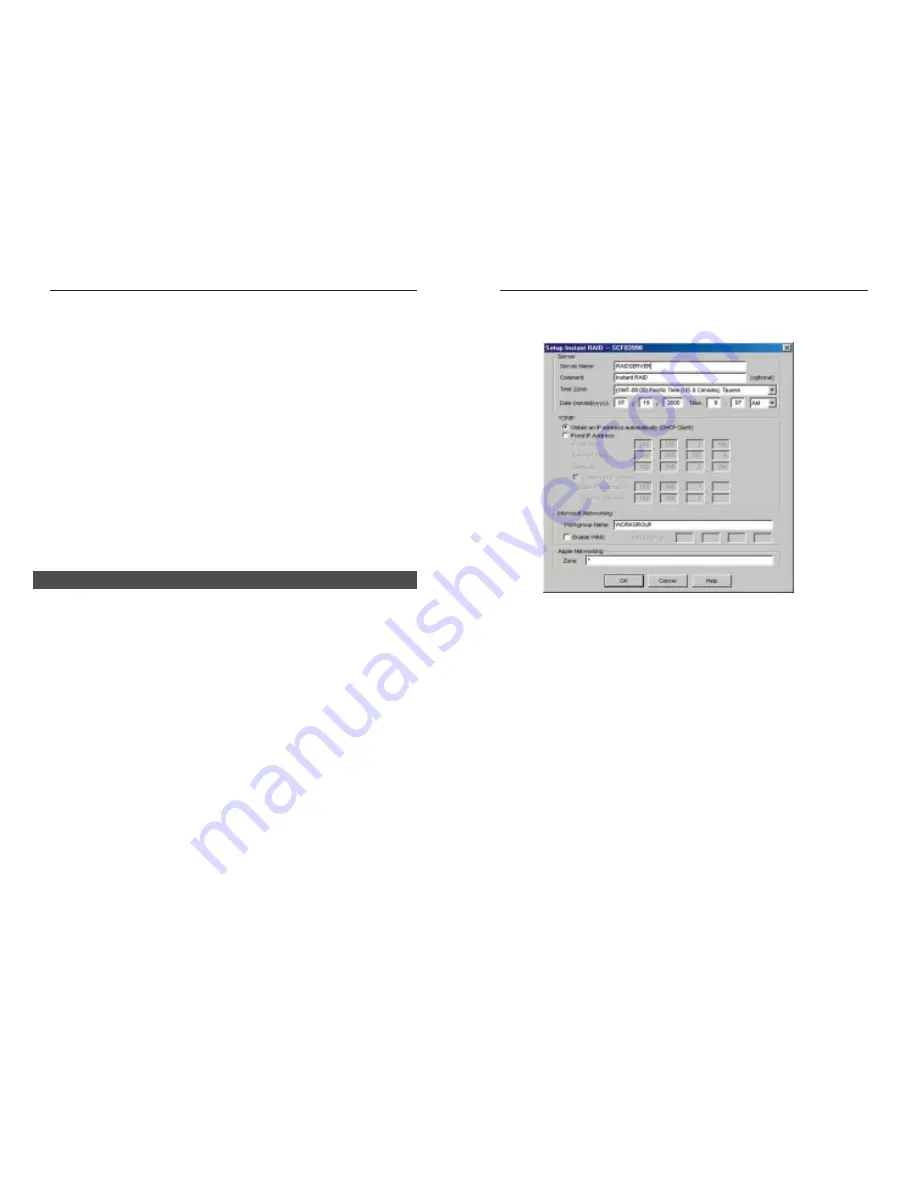
you are configuring and click the Quick Setup button on the far left of
the tool bar. The Setup RAID screen will appear. 

5. Enter the following data in the appropriate fields:

Server

Server Name:

The default name will be shown. You can change this if you
wish.

Comment:

This field is optional.

Time Zone:

Select the appropriate time zone.

Date/Time:

Enter the local date (mm/dd/yy) and time.

TCP/IP

Obtain an 
IP Address:

If you have a DHCP or Bootp server on your LAN, you 
can enable this setting. The Instant RAID will then obtain 
its IP Address from the DHCP or Bootp server. However, 
if you are using the RAID as a DHCP Server, a fixed IP 
Address must be set.

9

Linksys EtherFast

® 

Series

8

Hardware Installation

Use the following procedure to connect the Instant RAID to your LAN.

1.  Connect one end of the Network Cable to the Instant RAID’s LAN Port,

then connect the other end of the Network Cable to your hub.

2.  Connect the power cord to the Instant RAID’s Power Input Port, then plug

the power cord into a standard power outlet.

3.  Power On the RAID using the Power Switch on the rear of the device.

The RAID will perform a self-test (lasting 2 to 3 seconds), during which
all the LEDs will be illuminated.

After the self-test is complete, the boot process will begin. The Ready and 
Disk Full LEDs will be illuminated. When the boot process is completed, the 
Ready LED will be illuminated and the Error LED will be off. If the Error 
LED is still illuminated, or the RAID beeps repeatedly, there is a hardware 
problem. It takes the Instant RAID at least 30 seconds to completely boot up.

Now that everything is connected and powered on, you are ready to configure
your Instant RAID so that it is accessible to the users on your system. Make
sure that TCP/IP is installed.

1.  Insert the Driver Installation CD-ROM that came in your Instant RAID

packaging into your PC’s CD-ROM drive.

2.  The pop-up menu should appear a few seconds after you insert the CD

into your CD-ROM drive. When it does, click the Install Software but-
ton.

Follow the setup program’s prompts to install the Instant RAID Setup
Utility. When installation is complete, click the Exit button on the CD-
ROM pop-up window to return to your desktop. 

3.  For the default installation, click StartProgramsInstant RAID Setup

Utility. The RAID Setup Utility window will appear. The left section of the
window will display a list of all RAIDs, and the right section will display
data about the selected RAID. If no RAIDs are listed refer to the
Troubleshooting section on page 34.

Configuring the Instant RAID 

Summary of Contents for EFR240

Page 1: ...EtherFast Series Instant RAID Use this guide to install Linksys EtherFast Instant RAID EFR240 User Guide...

Page 2: ...warranty or representation expressed implied or statutory with respect to its products or the contents or use of this documentation and all accompa nying software and specifically disclaims its quali...

Page 3: ...hen Replacing a Hard Drive Hot Swappable Drives Status Indicators Level 1 RAID Specs General Features Auto Sensing Connection for Easy LAN Installation Supports Windows based LAN OS Tool Based File Ma...

Page 4: ...once to indicate that the reset was successful The Instant RAID password will be cleared and its IP Address set to 192 168 0 2 with a Network Mask of 255 255 255 0 You can now connect to the Instant...

Page 5: ...tdown is complete Error This LED is normally off It will illuminate amber during self test and turn off after the test is com plete If it remains on a hardware error is indicat ed During a software up...

Page 6: ...tely full IP This LED is normally off It will illuminate and blink if the Server is a DHCP Client The Instant RAID has an internal buzzer that beeps to indicate certain events 1 Beep Indicates that th...

Page 7: ...ing 2 to 3 seconds during which all the LEDs will be illuminated After the self test is complete the boot process will begin The Ready and Disk Full LEDs will be illuminated When the boot process is c...

Page 8: ...If checked the RAID will provide an IP Address and relat ed data to PCs upon request PCs will only request an IP Address if they are set up to act as DHCP Clients Start IP Address The first value for...

Page 9: ...the Address box enter the following web address http ip_address Where ip_address is the IP Address of the Instant RAID as in the following http 192 168 0 2 N No ot te e You will need the IP address of...

Page 10: ...the disk for errors Similar to Scandisk Because the disk check takes an exceptionally long time this should be done overnight Log Check the system log This is provided only for trou bleshooting Upgrad...

Page 11: ...eleted guest The guest user is a member of the everyone group and may be added to and deleted from any other groups By default the guest user has no password and a password can not be assigned This us...

Page 12: ...ly members of the everyone group No user can ever be removed from the everyone group unless the user is entirely deleted By default this group has Read Write access to the public share This can be cha...

Page 13: ...rs Administration screen appears click the New User button Enter the new user s name their password twice for confirmation whether or not you wish to limit their RAID storage space and which groups yo...

Page 14: ...r computer now N No ot te e The Gateway is the IP Address of your router or internet gateway If you don t have a router or internet gateway the address should be left at 0 0 0 0 If you have a Router o...

Page 15: ...s not exist on the RAID you will only have guest access rights There is no password which you can enter in this window Network Logon To access the Instant RAID you must correctly log on to the network...

Page 16: ...ve as shown below 5 Select a drive letter for this folder and check the Reconnect at Logon checkbox If you don t choose to reconnect the mapping will be lost when you shut down your PC Click OK 6 This...

Page 17: ...on Windows the Instant RAID and on any other network server you may be accessing Only the Network Administrator can create and modify user names Changing your Windows password in Windows 2000 Please...

Page 18: ...rage you must map a drive letter to each RAID folder you wish to access The drive will then be available to all Windows programs 1 Double click the Network Neighborhood icon on the desktop In Windows...

Page 19: ...the Instant RAID is available to any network user provided that user has access to the Instant RAID itself It will function exactly the same as any other network printer Using the RAID s Printer Compl...

Page 20: ...is properly installed that the LAN connections are OK and that the RAID is powered ON If you are using a router ensure that your PC and the Instant RAID are on the same network segment Ensure that you...

Page 21: ...defects in material and workmanship under normal use for ONE year from the date of purchase If the product proves defective during this warranty period contact Linksys Customer Support to obtain a Re...

Page 22: ...Copyright 2000 Linksys All Rights Reserved www linksys com...

Reviews: