background image

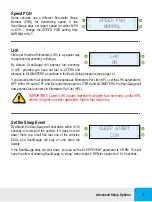
Speed PGN

Some vehicles use a different Parameter Group 
Number (PGN) for transmitting speed. If the 
ScanGauge does not report speed for either MPH 
or KPH,  change the SPEED PGN setting from 
NORMAL to ALT.

LHK

Liters per Hundred Kilometers (LHK) is a popular way 
to express fuel economy in Europe. 

By default, ScanGauge will express fuel economy 
in LHK, provided you have set fuel to LITERS and 
distance to KILOMETERS as outlined in the Basic Setup procedure (see page 12).

If you would prefer fuel economy to be express as Kilometers Per Liter (KPL), set the LHK parameter to 
OFF. With LHK set to OFF, and fuel and distance set to LITERS and KILOMETERS, the ScanGauge will 
now express fuel economy in Kilometers Per Liter (KPL).

IMPORTANT: Lower LHK values represent a higher fuel economy, unlike KPL 
where a higher number represents higher fuel economy.

Set the Sleep Event

By default, the ScanGauge will shut down within 10-15 
seconds of turning off the vehicle. If it does not shut 
down, there is a small risk that one of the vehicle’s 
ECUs and ScanGauge will stay on and drain the 
battery.

If the ScanGauge does not shut down, you can set the SLEEP EVENT parameter to 0 RPM. This will 
have the effect of allowing ScanGauge to “sleep” when it sees 0 RPM for a period of 10-15 seconds. 

<

>

<

>

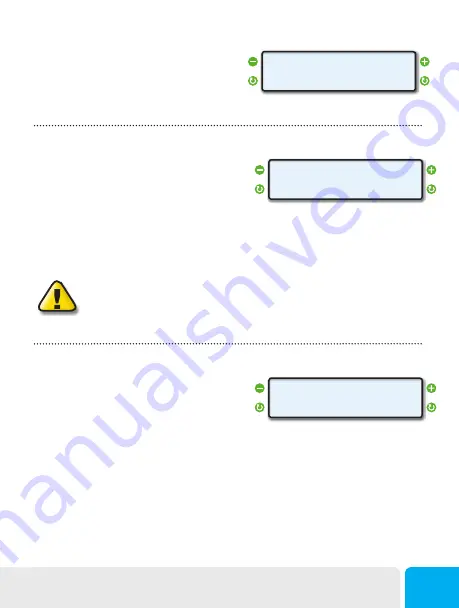
SPEED PGN

NORMAL

<

>

<

>

LHK

ON

<

>

<

>

SLEEP EVENT

COM

Advanced Setup Options 

 17

Summary of Contents for ScanGauge

Page 1: ...www ScanGauge com Version 1 0 User Manual Plugs into the J1939 or J1708 diagnostic connector already built into most 1987 or Newer Diesel Pusher Motor Homes RV s and Large Diesel Over The Road Trucks ...

Page 2: ...is not limited to the following restrictions Do Not mount the ScanGauge where it can obstruct the view of the driver Do Not mount the ScanGauge in a manner that could cause it to be propelled through the vehicle during an accident causing injury such as over or near an air bag Do Not route the cable in a manner that would interfere with the operation of the vehicle controls RIGHTS AND OBLIGATIONS ...

Page 3: ... Setting up your ScanGauge 12 Advanced Setup Options 14 Backlight Display 20 Refueling and Cost Adjustments 22 Operating Your ScanGauge 24 Digital Gauges 25 Trip Computers 28 Scan Tool 36 Advanced Features 40 X GAUGE 41 Performance Monitor 48 Custom Commands 55 Troubleshooting 58 Where to Get Support 59 View Firmware Version of Your ScanGauge 61 Reset Your ScanGauge 62 Read or Set the Operating Mo...

Page 4: ...here are however some important considerations when choosing a location for your ScanGauge Please see the Installation section for detailed information ScanGauge Overview 5 Basic Operation and Features 6 Locating the J1939 J1708 Connector 8 Mounting Your ScanGauge 8 Connecting Your ScanGauge 8 Important Installation Considerations 10 4 www ScanGauge com ...

Page 5: ... of the ScanGauge B Function Selection Button C Function Selection Button D Function Selection Button E HOME Button Use the HOME Button to quickly get back to the Home Screen F LCD Display Screen Displays the information the ScanGauge records G J1939 J1708 Connection Plug Primary connector H J1939 J1708 Connection Plug Secondary connector or Daisy Chain interface Front Side Back A B C D E H G F In...

Page 6: ...ent types of signaling from their computers In most cases the ScanGauge can quickly determine which type your vehicle is using You don t have to know which type it is for it to be used Automatic Repeat Buttons Pressing the buttons and holding them for more than a second will cause them to automatically repeat at a rate of about 2 times a second This allows for rapid stepping to a value without a l...

Page 7: ... before you do it This will allow all settings and trip information to be saved in Flash memory and restored when it is reconnected Customizable Backlight Color Choose from 7 standard backlight colors or program your own for 63 possible colors The backlight intensity is also adjustable and can be set to Off Low and High intensities SCAN TRIP GAUGE MORE SCAN Use the Scan Tool to view and clear Trou...

Page 8: ...nnector but do not plug it in at THIS time 3 Locate a Place For The ScanGauge You can use the sticky back Velcro supplied with the ScanGauge to attach it to the location you have chosen DO NOT mount the ScanGauge over an air bag cover where it could be propelled by a deploying airbag 4 Route The Cable Route the cable from the ScanGauge to your vehicle s diagnostic connector Be sure to keep the cor...

Page 9: ... with your vehicle s computer Connecting TRIP MORE Connecting Screen SCAN TRIP GAUGE MORE Home Screen Up to 10 seconds If it does not stop saying Connecting or the screen goes blank after 60 seconds refer to Troubleshooting on page 52 The TRIP and MORE buttons can be used even if a connection is not established If communication with the vehicle ECU is not completed within about 75 seconds the Scan...

Page 10: ...e normal op erating temperature The use of windshield shades or covering the ScanGauge with a piece of paper can significantly reduce this temperature If attached with Velcro you can also move it temporarily to a location away from the sun DO NOT mount the ScanGauge over an air bag cover where it could be propelled by a deploy ing air bag A pin in the cable is connected to the vehicle s 12V system...

Page 11: ...tup procedures to ensure your ScanGauge reports accurate information Setting Up Your ScanGauge Initial Setup Overview 12 Advanced Setup Overview 14 Backlight Display Options 20 Refueling and Cost Adjustment Initial Setup 22 The Fill Up Procedure 22 Fuel Cost Screen 22 Initial Setup 11 ...

Page 12: ... press the function button next to MORE on the Home Screen Next press the function button next to SETUP SCAN TRIP GAUGE MORE SETUP DISPLAY MORE FILLUP DISTANCE MILES PRESSURE UNITS PSI TEMP UNITS F CURRENCY FUEL UNITS GALLONS TANK SIZE 100 Gallons EDIT ADV SETTINGS See page 14 for Advanced Setup Options Use the lower buttons to adjust the currently selected setup parameter Use the upper buttons to...

Page 13: ...set the FUEL UNITS parameter Currency Type CURRENCY 元 Choose the currency symbol ScanGauge should use to display monitor values Tips for Setting the Tank Size The size will use Gallons or Liters depending on the selection you made in the Fuel Units Screen FUEL UNITS If the size in the manual is not in whole units use the next lower value For instance if the capacity is 80 5 gallons use 80 gallons ...

Page 14: ...vanced Setup Options are located within the SETUP menu To access the Advanced Setup Options screens press the lower right function button next to MORE on the Home Screen Next press the lower left function button next to SETUP Once on the Setup Screen use the upper left or right function buttons to cycle through the available screens until the screen displays ADV SETTINGS Press the lower right func...

Page 15: ...ers See page 17 Sleep Event SLEEP EVENT COMM 0 RPM Sets the ScanGauge power down event See page 17 ScanGauge wake event WAKE EVENT Normal Volts High Volts Low Volts Sets the ScanGauge power up event See page 18 Horsepower Adjustment HPR 99 99 Default 0 Adjusts the Horsepower reading See page 18 Fuel Usage Adjustment FUEL ADJ 99 99 Default 0 Adjusts the fuel usage measurement See page 18 Trip Metho...

Page 16: ...y affects the ScanGauge s indicated speed and distances and it does not affect the vehicle speedometer or odometer readings While viewing the SPEED Screen the lower left and right function buttons can be used to increase or decrease the selected adjustment in 1 steps The upper line displays the word SPEED and a percentage The percentage is the adjustment factor The lower line displays 2 numbers th...

Page 17: ... OFF With LHK set to OFF and fuel and distance set to LITERS and KILOMETERS the ScanGauge will now express fuel economy in Kilometers Per Liter KPL IMPORTANT Lower LHK values represent a higher fuel economy unlike KPL where a higher number represents higher fuel economy Set the Sleep Event By default the ScanGauge will shut down within 10 15 seconds of turning off the vehicle If it does not shut d...

Page 18: ...tment can be done to make the ScanGauge agree with the dynamometer Adjust Fuel Usage The FUEL ADJ function can be used to make the fuel use readings on the ScanGauge more accurate After each fill up of your vehicle s tank you should use the built in FILLUP function see page 22 to tell ScanGauge the tank has been filled If you notice a consistent discrepancy between the amount of fuel ScanGauge has...

Page 19: ...canGauge will automatically track all trips through the TRIP A and TRIP B trip computers Turn on Instant DTC alerts When a DTC diagnostic trouble code is set by default ScanGauge will store that code for later review through the SCAN function see page 36 If you wish to be notified immediately when a DTC is detected set the DTC Alerts parameter to ON It is important to note that DTCs may occur even...

Page 20: ...on next to MORE on the Home Screen Next press the function button next to DISPLAY Use the upper left and right function buttons to cycle through the available options SCAN TRIP GAUGE MORE Home Screen LIGHT BLUE COLOR CUSTOM COLOR EDIT SETUP DISPLAY MORE FILLUP HIGH LAMP Loop Loop Change the Backlight Intensity Use the lower left and right function buttons to adjust the backlight intensity Options ...

Page 21: ...As you press the buttons the backlight will change to show the color result of the current selections If you have previously set the intensity at LOW the display will show the color at the low intensity level If you had set it at HIGH the display will show the color at the high intensity level Note there may be a small difference in color between LOW and HIGH When you have the color you want press...

Page 22: ... your vehicle s fuel gauge indicates there is a half a tank of fuel then adjust the TANK value to match 1 2 of the tank capacity Using the FILLUP Screen Use the FILLUP screen each time you put fuel in the tank Adjust the number shown in the top line using the upper left and right function buttons until the number matches the amount of fuel you put in the tank You can increase the number in 10 gall...

Page 23: ... Do not top off To maintain the most accurate TO EMPTY information it is best to fill the tank to its capacity If you have no need to track the time and distance values of the TO EMPTY and TANK but still want to track fuel costs you can simply skip the FILLUP Screen by pressing NEXT and then entering the Fuel Cost When you re done press the lower right function button next to SAVE Refueling and Co...

Page 24: ...ow orange circle around it will take you back to the starting point at any time or activate the ScanGauge if asleep Digital Gauges Overview 25 Digital Gauge Abbreviations 26 Trip Computers Trip Computer Overview 28 Time based Trip Computers 30 Resetting Current Trip Data 32 Fuel based Trip Computers 32 Filling Up Your Tank 34 Scan Tool Scan Tool Overview 36 What to Do if DTCs Are Found 37 Clearing...

Page 25: ... to one of the gauges will allow you to change the gauge that is displayed in that position Pressing a button repeatedly allows you to cycle through all the available gauges The selection will continue through all of the gauges and then loop back to the starting gauge This gives you the ability to customize the gauge display to show the gauges you re most interested in The information available wi...

Page 26: ...ant fuel economy is updated about every 2 seconds at the NORMAL update rate Small changes in throttle position or load while driving will show almost immediate changes in this gauge MPH KPH Miles Per Hour Kilometers Per Hour Speed in the units selected RPM Revolutions Per Minute The RPM of the engine TPS Throttle Position Sensor In some vehicles a closed throttle will read 0 and full throttle will...

Page 27: ... This indicates the transmission fluid temperature in either F or C as selected in the setup procedure GPH LPH Gallons Per Hour Liters Per Hour Fuel consumption rate in the selected units This is sensitive to throttle gear and loading changes OIL Oil Pressure This indicates the engine oil pressure in the units PSI IN KPA MM as selected in the setup procedure LOD Engine Loading This is a percentage...

Page 28: ... Cost Today s Trips First Trip TODAY Previous Trips PREVIOUS DAY First Trip TRIP A Second Trip TRIP B Tank Trips TANK Trip MPG Trip Fuel Used Distance Trip Elapsed Time Average Speed Trip Fuel Cost TANK TO EMPTY Fuel Remaining for the Current Tank Distance Remaining Before Tank Is Empty Time Remaining Before Tank Is Empty The TRIP A and TRIP B trip computers are an optional method for tracking tri...

Page 29: ...lecting the lower right button next to RESET allows you to reset current trip data Displays the data stored for the currently selected Trip Computer Push the upper left and right function buttons to cycle through the available Trip data Push the lower left function button to cycle through the available Trip computers Displays the currently selected Trip computer Typical Trip Computer Display CURRE...

Page 30: ... minutes Information from the Today s Trip is automatically transferred to the Previous Day s Trip when the engine has been shut off for 8 to 10 hours To view the trip data push the upper left or right function buttons to cycle through the available data The diagram below uses the Current Trip screens as an example CURRENT RESET 3 30 GALLONS CURRENT RESET 40 6 MILES CURRENT RESET 0 5 HOURS CURRENT...

Page 31: ...be replaced with TRIP Aand TRIP B These new trip computers will automatically begin recording trip data as you operate your vehicle Each trip computer Trip A Trip B will track all trips but will allow you to RESET them independent of each other at any time To view the trip data push the upper left or right function buttons to cycle through the available data The diagram below uses the Trip A scree...

Page 32: ...l be transferred to the previous day If the vehicle is driven until late at night and then used again very early in the morning the data will stay in the Today s Trip The end of the Today s Trip requires the vehicle be off the ScanGauge connected and the vehicle not driven for 8 to 10 hours Fuel based Trip Computers The Tank Trip TANK and To Empty TANK TO EMPTY trip computers can tell you much abo...

Page 33: ... up your tank and follow the Fill up Procedure shown on page 34 TANK 12 60 GALLONS TANK 175 1 MILES TANK 3 1 HOURS TANK 56 MPH AVG TANK 13 9 MPG TANK TO EMPTY 7 40 GALLONS TANK TO EMTPY 102 8 MILES TANK TO EMPTY 1 8 HOURS TANK 3 80 COST Loop Loop The displays above tell you that if your mileage remains the same as it has since the last fill up you have approximately 7 4 gallons of fuel remaining a...

Page 34: ...he Fill Up Function The FILLUP function allows you to adjust and enter the fuel level and cost values to help ScanGauge maintain accurate TO EMPTY and FUEL COST computations To access the FILLUP screen from the Home Screen press the lower right function button next to MORE Next press the upper right function button next to FILLUP Filling the Tank to Capacity To tell ScanGauge you have filled the t...

Page 35: ...umps Different tilt of the vehicle at the fuel pump due to ground slope or vehicle loading Different temperature of the fuel changes density best to refill in the morning when the fuel is colder Variations in vehicle sensors due to temperature and time Pump accuracy limits These are just some of the variables that limit absolute accuracy and show why you should never trust a low reading of DISTANC...

Page 36: ...ool When you press SCAN the ScanGauge immediately checks your vehicle s computer for any DTCs Generally a Trouble Code will cause your Check Engine light turn on SCAN TRIP GAUGE MORE 2 STORED CODES CODES CLEAR 0 STORED CODES CODES CLEAR No Codes Found If no codes where found and your Check Engine light is still on you can use the CLEAR function Trouble Codes Found If ScanGauge detects Trouble Code...

Page 37: ...ed DTCs you can access the specific Error Code ID ID and related Failure Mode ID FM by pressing the function button next to CODES If more then one code is stored you can use the lower left and right function buttons to step through the stored codes 0 STORED CODES CODES CLEAR No Codes Found Displays the Error Code ID Number Displays the Failure Mode ID See page 38 for list of standard modes Display...

Page 38: ...of problem that was detected The table to the right lists the standard Failure Mode IDs Example DTC Code The code shown in the example screen to the upper right 100 1 would indicate Low Oil Pressure ID 100 Oil Pressure FM 1 Data valid but below normal operating range Failure Mode IDs ID Description 0 Data valid but above normal operational range 1 Data valid but below normal operational range 2 Da...

Page 39: ...se from the vehicle the screen may display the message WAITING If the process is successful the display will show CODES CLEARED This should also turn off the Check Engine light on the dashboard and clear any stored data related to the DTCs If the display shows NO RESPONSE the clear codes command was unsuccessful and your vehicle is not responding to the clear command This may indicate that your ve...

Page 40: ...E X GAUGE Overview 41 Add or Edit an X GAUGE 42 Display a Trip Value as an X GAUGE 46 Using an X GAUGE 47 Performance Monitor Performance Monitor Overview 48 Recording a Performance Run 49 Accessing Performance Monitor Data 50 Reading Performance Monitor Data 51 Set a Gauge for Performance Monitoring 53 Save a Performance Run 54 Helpful Tips 54 Custom Commands Custom Commands Overview 55 Enter and...

Page 41: ...o the ScanGauge via the front panel push buttons Your ScanGauge provides enough internal memory to save up to 25 X GAUGES An extensive library of X GAUGE codes for many different vehicles can be found on our Web site at www scangauge com support Accessing X GAUGE Features From the Home Screen press the lower right function button twice next to MORE Next use the upper left and right function button...

Page 42: ...the ScanGauge using the X GAUGE Program Parameters Screens In order to read the data from the vehicle and set up a functional X GAUGE you need to have the following information Command to send How to identify a response to the command Where to find the data in the response How to scale offset and display the data The X GAUGE Program Parameter Screen An X GAUGE is entered into the ScanGauge through...

Page 43: ... RXF Data The RXF Screen is the entry for the receive filter This value tells the ScanGauge what to look for in a response from the vehicle s computer Also some of the entries tell the ScanGauge how to display the data Choices are integer tenths hundreds hexadecimal or on off There are also some fields that can turn any trip value into a gauge When you re done press the OK button to proceed to the...

Page 44: ... those that are already defined This should be avoided as it can cause confusion When you re done press the OK button to proceed to the next step Available ASCI Characters A B C D E F G H I J K L M N O P Q R S T U V W X Y Z a b c d e f g h i j k l m n o p q r s t u v w x y z 1 2 3 4 5 6 7 8 9 0 _ Step 7 Saving Your X GAUGE To save your new X GAUGE programming press the lower right function button ...

Page 45: ...hat particular slot will overwrite any X GAUGE data already present in that memory slot Once you have the desired memory slot selected press lower right function button next to SAVE All the data will be written to that X GAUGE memory slot leaving the previously selected memory slot unchanged Disabling an X GAUGE To disable an X GAUGE already in memory start as if you were going to edit the gauge I...

Page 46: ...oose a number from the Trip Designations chart on the next page When you re done press the lower right function button next to OK to move to the next screen Step 3 For RXF make the first character an 8 as shown to the right An 8 as the first character is a special condition that tells the ScanGauge that this is to be a trip gauge All values after the 8 are ignored When you re done press the lower ...

Page 47: ... to use for the X GAUGE Keep pressing as needed until the X GAUGE name appears For instance if the following screen were visible pressing the button next to RPM a number of times would eventually reach TDT Push the function buttons to cycle through the available Digital Gauges Example Gauge Screen 1937RPM 16 2MPG 55MPH 3 40GPH 1 4TDT 16 2MPG 55MPH 3 40GPH Available Trip Parameters Parameter Trip N...

Page 48: ...ta parameters during the course of the Performance Run These include the elapsed time speed distance traveled and a user defined digital gauge See information below to select a built in digital gauge for monitoring The chart below outlines the data parameters the Performance Monitor records and a brief description of these parameters Available Performance Data Parameters Parameter Description Time...

Page 49: ...e s current speed and the elapsed time of the run It will continue to record data for a period of 24 seconds or until ScanGauge detects a speed of 0 MPH You can also manually stop the record process anytime by pressing the upper right function button next to STOP The Postrun Screen Once the Performance Run is complete and recording has stopped ScanGauge will then display the Postrun Screen This sc...

Page 50: ...emory To access the most recently recorded data from the Performance Monitor Home Screen press the upper left function button next to DATA Recall and Load a Saved Performance Run ScanGauge can store up to 8 Performance Runs You can access a saved Performance Run through the Memory Screen From the Performance Monitor Home Screen press the lower left function button next to MEMORY Next use the upper...

Page 51: ...hrough the data points 712ft 84MPH BACK 8 4Sec T Example Data Screen Push the upper left and right function buttons to step through the data Push to return to the previous screen Displays the elapsed time recorded for the current data point Indicates the currently selected step through parameter see next page Push the lower right function button to toggle the step through parameter see next page D...

Page 52: ...d incrementally every 5 MPH KPH Distance D While DISTANCE units are set to Miles see page 12 data can be viewed incrementally every 100ft with special data points at 60ft 330ft 1 16 mile 660ft 1 8 mile 1320ft 1 4 mile 2640ft 1 2 mile 5280ft 1 mile While DISTANCE units are set to KM see page 12 data can be viewed incrementally every 25m with special data points at 18m 101m 201m 402m 802m 5280ft Mon...

Page 53: ... left function button to cycle through the available gauges Once you have the gauge you want to monitor selected press the upper right function button to toggle MONITOR to ON When you re ready you can arm ScanGauge for a Performance Run by pressing the lower right function button next to ARM With a digital gauge selected and the Monitor set to ON the Performance Monitor will now record data for th...

Page 54: ... about your vehicle s performance Here are a few quick tips on how to use the data after a Performance Run Get Your 1 4 mile time On the Data Screen set the step through parameter to Distance D and step through the data until distance shows 1320ft Get Your 0 60 MPH time On the Data Screen set the step through parameter to Speed S and step thru through data until speed MPH shows 60MPH The time disp...

Page 55: ...s ECU as well as for those individuals who are familiar with the J1939 and J1708 protocols Accessing the Commands Feature From the Home Screen press the lower right function button twice next to MORE Next use the upper left and right function buttons to cycle through the available options until the screen titled COMMANDS appears Finally press the lower right function button next to EDIT to enter C...

Page 56: ...y selected memory slot Commands Home Screen EDIT SEND MEMORY 0 Enter and Save a Command To enter a command into your ScanGauge you will need to enter a hexadecimal string The command can be made up of numbers 0 to 9 characters A to F and spaces ScanGauge will allow you to enter the maximum number of characters the currently selected protocol or MODE allows for see page 63 Press the lower right fun...

Page 57: ... returned after the command is sent is displayed If there is a lot of traffic on the bus this may not be the response to the command you sent It may be necessary to resend the command and check for the correct response Pressing the lower right function button next to OK will return you to the Command Home Screen 486B10410544F7 OK EDIT SEND MEMORY 0 Advanced Features 57 ...

Page 58: ... troubleshooting information For more comprehensive information please visit us online at www ScanGauge com support Basic Troubleshooting 59 View Firmware Version 61 Reset Your ScanGauge 62 Read or Set the Operating Mode 63 58 www ScanGauge com ...

Page 59: ...he universal connector select J1708 If you used the 9 pin side of the connector select J1939 or J1708 Vehicle is not J1708 J1939 compatible None ScanGaugeD requires vehicle to be either J1708 or J1939 compatible Where to Get Support Below is a list of the more common troubleshooting tips For a more comprehensive list of troubleshooting tips tricks and frequently asked questions please visit us onl...

Page 60: ...o clear the codes You may also try clearing the codes with the vehicle not running and the key in the on position Try setting the CLR DTC parameter in the Advanced Setup options from NORMAL to ALT See Set Alternate DTC Clear Methods on page 19 Some vehicles don t respond properly to the Clear Codes command and the codes cannot be cleared by the ScanGauge Some gauges are blank Some sensors are not ...

Page 61: ...ight function button twice next to MORE Next use the upper left and right function buttons to cycle through the available options until you reach the screen titled Version SCAN TRIP GAUGE MORE SETUP DISPLAY MORE FILLUP Both CHANGE MODE by Linear Logic Version Troubleshooting 61 ...

Page 62: ...vailable options until you reach the screen titled Use Defaults To begin the process push the lower left function button next to YES The next screen will ask you to confirm the reset To complete the process push the lower right function button next to YES SCAN TRIP GAUGE MORE SETUP DISPLAY MORE FILLUP Both CHANGE MODE CANCEL CONFIRM RESET YES YES Use Defaults Setting your ScanGauge to factory defa...

Page 63: ...n button twice next to MORE The current mode will be displayed in the lower left corner of the screen To manually set ScanGauge to use a particular mode push the function button next to CHANGE to cycle through the available modes The mode should be set this way only if it cannot be determined automatically SCAN TRIP GAUGE MORE SETUP DISPLAY MORE FILLUP Both CHANGE MODE Push to cycle through availa...

Page 64: ... service Linear Logic com may be able to assist in solving a problem and will not diminish your rights to the full warranty Limits and Exclusions There are no express warranties except as listed above Linear Logic SHALL NOT BE LIABLE FOR INCIDENTAL OR CONSEQUENTIAL DAMAGES RESULTING FROM THE USE OF THIS PRODUCT OR ARISING OUT OF ANY BREACH OF THIS WARRANTY ALL EXPRESS AND IMPLIED WARRANTIES INCLUD...

Reviews: