background image

User Manual 


English 


Specification 


HDMI 2.0 18Gbps 


HDCP 2.2/1.4 


HDMI Audio Pass-through, 2CH Analogue Audio Extraction 


IR Support: 20-60kHz 


Housing Material: Metal 


Operating Temperature:


0°C - 40°C (32°F - 104°F) 


Storage Temperature:


-20°C - 70°C (-4°F - 158°F) 


Humidity:


10-50% RH (non-condensing) 


Power Requirements:


100W, 110-240VAC 


Colour: Black 

Connections 


Input: 8 x HDMI Type A (Female), 8 x 3.5mm (Female),  


Output: 8 x HDMI Type A (Female), 8 x 3.5mm (Female) 


Control:


RS-232 (Female), RJ-45 (Female), 16 x IR 3.5mm (Female), IR Extension 3.5mm (Female) 


Power:


IEC C13 (Female) 

Front and Rear Panel Overview 

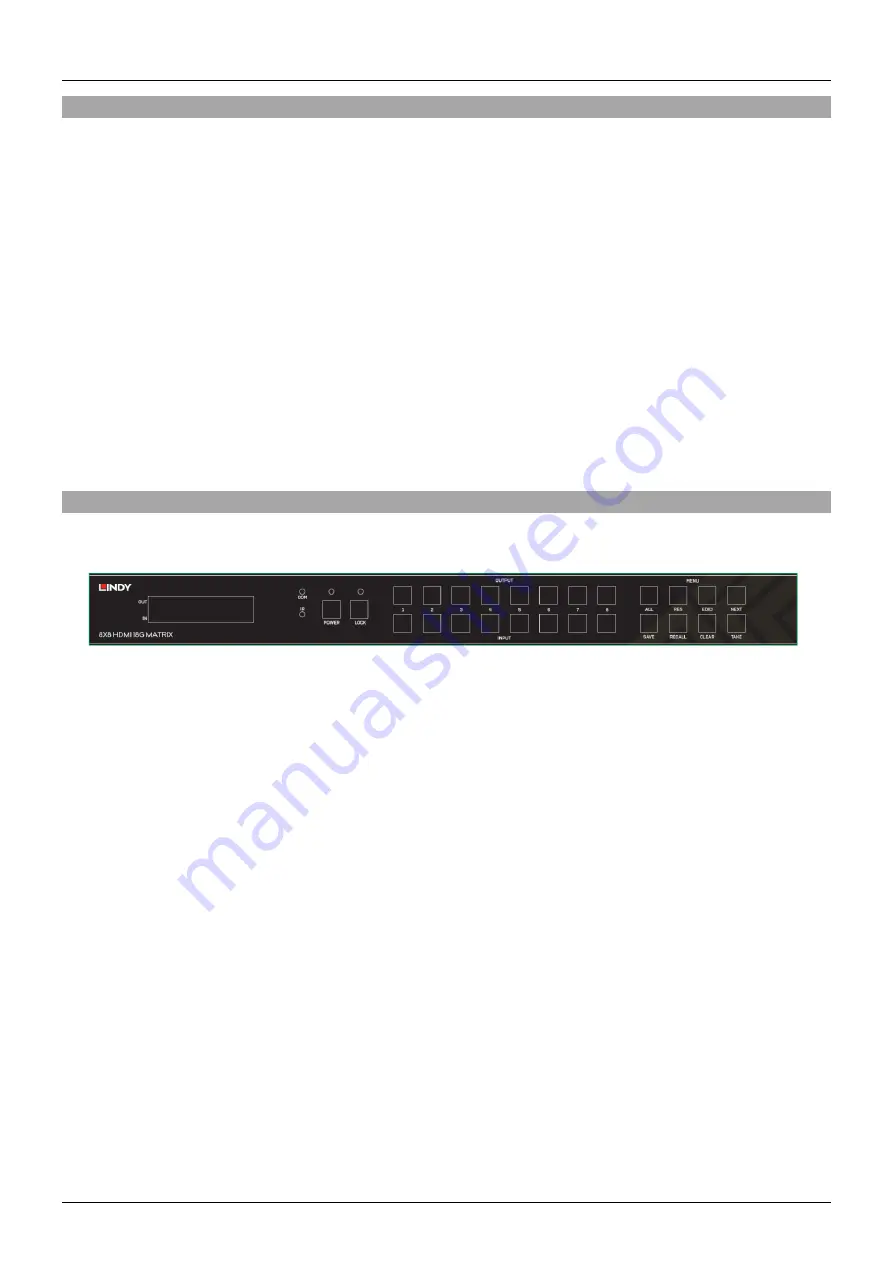
Front Panel 

Input 1-8

: Select between 8 HDMI source devices by pushing the required Input button 

Output 1-8

: Select between 8 HDMI displays by pushing the required Output button 

Power

: Press and hold for 3 seconds to turn the matrix on or off. When the matrix is on the Power LED 

will be illuminated 

Lock

: Press to lock or unlock the matrix’s front panel push button control. When the controls are locked 

the Lock LED will be illuminated. 

All

: Press ALL then a chosen Input and the Take button 

consecutively, this will switch the user’s chosen 

Input to output on all output displays 

Save

: Press Save and a chosen Output, this will save the current layout of Inputs 

– Outputs under the 

selected Output push button. The maximum number of possible saved layouts is 8. 

Recall

: Press Recall and the same chosen Output as above to set the chosen layout from the previously 

set 8 options. 

Res

: Press Res, a chosen output,  then Next. Repeatedly pressing Next will allow the user to cycle through 

several output resolutions for the selected display. Press Take to select the desired resolution. When Auto 
resolution is selected the optimum resolution of the display will be chosen. 
The options for supported output resolutions are as followed: 
Auto  /  3840x2160@60Hz  /  3840x2160@50Hz  /  3840x2160@30Hz  /  1920x1200@60Hz  / 
1920hz1080@60Hz  /  1920x1080@50Hz  /  1360x768@60Hz  /  1280x1024@60Hz  /  1280x720  @60Hz  / 
1280x720@50Hz / 1024x768@60Hz 

EDID

: Press EDID, then a chosen Input, then Next. This will allow the user to manage the EDID of the 

chosen Input port. The Manual EDID setting is for EDID Management via the Matrix’s control software. 
The options for EDID are as follows: 
Manual  /  3840x2160@60Hz  /  3840x2160@30Hz  /    1920x1200@60Hz  /  1920x1080@60Hz  / 
1280x1024@60Hz /  1280x720@60Hz /  1024x768@60Hz 

Summary of Contents for 38260

Page 1: ...LINDY Group FIRST EDITION November 2019 8x8 HDMI 18G Matrix with Video Wall Scaling User Manual English No 38260 lindy com Tested to comply with FCC Standards For Home and Office Use...

Page 2: ......

Page 3: ...adapters are firmly secured and locked in place before inserting into a wall socket Introduction Thank you for purchasing the 8x8 HDMI 18G Matrix with Video Wall Scaling This product has been designe...

Page 4: ...button consecutively this will switch the user s chosen Input to output on all output displays Save Press Save and a chosen Output this will save the current layout of Inputs Outputs under the selecte...

Page 5: ...the same number Extract analogue audio via a 3 5mm connection from HDMI IR Input Output Ports 1 8 These correspond with the Input HDMI to Output HDMI port of the same number for control from the disp...

Page 6: ...l over each source and display RS 232 and LAN Control For RS232 Control the baud rate is 9600 via the DBP Connector RS 232 1 Please see below for the pin layout of the DB9 Connector Please note the RS...

Page 7: ...mation of the matrix This can also be done via the Network Setting page To set IP address On the Network Setting tab select Find Via UART to read the current IP address Modify the IP address type to S...

Page 8: ...Mode Select Search device Select the matrix to control Once selected the software will read the network configuration Select Disconnected to connect to the matrix Once a successful connection is made...

Page 9: ...ve current matrix routing System Reset Factory reset the unit EDID Select this button to open the EDID Management page EDID Management Read EDID Select your chosen output port and select Read to show...

Page 10: ...matrix will rely on the analogue audio input connection for audio External The matrix will use the corresponding analogue audio input connection Output Type This allows for changes to be made to the...

Page 11: ...ing of devices at time intervals Select the Output port that requires control Select CTRL and the desired ports to select multiple outputs Select CTRL and then select the desired input ports Select th...

Page 12: ...ed when Send all outputs combined is ticked Un ticked When the number of the selected input ports is not the same as selected output ports the next loop will automatically start once the final output...

Page 13: ...Input Select Select the Input port to display on the video wall 1 8 Output Select Sync the desired output with the connected display Output Format Set the Output resolution Select one of the screens a...

Page 14: ...er can configure the bezel from all sides of each display within a video wall The maximum bezel adjustment is 100Pixels Once set please click Set to confirm Separate Video Wall layouts This matrix all...

Page 15: ...layout is configured pleas eclick Save Scene and enter the details To load a scene select Load Scene and enter the desired details of the scene to be loaded Web Control For basic switching control Inp...

Page 16: ...rts HDCP Please check the Cat X cable is connected securely If the Web Gui shows the message device response timeout after connection The IP address of the PC and Matrix may not be in the same network...

Page 17: ...ment This device complies with part 15 of the FCC Rules Operation is subject to the following two conditions 1 This device may not cause harmful interference and 2 This device must accept any interfer...

Page 18: ...ess bernehmen die Ger tehersteller LINDY bietet deutschen Endverbrauchern ein kostenloses R cknahmesystem an beachten Sie bitte dass Batterien und Akkus den Produkten vor der R ckgabe an das R cknahme...

Reviews: