background image

LINCOLN GmbH • Postfach 1263 • D-69183 Walldorf • Tel +49 (6227) 33-0 • Fax +49 (6227) 33-259 • Tx 466088

Subject to modifications

Owner Manual

Technical Description

Page 11 from 13

2.1A-28001-A94

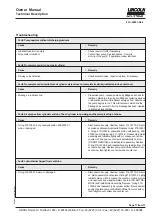
• Fault: Pump operates without discharging lubricant

• Cause

Remedy

• Lubricant reservoir is empty.

Check reservoir, refill, if necessary.

• Air pockets in lubricant.

Vent air from pump. See instructions „ Commis
sioning of the pump“. If applicable, renew lubricant.

• Fault: No compressed air on pump air cylinder

• Cause

Remedy

• 3/2-way valve defective

Check solenoid valve, repair or replace, if necessary.

• Fault: No compressed air available at air cylinder, piston does not complete its stroke (indicator pin does not move)

• Cause

Remedy

• Blockage in lubricant line.

Pressurize pump. Loosen pump body fittings and check for
lubricant  discharge. then loosen fittings at metering devices
or lubrication points until lubricant emerges from outlets and
the pump begins to run. This will indicate in which line the
blockage has occured. After the blockage hasbeen  cleared,
re-tighten all loose fittings.

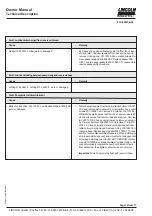
• Fault: Air escapes from cylinder vent tube. The air cylinder is operating and the piston is at top of stroke.

• Cause

Remedy

• O-ring 219-13043-6 or pneumatic piston 504-30342-1

Disconnect air supply. Unscrew bottom 314-18770-2. Remo-

worn or damaged.

ve piston and dissemble all parts. Replace O-ring  219-12451-
5, O-ring 219-13043-6, pneumatic piston with packing  504-
30342-1and retaining ring 211-12472-2 . Reassembly piston
assembly and lubricate lightly with oil. Loosen vent screw
counter nut and open vent screw approximately one turn
(DO NOT REMOVE)) and install piston assembly. Replace
O-ring 219-12225-6 and reassembly air cylinder bottom. Re-
connect air supply. Operate pump until lubricant flows from
vent screw, then tighten vent screw and counter nut.

• Fault: Lubricant discharged from vent tube.

• Cause

Remedy

• O-ring 219-12451-5 worn or damaged

Disconnect air supply. Unscrew bottom 314-18770-2. Remo-
ve  piston assembly and replace O-Ring 219-12451-5. Lightly
lubricate piston with oil. Loosen the counter nut at vent screw
and open vent screw approximately one turn (DO NOT RE-
MOVE) and install piston assembly. Replace O-ring 219-
12225-6 and reassembly air cylinder bottom. Reconnect air
supply. Operate pump until lubricant flows from vent screw,
then retighten vent screw and counter nut.

Troubleshooting

Summary of Contents for PP:

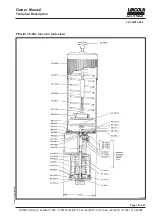
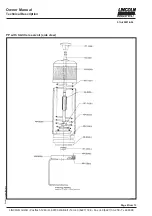
Page 1: ...into operation 3 Maintenance and repair 3 QuicklubGreasePumpModelPP 4 Technical Data 4 Commissioning of the system 5 Pump and main lines 5 Typical outlet combination 5 Contents Page PP with 1 5 litre reservoir Front view 6 PP with 1 5 litre reservoir Side view 7 PP with 0 4 litre reservoir Side view 8 Filling instruction for model PP 4 9 Spare part list 10 Troubleshooting 11 Declaration by the man...

Page 2: ...ure to heed the safety warnings may result in equipment and environment damage and or personal injury Ignoring the afety no tes may result in the disqualification from damage claim Safety instructions for user operator Protection devices against accidental contact for moving parts must not be removed from a pump in operation Leakages of harmful materials must be dumped wthout jeopardi zing human b...

Page 3: ...lectrical connections All operations on electrical equipment must be out by qualified staffonly Electrical connection of level controls inaccordancewithterminaldiagramsinAnnexorwithcicuitdiagram Maintenance and repair All repair work must be executed only by authorized and quali fiedpersonnelusingoriginalspareparts Priortoanypumprepair thefollowinginstructionsmustbecom pliedwith disconnect air sup...

Page 4: ... compressed air leaves the air cylinder The piston spring moves the piston downward The ball of the suction valve unseats allowing lubricant from reservoir to refill the discharge cavity in the pump bodey for the next lubrication cycle Important The pump must be installed in vertical position Fillingofreservoir It is advisable to fill the reservoir via the hydraulic lubrication fitting 251 14045 1...

Page 5: ...ivate the pump until lubricant is emerging from the disconnected main lines Then re tighten the inlet fittings of the metering device Repeat this procedure until all main lines are filled Feed lines It is advisable to fill each feed line with lubricant before it is connected with the metering device outlet FillinginstructionsformodelPP4 Remove pump reservoir with cover Immerse open part of pump re...

Page 6: ...Postfach 1263 D 69183 Walldorf Tel 49 6227 33 0 Fax 49 6227 33 259 Tx 466088 Page 6 from 13 Owner Manual Technical Description 2 1A 28001 A94 Subject to modifications PP with 1 5 litre reservoir Front view 1012a97a ...

Page 7: ... Postfach 1263 D 69183 Walldorf Tel 49 6227 33 0 Fax 49 6227 33 259 Tx 466088 Subject to modifications Owner Manual Technical Description Page 7 from 13 2 1A 28001 A94 PP with 1 5 litre reservoir side view 1013a97a ...

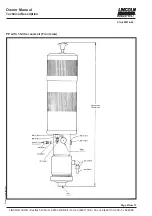
Page 8: ... Postfach 1263 D 69183 Walldorf Tel 49 6227 33 0 Fax 49 6227 33 259 Tx 466088 Page 8 from 13 Owner Manual Technical Description 2 1A 28001 A94 Subject to modifications PP with 0 4 litre reservoir side view 1014a97 ...

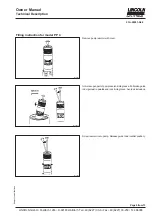
Page 9: ...nical Description Page 9 from 13 2 1A 28001 A94 Filling instruction for model PP 4 Remove pump reseroir with cover Immerse open part of pump reservoir into grease Pull piston guide rod vigorousl upwards and lock it into groove Avoid air inclusions Screw reservoir onto pump Release guide rode central position 1015a97 1016a97a 1017a97 ...

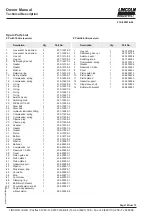
Page 10: ... 19125 1 29 Gasket 1 306 17831 3 30 Gasket 2 306 17833 1 31 Piston 1 310 19156 1 32 Bottom 1 314 18770 2 33 Cylinder 1 314 19108 2 34 Washer 1 318 18997 1 35 Ball seat 1 404 20235 2 36 Compression nut 1 404 20236 4 37 Reservoir 1 5 litre 1 404 20249 1 38 Cover 1 404 20250 1 39 Piston guide rod 1 404 20251 1 40 Piston plate 1 1 404 20252 3 41 Piston plate 2 1 404 20253 1 42 Gaskert support 1 404 20...

Page 11: ... cylinder vent tube The air cylinder is operating and the piston is at top of stroke Cause Remedy O ring 219 13043 6 or pneumatic piston 504 30342 1 Disconnect air supply Unscrew bottom 314 18770 2 Remo worn or damaged ve piston and dissemble all parts Replace O ring 219 12451 5 O ring 219 13043 6 pneumatic piston with packing 504 30342 1and retaining ring 211 12472 2 Reassembly piston assembly an...

Page 12: ... ball seat 404 20235 2 dirty Disconnect air supply Unscrew air cylinder bottom 314 187 worn or damaged 70 2 and remove piston assembly Unscrew two hex socket screws 201 12594 1 and remove air cylinder 314 19108 2 Withdraw the piston guide rod from top of reservoir and latch Unscrew reservoir from reservoir base and remove Unscrew two 201 12018 3 hex socket screws and remove pump bo dy Remove ball ...

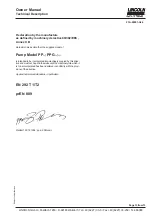
Page 13: ...ery derective 89 392 EEC Annex II B Herewhich we declare that the supplied model of Pump Model PP PPG is intended to be incorporated into machinery covered by this direc tive and must not be put into service until the machinery into which it is to be incorporated has been declared in confirmity with the provi sions of the directive Applied harmonized standards in particulare EN 292 T1 T2 prEN 809 ...

Reviews: