


B-7
OPERATION
POWER MIG
®
360MP
ARC CONTROL
The
POWER
Mig
®
360 allows the user to make adjusts to the
welding arc via the Weld Settings screen. Options available are
dependent on the welding process you have selected. The table
below lists the arc controls available per welding process.
Legacy Weld Modes
The
POWER
MIG
®
360 has all the functionality of the
POWER
MIG
®
350, and more. If you are familiar with the weld modes of
the
POWER
MIG
®
350, you can access these weld modes via
the
Legacy Modes menu. You can scroll through the list of
Legacy
Weld Modes and access all the modes that were
available on the
POWER
MIG
®
3
5
0. Press the right selector
knob to select a Legacy
Mode. Turn the left and right selector
knobs to make any
adjustments to the WFS/Amperage and
Voltage/Trim.
See Appendix for the complete list of Legacy Weld
Modes.
Loading Memories
The
POWER
MIG
®
360 enables the user to save the
Ready.Set.Weld
TM
and Weld Setting parameters they input in
order to quickly access in the future.
To save your weld settings, access the Weld Settings from the
Home Screen by pressing the right selector knob. Use the right
selector knob to scroll to the Save icon. Select the save icon, and
assign a spot in the list to save the settings to.
Note: Selecting a spot in the list that is already assigned to
another weld process will overwrite the previous weld process.
To access the saved weld settings, from the home screen, press
the middle button to select a weld process. Use the right selector
knob to scroll to and select the Saved icon.
Scroll to the spot in the list you assigned your desired weld
settings.
REMOTE GUN POT -
Disable or Enable Remote Gun Pot
BRIGHTNESS -
The brightness of the display can be
adjusted
within the settings option.
MEASUREMENT SYSTEM -
The units of measure can be
chosen
by the user. The units can be selected as metric
LANGUAGE -
The language of the text present in the user
interface software can be modified. The available
FACTORY RESET -
The user interface software settings
can be
reset to the original factory settings.
SYSTEM INFO -
Information regarding the software
revision of the
user interface and the software revision of
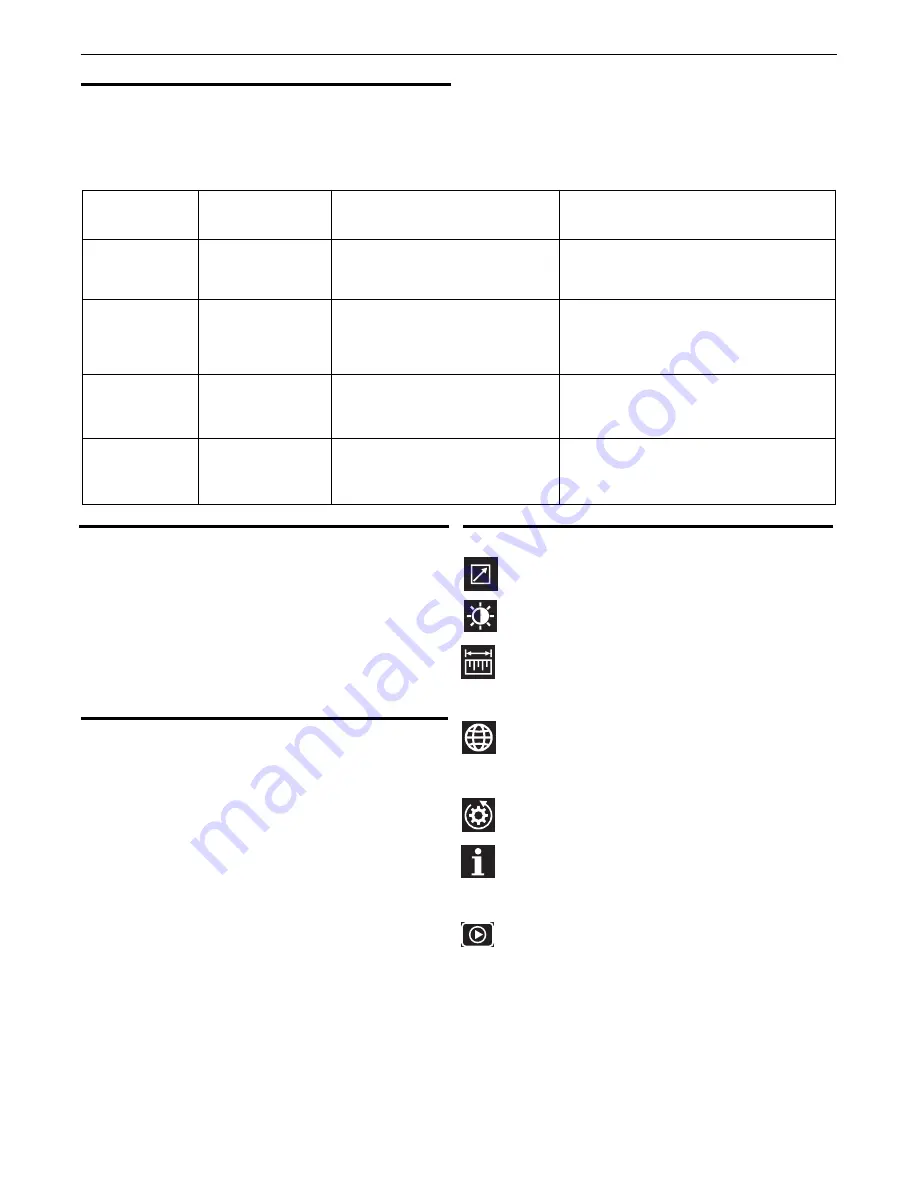
PROCESS
ARC CONTROL
SYNONYM
SETTING
APPLICATION AND RESULT
SMAW (STICK)
Arc Force
Lower (-1 to -10) for low hydrogen
types of electrodes. Higher (+1 to +10)
for cellulosic and other types.
Negative
settings are soft and buttery for low
hydrogen electrodes.
Positive
settings are harsh
and digging for other types of electrodes.
Short circuiting
metal transfer
Pinch Control
Setting -1 to -10 for softer higher
energy arc. S1 to +10 for a
crisper lower energy arc.
Negative settings result in a
more fluid puddle
and larger droplet size. The positive settings
reduce the droplet size and reduce energy to
the
arc.
Vertical Up
,
Pulse
,
Pulse – on –Pulse
®
Pulsed frequency
control
Negative settings reduces frequency.
Positive settings increase frequency.
Negative settings result in a wider bead with
more distinct ripples. Positive settings narrow the
resultant bead and the ripples are less distinct.
Pulse
Arc Control
Negative settings widen the arc cone.
Positive settings focus the arc cone.
Negative
settings result in a wider bead with
more
distinct ripples.
Positive
settings narrow
the
resultant arc and weld bead.
language options are English, French and Spanish. The default
language is English.
or English. The default units are English.
the inverter board is present in the information section.
DEMO MODE
- Selecting demo mode enables a series of
automated transitions through the display screen that will
provide the user a visual overview of the user interface and the
machine’s capabilities. Pressing any button while in Demo Mode
will pause the demonstration for 30 seconds. In demo mode the
output is disabled. To permit welding, the user must exit demo
mode or power cycle the machine, or disable it via the
Configurations Menu.
Configurations


