background image

7

EN

SUPRATRONIK LOCK: USER MANUAL

 

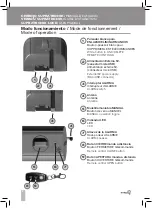
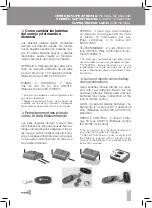
Setting the remote controls

In the rear part of the lock there is a WHI-

TE KEY (1) hidden inside the body.

1. 

LINK REMOTE CONTROLS: The remo-

te controls that are delivered with the locks 

come UNLINKED with the lock. The same 

remote control can be linked to more than 

one lock.

LINKING operation:

1.1  Press the WHITE KEY (1) until the 

LED (6) lights up in orange. (Wi-

thout acoustic signal). 

1.2  Press any key on the remote con-

trol (8) (9) and observe that the LED 

(6) changes to green, and the re-

mote control is linked. (Repeat this 

step with the different remote con-

trols to be linked).

1.3  Once the operation to LINK REMO-

TE CONTROLS has been comple-

ted, wait for the LED (6) to switch 

off automatically.

1.4 Check that the remote controls 

that have been linked are working 

correctly from the inside.

*Each lock allows the linking of 340 re-

mote controls.

**This operation does not delete remote 

controls previously recorded and allows 

you to add new ones.

2.

 DELETE ALL THE REMOTE CON-

TROLS: 

2.1  Press and hold the white button (1) 

until the LED lights up in RED and you 

hear an acoustic signal.

LOST REMOTE CONTROL: In the event that 

a remote control is lost you must carry out 

the deleting of remote controls and repeat 

step 1 with the remaining remote controls. 

The lost remote control will no longer work.

 Operation of lock with remote 

control 

1. 

Press the CLOSE button (8) on the 

remote control. The RED LED will light 

up for the duration of the operation and 

you will hear a BEEP when it has finished. 

This means that the lock is CLOSED.

*The CLOSING operation should be ca-

rried out AFTER making sure, using the 

main lock, that the door is properly clo-

sed.

2. 

Press the OPEN button (9) on the re-

mote control. The GREEN LED will light 

up for the duration of the operation and 

you will hear two beeps when it has finis-

hed. This means that the lock is OPEN.

*The operation of OPENING the lock 

should be done BEFORE opening the 

main door lock.

3.

 FAILED OPERATION: A CLOSING or 

OPENING operation that is not carried 

out correctly will lead to a FAILED ope-

ration. In this event the lock will BEEP 

FOUR TIMES and the ORANGE LED 

(6) will light up, indicating that it has not 

been possible to complete the selected 

operation. In this case the lock will be 

ready for a new attempt.

**A FAILED OPERATION may be due to:

3.1  Friction between the lever and the 

keep in the door frame, due to in-

correct installation or because the 

door has settled, so that the lock has 

gone out of alignment.

3.2 The LOCK (8) command is ac-

tivated from the remote control 

before the door is completely 

closed. In this case the lever will 

collide with the keep without en-

tering the housing correctly.

Summary of Contents for SUPRATRONIK 4940TK

Page 1: ...Manual de usuario Guide d utilisation User Manual 4940TK ...

Page 2: ...LETE REMOTE CONTROLS Alimentación Externa 5V conector microUSB Alimentation externe 5V connecteur microUSB External 5V power supply MicroUSB connector Interruptor ALARMA Interrupteur d ALARME ALARM switch Antena Antenne Antenna Muletilla maniobra MANUAL Bouton de verrou MANUEL MANUAL operation toggle Indicador LED LED LED Altavoz de la ALARMA Haut parleur d ALARME ALARM speaker Botón CIERRE mando ...

Page 3: ...ar el cerrojo con el mando a distancia 1 Al presionar el botón de CIERRE 8 en el mando a distancia se encenderá el LED ROJO mientras dure la maniobra y se escuchara UN PITIDO al finalizarla lo que significa que el cerrojo está CERRADO La operación de CIERRE del cerrojo se deberá realizar DESPUÉS de asegurar con la cerradura principal que la puerta está debidamente cerrada 2 Al presionar el botón d...

Page 4: ...ría del cerrojo esta baja el cerrojo está diseñado para que entre en un MODO de SEGURIDAD En este modo si el usuario intenta CERRAR el cerrojo manualmente éste se abrirá inmediatamente con el motor De esta manera se asegura que si la ba tería está baja no se permite que se cierre manualmente desde dentro de la casa para evitar el riesgo de que si en la casa hay un niño o una persona dependiente so...

Page 5: ...mer toutes les télécommandes et recommencer la 1ère étape avec les télécommandes existantes La télécom mande perdue arrêtera de fonctionner Fonctionnement du verrou avec télécommande 1 Appuyez sur le bouton de FERMETU RE 8 de la télécommande la LED ROU GE s éteindra le temps de la manœuvre et vous entendrez un BIP à la fin de celle ci Cela signifie que le verrou est FERMÉ L opération de FERMETURE ...

Page 6: ...us recommandons de laisser la source d alimentation auxiliaire de 5Vdc 500 mA non incluse branchée sur le cou rant ainsi que 4 piles alcalines AAA neuves si vous quittez l immeuble pour longtemps que la porte ne soit complètement fermée Dans ce cas le levier heur tera le fermoir sans entrer correcte ment dans son logement Fonctionnement manuel du verrou Le verrou est conçu pour pouvoir être manœuv...

Page 7: ...tep 1 with the remaining remote controls The lost remote control will no longer work Operation of lock with remote control 1 Press the CLOSE button 8 on the remote control The RED LED will light up for the duration of the operation and you will hear a BEEP when it has finished This means that the lock is CLOSED The CLOSING operation should be ca rried out AFTER making sure using the main lock that...

Page 8: ...y mode If the battery of the lock is low the lock is designed to go into a SAFETY MODE In this mode if the user attempts to CLOSE the lock manually it will immediately open using the motor This will ensure that if the battery is low it is not possible to lock manually from insi de the house This is to avoid the danger that a child or a dependent person who is alone in the house might lock themselv...

Page 9: ... neu ves et usagées ensemble peut provoquer un mauvais fonctionnement du verrou ou de la télécommande VERROU 4 piles type AAA alcalines La durée de vie des piles est de 2 ans et faisant 10 manœuvres par jour Piles conformes à la norme IEC 62133 2012 TÉLÉCOMMANDE 2 piles lithium 3V type CR2016 Piles conformes à la nor me IEC 60086 4 Le verrou ne supprimera pas les télécomman des raccordées lorsque ...

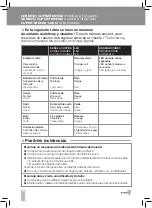
Page 10: ...rrojo funciona bien Posibles incidencias En la siguiente tabla se hace un resumen de señales acústicas y visuales Dans le tableau suivant vous trouverez un résumé des signaux sonores et visuels The following table summarises the acoustic and visual signals SEÑAL ACÚSTICA LED OBSERVACIONES SIGNAL SONORE LED OBSERVATIONS ACOUSTIC SIGNAL LED COMMENTS Enlazar mando Naranja verde LED durante varios seg...

Page 11: ...uelle si le levier qui sort du verrou est en contact avec le fermoir de l encadrement de la porte dû à une mauvaise installation du produit ou à une déformation de la porte d Si vous n arrivez pas à résoudre le problème en ayant suivi les étapes précédentes contactez votre revendeur L alarme ne se désactive pas a Essayez de désactiver l alarme avec une autre télécommande b Enlevez les piles du ver...

Page 12: ...and gives fault signals a Check that you have removed the black part used for installation b Open the door and carry out an electrical operation to check that the lock is working correctly c Check by means of a manual operation if the lever coming out of the lock is coming into contact with the keep in the door frame due to incorrect installation of the product or deformation of the door d If the ...

Reviews: