Lightspeed TOPCAT Registration Manual Download Page 9

REGISTRATION USING THE ACTIVATE APP 

ADDING OR REPLACING AN ACTIVATE POD

For users adding a Pod, or replacing a lost or malfunctioning Pod.

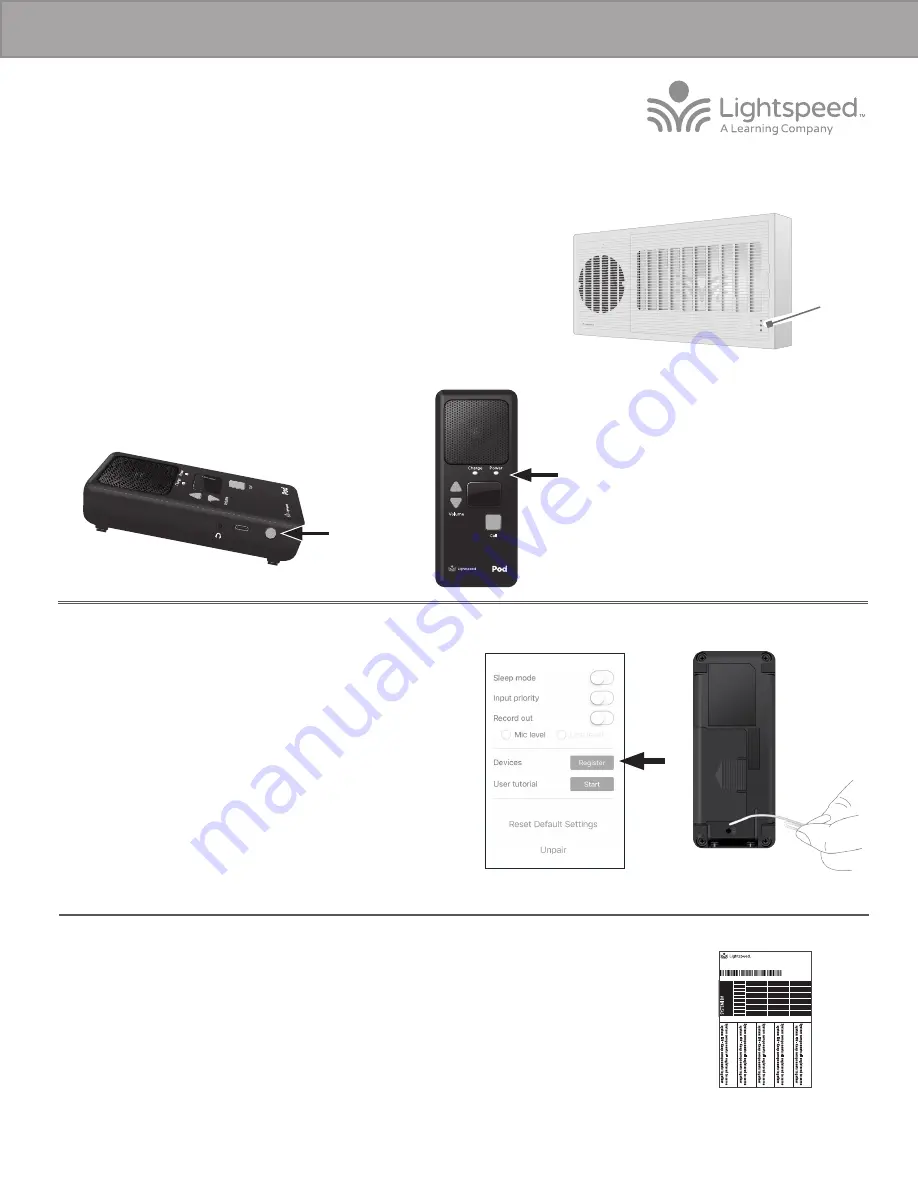
1.  Start with the Topcat plugged in and powered on. To verify it is powered 

on, there will be a blue power light on the front of the Topcat.If replacing 

a Pod, make sure the malfunctioning Pod is powered off before you begin 
the process.

2. 

Power on the new Pod. The blue power light should begin blinking.

3. 

On your mobile device, open the Lightspeed Activate app.

4. 

Go to the ‘Settings’ tab and scroll down to find the ‘Register’ button and press 
the button.

5. 

Follow the instructions within the app to register the new Pod.

6. 

When the Pod is registered, you will see the Pod icon change to green on the 
screen.

7. 

The registration is complete. Using the app, select the new pod and begin speaking into the Flexmike to check for audio.

8. 

Place system ID number (attached to the Topcat Quickstart Guide) on the new Pod.

NOTE: 

if at any point, the Topcat or Pod lights begin blinking rapidly, that indicates a registration error. Power off the Pod, 

then repeat steps 3-6.

SYS

TEM ID#

SYS

TEM ID#

SYS

TEM ID#

SYS

TEM ID#

SYS

TEM ID#

RETAIN EXTRA LABELS IN THE EVENT A COMPONENT IS REPLACED OR ADDED. 

Ma

tch components

to this system ID#

Apply to system components to indicate which parts are registered 

as a system.  Keep registered items together when storing away.

Registration ID Labels

00-01

00-01

00-01

00-01

00-01

00-01

00-01

00-01

00-01

00-01

00-01

00-01

00-01

00-01

00-01

00-01

00-01

00-01

00-01

00-01

00-01

00-01

00-01

00-01

00-01

00-01

00-01

00-01

00-01

00-01

00-01

00-01

00-01

00-01

334-0162-02-00-01

10101

TOPCAT ACCESS REGISTRATION GUIDE

Topcat 

Access

Solid light

Summary of Contents for TOPCAT

Page 1: ...nd pull the battery out leaving it plugged in to reveal the registration button 5 Use another registered functional component existing Flexmike Sharemike or Media Connector to trigger the registration...

Page 2: ...lights begin blinking rapidly that indicates a registration error Turn the new Flexmike off and repeat steps 4 9 5 Open the new Flexmike battery compartment and pull the battery out leaving it plugge...

Page 3: ...htened out briefly press the registration button on the inside of the Topcat The 1 and 2 lights will begin blinking on the Topcat 9 The registration is complete You can begin speaking into the new Fle...

Page 4: ...rn the new Sharemike off and repeat steps 4 9 Power On Solid light Existing Flexmike 6 Use another registered functional component existing Flexmike Sharemike or Media Connector to trigger the registr...

Page 5: ...paperclip with the end straightened out press and hold the registration button inside the registered Flexmike for 3 seconds The 1 and 2 amber lights will begin blinking on the Topcat 7 Briefly press...

Page 6: ...e You can now plug any audio source into the Activate to verify there is audio 9 Place system ID number attached to the Topcat Quickstart Guide on the new Activate NOTE if at any point the Topcat or A...

Page 7: ...Mic 2 button to add replace the Flexmike 8 Follow the instructions within the app to register the new Flexmike 9 When the Flexmike is registered you will see the Mic 1 or Mic 2 icon appear on the scre...

Page 8: ...EM ID SYSTEM ID SYSTEM ID SYSTEM ID SYSTEM ID RETAIN EXTRA LABELS IN THE EVENT A COMPONENT IS REPLACED OR ADDED Match components to this system ID Apply to system components to indicate which parts ar...

Page 9: ...7 The registration is complete Using the app select the new pod and begin speaking into the Flexmike to check for audio 8 Place system ID number attached to the Topcat Quickstart Guide on the new Pod...

Page 10: ...rompt you to Pair with the remote Press the pair button to complete the process the app will take you through a tutorial on how to use the vaious functions 14 When using the app we recommend always le...

Page 11: ...the Flexmike will have just one light blinking 1 or 2 depending on which microphone is being replaced and then turn solid 10 The registration is complete Press the center button on the remote and beg...

Page 12: ...the Sharemike will turn solid 10 The registration is complete Press the center button on the remote and begin speaking into the Sharemike to verify there is audio 11 Place system ID number attached to...

Page 13: ...ion is complete Using the remote select the new pod and begin speaking into the Flexmike to check for audio 10 Once verified apply the appropriate pod number sticker on top of the unit for easy identi...

Reviews: