8 0 0 i X U s e r M a n u a l
800iX User Manual | 16
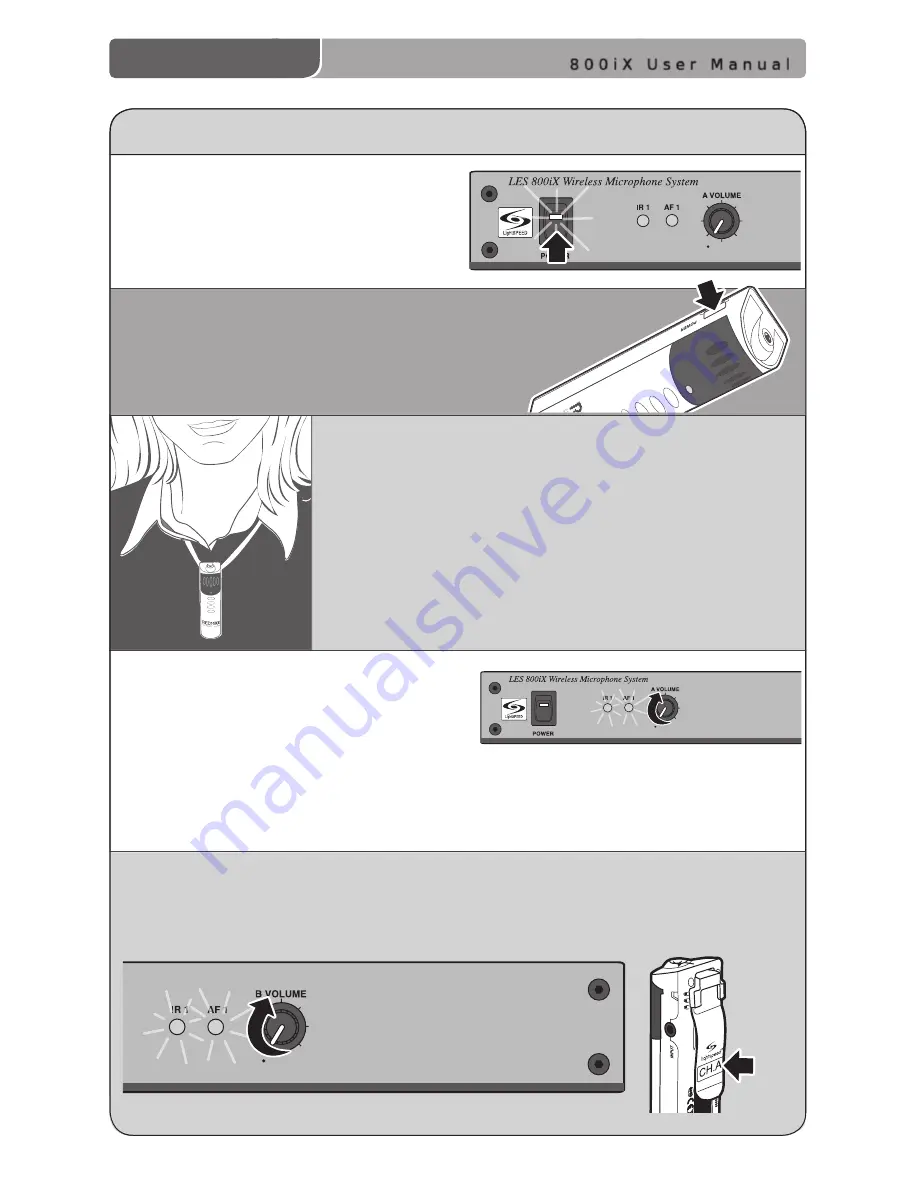
3. Slip
the REDMIKE with lanyard around the neck
and position the top of the microphone just below
the collarbone.
NOTE:
Positioning of the REDMIKE is
critical for proper volume adjustment.
4.
While
speaking in a normal voice
slowly increase the volume of the
corresponding channel on the 800iX
until your voice is barely audible.
REMEMBER:
This equipment
supplements the user’s voice so they are able to speak in a conversational tone.
Having the volume set too high will result in feedback and listener fatigue.
INITIAL SET-UP OF REDMIKE
5. If
a
second REDMIKE was purchased, repeat
steps 2-4.
1. Turn
the 800iX power switch to the
ON position. The RED LED on the
switch will glow.
2. Turn
on the REDMIKE. The RED IR LED on the
800iX will light to indicate a signal is being
received.
NOTE:
Each REDMIKE
has its channel pre-set to
either A or B, as indicated
on the back of the Mic.
Summary of Contents for 800IX
Page 1: ...U s e r M a n u a l 800iX Classroom Audio System...
Page 2: ......
Page 6: ...8 0 0 i X U s e r M a n u a l 1 800iX User Manual SECTION 1 System Overview...
Page 12: ...8 0 0 i X U s e r M a n u a l 7 800iX User Manual SECTION 2 Installation...
Page 43: ...8 0 0 i X U s e r M a n u a l 800iX User Manual 38 USER NOTES...
Page 44: ...8 0 0 i X U s e r M a n u a l 800iX User Manual 39 USER NOTES...
Page 45: ...8 0 0 i X U s e r M a n u a l 800iX User Manual 40 USER NOTES...
Page 46: ...8 0 0 i X U s e r M a n u a l 800iX User Manual 41 USER NOTES...
Page 47: ......


