background image

OPERATION

CAUTION:
Before beginning a workout session ensure Safety Tether Key is properly placed onto the
Computer Console and the Safety Clip is securely attached to an article of your clothing.
Always begin the treadmill standing on the side rails-not on the running belt. Allow the 
treadmill to reach a speed of at least 0.8 km/h before walking on the running belt.

I: Operation in Quick Start Mode

Ensure this treadmill is plugged into a nominal 230 volt 50/60hz, which has a grounding plug.

Step 1: Power Up 

z

Press the Master Power Switch located at the front of the treadmill to ON position. The LCD 

console will immediately run a self diagnostic display. After that it will display current system 
status.

Step 2: Begin Workout

z

Press the 

ON

button then press UP button to increase running speed. 

z

As the running speed reaches 0.8 km/h you can start walking on the treadmill. To adjust the

desired speed by pressing the UP or DOWN button to increase or decrease running speed. 

z

During exercise press 

OFF 

button to stop operation.

11

Summary of Contents for 97320

Page 1: ...PACE MAKER PRO OWNER S MANUAL MODEL 97320 The specifications of this product may vary from this photo subject to change without notice ...

Page 2: ...nded under the conditions that it has been installed and operated in accordance with LifeGear s Owner s Manual LifeGear s obligation under this warranty is limited to replacing or repairing free of charge any parts which may prove to be defective under normal home use This warranty does not include any damage caused by improper operation misuse or commercial application From the date of purchase t...

Page 3: ... those described in this manual Should any problems arise discontinue use and consult an Authorized Service Representative zDo not use outdoors zDo not operate where aerosol spray can products are being used or where oxygen is being administered zDo not pull the treadmill by its power cord or use the cord as a handle zNever operate the treadmill with the air openings blocked Keep air openings free...

Page 4: ...d into a nominal 230 volt 50 60 hz which has a grounding zKeep hands clear of all moving parts Never place hands feet under the treadmill zDo not use the treadmill on a carpet that is greater than 1 2 inch in height zBefore each use check that the running belt is aligned and centered on the treadmill bed and all visible fasteners on the treadmill are sufficiently tightened and secure WARNING BEFOR...

Page 5: ...3 24 25 27 28 26 29 30 31 32 34 35 36 37 38 39 40 41 43 42 88 44 45 47 47 46 48 48 49 49 50 55 50 52 53 54 55 56 29 69 55 51 56 58 59 60 61 63 64 65 49 62 62 49 64 66 67 68 70 55 55 71 72 75 75 74 74 73 73 66 33 76 77 78 79 80 26 26 21 26 24 26 82 83 84 85 86 87 81 81 81 81 76 88 57 ...

Page 6: ...il 2 25 Bolt M8 60 2 26 Screw M4 16 13 27 Screw M6 35 8 28 Nut M6 8 29 Nut M8 2 30 End Cap 25 50 2 31 Dust Cover Up 1 32 Dust Cover Lower 1 33 Screw M4 60 4 34 L Handrail 1 35 R Handrail 1 36 Handlebar 1 37 End Cap for Handlebar 2 38 Computer 1 39 Computer Bracket Cover 1 40 Bolt M5 10 4 41 Safety Magnet 1 42 Handlebar Adorner 2 43 Bolt M8 50 4 44 End Cap 30 60 2 45 Foam Grip 2 46 Spacer 2 47 Cap ...

Page 7: ... 2 72 Screw M4 12 7 73 Sensor Cable I 850 mm 1 74 Sensor Cable II 1100 mm 1 75 Sensor Cable III 600 mm 1 76 Speed Button W Wire 1 77 End Cap 25 1 78 End Cap 20 1 79 Fuse Box 1 80 Cable Power Plug 1 81 Nylon Nut M4 7 82 Earth Lead 1 83 Cable Switch PCB 1 84 Wire for Fuse Box 1 85 Inductance 34MH 40MH 1 86 Wave Filter 06SS4 2DC1 1 87 Ring for Cable Power 1 88 Mode Button w Wire 1 ...

Page 8: ...bed parts are all the parts you need to assemble this machine Before you start to assemble please check the hardware packing to make sure they are included 2 Please find tools in the hardware pack to help you assemble this machine easier PLACE WASHER BOLT S END OR SCREW ON CIRCLE TO CHECK FOR CORRECT SIZE INCHES MILLIMETERS ...

Page 9: ...f your own home This manual is designed to help you easily assemble adjust and use this machine Please read this manual carefully For the sake of familiarizing yourself with the parts identified in the instructions please first study the overview drawing Set all parts in a clear area on the floor and remove the packing materials Refer to the parts list for help to identify the parts To assemble th...

Page 10: ...o crimp pinch or otherwise damage the cable and cable connections Install Handlebar 3 Attach the Handlebar 36 to the top of the Handrails 34 35 with two Handlebar Adorners 42 and four M8 50 Bolts 43 4 Connect the Sensor Cable II 74 and Sensor Cable III 75 Place the connection inside of R Handrail 35 Careful not to crimp pinch or otherwise damage the cable and cable connections 1 4 2 2 1 3 1 4 1 3 ...

Page 11: ...s 66 Speed Button Wire 76 Mode Button Wire 88 and Sensor Cable III 75 to the Computer 38 8 Assemble the Computer 38 onto the bracket of the Handlebar 36 with four M5 10 Bolts 40 Place the wire connections inside the room of the Handlebar 36 bracket and cover up the Computer Bracket Cover 39 5 8 6 5 1 7 1 8 1 7 34 44 35 39 36 38 38 75 66 40 36 39 ...

Page 12: ...readmill is plugged into a nominal 230 volt 50 60hz which has a grounding plug Step 1 Power Up zPress the Master Power Switch located at the front of the treadmill to ON position The LCD console will immediately run a self diagnostic display After that it will display current system status Step 2 Begin Workout zPress the ON button then press UP button to increase running speed zAs the running spee...

Page 13: ...position See diagrams A and B Check the Spring Knob is pop down into the locked position before moving the treadmill Setting Down the Treadmill Place one hand on the rear end of deck and the other hand to pull the Spring Knob then lower the deck down from the rear of treadmill until the Spring Knob pops down into the locked position See diagram C TO PREVENT INJURY PLEASE MAKE SURE YOU HAVE A FIRM ...

Page 14: ...LINE ADJUSTMENT 13 Incline adjustment Place one hand on the rear end of deck Lift up the rear end of deck and then pull the Incline Beam to a higher or lower position Please refer to the diagrams A B and C B C A ...

Page 15: ...ULATES TOTAL RUNNING TIME UP TO 99 59 SPEED DISPLAYS CURRENT RUNNING SPEED FROM THE MINIMUM 0 8KPH TO THE MAX 12 KPH DISTANCE ACCUMULATES TOTAL RUNNING DISTANCE UP TO 99 99KM CALORIE ACCUMULATES CALORIES CONSUPMTION DURING EXERCISE THIS DATA IS A ROUGH GUIDE FOR COMPARISON OF DIFFERENT EXERCISE SESSIONS WHICH CAN NOT BE USED IN MEDICAL TREATMENT PULSE THE MONITOR WILL DISPLAY YOUR CURRENT HEART RA...

Page 16: ...BUTTON ON THEN PRESS UP TO HAVE THE TREADMILL RUNNING 3 YOU MAY ADJUST RUNNING SPEED BY PRESSING THE BUTTONS UP or DOWN UPFORWARD ADJUSTING EACH SHORT PRESSING TO HAVE SPEED UP WITH PRESET MINIMUM INCREMENT SLOWLY OR HOLD ON PRESSING TO ACCELERATE ADJUSTMENT BACKWARD ADJUSTING EACH SHORT PRESSING TO HAVE SPEED DOWN WITH PRESET MINIMUM DECREMENT SLOWLY OR HOLD ON PRESSING TO ACCELERATE ADJUSTMENT D...

Page 17: ...er the console detects this error Troubleshooting Resetting error codes In the rare event of the treadmill displaying an error code E followed by a number simply reset the computer by 1 Step off the treadmill Ensure that you are clear of the running belt 2 Turn the treadmill off at the master power switch located near the motor housing WARNING Ensure nothing is positioned near or under running bel...

Page 18: ...uch as baggy sweat pants neckties loose socks or jewelry Never drape towels on or around the treadmill during use zThis treadmill is equipped with a safety tether key Always clip the cord attached to the safety tether key to a part of your clothing so the key will properly detach from the computer console therefore stopping the treadmill as necessary zWear running or walking shoes with high tracti...

Page 19: ... electrical cord from the electrical outlet This is especially important if you are not going to use your treadmill for extended periods zWipe all treadmill surfaces with a dry cloth or towel especially perspiration on the handlebars control panel running belt or other treadmill components CAUTION Turn off and unplug the treadmill before proceeding with any maintenance or visual inspections Failur...

Page 20: ...g use of running the belt will stretch out If the running belt is shifting to the left turn on the main power switch of treadmill and let the running belt run at the speed of 2 3 km h Using the hex key provided turn the left rear roller adjustment bolt 1 4 turn in the clockwise direction You should see the belt start to correct itself by moving back toward the center Repeat the above procedure unt...

Page 21: ...nger It s important to work at your own pace Ultimately you ll be able to exercise continuously for 30 minutes The better your aerobic fitness the harder you ll have to work to stay in your tar get zone But remember these essentials Contact your physician before starting a workout or training program Have him review your training and diet programs to advise you on a workout routine you should adap...

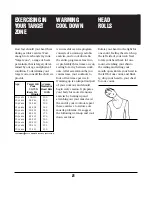
Page 22: ...prepares your body for more strenuous exercise by heating up and stretching out your muscles At the end of your workout repeat these exercises to reduce sore muscle problems We suggest the following warm up and cool down exercises Rotate your head to the right for one count feeling the stretch up the left side of your neck Next rotate your head back for one count stretching your chin to the ceilin...

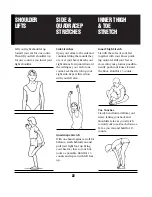
Page 23: ...at this action with your left arm Quadriceps Stretch With one hand against a wall for balance reach behind you and pull your right foot up Bring your heel as close to your but tocks as possible Hold for 15 counts and repeat with left foot up Inner Thigh Stretch Sit with the soles of your feet together with your knees point ing outward Pull your feet as close into your groin as possible Gently push...

Page 24: ...obic exercise is any sustained activity that sends oxygen to your muscles via your heart and lungs your body s most impor tant muscle Aerobic fitness is promoted by any activity that uses your large muscles arms legs or buttocks for example Your heart beats quickly and you breathe deeply An aerobic exer cise should be part of your entire exercise routine Weight Training Along with aerobic exercisi...

Reviews: