background image

44

Using Programs

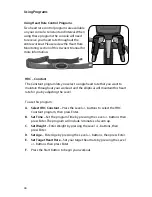
Using Heart Rate Control Programs

Two heart rate control programs are available 

on your console: Constant and Interval. When 

using these programs the console will need 

to receive your heart rate throughout the 

entire workout. Please review the Heart Rate 

Monitoring section of this Owner’s Manual for 

more information.

HRC – Constant


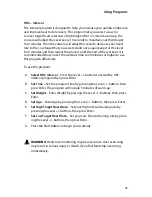
The Constant program lets you select a single heart rate that you want to 

maintain throughout your workout and the elliptical will maintain this heart 

rate for you by adjusting the Level. 

To use this program:

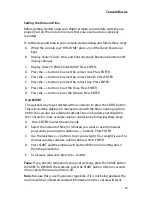
A.  Select HRC Constant – 

Press the Level +/- buttons to select the HRC 

Constant program, then press Enter.


B.  Set Time –

 Set the program Time by pressing the Level +/- buttons then 

press Enter. The program will include 3-minutes of warm up. 

C.  Set Weight – 

Enter Weight by pressing the Level +/- buttons, then  

press Enter.

D.  Set Age – 

Enter Age by pressing the Level +/- buttons, then press Enter.

E.  Set Target Heart Rate – 

Set your target heart rate by pressing the Level 

+/- buttons then press Enter.

F. 

Press the Start button to begin your workout.

LEVEL

LEVEL

Summary of Contents for E5i

Page 1: ...E5i Commercial Elliptical Trainer Owner s Manual ...

Page 2: ... state of the art production processes and quality components Then we back LifeSpan products with excellent warranties and a responsive customer service department making it simple and easy to get assistance should the need arise This attention to quality our high standard for customer service and focus on innovation has earned LifeSpan numerous awards and consistent praise from independent review...

Page 3: ... Programs Warranty Registration Assembling Your Elliptical Exploded View Hardware Assembly Instructions Leveling Console Basics Readout Display Operating Keyboard Date Time Quickstart Using Programs Preset Programs Custom User Using Heart Rate Control Programs Bluetooth Adapter Maintenance and Tips Personal Settings General Maintenance Moving Troubleshooting 7 10 22 36 40 46 48 ...

Page 4: ...not use attachments that are not recommended by LifeSpan Keep hands away from all moving parts Keep your elliptical on a solid level surface Do not operate elliptical on deeply padded plush or shag carpeting Damage to carpeting may occur Children and Pets When in use children and pets should be kept at least 10 feet 3m away This elliptical can be used by children ages 12 years and above and person...

Page 5: ...s or spikes Use caution while participating in other activities while using your elliptical such as watching television or reading These distractions may cause you to lose balance which may result in injury Heart Rate monitoring systems may be inaccurate Various factors including the user s movement may affect the accuracy of the heart rate readings The pulse sensors are intended only as exercise ...

Page 6: ...70 kg Console Features Readouts Time Speed Calories Heart Rate Watts Stride step Count Resistance Level Date and Clock Average Watts Stride Count Per Minute CPM Calorie Burn Rate Per Hour Distance Programs 2 Heart Rate 2 User Setup and 17 preset programs Display 7 5 Blue Backlit LCD Heart Rate Contact Heart Rate Sensors Chest Strap Compatible Quickset 8 Buttons for Resistance Control USB Plus Char...

Page 7: ... most of your mobile devices Bluetooth Optional Bluetooth adapter allows for wireless data sync with the LifeSpan App Does not charge iPad 1 iPad 2 and iPad 3 Unique Features As a leader in the fitness industry LifeSpan has developed a number of unique features that make our products more engaging and easier to use You can learn more about how to use these features throughout this Owner s Manual ...

Page 8: ...grams Media Holder USB Plus Bluetooth Pairing optional feature Alternate Readouts Operating Keyboard Quickset Resistance Controls Resistance Level Resistance Level Quickset Resistance Controls About Your Elliptical Console Overview ...

Page 9: ...13 About Your Elliptical ...

Page 10: ...ormance enhancement improved lactate removal capabilities and enriched heart health Zone 3 Aerobic Zone 70 80 of your Max HR The aerobic zone is ideal for cardiovascular training Workouts in this zone are more intense involving moderate jogging Long term benefits are improved heart health and cardiovascular performance reductions in blood pressure and cholesterol and increased calorie burn Zone 2 ...

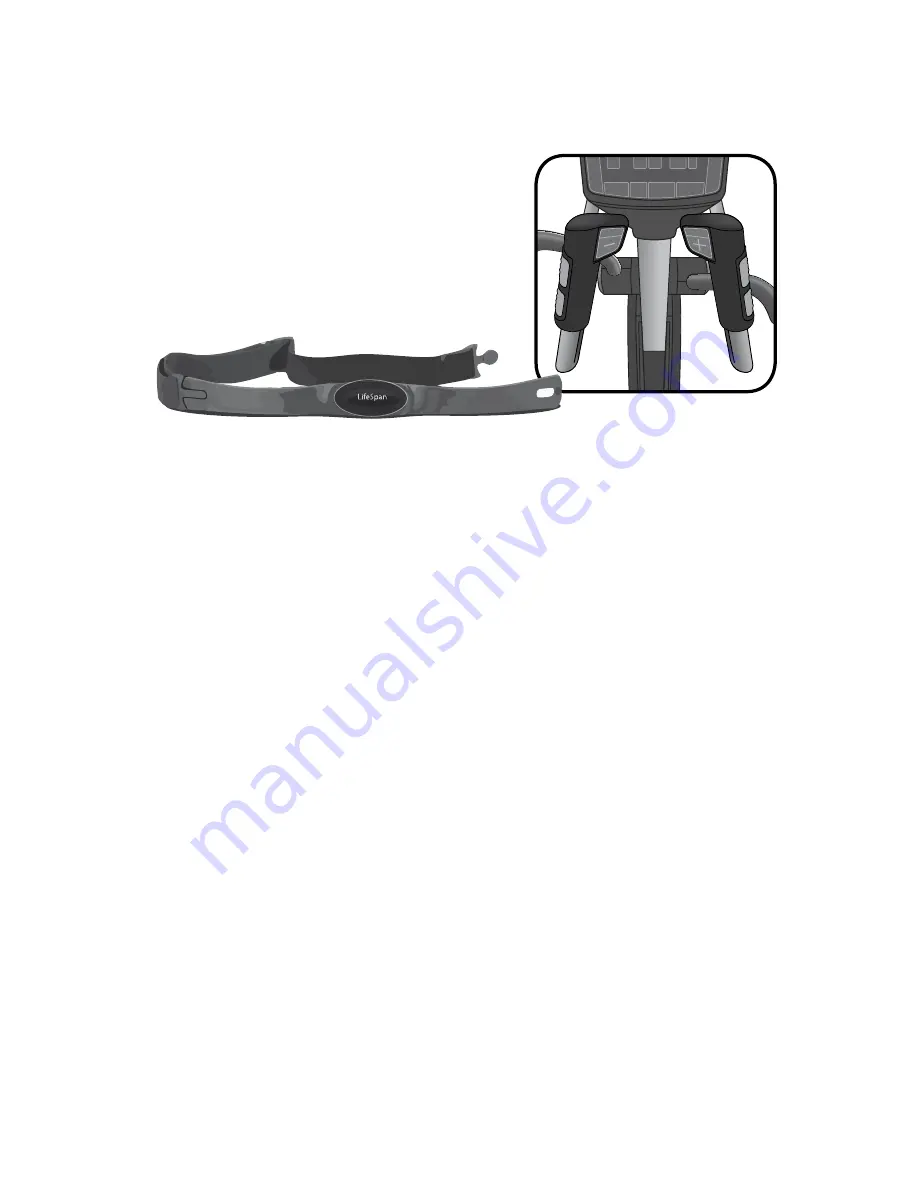
Page 11: ...l models have integrated heart rate receivers built into the console To purchase a heart rate chest strap go to www LifeSpanFitness com The chest strap should be worn as shown When using a chest strap you may need to warm up first to increase the moisture in your skin If this doesn t work use aloe or another moisturizer where the sensors on the chest strap are making contact with your skin Note Th...

Page 12: ... Two overall levels may be selected which raises or lowers the program profile Long Slow Distance 40 minutes default This profile has small changes allowing for a more consistent style of effort maximizing the duration of your workout Short Interval 20 minute default This has the widest variation of resistance level and has the shortest default duration Moderate Interval 30 minute default Smaller ...

Page 13: ...is a Swedish workout that inspires improved levels of fitness through unpredictable changes in programming This profile purposefully has no predictable pattern to its profile Uphill Climb 30 minute default A gradual increase then corresponding decrease of resistance level Pyramid Climb 30 minute default Similar to Uphill Climb but with less frequent changes Plateau Climb 40 minute default A higher...

Page 14: ...ed changes in intensity Steady Pace 40 minute default Similar to Long Slow Distance but with a lower intensity steady profile This is the easiest of the preset programs Long Slow Distance 2 40 minute default Similar to Long Slow Distance but reaches maximum intensity more rapidly Cardio Run 20 minute default A short continuous workout with consistently high intensity Short Interval 2 20 minute def...

Page 15: ...intain your heart rate close to the target you ve selected Interval Heart Rate The Interval Heart Rate is designed to help you increase aerobic endurance and improve heart rate recovery This program lets you select a LOW or recovery target heart rate and a High target After the 3 minute warm up the console will adjust the resistance level every 10 seconds to maintain your LOW target for 2 minutes ...

Page 16: ...option 4 for a Customer Service Agent please note that certain kinds of service should only be performed by a qualified service technician LifeSpan reserves the right to make changes and improvements to our products without incurring any obligations to similarly alter any product purchased In order to insure our product warranty and to ensure the safe and efficient operation of your LifeSpan produ...

Page 17: ...a warranty claim make sure you retain your purchase receipt to verify the date of purchase and register your LifeSpan product online To complete the registration go to www LifeSpanFitness com and select Product Registration About Your Elliptical ...

Page 18: ...lay them out on the floor to become familiar with the components Since your elliptical is a heavy piece of equipment it is recommended you use two people during assembly and follow these assembly instructions to reduce any problems that could occur 6 4 7 9 18 1 8 3 9 10 A 10 B 10 A 10 B 2 5 Assembling Your Elliptical ...

Page 19: ...dware not shown Item Pre Installed Hardware N A M8 x 20L Bolt N A M8 Washer N A Console Mast Cover N A M4 x 10L Screw Assembling Your Elliptical 6mm Allen Wrench 4mm Allen Wrench 5mm Allen Wrench w Phillips 13 17mm Wrench x2 Item Qty Hardware Description 11 2 M8 x 15L Countersink Bolt 12 6 M8 Washer 13 2 M8 x 35L Bolt 14 6 M4 x 10L Screw 15 4 M8 x 20L Bolt Item Pre Installed Hardware N A M8 x 15L ...

Page 20: ...l A Cut tape around the bottom edge of the box B Lift top of box up and off C Remove the right arm from box D Remove the left arm from box E Remove packaging boards F Continue removing components from the box until only the Main Base 1 is left A B F D C F E ...

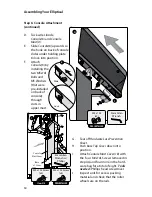
Page 21: ...ng is still in place prior to reinstalling the bolt I Cut the corners of the bottom box and remove all packaging J Place Rail Base 2 in position with mounting holes in Main Base 1 Step 2 Hardware Loss Prevention Sheet A The Main Base 1 has the Hardware Loss Prevention Sheet draped around the Console Mast Support The purpose of this paper is to act as a shield to prevent bolts washers and screws fr...

Page 22: ...t tighten at this time 2 Install two M8 x 35 Bolts 13 and Washers 12 down through the Rail Base and into the Main Base Do not tighten 3 Fully tighten the two M8 x 15L Countersink Bolts and then the two M8 x 35L bolts 6mm Allen Wrench Main Base Rail Base 5mm Allen Wrench w Phillips M8 x 35L x2 Item 13 Item 11 M8 x 15L Countersink Bolt x2 Item 12 M8 Washer x8 26 M8 X 35L M8 X 15L Countersink Bolt M8...

Page 23: ...continued B Remove the four pre installed M4 x 10L screws 14 from the Main Base 1 C Install the Base Connection Cover onto the Main Base using the four M4 x 10L screws 14 removed in step A 5mm Allen Wrench w Phillips Item 14 M4 x 10L Screw x4 M4x10L B C ...

Page 24: ...ve the Console Mast Cover 18 by removing four pre installed screws as shown in Illustration B Slide the Base Top Cover 5 onto the Console Mast 4 as shown Top Base Cover Console Mast Console Mast Cover 5mm Allen Wrench w Phillips PRE INSTALLED M4 x 10L Screw x4 4 5 18 ...

Page 25: ...mponents D Install four M8 x 20L Bolts 15 and M8 Washers 12 found in your hardware bag E Fully tighten all four M8 Bolts with the provided 6mm Allen wrench See Illustration D F Securely connect the 8 pin connec tor from the Con sole Mast and Main Base Tuck extra wire back into the Console Mast 4 6mm Allen Wrench D F Assembling Your Elliptical Item 15 M8 x 20L Screw x4 Item 12 M8 Washer x4 ...

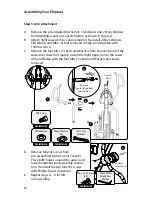
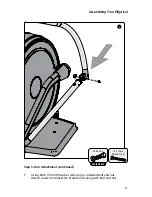
Page 26: ...bar post on Console Mast 4 as shown in Figure A B Attach Right Lower Arm to Console Mast 4 Re install 2 Wave Washers Flat Washer and M8 x 15L Bolt removed in Step A and tighten with 13mm wrench C Remove the four M8 x 15L Bolts and Washers from the pivot joint of the Lower Arm shown in Figure B Install the Right Upper Arm to the Lower Arm and fasten with the four M8 x 15L Bolts and Washers previous...

Page 27: ...Your Elliptical Step 5 Arm Attachment continued F Using both 13mm Wrenches remove pre installed bolt and nut Attach Lower Arm Bracket to Pedal Arm Bearing with bolt and nut F 13 17mm Wrench x2 PRE INSTALLED M8 x 30L ...

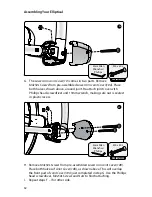
Page 28: ... making sure nut is seated in plastic recess H Remove M4x50L Screws from pre assembled Lower Arm Joint Cover 10B Place both halves of Joint Cover 10B as shown above This will overlap the front part of Joint Cover 10A just completed in step G Use the Phillips head screwdriver M4x50L Screws and Nuts to finish attaching I Repeat steps F I for other side 5mm Allen Wrench w Phillips 5mm Allen Wrench w ...

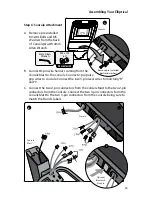
Page 29: ...ires to console Connect the two 3 pin level wires to matching R and L C Connect the two 2 pin connectors from the Console Mast to the two 2 pin connectors from the Console Connect the two 3 pin connectors form the Console Mast to the two 3 pin connectors from the Console being sure to match the R and L labels A R L Optional Bluetooth Module B C PRE INSTALLED M5 x 10L x2 4mm Allen Wrench Remove pre...

Page 30: ...e rails Step 6 Console Attachment continued D Tuck wires inside Console 6 and Console Mast 4 E Slide Console 6 upwards so the hook on back of console slides under holding plate to lock into position F Attach Console 6 by installing the two M5x10L Bolts and M5 Washers that were pre installed on back of console through slots in upper mast 5mm Allen Wrench w Phillips PRE INSTALLED Item 14 M4 x 10L Sc...

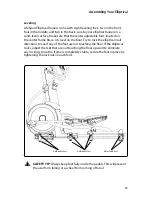
Page 31: ...ck the elliptical in all directions to see if any of the feet are not touching the floor If the elliptical rocks adjust the feet that are not touching the floor upward to eliminate any rocking Once the frame is completely stable secure the feet in place by tightening the lock nut on each foot Adjustable Feet Adjustable Feet Adjustable Feet SAFETY TIP Always keep feet fully inside the pedals This w...

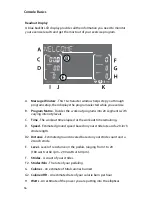
Page 32: ... levels C Time The workout time elapsed or the workout time remaining D Speed Estimated ground speed based on your stride rate and a 20 inch stride length D2 Distance Estimated ground covered based on your stride count and a 20 inch stride E Level Level of resistance on the pedals ranging from 1 to 20 180 watts at 60 rpm 200 watts at 60 rpm F Strides A count of your strides F2 Strides Min The rate...

Page 33: ...h day year below the program matrix J Time The time of day is shown below the program matrix using a 24 hour reading clock K Indicator icons HRC This icon flashes when your pulse is being taken Bluetooth Flashes when pairing with a mobile device USB This will light up when your exercise data is being transferred to a USB flash drive ...

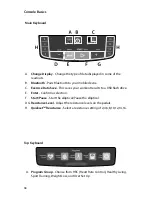
Page 34: ...results to a USB flash drive E Enter Confirm a selection F Start Pause Start the elliptical Pause the elliptical D G Resistance Level Adjust the resistance levels on the pedals H QuicksetTM Resistance Select a resistance setting of 2 4 6 8 10 12 14 16 Top Keyboard A Program Group Choose from HRC Heart Rate Control Healthy Living Sport Training Weight Loss and User Set Up Console Basics ...

Page 35: ... the START button This will start the elliptical in manual mode with the time counting up from 00 00 You can also set a desired workout Time and update your Weight in the console for more accurate calorie calculation by following these steps A Press ENTER to select manual mode B Select the amount of time in minutes you want to use the manual program by pressing the resistance buttons Press ENTER C...

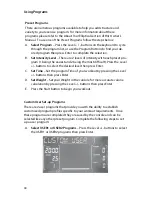
Page 36: ...ng the most difficult Press the Level buttons to select the desired level then press Enter C Set Time Set the program Time of your workout by pressing the Level buttons then press Enter D Set Weight Set your Weight in the console for more accurate calorie calculation by pressing the Level buttons then press Enter E Press the Start button to begin your workout Custom User Set up Programs There are ...

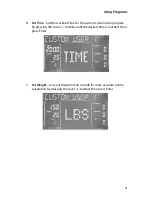
Page 37: ...me for the current custom user program by pressing the Level buttons until the desired time is reached then press Enter C Set Weight Set your Weight in the console for more accurate calorie calculation by pressing the Level buttons then press Enter ...

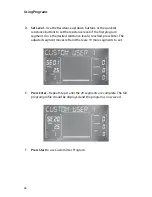
Page 38: ... the first program segment Once the desired resistance level is reached press Enter The adjusted segment moves left and there are 19 more segments to set E Press Enter Repeat Step D until the 20 segments are complete The full program profile should be displayed and the program is now saved F Press Start to use Custom User Program ...

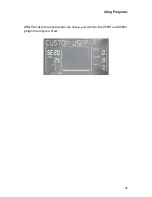
Page 39: ...43 Using Programs After the custom user programs are set up just scroll to the USER1 and USER2 programs and press Start ...

Page 40: ...hout your workout and the elliptical will maintain this heart rate for you by adjusting the Level To use this program A Select HRC Constant Press the Level buttons to select the HRC Constant program then press Enter B Set Time Set the program Time by pressing the Level buttons then press Enter The program will include 3 minutes of warm up C Set Weight Enter Weight by pressing the Level buttons the...

Page 41: ...se this program effectively To use this program A Select HRC Interval Press the Level buttons to select the HRC Interval program then press Enter B Set Time Set the program Time by pressing the Level buttons then press Enter The program will include 3 minutes of warm up C Set Weight Enter Weight by pressing the Level buttons then press Enter D Set Age Enter Age by pressing the Level buttons then p...

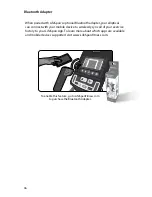
Page 42: ...n connect with your mobile device to wirelessly sync all of your exercise history to your LifeSpan App To learn more about which apps are available and mobile devices supported visit www LifeSpanFitness com To enable this feature go to LifeSpanFitness com to purchase the Bluetooth Adapter LEVEL ...

Page 43: ... and Distance in miles or kilome ters shown on the display Calendar Date and Time are shown on the display readouts but can be turned off with this setting We recommend that you keep date and time turned on to accurately track your results Audible Beep Turns off the audible alert that beeps for speed and incline changes or when the elliptical is starting or stopping ...

Page 44: ...ress LEVEL to change from English EN to Metric SI Press ENTER to continue Select the units EN or SI This screen shows the Total Distance exercised in miles or kilometers Press ENTER to continue Total Distance 0 000 This screen shows Total Hours of use Press ENTER to continue Total Hours 0 000 Roller Size is displayed Do not modify Press ENTER to continue Roller 114 cm Press LEVEL to turn Calendar ...

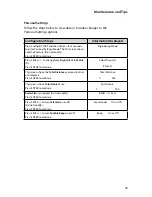
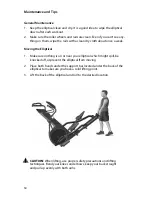
Page 45: ...oving the Elliptical 1 Make sure nothing is on or near your elliptical which might spill be knocked off or prevent the elliptical from moving 2 Place both hands under the support bar located under the back of the elliptical to make sure you have a solid lifting point 3 Lift the back of the elliptical and roll to the desired location CAUTION When lifting use proper safety precautions and lifting te...

Page 46: ...ace Adjust the front and rear adjustment feet until all four feet are sitting solid on the floor Once level turn the center feet down till they touch the floor Problem No power at console when pedaling Solution Make sure all connections made during assembly are good Pedal at an RPM of at least 60 for 30 seconds If no power contact lifespan customer service Problem Rough feeling in pedals when in u...

Page 47: ...LifeSpan Fitness 785 West 1700 South Suite 1 Salt Lake City UT 84104 Phone 877 654 3837 www LifeSpanFitness com E5i Commercial Elliptical Trainer Version 1 2 ...

Reviews: