background image

7

Hooking up the unit

Hooking up the unit - more you
can do

Resolution Setting

You can change the resolution for component video
and HDMI output. 
To change the resolution using setup menu to select
the desired resolution - Auto, 480i(576i), 480p(576p),
720p, 1080i, 1080p.

Available resolution according to connection

[HDMI OUT]: Auto, 1080p, 1080i, 720p and 480p (or
576p)
[COMPONENT VIDEO OUT]: 480p (or 576p) and 480i
(or 576i)
[VIDEO OUT]: 480i (or 576i)

Notes on HDMI Out connection

• If your TV does not accept your resolution setting,

abnormal picture appears on the screen.
Please read owner’s manual for TV, and then set
the resolution that your TV can accept.

• Use the HDMI cable within 5 meters 
• If the volume bar is not displayed on TV screen,

when you select Simplink to off on TV, restart the
unit.

Enjoying audio from an external source

You can enjoy audio from an external source through
your unit.
Press INPUT repeatedly to select the desired input
source. - AUX, AUX OPT, PORTABLE, HDMI IN, USB

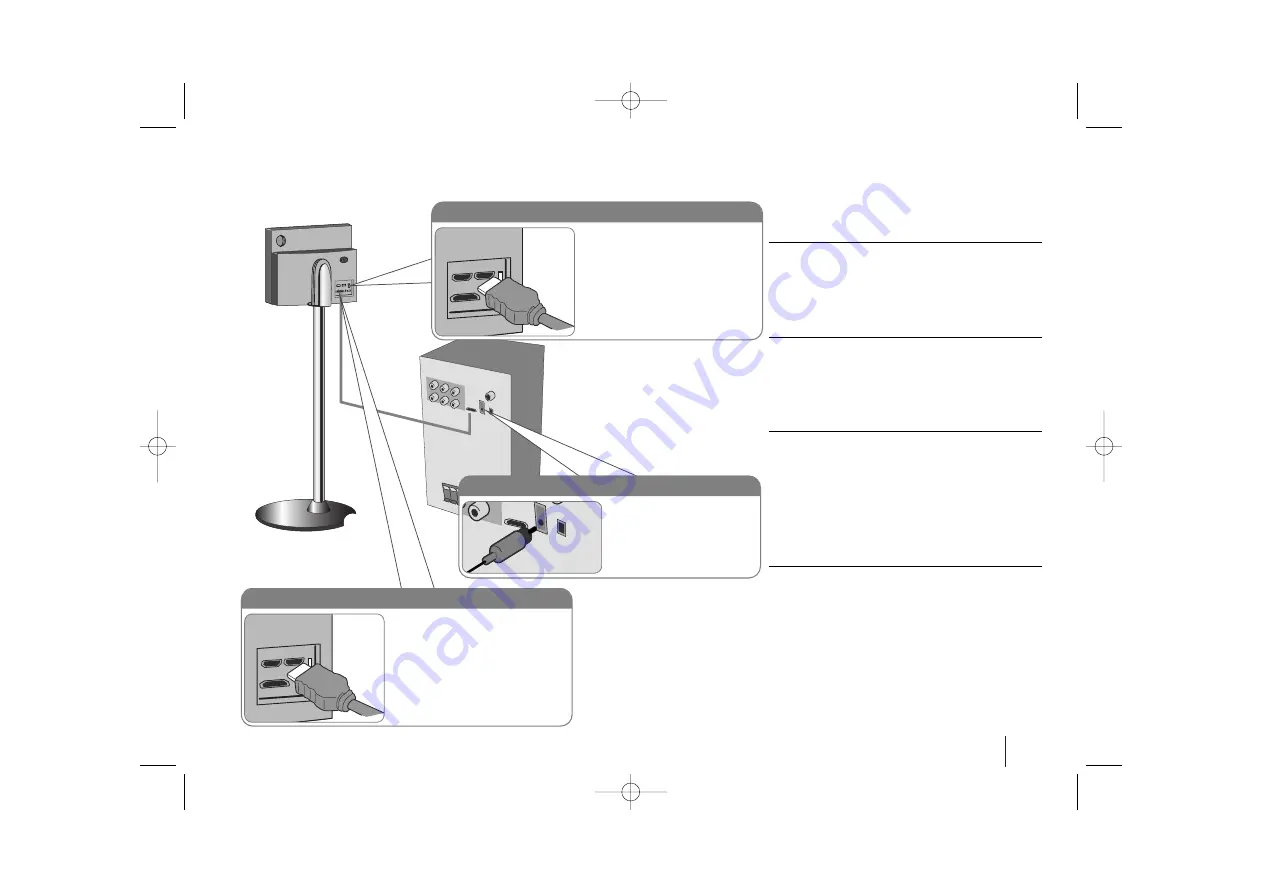
HDMI In connection

Connect the HDMI INPUT jack on
the unit to the HDMI output jack on
your Set-Top box (or Digital Device
etc.) using an HDMI cable. Set the
external source to HDMI IN by
pressing INPUT. In HDMI IN mode,
you can’t change the resolution.

Digital Audio in connection

Connect the unit’s OPTICAL
IN jack to the optical out to
jack on your TV (or Digital
Device etc.)

HDMI Out connection

Connect the HDMI OUTPUT jack
on the unit to the HDMI input jack
on a HDMI compatible TV using a
HDMI cable.

After push the cables (system cable and HDMI cables
etc.) into the cable fixing hole in the stand, attach the
back cover.

HT953TV-XK_BRUSLLK_ENG_0304  7/17/08  7:15 PM  Page 7

Summary of Contents for SH93TV-A

Page 1: ... page 11 HDMI In Simple connection with Set Top Box through HDMI Go to page 7 USB Direct Recording Record music from CD to your USB device Go to page 18 Portable In Listen to music from your portable device MP3 Notebook etc Go to page 18 The working life of this product is 7 years since the date of purchase Internet address http ua lge com Customer Information Center LG 380 44 490 7777 8 800 303 0...

Page 2: ...NTO BEAM CAUTION The apparatus should not be exposed to water dripping or splashing and no objects filled with liquids such as vases should be placed on the apparatus CAUTION concerning the Power Cord Most appliances recommend they be placed upon a dedicated circuit That is a single outlet circuit which powers only that appliance and has no additional outlets or branch circuits Check the specifica...

Page 3: ... Basic Playback 19 Reserving the Song 20 Karaoke Menu Playback 20 21 Language Codes 22 Area Codes 22 Troubleshooting 23 Types of Playable Discs 24 Specifications 25 What is SIMPLINK Some functions of this unit are controlled by TV s remote control when this unit and LG TV with SIMPLINK are connected through HDMI connection Controllable functions by LG TV s remote control Play Pause Scan Skip Stop ...

Page 4: ...ack cover Insert the cable holder in the hole on the stand Connecting the active woofer to the unit Connect one and of the system cable into the system jack on the unit Connect the other end of the system cable into the system jack on the rear of the active woofer Mount the stand on the base and tighten 4 screws 5 x 70 on the bottom side of the base HT953TV XK_BRUSLLK_ENG_0304 7 17 08 7 15 PM Page...

Page 5: ...taching the speakers to the active woofer a a Connect the wires to the active woofer To connect the cable to the active woofer press each plastic finger pad to open the connection terminal Insert the wire and release the finger pad Rear Rear Centre Front Front Behind you and to your right Behind you and to your left Above screen directly in front of you In front of you to the right of the screen I...

Page 6: ...o jack on the unit Component Video connection Connect the COMPONENT VIDEO OUT jacks on the active woofer to the corre sponding input jacks on your TV using a Y PB PR cable AM FM connection AM Connect the AM loop aerial to the DVD receiver FM Connect the FM aerial The reception will be its best when the two loose ends of the aerial are in a straight and horizontal line Video Out connection Connect ...

Page 7: ...en when you select Simplink to off on TV restart the unit Enjoying audio from an external source You can enjoy audio from an external source through your unit Press INPUT repeatedly to select the desired input source AUX AUX OPT PORTABLE HDMI IN USB HDMI In connection Connect the HDMI INPUT jack on the unit to the HDMI output jack on your Set Top box or Digital Device etc using an HDMI cable Set t...

Page 8: ...Set Up Press TVtHT SPK to select the AUX OPT directly MUTE Press MUTE to mute your unit You can mute your unit in order for example to answer the telephone VOLUME Adjusts speaker volume EQ You can choose 6 or 7 fixed sound impressions VSM Press VSM to set the Dolby Pro Logic II or VIRTU AL sound REPEAT Repeats a Chapter Track Title all SUBTITLE During playback SUBTITLE repeatedly to select a desir...

Page 9: ...ns Use the touch buttons with clean and dry hands In a humid environment wipe out any moisture on the touch buttons before using Do not press the touch buttons hard to make it work If you apply too much strength it can damage the sensor of the touch buttons Touch the button that you want to work in order to operate the function correctly Be careful not to have any conductive material such as metal...

Page 10: ...ed option on the second level v v V V 5 Move to third level B B 6 Change the setting v v V V ENTER OSD Initial language settings optional 1 Turn the power on Appear the language list display window POWER 2 Select the language vV b B 3 Press ENTER 4 To confirm press b B and ENTER Before using the unit for the first time you have to adjust OSD initial language ON REMOTE Initial Setting the Area Code...

Page 11: ... for TVs providing display information EDID you can not select resolutions that the TV does not accept If the picture does not appear on the screen change the TV s input source If you turn off the TV or disconnect the HDMI cable during playback of the device the playback may pause You have to click on the play button to play back again For some TVs when you change the TV mode such condition specif...

Page 12: ...uring sing a song in the karaoke mode only Select the On Score bar shows 41 level while checking the interval and beat Select the Off Score bar are not display on the screen This function is not supported the Semi karaoke mode Setting the sound mode VSM VIRTUAL SOUND MATRIX and Dolby Pro Logic II You can select the Dolby Pro Logic II or Virtual sound Press VSM to set the vir tual sound or to chang...

Page 13: ...lect Skip to the next previous chapter track Press SKIP to move to the next chapter track Press SKIP to return to the beginning of the current chapter track Press SKIP twice briefly to step back to the previous chapter track Pause playback Press PAUSE STEP X to pause playback Press PLAY B to continue play back Frame by Frame playback Press PAUSE STEP X repeatedly to play title Frame by Frame Playi...

Page 14: ... MP3 WMA and JPEG files together you can select which menu of files you would like to play by pressing TITLE Changing the character set to display DivX subtitle correctly If the subtitle does not display properly during playback press and hold SUBTI TLE for about 3 seconds then press SUBTITLE to select another language code until the subtitle is displayed properly DivX file requirement DivX disc c...

Page 15: ...etc except for Karaoke mode and In the state CD G This function available to use only when a microphone is connected Press VOCAL FADER button then you can see FADE ON or FADE OFF on the front display The quality of the VOCAL FADER may be different depending on the record ing conditions of music files This function is not available on the MONO mode Power Save Mode You can set up the unit into an ec...

Page 16: ...to mono and usually improve the reception Listening to the radio 1 Turn the power on POWER 2 Select either FM or AM FUNCTION 3 Select a radio station TUN 4 To save a radio station A preset number will show in the display PROG MEMO 5 To select a saved station input the preset number Up to 50 radio stations can be saved PRESETv V 6 To confirm press PROG MEMO Be sure that both FM and AM aerials are c...

Page 17: ...n of this unit does not support all USB devices Digital camera and mobile phone are not supported This unit is not supported when the total number of files is 1000 or more If the connected USB device has two or more folders a drive folder is dis played on the screen If you want to move to the previous menu after you select a folder press RETURN In case of Multi card reader video files can not be p...

Page 18: ...ormat TRK 001 mp3 In the state CD G DTS disc USB Record is not operated If you record more 999 files on CD_REC folder appears ERROR on the display New files are numbered in numeric sequence if the total number of the files are more than 999 delete some or store some in PC External HDD Multi Card reader Locked device and MP3 player is not sup ported When a HDMI cable is connected or TV is turned of...

Page 19: ... CON b repeatedly dur ing playback To sharp the key one by one press the KEY CON repeatedly during playback To return to the original key press the KEY CON b repeatedly to appear the original key To adjust ECHO Volume You can give an echo effect to the sound from the microphones Press the ECHO VOL V V v v on the remote control to increase the echo volume or decrease it MIN 1 14 MAX steps Note Afte...

Page 20: ...ct the Note To move to the main menu press MENU To move the previous mode select the by pressing the v v V V then press ENTER Çäã Çäã Çäã Çäã Çõäã Reserving the Song When you want to make a reservation of next melody you can enjoy the most 8 melodies reservation Without waiting 1 To reserve melody number you want in the karaoke disc play mode Melody number appears on the TV screen 2 To reserve The...

Page 21: ...ong 1 LOCAL SONG 2 POP SONG or 3 CLASSIC items from the menu and press 3 1 If you select the LOCAL SONG or POP SONG appear the 1 SONG LIST and 2 SINGER LIST on the TV screen 3 2 If you select the CLASSIC appear the 1 CLAS SIC LIST and 2 COM POSER LIST on the TV screen 4 Select the 1 SONG LIST or 1 CLASSIC LIST 5 Select initial of song title you want 6 Select the song title you want 7 Select the 2 ...

Page 22: ... 8377 Sanskrit 8365 Scots Gaelic 7168 Serbian 8382 Serbo Croatian 8372 Shona 8378 Sindhi 8368 Singhalese 8373 Slovak 8375 Slovenian 8376 Spanish 6983 Sudanese 8385 Swahili 8387 Swedish 8386 Tagalog 8476 Language Code Tajik 8471 Tamil 8465 Telugu 8469 Thai 8472 Tonga 8479 Turkish 8482 Turkmen 8475 Twi 8487 Ukrainian 8575 Urdu 8582 Uzbek 8590 Vietnamese 8673 Volapük 8679 Welsh 6789 Wolof 8779 Xhosa ...

Page 23: ...iver There is an obstacle in the path between the remote control and the unit The batteries in the remote control are flat Plug the power cord into the wall outlet securely Select the appropriate video input mode on the TV so the pic ture from the DVD Receiver appears on the TV screen Connect the video cables securely to both the TV and DVD Receiver Select the correct input mode of the audio recei...

Page 24: ...YED IN THE PICTURE IN CASE OF 525 OR 625 PROGRESSIVE SCAN PICTURE PROBLEMS IT IS RECOMMEND ED THAT THE USER SWITCH THE CONNECTION TO THE STANDARD DEFINITION OUTPUT IF THERE ARE QUESTIONS REGARDING OUR TV SET COMPATIBILITY WITH THIS MODEL 525p AND 625p UNIT PLEASE CONTACT OUR CUSTOMER SERVICE CENTER You have to set the disc format option to Mastered in order to make the discs compatible with the LG...

Page 25: ...e 155 W 155 W 4Ω at 1 kHz THD 10 Surround mode Front 155 W 155 W THD10 Center 155 W Surround 155 W 155 W 4Ω at 1 kHz THD 10 Subwoofer 225 W 3Ω at 30 Hz THD 10 Speakers Front Rear Center active Speaker speaker Subwoofer Type 2 Way 3 Speaker 2 Way 3 Speaker 1Way1Speaker Impedance 4 Ω 4 Ω 3 Ω Rated Input Power 155 W 155 W Max Input Power 310 W 310 W NetDimensions WxHxD 300x1260x285mm 400x110x95mm 245...

Page 26: ...26 HT953TV XK_BRUSLLK_ENG_0304 7 17 08 7 16 PM Page 26 ...

Reviews: