background image

3

Safety Instructions

G

Please take note of the safety instructions to prevent any potential accident or misuse of the projector.

After reading this manual,  keep it in the place that the user always can contact easily.

G

Safety Instructions are given in two forms as detailed below.

WARNING

The violation of this instruction may cause serious injuries and even death.

NOTES

The violation of this instruction may cause light injuries or damage to the projector.

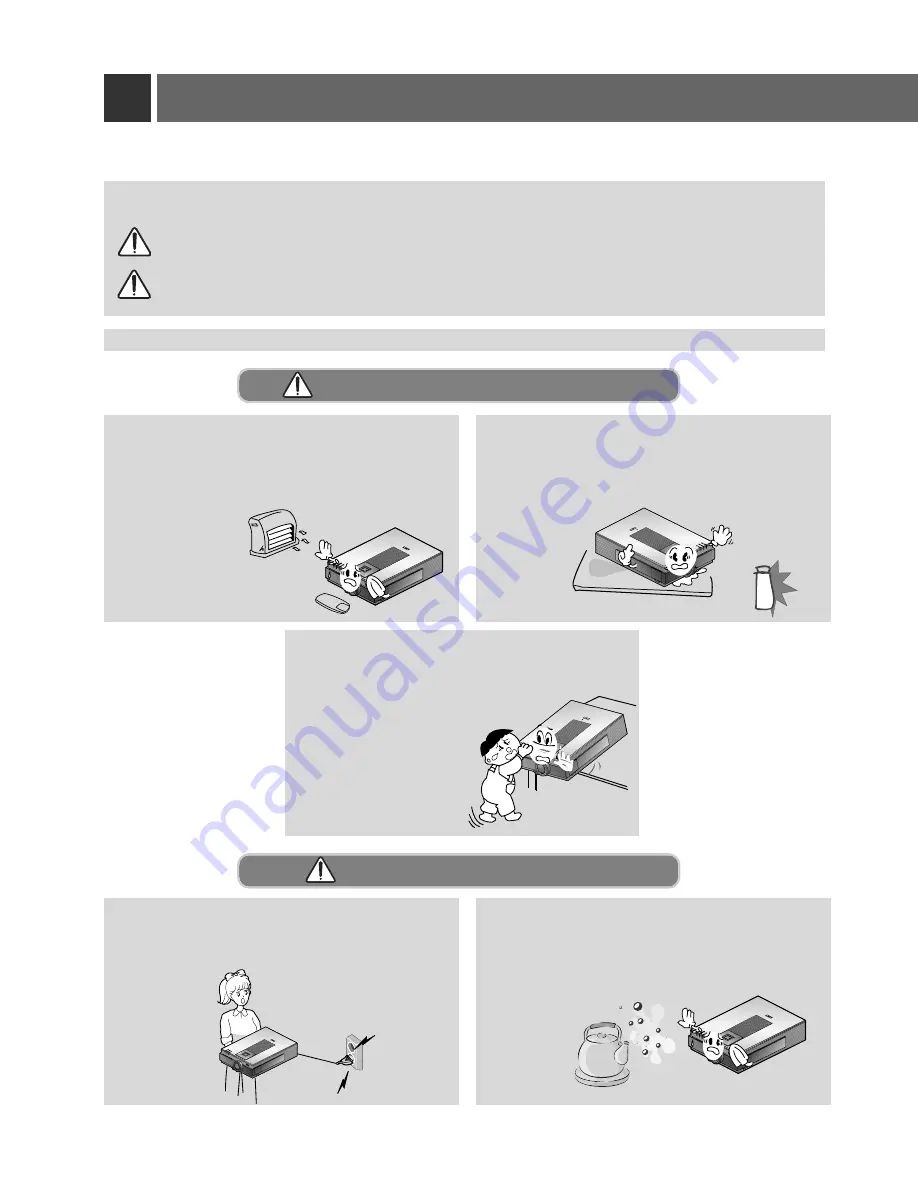
Indoor Installation-WARNING

Indoor Installation-NOTES

R

MENU

SOURCE

ENTER

PATTERN

POWER

VOL

VOL

R

R

Do not place the Projector in direct sunlight or
near heat sources such as radiators, fires and
stove etc.

- This may cause 

a fire hazard !

Disconnect from the mains and remove all
connections before moving. 

Do not place the projector close to sources
of steam or oil such as a humidifier.

- This may create a fire hazard or an 

electric shock 

hazard !

R

MENU

SOURCE

ENTER

PATTERN

POW

ER

VOL

VOL

Do not place inflammable materials
beside the projector 
- This may cause a fire hazard !

R

MENU

SOURCE

ENTER

PATTERN

POWER

VOL

VOL

Do not make the children hang on or
climb the installed projector. 

- It may cause the display to fall, 

causing a injury or a death.

Summary of Contents for RL-JT10

Page 1: ...d this manual carefully before operating your set Retain it for future reference Record model number and serial number of the set See the label attached on the bottom of the set and quote this information to your dealer when you require service Model number Serial number ...

Page 2: ... against harmful interference when the equipment is operated in a commercial environment This equipment generates uses and can radiate radio fre quency energy and if not installed and used in accordance with the instruction manual may cause harmful interference to radio communications Operation of this equipment in a residential area is likely to cause harmful interference in which case the user w...

Page 3: ...Desktop PC 29 Connecting to a Macintosh PowerBook 30 Connecting to a Video Source 31 Connecting to a DVD 32 Connecting to a D TV Settop Box 33 SPECIAL FUNCTIONS 5 Selecting language 36 Using Blank function 37 Using Flip Horizontal 39 Checking lamp time 40 Selecting PC screen size input signal 41 POSI TIONING 6 Using Tracking function 45 TRACK ING VIDEO 7 Using Resize function 42 Adjusting screen d...

Page 4: ...M E N U S O U R C E E N T E R P A T T E R N P O W E R V O L V O L R R Do not place the Projector in direct sunlight or near heat sources such as radiators fires and stove etc This may cause a fire hazard Disconnect from the mains and remove all connections before moving Do not place the projector close to sources of steam or oil such as a humidifier This may create a fire hazard or an electric sho...

Page 5: ...an 30cm An excessive increase in its internal temperature may cause a fire hazard R Don t clog the vents air intake exhaust of the projector This would cause the internal temperature to increase and could cause a fire hazard R M E N U S O U R C E E N T E R P A T T E R N P O W E R V O L V O L Do not place the projector directly on a carpet rug or place where ventilation is restricted This would cau...

Page 6: ... E E N T E R P A T T E R N P O W E R V O L V O L Earth wire should be connected If the earth wire is not connected there is possible a danger of electric shock caused by the current leak age If grounding methods are not possible a separate cir cuit breaker should be employed and installed by a qualified electrician Do not connect ground to telephone wires lightning rods or gas pipe The mains plug ...

Page 7: ...g on the power plug pins or outlet This may cause a fire hazard R MEN U SOU RCE ENT ER PAT TER N PO WE R VOL VOL Place the projector where people will not trip or tread on the power lead R Do not turn the projector On Off with plug ging in or unplugging the power plug to the wall outlet Do not use the power plug for switch It may cause mechanical failure or could give an electric shock R MEN U SOU...

Page 8: ...diately and consult your Service Agent This may cause an electric shock hazard R M E N U S O U R C E E N T E R P A T T E R N P O W E R V O L V O L Dispose of used batteries carefully and safely In the case of a battery being swallowed by a child please consult a doctor immediately R M E N U S O U R C E E N T E R P A T T E R N P O W E R V O L V O L In the event that an image does not appear on the ...

Page 9: ...OL VOL Do not drop the projector or allow impact shock This may cause mechanical failure or personal injury R M E N U S O U R C E E N T E R P A T T E R N P O W E R V O L V O L Do not place heavy objects on top of pro jector This may cause mechanical failure or personal injury R ME NU SO UR CE ENT ER PAT TER N PO WE R VO L VO L Don t look directly onto the lens when the projector is in use Eye dama...

Page 10: ... and easily damaged R M E N U S O U R C E E N T E R P A T T E R N P O W E R V O L V O L Do not use any sharp tools on the projec tor as this will damage the casing R M E N U S O U R C E E N T E R P A T T E R N P O W E R V O L V O L Do not place objects on top of the projec tor The top and bottom of the projector will get hot This may cause mechanical failure or a fire haz ard R Do not position the...

Page 11: ...his may cause damage to the projector and could give an electric Shock as well as invalidating the warranty R In case of using a receiver VCR Digital Set Top Box in the event of a lightning or thunder storm unplug the projector and aerial from the wall outlet This will prevent damage to the projector and possible electric shock Only use the specified type of battery This could cause damage to the ...

Page 12: ...ng Lens cover Zoom ring Power button Control panel The LCD projector is manufactured using high precision technology You may however see a few tiny black or coloured dots that continuously appear on the projector image This is a normal result of the manufacturing process and does not indicate a malfunction If you store the projector in a cold place to avoid condensation forming internally wait for...

Page 13: ...nterface DVI input RS232C Mouse To use the USB jack your PC should be equipped with a USB jack Connect a mouse to the USB A jack Connect USB jack of PC to the USB B jack of the projector with USB cable supplied USB B Kensington Security System Connector Refer to page 22 Rear remote control sensor ...

Page 14: ... in the menus MENU Button Selects or closes menus SOURCE Button Switches to RGB Video S Video Component mode VOLUME Button Adjusts volume level and functions of menus ENTER Button Checks present mode and saves the change of functions PATTERN Button When pressing the PATTERN button the test screen for focus adjustment is displayed ...

Page 15: ...A AV box back Panel V box back Panel Y PB DVD IN 480i PR Video Video Audio Audio S Video L Mono R S Video Video Audio DVD IN 480i DC OUT 12V 0 5A AV INTERFACE DC OUT 12V 0 5A Use this jack when connecting the wireless receiver to the projector AV INTERFACE ...

Page 16: ... ZOOM MOUSE DRAG Button VOLUME Button STILL Button L MOUSE Button Zoom out Button RESIZE Button AUTO TRACKING Button KEYSTONE D E Button ZOOM D E Button BLANK Button LASER Button Slide the battery cover in the direction of the arrow to remove MENU Button ENTERA Button POINTER Button MUTE Button Switches the sound on or off 1 Insert the batteries with correct polarity 2 Replace the battery compartm...

Page 17: ... zoom function POINTER Button After selecting menus controls selecting and adjusting functions with the direction of up down left right Moves the screen with the direction of up down left right on zoom function Moves and releases the selected icon on PC screen MOUSE DRAG Button Uses to select and drag an icon in PC mode ENTERA Button Checks the present mode and saves the change of functions ZOOM D...

Page 18: ...ng the end of its life and needs Red to be replaced with a new lamp over 1900 hours Replace the Lamp Lamp Indicator Red flashing The projector has trouble in the lamp or around it Contact the service center Green flashing The lamp cover is not closed Orange Warning about high temperature Turn the power of projector off and check the ventilator Temperature Indicator Temperature is Too High Red The ...

Page 19: ...ems Contact your dealer for replacing a new lamp Remote Control Batteries 2 size AA AV Box Power Cord Audio Video Cable AV Box cable DVI to VGA Cable MAC Serial Mouse Cable RS 232C cable DVI cable USB Cable Portable Bag Sponge for lens protection Lamp S Video Cable Projection Screen PS 2 Mouse Cable IBM PC or Compatible 18 INTRODUCTION Operating guide ...

Page 20: ... This product should be mounted securely to a suitable bracket or stand Don t place the projector in the following conditions It may cause malfunction or product damage Avoid impact to the projector Do not spill liquid of any kind into the projector Leave an adequate distance 30cm or more around the projector Don t place the projector where it can be covered with dust This may cause overheating of...

Page 21: ...y however see tiny black or coloured dots continuously appear on the LCD projector image This is a normal result of the manufacturing process and does not indicate a malfunction Turn off the projector or switch the projector to standby mode to connect the AV box To receive D TV programmes it is necessary to purchase a D TV receiver Set Top Box and connect it to the projector If there is no input s...

Page 22: ...ystone function Refer to page 43 4 4 Connect the cables of the projector to a wall power socket and other connected sources projection distance based on the picture format The longest distance the shortest distance show status what adjusted by zoom function A Match the screen heigh X bottom with light from the lens Light from the lens Angle 27 Maximum Zoom 21 Minimum Zoom A Screen heigh X Projecti...

Page 23: ...led installation and use of the Kensington Security System refer to the user s guide attached to the Kensington Security System set For further information contact http www kensington com the internet homepage of the Kensington company that deals with expensive electronic equipment such as notebook PCs or LCD projectors Kensington Security System is an optional item R K R K 22 INSTALLATION AND COM...

Page 24: ... operation indicator has flashed green for some time Select the source mode with the SOURCE button Leave the projector plugged in for at least 2 minutes after switching off the projector as this will allow the lamp cooling to continue which will help to preserve the lamp life 3 Adjust volume level If you press VOLUME button sound and volume level number are increased If you press VOLUME button sou...

Page 25: ...ration indicator is flashing red leave the power cord plugged into the outlet Do not pull out from the outlet until operation indicator is flashing orange If operation indicator is flashing red the power button on the top cover or remote control may not operate 3 Turning off the Projector Power Off Please Press Key Again 24 INSTALLATION AND COMPOSITION ...

Page 26: ... image rotate the focus ring which is the outer ring on the lens To adjust the size of the image rotate the zoom ring which is the inner ring on the lens To raise or lower the image on the screen extend or retract the foot at the bottom of the projector by pushing foot adjuster button as below 1 Stand behind the projector and lift the foot adjuster levers while you support the front of the project...

Page 27: ...26 INSTALLATION AND COMPOSITION Press the SOURCE button 1 Each press of the SOURCE button changes the display as below 2 RGB Video S Video Component Selecting source mode ...

Page 28: ...tput Refer to page 58 for the supported pc graphic card displays of the projector How to connect a Connect either end of the DVI to VGA cable to DVI input of the projector If the PC has DVI output use DVI cable b Connect the a PS 2 mouse for IBM PC or compatible cable 6 pin to the RS232C of the projector R K AV Interface DVI Input RS 232C a b 27 ...

Page 29: ... your computer and the external monitor the picture of the external monitor may not appear properly IN such cases set the output mode of your computer to output the signal only to the external monitor For details refer to the operating instructions supplied with your computer If the PC has DVI output use DVI cable b Connect the PS 2 mouse for IBM PC or compatible cable 6 pin to the RS232C of the p...

Page 30: ...top PC How to connect a Connect either end of the DVI to VGA cable to DVI input of the projector b Connect the mouse cable 4 pin from the Macintosh mouse port to the RS232C of the projector R K AV Interface DVI Input RS 232C b a 29 ...

Page 31: ...sh PowerBook How to connect a Connect either end of the DVI to VGA cable to DVI input of the projector b Connect the mouse cable from the Macintosh PowerBook mouse port to the RS232C of the projector R K AV Interface DVI Input RS 232C a b ...

Page 32: ...n S Video cable You can enjoy a better picture quality when connecting S Video equipment to the projector In AV input mode if the auto video system recognition fails to detect a correct video system type please press the AUTO TRACKING button on the remocon Then the projector executes the fine auto video system recognition You can connect a VTR a camcorder a LDP or any other compatible video image ...

Page 33: ...V Interface DVI Input RS 232C DC OUT 12V 0 5A AV INTERFACE a b How to connect a Connect the AV interface jack of the projector to the AV interface jack of the AV box using the AV box cable b Connect the DVD IN 480i ports Y PB PR of the AV box to the Video output ports Y PB PR of the DVD c Connect the Audio output ports R L of the AV box to the Audio output ports R L of the DVD DVD rear c AV box fr...

Page 34: ... of the projector to the AV interface jack of the AV box using the AV box cable c Connect the Audio inputs R L Mono of the AV Box to the Audio output R L of the D TV Settop Box To receive D TV programmes it is necessary to purchase a D TV receiver Set Top Box and connect it to the projector Please refer to the owner s manual of the D TV Set Top Box for the connection between LCD projector and D TV...

Page 35: ...t mode are different from those in the RGB mode Refer to page 47 2 If there is no input signal the Menu will not display on screen This operating guide explains operation of RGB PC mode mainly exit move enter Menu Menu G VIDEO G POSITION G SPECIAL G TRACKING exit move adjust Menu Menu E VIDEO Contrast Brightness Color R Color G Color B Reset G POSITION G SPECIAL G TRACKING 80 80 exit move adjust M...

Page 36: ... function Press the STILL button You can freeze the input image 1 To release this function press the STILL button again The STILL function would release automatically after about 10 minutes 2 Moving Image Still Image ...

Page 37: ...e item Move the POINTER button left or right to select the language you want to use On Screen Display OSD is provided in the selected language from this point To exit the menu display press the MENU button again 2 3 exit move enter Menu Menu G VIDEO G POSITION G SPECIAL G TRACKING exit move select Menu Menu G VIDEO G POSITION E SPECIAL Language Flip Horizontal Set ID Blank Image Lamp Time VGA Text...

Page 38: ...ons meetings or briefings Press the BLANK button The screen turns off to a background color and sound also turns off You can choose the background color Refer to page 38 1 Press any buttons to cancel the blank function On exiting the blank status sound also is restored 2 37 Using Blank function ...

Page 39: ...own to select the Blank Image item 2 Move the POINTER button left or right to select the color you want to use Background color will be changed to the selected color from this point To exit menu display press the MENU button 3 exit move select Menu Menu G VIDEO G POSITION E SPECIAL Language Flip Horizontal Set ID Blank Image Lamp Time VGA Text G TRACKING exit move enter Menu Menu G VIDEO G POSITIO...

Page 40: ...ach time you press the button the image will be reversed To finish menu display press the MENU button 3 This function reverses the left and the right side of the projected image Use this function when projecting from behind onto a transparent screen being viewed from the opposite side Rear Projection exit move enter Menu Menu G VIDEO G POSITION G SPECIAL G TRACKING exit move enter Menu Menu G VIDE...

Page 41: ...t the Lamp Time item 2 The lamp hours used will be displayed When projector lamp is reaching the end of its life over 1900 hours the lamp indicator will flash red and the projector will display Replace the Lamp on screen exit move enter Menu Menu G VIDEO G POSITION G SPECIAL G TRACKING exit move Menu Menu G VIDEO G POSITION ESPECIAL Language Flip Horizontal Set ID Blank Image Lamp Time VGA Text G ...

Page 42: ...ER button up or down to select the VGA Text item 2 Move the POINTER button left or right to select the screen size you want to use 3 a Selecting 720X400 When input signals are 720X400 70Hz or 640X400 70Hz the projected screen size is always adjusted to the format of 720X400 70Hz b Selecting 640X400 When input signals are 720X400 70Hz or 640X400 70Hz the projected screen size is always adjusted to ...

Page 43: ...is function only under SVGA 800x600 mode in RGB mode You can also use this function by using the MENU button R Press the RESIZE button Each press of the button changes the display as below 1 Scaled 4 3 Original 16 9 RGB mode Video S Video Component mode ...

Page 44: ...B mode only Keystone function adjusts the upper and lower width of the projected image to prevent the image from being a trapezoid shape Use this function when the screen or the projector is slanted and can not make an ideal projection angle 2 Press the POINTER button and move the button left or right or press the VOLUME button to adjust the screen condition as you want Horizontal Vertical Keyston...

Page 45: ...t up or down 3 Press the ENTER A or RESIZE AUTO TRACKING button again to exit the zoom function 4 Press the ZOOM D E or L MOUSE R MOUSE button to adjust the zoom level 2 This function doesn t work in 720p 1080i mode You can use this function by using the MENU button In the zoom mode you can adjust horizontal vertical position with the POINTER button R 11 25 25 25 1 25 ...

Page 46: ...cally adjusted Press the AUTO TRACKING button 1 Adjust Clock or Phase in TRACKING menu after operation of Auto Tracking if you want to get better picture quality in accordance with diverse PC input modes Refer to page 46 It s available to adjust Clock Phase in analog RGB mode only 2 You can also use this function by using the MENU button PC mode It is best to perform this function while displaying...

Page 47: ... the POINTER button up or down to select the TRACKING menu 1 Press the ENTER A button and move the POINTER button up or down to select the Clock or Phase item 2 Clock Phase Function Clock Phase Function Move the POINTER button left or right or press the VOLUME button to adjust the screen con dition To exit the menu display press the MENU button 3 exit move adjust Menu Menu G VIDEO G POSITION G SPE...

Page 48: ...anging it press ENTER button after selecting Reset item To finish menu display press the MENU button 4 Press the ENTER A button 2 exit move adjust Menu Menu E VIDEO Contrast Brightness Color R Color G Color B Reset G POSITION G SPECIAL G TRACKING 80 80 exit move adjust Menu Menu E VIDEO Contrast Brightness Color Tint Reset G POSITION G SPECIAL 80 80 exit move enter Menu Menu G VIDEO G POSITION G S...

Page 49: ...the ASCII code communication ex Hyper Terminal Refer to RS 232 Protocol P 51 to control the hexa code communication Connect the RS 232C input jack to an external control device such as a computer or anA V control system and control the Projector s functions externally If you want to extend the cable length you can connect a Female 9 pin Male 9 Extension Cable R K AV Interface DV Input RS 232C ...

Page 50: ...male 9 Pin Female 9 Pin configuration PC 4 3 5 7 8 SHELL If you want to extend the cable length you can connect a Female 9 pin Male 9 pin Extension Cable Refer to Fig 2 MALE FEMALE 2 3 4 5 6 7 8 2 3 4 5 6 7 8 49 External control device setup Use the RS232C cable to control the projector externally Refer to Fig 1 ...

Page 51: ... the Set ID 2 Move the POINTER button left or right to adjust Set ID to choose the desired projector ID number The adjustment range of Set ID is 0 100 If projectors have specified ID numbers then only the selected projector operates To exit the menu display press the MENU button 3 exit move enter Menu Menu G VIDEO G POSITION G SPECIAL G TRACKING exit move select Menu Menu G VIDEO G POSITION E SPEC...

Page 52: ... or Keypad input Input Action 2 byte It shows a Keycode Example 0x25 shows left arrow button operation Operation packet type Operation Action Operation Value Operation Action It sets Set Get Initialize Increment Defrement Execute Operation It shows GUI operation such as Brightness Contrast Value It shows a value for set command which doesn t use other operation action key code list 01 Power Magic ...

Page 53: ...0xEFBD Set ID Type 2 Keycode Type Payload Size 4 4byte Payload size Input Type 1 IR Input Input Action 12 Cursor Down Execute 07 G 08 D Magic Number Type Payload Size CRC Input Type Input Action Magic Number 0xEFBD Set ID Type 2 Keycode Type Payload Size 4 4byte Payload size Input Type 1 IR Input Input Action 13 Cursor Right Execute Magic Number Type Payload Size CRC Input Type Input Action Magic ...

Page 54: ... 0xEFBD Set ID Type 2 Keycode Type Payload Size 4 4byte Payload size Input Type 1 IR Input Input Action 31 Zoom Execute 15 Mute 16 Blank Magic Number Type Payload Size CRC Input Type Input Action Magic Number 0xEFBD Set ID Type 2 Keycode Type Payload Size 4 4byte Payload size Input Type 1 IR Input Input Action 24 Mute On Off Magic Number Type Payload Size CRC Input Type Input Action Magic Number 0...

Page 55: ... Input Type 1 IR Input Input Action 33 Keystone Execute 01 RGB video a Contrast Operating List Contrast default value Magic Number Type Payload Size CRC Operation Action Operation Value Magic Number 0xEFBD Set ID Type 3 Operation Type Payload Size 6 6byte Payload size Operation Action1 Operation Set Operation 2 Contrast Value 0 100 Contrast Value Operation Action1 Operation Set Operation 2 Contras...

Page 56: ...Number 0xEFBD Set ID Type 3 Operation Type Payload Size 6 6byte Payload size Operation Action1 Operation Set Operation 60 Contrast Value 0 100 Contrast Value Contrast default value Operation Action 1 Operation Set Operation 60 Contrast Value 80 Contrast Value Contrast setting value Operation Action 2 Operation Get Operation 60 Contrast Value 0 100 Contrast Get Value Red default value Operation Act...

Page 57: ...tion Type Payload Size 6 6byte Payload size Operation Action1 Operation Set Operation 22 Keystone Value 78 178 Keystone Value Key stone default value Operation Action 1 Operation Set Operation 22 Keystone Value 128 Keystone Value Key stone setting value Operation Action 2 Operation Get Operation 22 Keystone Value 78 178 Keystone Get Value Contrast default value Operation Action1 Operation Set Oper...

Page 58: ...izontal 04 Audio a Volume Magic Number Type Payload Size CRC Operation Action Operation Value Magic Number 0xEFBD Set ID Type 3 Operation Type Payload Size 6 6byte Payload size Operation Action1 Operation Set Operation 531 Volume Value 0 100 Volume Value Volume default value Operation Action 1 Operation Get Operation 531 Volume Value 20 Volume Value Volume setting value Operation Action 2 Operatio...

Page 59: ...0X480 75 00Hz 37 500kHz 640X480 85 008Hz 43 269kHz 640X480 100 040Hz 53 011kHz 640X480 120 00Hz 64 062kHz SVGA 800X600 56 250Hz 35 156kHz 800X600 60 317Hz 37 879kHz 800X600 72 188Hz 48 077kHz 800X600 75 00Hz 46 875kHz 800X600 85 061Hz 53 674kHz 800X600 90 00Hz 56 00kHz 800X600 100 00Hz 64 016kHz XGA 1024X768 43 479Hz interlace 35 522kHz 1024X768 60 004Hz 48 363kHz 1024X768 70 069Hz 56 476kHz 1024X...

Page 60: ...rt or stains moisten a soft cloth with water and a neutral detergent and then wipe the casing Do not use alcohol benzene thinners or other chemical detergents as these can cause the casing to be warped Cleaning the Cleaning the Air Filter Air Filter The air filter which is located at the top of the projector should be cleaned after every 100 hours use If it is not cleaned periodically it can becom...

Page 61: ...60 Memo ...

Page 62: ...61 Memo ...

Page 63: ...6 feet 9m 0 5W 0 5W stereo 4 3 horizontal vertical 1 1 3 NTSC PAL SECAM NTSC4 43 PAL M PAL N AC 100 240V 50 60Hz 67mm 216mm 245mm 2 3kg R temperature lamp model AJ LA40 power consumption 150W In operation 32 95 F 0 C 35 C In storage and transit 4 140 F 20 C 60 C humidity In operation 20 80 relative humidity by dry hygrometer Not in operation 10 90 relative humidity by dry hygrometer Warning This i...

Page 64: ...P NO 3828VA0314B a 373 026H ...

Reviews: