background image

- 15 -

Operation & Maintenance Manual

User setting consists of 2 screens. Movement can be done with clicking arrow 

Through user

setting, operator can make up the control parameter of chiller.

Operator basically can check and change the control setting condition of cold water outlet tempera-
ture. Among temperature setting items, target temperature of cold water outlet temperature and con-
trol range can be set by operator in user setting screen. Also by setting preheat function, operator
can set machine to operate only after ranged preheat time when power is ON.

For changing value, select the part which indicates the value and select the number which operator
wants to change to. If operator wants to cancel the change, select CLR, it would be cancelled. Stop
and Re-start temperature would be set automatically by setting Stop temperature Dt, Re-start Dt in
parameter setting. Stop temperature means the temperature at which compressor would be
stopped. Setting condition is 5.0ʼC. Re-start temperature means the temperature in case that com-
pressor should be re-started after Stop. Setting condition is 9.0ʼC. Difference of Stop temperature
and Re-start temperature prevent often re-start of compressor.

Oil preheat can be set as Use/Nonuse, by minute unit. In the region where outdoor temperature is
low, oil needs to be preheated to ensure proper thickness of oil.

Control mode consists of Local Control/Tele Control, Hand Control/Auto control and MODBUS
Use/Nonuse. In case of Local Control, chiller may be operated by key controlling of operator. If
mode is changed to tele control, Start and Stop of chiller may be done by the condition of tele con-
tact part.

In case of Auto control, chiller would Start and Stop automatically by operator setting operation
schedule. Schedule setting can be done in function setting menu. Contrarily, in case of Hand
Control, chiller would be operated by key control of operator or tele signals.

MODBUS would be used to conduct the control after connecting chiller to BMS and MODBUS
through network.

Operator can change password in second screen. Some function of HMI would be protected by
password. Password change can be done by selecting New Password , re-input it and complete it
by clicking OK.

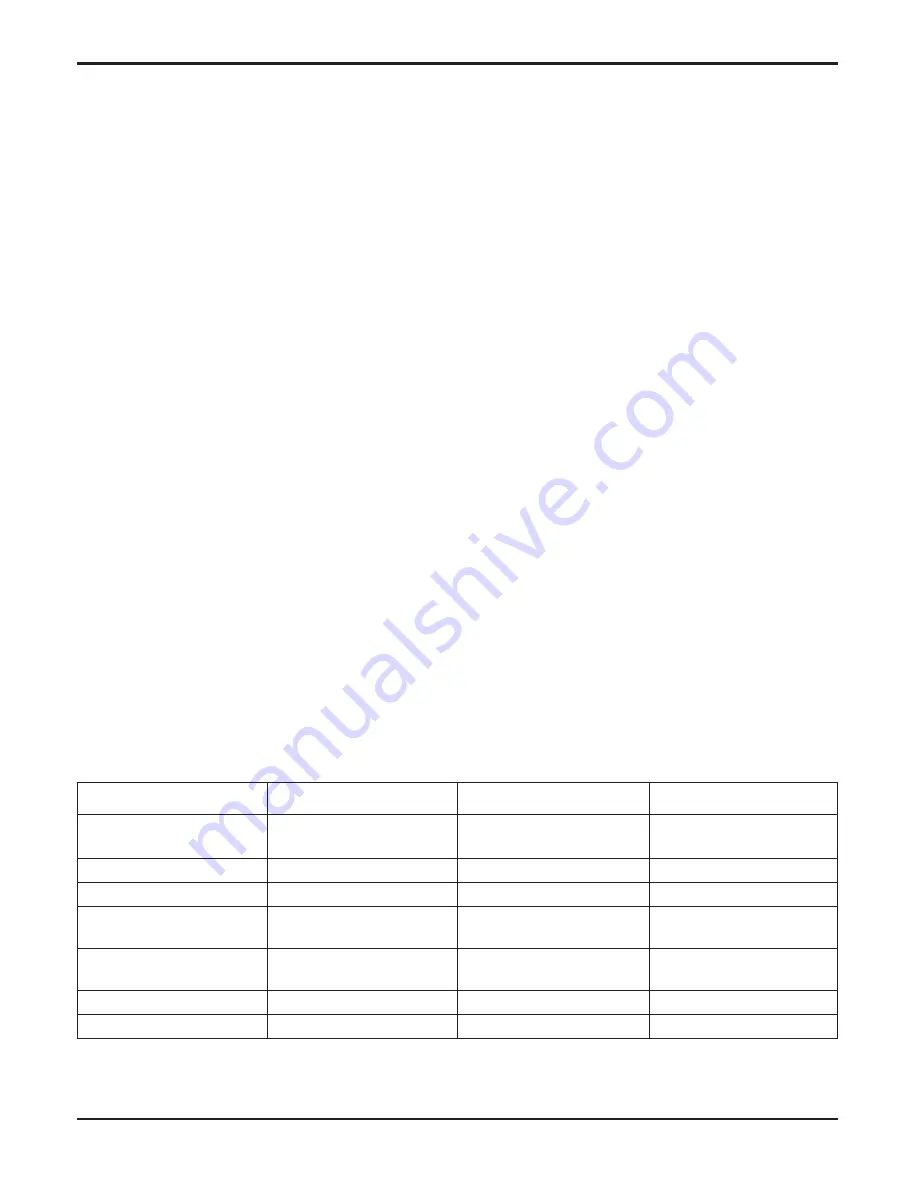
Setting range of user setting value is specified below.

Table 1

Indication

Target Temp

Control Range

Preheat Function

Local Control/

Tele Control

Hand Control/

Auto Control

MODBUS

Code

Meaning

Setting temperature 

of cold water outlet

Control Range

Preheat function

Local Control/

Tele control

Hand Control/

Auto Control

MODBUS Use

User input Password 

Setting Range

5°C~12°C

0.6°C~1.5°C

Use/Nonuse

Local Control/

Tele Control

Hand Control/ 

Auto Control

Use/NonUse

XXXX

Basics

7°C

0.6°C

Use

Local Control

Hand Control

NonUse

6666

Summary of Contents for RCWW-1

Page 1: ...ntenance Manual completely before Operating Maintenance the product Operating Maintenance must be performed in accordance with the national wiring standards by authorized personnel only Please retain this Operating Maintenance for future reference after reading it thoroughly MODELS RCWW 1 Compressor www lg com ...

Page 2: ...nit 26 Power Panel 33 Machine On Off Control 34 START UP Pre Start up 35 Operating Procedure 36 Operation Limit 37 OPERATION Operation Sequence 41 Sensors 42 SERVICE Cycle Part 43 Control System 57 Maintenance 65 TROUBLE SHOOTING 66 APPENDIX Wiring Diagram 72 Cycle Diagram 73 Check List 74 Water cooled Screw Operation Maintenance Manual TABLE OF CONTENTS ...

Page 3: ...warranty period problems from mishandling by the consumer problems from natural disaster and power cord defect n The details included in the user manual can change without prior notice to improve the product n The meanings of the symbols used in this manual are as follows This symbol means that there is a possibility of death or major injury This symbol means that there is a possibility of propert...

Page 4: ... a different refrigerant is mixed with original refrigerant it can cause problems in the refriger ant cycle and damage the product Use the exclusive cable for the product It can cause electric shock and problems to the product Install the product where the weight of the product can be supported If the product is installed at location with inappro priate hardness it can fall over to cause damage Wh...

Page 5: ... product It can cause a problem or an injury Be careful of the rotating part Do not insert your finger or rod into the rotating part of the pump and fan It can cause a damage Be careful in case of a fire earthquake or lightning In case of natural disasters including fire earth quake or lightning or if there is a risk of lightning strike immediately stop operating the product If you continue to ope...

Page 6: ...ent potential damage of the tube within the heat exchanger When the chiller is exposed to temperature below 0 C use the brine appropriately within the water circulating pipe to prevent the heat exchanger from freezing Do not exhaust refrigerant inside the building through the refrigerant exhaust valve Outlet of the exhaust valve must be directed to outdoors Leakage of refrigerant in closed space c...

Page 7: ...n cause deformation or problem to the product Install the product so that the tension is not applied to the cable of the product If tension is applied the cable can be disconnect ed or generate heat to cause a fire When the power cable is damaged do not exchange the cable directly Contact the service center for replacement When installing the product make sure to level the product Purpose of preve...

Page 8: ...t Do not turn off the main power immediately after stopping the operation Always wait at least 5 minutes before turning off the main power If not it can cause shortage of oil supply or other problems Do not operate the product with the panel or safety device removed Rotating hot or high pressure parts can cause a safety accident Be careful when disposing the product When disposing the chiller requ...

Page 9: ... an explosion or a problem Do not remove or change the cable connec tion when delivering the chiller Operation of the compressor in the opposite direction can cause a problem to the compressor and must be replaced When shorting the part using jumper or other tools do not bypass by deviating from the specified procedure Grounding the control board and short circuiting other cables can lead to elect...

Page 10: ... removed it can damage the parts Install the device only on the heat exchanger When the device is installed on the lower heat exchanger the device may not be lifted safely It can cause an injury or damage to the chiller Do not add different type of oil It can lead to abnormal operation of chiller Before receiving the service the controller power must be shut down Ensure the safety and prevent the ...

Page 11: ...is indicated Fig 1 above It consists of 7 menus about User inter face HMI is touch screen and you can move to the menu you want if you click the menu item with your hand User Setting Parameter Setting and Function Setting of menu limit is accessed by certi fication code system Especially Parameter Setting limits access of operator and operator only has authority to access to User Setting In case o...

Page 12: ...tion in the Fig 2 above would be applied when the pump is controlled by control signal of chiller Operator can check the present existence of alarm It can be checked because there are indications of kinds of alarm in the bottom of screen When alarm is ON alarm box on the top would be flicker ing twice in a second and it can be eliminated by pushing the alarm box on the top It would move to Alarm d...

Page 13: ... alarm contents which operator wants to eliminate and select the alarm by clicking OK Cancel the alarm by clicking Clear Canceled alarm would be eliminated in the alarm display screen If operator does not cancel the alarm after alarm is ON Chiller would not work even if actual alarm situation is complete After alarm is ON always cancel the alarm and re start it for operation Alarm elimination Rese...

Page 14: ... 14 Chiller Water cooled Screw User Setting Fig 5 ...

Page 15: ...outdoor temperature is low oil needs to be preheated to ensure proper thickness of oil Control mode consists of Local Control Tele Control Hand Control Auto control and MODBUS Use Nonuse In case of Local Control chiller may be operated by key controlling of operator If mode is changed to tele control Start and Stop of chiller may be done by the condition of tele con tact part In case of Auto contr...

Page 16: ... 16 Chiller Water cooled Screw Function Setting Fig 6 ...

Page 17: ...operation it means that it would not be operated It can be changed by selecting box as explained earlier Setting operation schedule is used for efficient process operation schedule setting of manufacturing facilities The last screen enable operator to set the operation schedule of chiller by a week unit Input detailed operation time schedule from Monday to Sunday Time can be set in minute unit If ...

Page 18: ... 18 Chiller Water cooled Screw I O Display ...

Page 19: ...ndi tion and 2 screens for expressing the output condition Input Output display has input information that means switch data that chiller control is inputted and output information that means output sig nal approval of load equipment that conduct chiller controller output Black oval of input output sig nal means ON white oval means OFF ...

Page 20: ... making oil flow both inputs are ON when compressor operation is stabilized Therefore it check if it powers on normally in 5 minutes of compres sor operation and it judge if it operates alarm If it is not ON in 5 minutes of compressor operation PLC may recognize it alarm and stop the chiller safely Delay time is changeable through Parameter Setting and contact LGE service agent when change is need...

Page 21: ...eventing ice formation Low temperature detection would be done by the standard of cold water temperature 2ʼc it would be ON in normal temperature and it would be OFF if it is lower than 2ʼc Pump contactor input to the field wire is needed contact part of electron contactor of cold water and cooling water pump would be inputted to PLC in series This signal should be ON when pump operation is needed...

Page 22: ...oading Valve and Unloading Valve is used to control Sliding Valve by using oil pressure for compressor Liquid Solenoid valve is valve for Economizer operation and it is installed at the pipe that sprays the mid pressure refrigerant to middle of compressor rotor and it sprays when it is ON If it is normal Liquid Solenoid valve is ON and spray refrigerant 100 in operating condition Pump contactor ou...

Page 23: ... 23 Operation Maintenance Manual Running Information Fig 8 ...

Page 24: ...d operation current in present con dition also does accumulate operation time of cold water cooling water pump and compressor Also operation value state indicates refrigerant temperature of chilling cycle and cold water cooling water temperature Indicated temperature would be shown to one place of decimal and it includes Leaving Cond Liquid Entering Cond Liquid Leaving Chilled Liquid Entering Chil...

Page 25: ...munication port if it is connected to BMS it provides interface function through exclusive communication port PLC power input is 24V AC 50Hz and it gets its power from transformer which is located in power panel SMPS Switching Mode Power supplier is equipment that making 24V DC power using 220V AC 50Hz power it provides power to touch panel Fuse protects circuit from over current used for 220V AC ...

Page 26: ...wer approval through power lamp Also switch that can set body remote and emergency stop switch is also installed Fig 10 CONTROLS n PLC and HMI Unit HMI Human Machine Interface which is united with PLC Programmable Logic Controller is shown in Fig 10 described below it is located in control panel Door HMI is touch screen for convenient user interface Through touch screen interface operator can chec...

Page 27: ...s delivered to PLC as input or it is approved output from PLC Used input output for this product among input output of PLC is shown below POW it is used to provide power to PLC DIN it is used to provide switch input signal to PLC OUT1 OUT2 it is used to deliver output signal from PLC AIN1 AIN2 it is used to deliver sensor information to PLC COM it is used to connect communication between PLC and H...

Page 28: ...as 4Hz frequency D3 D6 should be OFF Other LED is flickering depending on PLC commu nication condition 4 position DIP switches should be OFF 8 position DIP switch should indicates MODBUS slave equipment address 8 position DIP switch indicates 8 bit number of 6 figures which has contrary one bit as number of 2 figures For example basic setting place described in the picture below switch 2 8 ON and ...

Page 29: ...ication contactor 86 O16 O15 Cooling Water Pump Chilled Water Pump 84 O14 Tower Fan 83 O13 O12 O11 O10 O09 OUT2 Common 220V AC Live 7 COM 1 Oil Recover Valve 78 O08 O07 O06 1 Unloading Electrovalve 1 75 Electrovalve 75 O05 1 Loading Electrovalve 74 O04 1 Y Contactor 73 O03 1 Contactor 72 O02 1 Main contactor Oil separator sol Valve 71 O01 OUT1 76 85 Table 4 ...

Page 30: ...terior protection equipment Power phase sequence monitor equipment 1 Compressor overload relay High pressure switch Low pressure switch Freeze and burst prevention switch Water pump contactor input Cold water cooling water flow switch Emergency stop switch Tele control 24V AC Positive 45 I15 44 I14 43 I13 42 I12 41 I11 40 I10 39 I09 38 I08 37 I07 36 I06 35 I05 34 I04 33 I03 31 I01 DIN 32 I02 Table...

Page 31: ... 17 AI4 14 AI3 Chilled water outlet temperature 15 AI3 12 AI2 Cooling water inlet temperature 13 AI2 10 AI1 Cooling water outlet temperature 11 AI1 AIN1 AIN2 Description Wire No Pin Connector Table 6 MODBUS communication function is provided by standard Chiller can unify to existing BMS net work using MODBUS communication MODBUS can transmit to Lonworks or BACnet using third transmitter for connec...

Page 32: ...107 Compressor current Ampere 8 46108 Chiller operation time Hour 9 46109 0 Chiller Starting 0 OFF 1 ON 10 46109 1 Chiller Shut downing 0 OFF 1 ON 11 46109 2 Chiller Stop 0 OFF 1 ON 12 46109 3 Chiller Failure 0 OFF 1 ON 13 46110 0 Comp Main MC 0 OFF 1 ON 14 46110 1 Comp MC 0 OFF 1 ON 15 46110 2 Comp Y MC 0 OFF 1 ON 16 06111 Start stop 1 Start 0 Stop Yes 17 41421 chilled water outlet setting temper...

Page 33: ...condition of magnet switch during PLC control OCR Over Current Relay which is installed with magnet switch detects over current and send signal to PLC to protect compressor from over current Rated electrical input power input normality is watched always by Voltage Monitoring Relay and when abnormality is detected it sends signal to PLC and let it conduct alarm operation when abnormal power is prov...

Page 34: ...owering ON OFF by setting Start and Stop time Select user setting Hand Auto mode and Auto control to set this mode Basic ON OFF time is set as Start 8 00 Stop 17 00 For changing operating time for Auto control select Function setting on Main menu Input operation period in the second screen Next input operation time of chiller from Monday to Sunday in detail Select User setting for returning to Mai...

Page 35: ... coolant water loop must be cleaned before the device is connected Check all water pipes Check whether the direction of the water flow is correct and whether the pipe is accu rately connected to the evaporator and condenser Open all the flux valves that flow in the direction to con denser and evaporator Turn ON the chilled water and coolant pump and measure the water pressure reduced part of the c...

Page 36: ... the temperature of the chilled water is too high When the Auto control does not work in the chiller check whether the water circulation pump is operating Check and audit all the fuses All the fuses on the power and control panel must be installed in the correct location Check and audit the condition of the touch screen of PLC and HMI HMI will display the LG logo as it is turned on and then the no...

Page 37: ...sor motor will not operate The equation to calculate the voltage imbalance is as follows Voltage imbalance 100 x Maximum voltage compared to average voltage Average voltage Maximum voltage compared to average voltage is the absolute value of the maximum difference from average voltage of 2 phases Example Voltage source 400 3phase 1 2 3 50Hz 12 405V 23 394V 31 410V Average voltage 405 394 410 3 403...

Page 38: ...hieve lower or high rise in temperature To ensure appropriate heat exchange and turbulence Within the evaporator and condenser the flow rate must exceed the minimum flow rate Table 9 Table 10 Evaporator Condenser MODEL Min Norminal Max gpm l s gpm l s gpm l s RCWW200RAAA 411 17 25 94 519 54 32 78 763 60 48 18 MODEL Min Norminal Max gpm l s gpm l s gpm l s RCWW200RAAA 363 68 22 95 587 39 37 06 675 ...

Page 39: ...0 160 140 120 100 80 60 40 20 0 200 0 10 20 30 40 50 60 70 80 90 100 110 120 1 compressor model 200 RT Water flow rate l s Pressure drop ft wg 70 60 50 40 30 20 10 0 0 200 200 400 600 800 1000 1200 1400 1600 1800 1 compressor model 200 RT Water flow rate gpm Cooling water pressure drop SI Unit Cooling water pressure drop English Unit ...

Page 40: ...180 160 140 120 100 80 60 40 20 0 200 0 10 20 30 40 50 60 70 80 90 100 1 compressor model 200 RT Water flow rate l s 200 Pressure drop ft wg 70 60 50 40 30 20 10 0 0 200 400 600 800 1000 1200 1400 1600 1 compressor model 200 RT Water flow rate gpm Chilled water pressure drop SI Unit Chilled water pressure drop English Unit ...

Page 41: ... includes capacity control mid pressure cool ing control to cool the motor and the alarm control When the chiller must be stopped the operating condition of the compressor will turn on SV1 and SV2 to change to minimum capacity location 60 seconds after the stop ping is delayed the compressor will be stopped Even when the compressor is stopped the chilled water pump will prevent the compressor from...

Page 42: ...3 93 1 22 32 145 79 10 18 23 52 3 9 94 1 19 31 137 59 11 17 48 53 3 78 95 1 16 30 129 91 12 16 77 54 3 66 96 1 13 29 122 72 13 16 09 55 3 55 97 1 1 28 115 98 14 15 44 56 3 44 98 1 08 27 109 66 15 14 82 57 3 33 99 1 05 26 103 74 16 14 23 58 3 23 100 1 02 25 98 18 17 13 67 59 3 13 101 0 99 24 92 95 18 13 13 60 3 04 102 0 98 23 88 04 19 12 62 61 2 95 103 0 95 22 83 43 20 12 13 62 2 86 104 0 93 21 79 ...

Page 43: ...14 4 15 11 22 19 19 20 SERVICE No PART No PART No PART No PART 1 Compressor 7 Flux controller 13 Flux switch 19 Safety valve 2 Condenser 8 Flux controller 14 Oil solenoid valve 20 Temperature Sensor 3 Receiver tank 9 Dryer 15 Oil flux switch 21 Low pressure switch 4 Oil filter 10 Evaporator 16 Temperature Sensor 22 Water flux switch 5 Oil separator Economizer 11 Oil heater 17 Oil high pressure swi...

Page 44: ...pressure side as the lubrication oil of the discharged gas will be separated in the oil separator The size and shape of the discharge port is decided by the Internal compression ratio Vi of the compressor This ratio must have the relationship defined by the operating pressure ratio to avoid the efficiency loss from high or low pressure axis Table 13 No Description No Description 1 Compressor case ...

Page 45: ...alve moves to the left side and part of the refrigerant goes around from the compression compartment to the suction end again In result the cooling capability is reduced due to the reduction of displacement of the refrigerant flowing inside the system Piston spring pushes the piston to its original place that is minimum load location to reduce the operating cur rent in the next start up When the c...

Page 46: ...nlet and solenoid valve SV1 of the inlet can be con trolled to control the cooling capability in stable condition The no gear capacity control system is related to the controller to control the system in the desired condition It is very important to control the load and unload from the controller in stable condition If the load changes suddenly install the orifice valve additionally for a more sta...

Page 47: ...at To separate the oil from the refrigerant with the oil mixed the oil separator is designed to let minimum amount of oil get into the system Special care is needed for the temperature which is the significant element in the life of the compressor bearing High oil temperature reduces the viscosity and deteriorates the lubrication within the compressor and the heat absorption condition It is recomm...

Page 48: ...l type is shown below Unit CPI SOLEST MOBIL EAL ICI EMKARATE 68 120 220 370 68 100 RL411 RL375 RL421 Color ASTM 0 5 0 5 1 5 L2 0 L1 0 Specific weight 0 945 0 94 0 95 0 955 0 971 0 966 0 9723 0 9783 0 9759 40 C 100 C Viscosity 64 131 215 9 385 96 62 5 95 8 48 74 1 134 8 9 14 53 20 8 29 23 8 3 10 5 7 3 10 1 15 Ignition point C 266 254 271 302 254 260 273 246 265 Pour point C 43 36 5 25 21 43 37 40 3...

Page 49: ...ation High pressure switch malfunction Compressor discharge valve partially closed Condenser water pipe clogged Issue of condenser scale Replace switch Open valve or replace valve with defect Check pipe Repair or replace defect Clean condenser Long or continuous chiller operation Insufficient refrigerant charged amount Control fuse issue Full Partial clog in strainer Insulation defect Service load...

Page 50: ... temperature of the motor coil temperature is 120 C and the temperature to restart the operation is 75 C The compressor discharge produc tive block temperature is 110 C and the temperature to restart the operation is 60 C The troubleshooting of the compressor is described in the above table In the chiller shell and tube type evaporator must be installed The evaporator has the internal structure of...

Page 51: ...ig 23 No Part name QTY Cover 1 Insulation board 1 Micro switch 1 Adjustment screw 1 Metal installation for flow adjustment screw 1 Flow adjustment screw 1 Operating plate 1 Adjustment spring 1 Table 17 u Condenser Condenser uses the shell and tube type Internal structure reduces the condensation temperature by 1 2 C compared to other products in 1 0 MPa design condition by improving the general co...

Page 52: ...n be adjusted Default setting is shown below Low pressure switch and high pressure switch are closed in normal conditions and when the detected pressure exceeds the set value it will open After recovering from high or low pressure condition the switch will automat ically return to normal location Low pressure block 3 2kgf cm2 High pressure block 10 5kgf cm2 Table 17 Fig 24 ...

Page 53: ...too low because of low outdoor air temperature 2 In case of which cooling water temperature is too low because of cooling water flow rate is too high 3 In case of which cooled water temperature doesnʼt lower because of cooled water flow rate is too high 4 In case of which cooled water temperature doesnʼt lower because cooling load is too high In this case an operator operates the machine to genera...

Page 54: ...ng a leaking part you must use a good refrigeration practice After the leaking part is repaired the water inside the chiller must be removed completely to form a vacuum condition u Refrigerant Charge Insert the coupling to the refrigerant charge port To prevent the damage of the tube from freezing of the residual moisture inside the evaporator you must circulate the water in the evaporator and con...

Page 55: ... is recommended to disassemble the oil filter and wipe the oil filter mesh u Oil Flow Switch Oil flow switch is also installed on the oil separator on the pipe that returns the oil to the compressor The set ting range of the flow switch is 3 4 4 2 l min from where the flow rate increases and 3 0 3 8 l min from where the flow rate decreases Maximum flow rate of the flow switch is 67 l min Item Name...

Page 56: ...er input Fig 29 Fig 30 Valve Port size Connector size A B C D E 240RA16T9M 1 1 1 8ODF 5 80 2 23 4 13 9 06 0 91 u Solenoid Valve Solenoid value is installed on oil return pipe between oil filter and compressor by factory default The valve on the oil filter side is turned ON during the device operation so that the oil can circulate to the compressor and when the operation stops it will be turned OFF...

Page 57: ...t power panel is composed of the electric parts related to Rated electrical input main power and the right control panel is composed of low voltage parts such as PLC and HMI device Panel is designed to be water proof through the dual door system Panel is not appropriate for IP55 Control Panel Power Panel Fig 31 ...

Page 58: ...rt up is reduced by 1 3 by the direct start method All wire voltages VL of Wye and Delta coil configuration are Rated electrical input but the phase voltage VP of the Wye coil configuration is reduced by 1 3 of the Delta coil configuration Also the line current IL is reduced by 1 3 of the Delta coil By using this principle the compressor is equipped with the Wye coil con figuration Coil configurat...

Page 59: ...t is detected For OCR the switch on OCR must manually be initialized to recover normally Tripping point scope and initial setting is are shown below At the bottom right of the power panel the voltage monitoring relay is to check whether the power is appropriately installed There are 3 fuses installed for the Rated electrical input power input to the voltage monitoring relay The ventilation fan of ...

Page 60: ...ays based on the selective protection and initialization method Function of DIP switch is shown below Based on the default setting only the switch locat ed on ʻ5S 1Sʼ will be turned OFF and the rest ON Do not change the initial setting to keep the pro tection V R S T S V R S T S V R S T S V R S T S V R S T S V R S T S UNDER VOLTAGE UNBALANCE VOLTAGE PHASE LOSS NO INPUT OVER VOLTAGE Rated electrica...

Page 61: ... relay Default setting of rotary switch is shown below Table 22 u Assist Relay Assist Relay is to check whether the power of the controller is 220V Assist Relay is shown below u Compressor Contactor Compressor contactor starts stops and controls the fixed range of the compressor motor when the product is operating The rated voltage of the compressor contactor is rated electrical input Fig 36 Fig 3...

Page 62: ...clockwise direction to recover the output power From the internal door of the control panel the operator can access the HMI device and depending on the HMI device the power lamp and Start Stop Remote control switches are installed on the door Start Stop Remote switch turns on the control power to the control system and the remote control switch uses BMS etc to enable the control The power conditio...

Page 63: ... from the right SMPS Switched mode power Relay is to check the appropriateness of 220V AC and the Start Stop Remote control switch installed on the door is located at the starting part The ventilation fan of the control panel operates permanently after the power is turned ON Ventilation Fan Thermostat SMPS Switching Mode Power Supply Control fuse Control Relay Fig 39 ...

Page 64: ...e inside the control panel The shape and characteristics are as follows u Ventilation Fan Ventilation fan has two sides attached power panel and control panel This fan sends air externally to respond to the temperature rise within both boxes when the product is operating to prevent any problem when the temperature of each box rises Fig 40 Fig 41 ...

Page 65: ...5 Check every 6 months When the operating pressure of the cooler is out of the range clean the unit 6 Check Check Annual clean 7 Check Check Monthly check 8 Oil filter Check Check Check every 6 months Clean if necessary 9 Dryer filter Check Annual replacement 10 Oil amount Check Annual check 11 Oil color Check Replace Replace 12 Check Annual check 13 Check Check every 6 months 14 Check Check or re...

Page 66: ...chiller Lastly you must check the alarm setting You can check whether the alarm is turned ON through the HMI device If the alarm is turned ON follow the alarm troubleshooting procedure Generally the compressor of the chiller operates by the cold water outlet temperature compressor stop temper ature and the compressor restart temperature But the compressor can operate for a long period of time with...

Page 67: ... a fuse Power recovery of chiller Check leakage and add refrigerant Check device configuration Check alarm condition Check separate alarm troubleshooting procedure and follow the troubleshooting direction To check the alarm condition pressure check the PLC input channel diagram Check the oil preheat time and temperature reach Check compressor start delay time reach Check cold water outlet temperat...

Page 68: ...ual input switch In case of any issue first check whether there is an appropriate amount of refrigerant within the chiller If there is no issue with the amount of refrigerant the conta minated heat exchanger could be the cause Consider that coolant outlet temperature range oper ates 20 C 40 C Oil issue means that there is no oil flow from the oil separator to the compressor or the amount of oil in...

Page 69: ... switch error Air mixed to refrigerant Controller DI point error Insufficient refrigerant High pressure switch trip Pressure alarm Cold water pipe valve open Cold pump error Insufficient cold water Flow alarm Check power Over voltage Under voltage Reverse phase Voltage imbalance Missing phase 5E alarm 2 Dp alarm Emergency switch trip Emergency stop Potential solution Potential cause Recognition Di...

Page 70: ...r Potential solution Increase setting of cold water outlet temperature Increase cold water or replace pump Test or replace internal protective switch Charge refrigerant or review valve condition Test or replace internal protective switch Check voltage clean heat exchanger repair overload relay repair or replace compressor Repair or replace oil service valve Repair or replace low pressure switch In...

Page 71: ...ge temperature alarm Communication error Communication error alarm Check sensor line Change sensor Sensor line short Sensor error Compressor discharge temperature sensor closed Check sensor line Change sensor Sensor error Compressor discharge temperature sensor open Displayed alarm message Recognition Potential cause Potential solution Sensor line blocked or loose Coolant water inlet temperature S...

Page 72: ...02 R S T N VOLTAGE MONITORING 5E L N 220VAC FG 415VAC 3P 4W 2 1 8 38 47 4 7 6 5 F4 F5 F6 2 4 1 2 111 TO MAIN CONTROL UNIT 22 23 4 2 112 CT 11 14 2 4 INTERNAL PROTECTOR INT69 M3 T1 T2 T3 T1 T2 T3 L1 L2 L3 L1 L2 L3 FR COMP2 W V U X Y Z TO MAIN CONTROL UNIT M2 M1 N L DT OH 603 605 2 1 5 6 7 8 37 26 604 CF1 THC1 9 DRY CONTACT DRY CONTACT 220VAC POWERED 220VAC POWERED 220VAC POWERED 220VAC POWERED R S ...

Page 73: ... SYMBOL 10 9 Expansion Devices 5 Oil separater 4 Oil Filter 3 Expansion Device 2 Condenser 1 Compressor S DP WF T T WF T T HP HP T OF OL OH High pressure switch HP Low pressure switch LP Oil flow switch OF AF Water flow switch WF Anti freezing switch AF Temperature sensor T Oil level sensor OL Diffenent pressure switch DP 1 2 3 4 5 6 7 8 9 10 11 High Pressure Gauge Low Pressure Gauge Muffler HP LP...

Page 74: ...ck List 1 Project Information 2 Model Information Content Information Product Model Serial Compressor A Model Serial Compressor B Model Serial Content Information Project name Address Installing contractor Sales office Start up performer ...

Page 75: ...nnected well Yes No Are all plugs connected well Yes No Is the product preheated for more than 8 hours before starting Yes No Is the air in the pipe purged from the relief valve properly according to the region Yes No Contents Check Are all valves of the chiller open Yes No Are all pipes correctly connected Yes No Is there any clog in the drain pipe Yes No Is there any leakage Yes No Is the air wi...

Page 76: ...voltage imbalance within 2 Yes No Is there any abnormal noise or vibration Yes No Does the alarm work normally Yes C C C C C C psig Gpm l s kPa kPa kg kg No Compressor capacity External temperature Cold water inlet temperature Cold water outlet temperature Coolant water inlet temperature Coolant water outlet temperature Compressor discharge temperature Brine density Evaporator pressure drop Cold w...

Page 77: ......

Reviews: