background image

A13

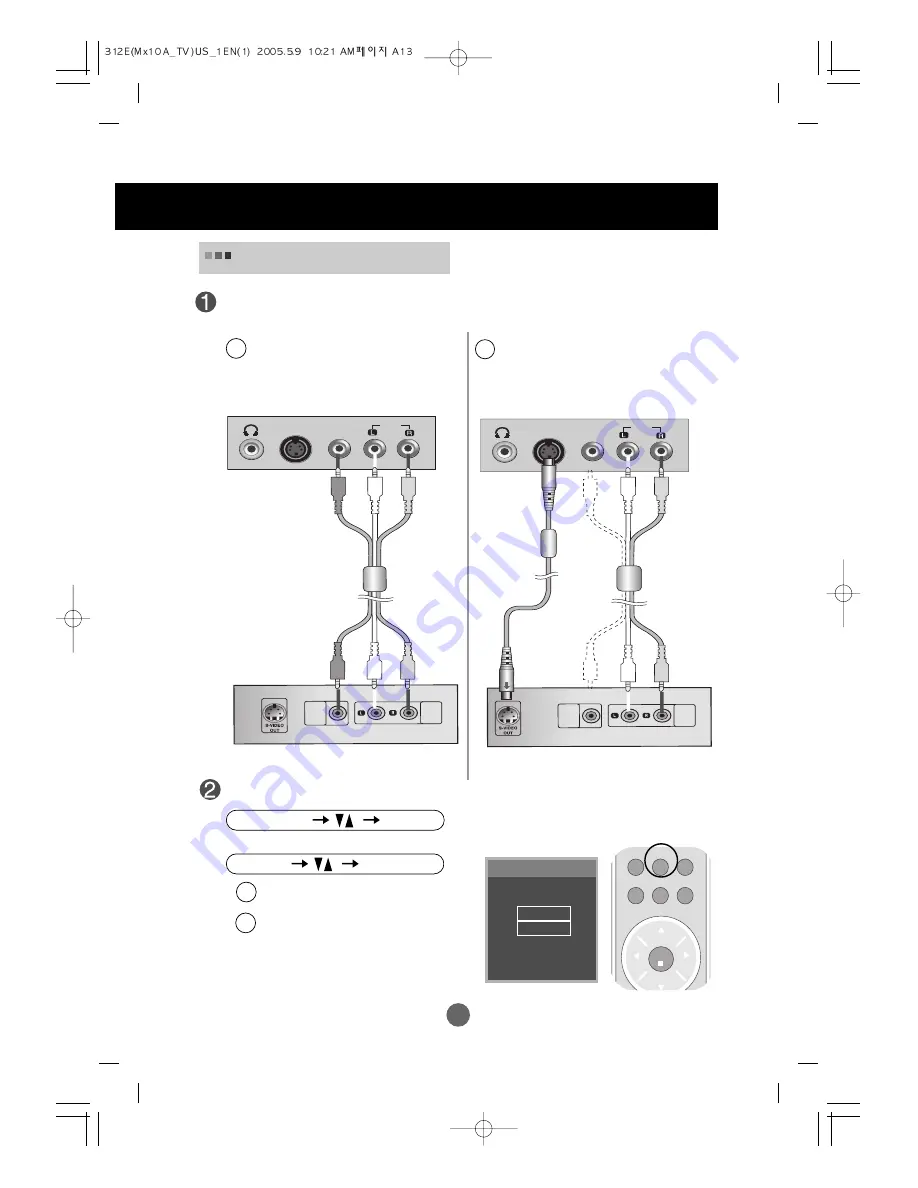
Connecting to External Devices

Connect the video/audio cable as shown in the below figure and then connect the power
cord (See page A12).

When watching VCR/DVD

When connecting with an S-Video cable.

• 

Connect to the S-Video input terminal to

watch high image quality movies.

B

A

Input select

TV
Video
S-Video
PC

ch

enter

tv/video

mts

multimedia

fcr

menu

exit

ch

vol

vol

When connecting with a RCA cable.

• Select 

Video

When connecting with a S-Video cable.

• Select 

S-Video

B

A

When connecting with an RCA cable.

• 

Connect the input terminal with a proper
color match.

(Video – Yellow, Sound

(left) – White, Sound (right) – Red)

Select an input signal.
Press the multimedia button on the remote control to select the input signal. 

Or, press the SOURCE button at the front side of the product.

multimedia

enter

SOURCE

AUTO/SELECT

S-Video

Video

Audio

VIDEO

OUT

AUDIO

OUT

RCA Cable

Yellow

White

Red

VCR/DVD

W

R

Y

(Not included)

VIDEO

OUT

AUDIO

OUT

S-Video

Video

Audio

RCA Cable

S-Video Cable

VCR/DVD

White

Red

W

R

(Not included)

(Not included)

Summary of Contents for M1910A

Page 1: ...een Name of the Buttons in the screen Adjustment Unit OSD On Screen Display Menu OSD On Screen Display Screen Tracking Order Set Select the channel when using the TV Adjusting the picture function Adjusting the sound function Adjusting the time function Selecting the setup function Adjusting the screen function PC only A15 A15 A17 A18 A19 A20 A22 A23 A24 A30 Troubleshooting Specifications Installa...

Page 2: ...or hear a strange sound unplug the power cord and contact the service center If you continue to use without taking proper measures electrical shock or fire can occur If you dropped the product or the case is broken turn off the product and unplug the power cord If you continue to use without taking proper measures electrical shock or fire can occur Contact the service center Do not drop metallic o...

Page 3: ...n deterioration can cause electric leakage electric shock or fire Fix the power cable completely If the power cable is not fixed completely a fire can break out Hold the plug when pulling out the power cable Do not bend the power cord with excessive force or put heavy objects on the power cord The power line can be damaged which may cause electric shock or fire Do not insert a conductor like a met...

Page 4: ...ck by referring to the User s Guide Your vision can be impaired Use authorized detergent only when cleaning the product Do not use benzene thinner or alcohol Product can be deformed Caution Do not shock the product when moving it You may be electrocuted or the product can be damaged Do not dispose the product packing box Use it when you move Make the panel face forward and hold it with both hands ...

Page 5: ...D Sub Signal Cable ENGLISH Accessories 1 Take out the battery cap 2 Insert the batteries with correct polarity 3 Close the battery cap You can use a remote control 7 meter distance and 30 degree left right within the receiving unit scope Dispose of used batteries in the recycle bin to prevent environmental pollution Inserting batteries into remote control Back Cap Remote Control Batteries ...

Page 6: ... attached devices is turned off Unfolding the stand base Place the product with its front facing downward on soft cloth Hold down the release button inside the stand and strongly pull out the stand with your two hands The stand won t move if you don t press release button Before Connecting to the PC ...

Page 7: ...able power cord and the audio cable to use in order to arrange in the cable holder as shown in the following figure To connect the cables refer to next pages Push the back cap according to the steps shown in the following figure To arrange cables in order ...

Page 8: ...this button repetitively to set the intended screen cc Button Select a closed caption Exit Button Menu Button Channel Number Select Button Operational at the TV mode only Set Button Audio Button Use this button to select the sound tone Press repeatedly to select Flat Music Movie Sports User sound tone Mute Button Name and Function of the Parts Name of the Remote Control Buttons mts Sound Mode Sele...

Page 9: ...vol vol If you press the button once the following Input Signal Window will appear Select the signal type you want using the button The signal type will be changed with the following order Set the signal type you want Input Select Button TV AV Button TV Video S Video PC Input select TV Video S Video PC ...

Page 10: ...N ANT IN Back Cap Open the back cap before you install the product 17 inch 19 inch 15 inch Power Connector Connect the power cord Headphone Earphone Connection Terminal AV Input Terminal D Sub Analog Signal Connector TV Tuner Jack Connect the antenna PC Sound Jack Connect to the jack in the PC sound card ...

Page 11: ...ound card user s guide Speaker Out The terminal connected to the speaker that is not equipped with an amplifier Line Out The terminal connected to the speaker equipped with an amplifier If Audio Out in the PC sound card has only Speaker Out reduce the PC volume This product is integrated with an amplifier Connecting the sound card output terminal AV Input Terminal S Video Video Audio S Video Input...

Page 12: ...necting with the D Sub signal input cable IBM compatible PC When connecting with the D Sub signal input cable Macintosh B A ANT IN AUDIO IN S Video Video D Sub Audio Rear side of the product Audio R L S Video AUDIO IN ANT IN PC Macintosh Macintosh Adapter Optional Use the standard Macintosh adapter since an incompatible adapter is available in the market Different signaling system B A ...

Page 13: ...necting to a wall outlet Connect the power cord Input select TV Video S Video PC Select PC Select an input signal Press the multimedia button on the remote control to select the input signal Or press the SOURCE button at the front side of the product ch enter tv video mts multimedia fcr menu exit ch vol vol Touch the Power On Off sensor Power On Off sensor multimedia enter SOURCE AUTO SELECT ...

Page 14: ...ect Video When connecting with a S Video cable Select S Video B A When connecting with an RCA cable Connect the input terminal with a proper color match Video Yellow Sound left White Sound right Red Select an input signal Press the multimedia button on the remote control to select the input signal Or press the SOURCE button at the front side of the product multimedia enter SOURCE AUTO SELECT S Vid...

Page 15: ... the rear side of the product and then connect the power cord When watching TV Input select TV Video S Video PC ch enter tv video mts multimedia fcr menu exit ch vol vol Select TV Select an input signal Press the multimedia button on the remote control to select the input signal Or press the SOURCE button at the front side of the product multimedia enter SOURCE AUTO SELECT ...

Page 16: ...de this indicator color changes to amber Power On Off sensor Power Indicator Use this button to show hide the OSD On Screen Display menu screen MENU Button Use this button to select an icon or adjust the setting in the OSD screen OSDSelect AdjustButton Selecting and Adjusting the Screen SOURCE MENU VOL AUTO SELECT CH Adjust the volume Use this button to control the channel for the TV signal Volume...

Page 17: ... signal If you press the AUTO SELECT button automatic screen adjustment will be started AUTO SELECT Button TV Television Video Composite video S Video S Video PC D Sub analog signal Select the input signal SOURCE Button The unit that receives the signal from the remote control Processing Input select TV Video S Video PC ...

Page 18: ...nce it provides graphical presentation Note OSD On Screen Display Menu Icon Function Description Channel Picture Sound Timer Adjusting the time function Adjusting the screen function PC only Adjusting the sound function Adjusting the picture function Set Select the channel when using the TV Special Selecting the setup function Screen ...

Page 19: ... selected that fits into the current mode If adjustment is not satisfactory you need to adjust screen position clock and phase in the OSD menu Pop up the menu screen Move where you want to adjust Select a menu icon Adjust the status Save adjustment Exit from the menu screen Press the Menu Button then the main menu of the OSD appears To access a control use the Buttons When the icon you want become...

Page 20: ...stored automatically To stop auto CH progess press the menu or enter button Wait for auto CH progess to complete the channel search cycle before choosing a channel The TV scans for over the air channels and then channels are provided by a cable service Set Select the channel when using the TV This function lets you select your favourite channels directly Press the buttons to select a channel numbe...

Page 21: ...K MENU EZ Video ACC FLATRON f ENGINE Contrast Brightness Cool Normal Warm User Selecting a factory setting color set Cool Slightly purplish white Normal Slightly bluish white Warm Slightly reddish white User Select this option to use the user defined settings Red Green Blue Set your own color levels Contrast To adjust the contrast of the screen Brightness To adjust the brightness of the screen FLA...

Page 22: ...ild image User Select this option to use the user defined settings Selecting a factory setting color set Cool Slightly purplish white Normal Slightly bluish white Warm Slightly reddish white User Select this option to use the user defined settings Red Green Blue Set your own color levels This feature lets you easily select the best desired image condition optimized to the environment Adjusting the...

Page 23: ... and natural audio Music Select this option to enjoy the original sound when listening to the music Movie Select this option to enjoy sublime sound Sports Select this option to watch sports broadcasting User Select this option to use the user defined audio settings To adjust uneven sound volumes across all channels or signals automatically to the most appropriate level To use this feature select O...

Page 24: ...nd then use button to select On or Off 3 Press the enter menu button to save In the event of power interruption disconnection or power failure the Clock must be reset Two hours after the set is switched on by the On timer function it will automatically switch back to off mode unless a button has been pressed Once the On or Off timer is set these functions operate daily at the preset time Off timer...

Page 25: ...Español Français To choose the language in which the control names are displayed Use the buttons to select On or Off It can be set up so that it can only be used with the remote control This feature can prevent unauthorized viewing In order to lock the OSD screen adjustment set the Key lock tab to the On position In order to unlock it do the following 1 Push the menu button on the remote control a...

Page 26: ...ssword MPAA Age block Content block Aux block Canadian On Off Optional Canadian only Selecting and Adjusting the Screen V Use the buttons to select caption mode Text services give a wide variety of information on all kind of subjects ex captioned program lists weather forecasts stock exchange topics news for hearing impaired on up to half of the TV screen But not all stations offer text services e...

Page 27: ...th a password The default password is 0000 You can change the password to any four digit number 3 Press the buttons to select the Set password sub menu then press the button to change the setting Use the number button pad to enter a new four digit password when prompted 4 Re enter the new four digit password when prompted Setting a password Parental OK MENU Lock Set password MPAA Age block Content...

Page 28: ...above TV 14 above TV MA F Violence fantasy violence Applies only to TV Y7 Content block Selecting the setup function To adjust the CAPTION VCHIP function US Only MOVIE Ratings Unblocked G above General audience PG above Parental guidance suggested PG 13 above 13 years and up R above Restricted NC 17 above 17 years and up X Adult If you set PG 13 above G and PG movies will be available PG 13 R NC 1...

Page 29: ...çais V CHIP rating and categories Optional Canadian Rating System Rating guidelines are provided by broadcast station Most television programs and television movies can be blocked by TV rating and or individual categories Parental OK MENU Lock Set password MPAA Age block Content block Aux block Canadian To set Canadian Parental OK MENU Lock Set password MPAA Age block Content block Aux block Canad...

Page 30: ...nals on the same channel By selecting From CC1 CC4 TEXT1 TEXT4 you can choose which signal you view CC1 is usually the signal with the captions while Another mode might show demonstration or programmimg information 3 Your TV might not receive caption signals normally in the following situations Poor reception conditions are encountered IGNITION Picture may flutter drift suffer from black spots or ...

Page 31: ...r the automatic adjustment of the screen Position Clock and Phase This button is for the manual adjustment of the screen Position Clock and Phase H Position To move image left or right V Position To move image up or down Clock To minimize any vertical bars or stripes visible on the screen background The horizontal screen size will also change Phase To adjust the focus of the display This item allo...

Page 32: ...The signal cable between PC and product is not connected Check the signal cable Press the multimedia button in the remote control to check the input signal Is the product power cord connected Does the power indicator is turned on Power is on power indicator is blue but the screen appears extremely dark Does the power indicator look amber Does the Out of range message appear Does the Check signal c...

Page 33: ...tomatically select an optimal screen status that fits into the current mode If adjustment is not satisfactory use the Clock OSD menu D Sub analog signal Press the AUTO SELECT button in the front side of the set to automatically select an optimal screen status that fits into the current mode If adjustment is not satisfactory use the Phase OSD menu Is the screen position wrong Do thin lines appear o...

Page 34: ...t a malfunction of the LCD Screen has poor color resolution 16 colors Screen color is unstable or mono colored Do black spots appear on the screen Screen color is abnormal See if the audio cable is connected properly Adjust the volume See if the sound is set properly Adjust the volume No sound Sound is too low The audio function does not work See if you have selected the proper channel mode Use th...

Page 35: ...o Composite video TV D Sub Analog Rated Voltage AC 100 240V 50 60Hz 0 6A Power Consumption On Mode 30W Sleep Mode 4W Off Mode 2W Tilt Range 5 25 Tilt Stand Attached Size WxLxH 375 4 mm x 221 8 mm x 373 8 mm Weight excl package 4 4 kg 9 7 Ibs Operational Condition Temperature 10 C 35 C Humidity 10 80 Storage Condition Temperature 20 C 60 C Humidity 5 95 The product specifications can change without...

Page 36: ...al Frequency 30 83 kHz Vertical Frequency 56 75 Hz Synchronization Type Separate S Video Composite video TV D Sub Analog Rated Voltage AC 100 240V 50 60Hz 1 0A Power Consumption On Mode 50W Sleep Mode 4W Off Mode 2W Tilt Range 5 25 Tilt Stand Attached Size WxLxH 419 9 mm x 221 8 mmx 423 5 mm Weight excl package 5 9 kg 13 0 Ibs Operational Condition Temperature 10 C 35 C Humidity 10 80 Storage Cond...

Page 37: ...requency 30 83 kHz Vertical Frequency 56 75 Hz Synchronization Type Separate S Video Composite video TV D Sub Analog Rated Voltage AC 100 240V 50 60Hz 1 0A Power Consumption On Mode 55W Sleep Mode 4W Off Mode 2W Tilt Range 5 25 Tilt Stand Attached Size WxLxH 458 3 mm x 242 0 mm x 457 7 mm Weight excl package 7 0 kg 15 4 Ibs Operational Condition Temperature 10 C 35 C Humidity 10 80 Storage Conditi...

Page 38: ...40 x 480 640 x 480 800 x 600 800 x 600 832 x 624 31 469 31 468 31 469 37 500 37 879 46 875 49 725 70 70 60 75 60 75 74 VGA VGA VGA VESA VESA VESA VESA 8 9 10 11 12 13 1024 x 768 1024 x 768 1152 x 870 1152 x 900 1280 x 1024 1280 x 1024 48 363 60 123 68 681 61 805 63 981 79 976 VESA MAC VESA VESA VESA VESA 60 75 75 65 60 75 Preset mode Horizontal Frequency kHz Vertical Frequency Hz Preset mode Horiz...

Page 39: ...t VESA wall mounting Connected to another object Stand type and wall mounted type This monitor accepts a VESA compliant mounting interfacepad optional For further information refer to the VESA Wall Mounting Instruction Guide VESA wall mounting Theft prevention locking device ...

Page 40: ......

Reviews: