52
Single Zone V
ertical
Air Handling Unit Installation Manual
Due to our policy of continuous product innovation, some specifications may change without notification.
©LG Electronics U.S.A., Inc., Englewood Cliffs, NJ. All rights reserved. “LG” is a registered trademark of LG Corp.
ELECTRICAL SYSTEM INSTALLATION
Indoor Unit Electrical Connections
Connecting Indoor Unit Electrical Wiring
• Verify that main power to the unit is completely off before proceeding
with these steps as there is a risk of electrical shock and bodily injury.
• Follow all safety and warning information outlined at the beginning and
throughout this manual. Failure to do so may cause bodily injury.
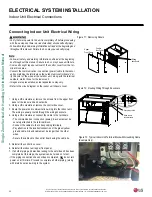
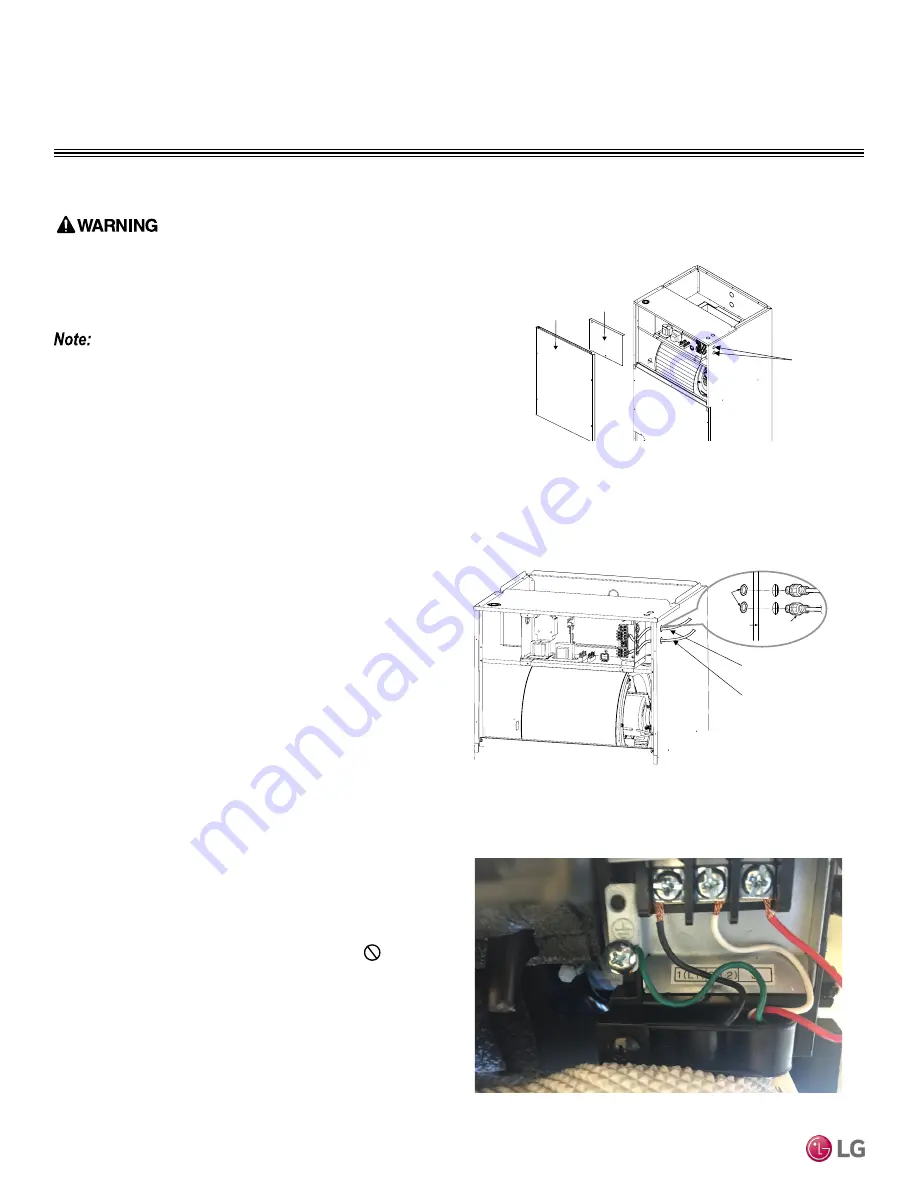
1. Using a JIS screwdriver, remove the screws from the upper front
panel of the indoor unit and set aside.
2. Using a JIS screwdriver, remove the control box cover.
3. Route the power and communication wiring into the indoor unit.
The wiring is usually routed through the wiring knockouts.
4. Using a JIS screwdriver, connect the cable to the terminals..
• The communication / connection (power): Each wire must be
securely attached to the terminal block.
• Connect the cables to the corresponding terminals.
• Pay attention to the location/connection of the green/yellow
ground cable. Ground cable must be longer than the other
wires.
• Secure the cable onto the control board using the cable tie.
5. Reinstall the control box cover.
6. Reinstall the indoor unit upper front panel.
7. If all other piping and electrical wiring to the outside unit has been
completed at this stage, the system can be turned on to test.
• If the piping connections have not been completed,
do not turn
power on at this time. Proceed to complete all other piping, (along
with drain hose) and wiring to the system.
Figure 71: Removing Panels
Figure 72: Routing Wiring Through Knockouts
• Follow all safety and warning information outlined at the beginning
and throughout this manual. Failure to do so may cause unit failure.
• Some units might require removal of the control cover from the ter-
minal block area.
• Connect the communication / connection (power) cable to the indoor
unit by matching the terminals on the outdoor unit control board. Ver-
ify the color of the wires at the outdoor unit, along with the terminal
numbers, match those for the indoor unit.
• Images are representative; actual appearance may vary.
• Refer to the circuit diagram on the indoor unit chassis cover.
Figure 73: Typical Indoor Unit Terminal Block with Grounding Cable
(Example Only).
Wiring
knockouts
Control
Box Cover
Upper
Front Panel
Connecting cable
Wired remote
controller cable
Lock
nut
Conduit
mounting plate
1/2 inch
Conduit
Summary of Contents for LV181HV4
Page 73: ...NOTES ...

