background image

–5–

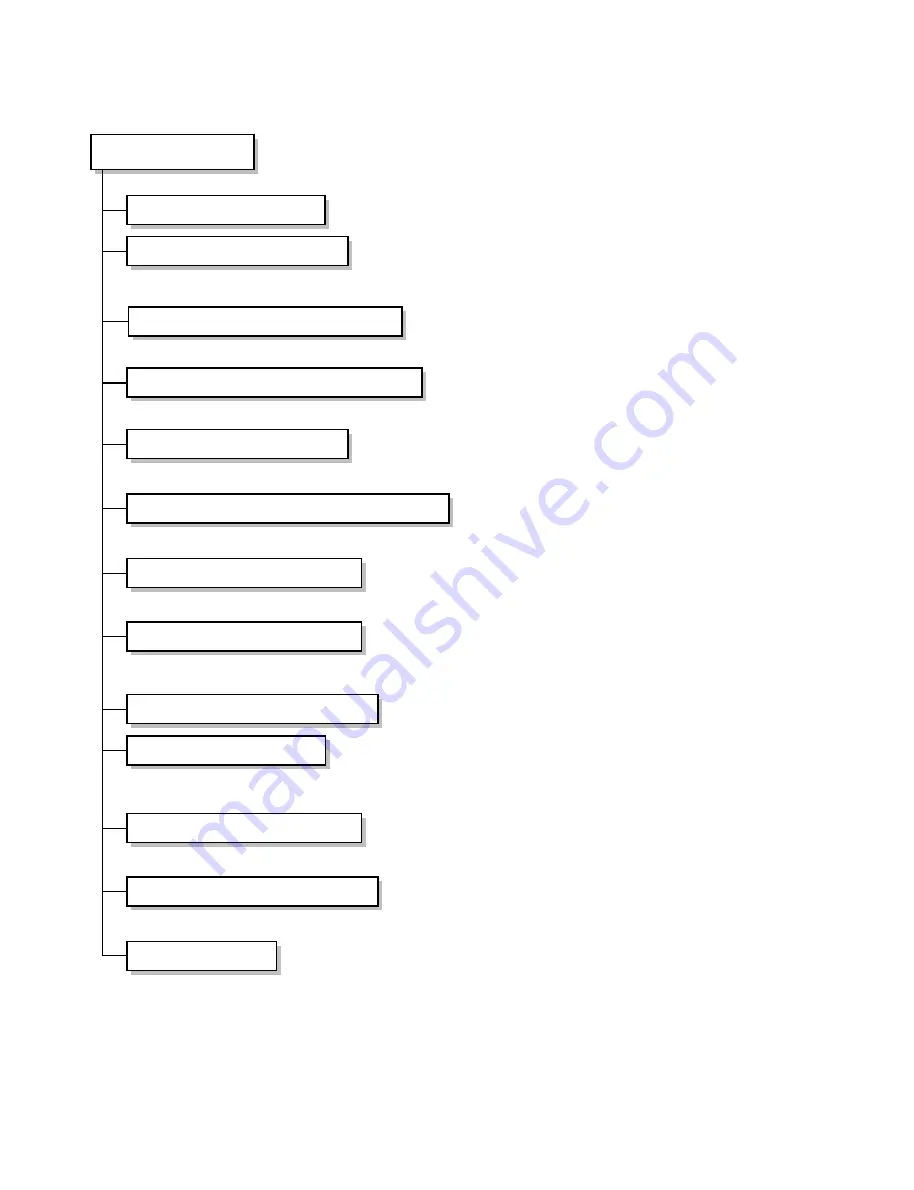
1.4 Functions

Indoor Unit

Power Switch ON/OFF

Operation Mode Control

Sensing the room temperature

Controlling the room temperature

Starting Current Control

Sensing Heat Exchanger Temperature

Timer Delay Safety Control

Indoor Fan Speed Control

Operation Indication lamps

Temperature Setting

Airflow Direction Control

Room temperature Display

Timer Control

• Cooling, Fan 

➔ 

Cooling Model

• Room temperature sensor (Thermistor)

• Maintains the room temperature in accordance with the setting temperature.

• Indoor fan is delayed for 3 sec at the starting.

• Heat exchanger temperature sensor (Thermistor)

• Restarting is inhibited for approx. 3 minutes.

• High, Low

• Up : up to 30°C
• Down : down to 16°C 

• Airflow direction Manual control

• Low, 10° ~ 35°C, Hi

• Off Timer (1, 2, 3....7 hour)

Summary of Contents for LP-8091PC

Page 1: ...Package Air Conditioner SERVICE MANUAL MODEL LP 8091PC Библиотека СОК ...

Page 2: ...g Diagram 7 3 Dimensions 8 4 Operation Details 9 5 Installation 11 6 Operation 23 7 3 Way Valve 24 8 Troubleshooting Guide 31 9 Electronic Control Device 42 10 Schematic Diagram 44 11 Exploded View and Replacement Parts List 45 2 ...

Page 3: ... Precautions When servicing the unit set the main SWITCH to OFF and remove the POWER SUPPLY cables Observe the original lead dress If a short circuit is found replace all parts which have been overheated or damaged by the short circuit After servicing the unit make an insulation resistance test to protect the customer from being exposed to shock hazards 1 2 Features Design for cooling Super energy...

Page 4: ...OOR REFRIGERANT R 22 Kg HEAT INDOOR R C FPI EXCHANGER OUTDOOR R C FPI FAN INDOOR TYPE OUTDOOR ROOM TEMPERATURE CONTROL NET INDOOR Kg WEIGHT OUTDOOR DIMENSIONS INDOOR mm W H D OUTDOOR SVC LIQUID Inch VALVE GAS mm 3 220 60 71 400 20 927 9 500 27 6 COPELAND RECIPRO QR90K2 ES8 9 500 110 91 000 64 66 50 104 5 4 3 27 17 2 18 17 SIROCO PROPELLER MICOM CONTROL 85 150 750 1 800 480 1 000 965 370 1 2 3 4 MO...

Page 5: ...ps Temperature Setting Airflow Direction Control Room temperature Display Timer Control Cooling Fan Cooling Model Room temperature sensor Thermistor Maintains the room temperature in accordance with the setting temperature Indoor fan is delayed for 3 sec at the starting Heat exchanger temperature sensor Thermistor Restarting is inhibited for approx 3 minutes High Low Up up to 30 C Down down to 16 ...

Page 6: ... 6 Outdoor Unit Outdoor Fan Speed Control Sensing discharge pressure for compressor One speed Discharge pressure sensor High Pressure Switch ...

Page 7: ...of the terminal block A 2nd Remove the b wire from the 2 of 52C and connect the wire to the N of the terminal block A 3rd Change the compressor wires like an example 4rd For setting the E O C R current FIELD WIRING 380V WIRING 220V WIRING TERMINAL BLOCK A 3ø 3W 220V 60Hz POWER SUPPLY 3ø 4W 380V 60Hz POWER SUPPLY Co1 FMo1 FMo2 COMP U Z VW X Y Co2 BK WH BK Tmi Tmo 1 2 3 4 5 6 1 2 3 4 5 6 BK BK RD WH...

Page 8: ...rain hole Connecting cable and liquid gas side piping hole Liquid side piping hole Air inlet vent Air outlet vent Window display 750 250 728 1800 780 134 725 210 305 490 700 650 963 930 582 185 125 546 1245 700 50 260 95 80 Air Outlet Vent Air Inlet Vent ...

Page 9: ... indoor pipe temperature is below 2 C and restart at the pipe temperature is above 12 C 4 Child Lock function The procedure is as the following 1st Press the 2 buttons of the temperature control simultaneously to raise to lower on the Display Panel of the product for more 3 seconds 2nd The buzzer sounds and then the window of Display Panel shows L LO OC C LOC mark 3rd To release this function the ...

Page 10: ...ing once more test operation and the set shall be stopped After test operation operating and 18 minutes test operation and the set shall be stopped If you press start stop button while test operation operating test operation shall be stopped and the set shall start When test operation operating the display of 8 88 8 8 88 8 shall be shifted to tESt Regardless of outside temperature the set operates...

Page 11: ...the spaces indicated by arrows from the wall ceiling fence or other obstacles Outdoor unit If an awning is built over the unit to prevent direct sunlight or rain exposure be careful that heat radiation from the condenser is not restricted There should not be any animals or plants which could be affected by discharged hot air Ensure the space indicated by arrows from the wall ceiling fence or other...

Page 12: ...itted to the build ing mount the rubber underneath the outdoor unit 4 Refrigerant amount Before shipment this air conditioner is filled with the rated amount of refrigerant including additional amount required for air purging subject to 5m pip ing length The rated amount of refrigerant is indi cated on the name plate But when the piping length exceeds 5 meters additional charge is required accordi...

Page 13: ...e dust and scale in working 7 Tighten the flare nut indoor Connecting the pipings of the indoor unit 8 Check a gas leakage of the connecting part of the pipings 9 Air purging of the piping and indoor unit The air which contains moisture and which remains in the refrigeration cycle may cause a malfunction on the compressor 10 Open the 3 way liquid side and 3 way gas side valves 11 Form the pipings ...

Page 14: ...ge Cleaning the pipe 11 Spanner To tighten the connecting parts of the pipings 12 Monkey spanner 13 Driver 14 Benchi 150mm Cutting the wires 15 Tapeline To measure the length 16 Core drill To make holes through the concrete wall and blocks 17 Voltmeter Amperemeter Clampmeter To measure the current and voltage 18 Insulation resistance tester To measure the insulation resistance 19 Glass thermometer...

Page 15: ...hassis Replace the tubing holder into original position Route the tubing and the drain hose staight backwards Insert the connecting cable into the indoor unit through the hole Do not connect the cable to the indoor unit Make a small loop with the cable for easy connection later Tape the tubing and the connecting cable Indoor unit installation Connecting the pipings to the indoor unit Align the cen...

Page 16: ...to prevent the tubing from cracking or crushing Keep in mind that the bending part should not be cracked and make the radius R as long as possible Refer to Fig 2 Spring R70mm Fig 1 Fig 2 R 5 4 Connecting Piping to Outdoor Unit 1 Connecting pipings to the outdoor unit Upon connecting 4 way valves please weld connecting pipes using elbows instead of connecting pipes with flare nuts 5 5 Connecting th...

Page 17: ...tted for service operations The screws which fasten the wiring in the cas ing of electrical fittings are liable to come loose from vibrations to which the unit is subjected during the course of transportation Check them and make sure that they are all tightly fas tened If they are loose it could give rise to burn out of the wires See to it that the starting voltage is maintained at more than 90 pe...

Page 18: ...4 way gas side valves Remove the service port cap from the 3 way gas side valve To open the valve turn the valve stem of 3 way liquid side valve counter clockwise approx 90 and hold it there for ten seconds then close it Check a gas leakage of the connecting portion of the pipings To open 3 way liquid side valve again turn the valve stem counter clockwise until it stops To purge the air push the p...

Page 19: ...on Checking a gas leakage for the left piping Connect the manifold gauge to the service port of 3 way gas side valve Measure the pressure Keep it for 5 10 minutes Ensure if the pressure indicated on the gauge is as same as that of measured at first time CLOSE CLOSE Closed Closed Indoor unit Outdoor unit Liquid side Gas side ...

Page 20: ...0 5 8 Checking the Drainage and Form the Piping 1 Checking the Drainage Remove the inlet grille Check the drainage Pour a glass of water into the drain pan Ensure if water flows drain hose of indoor unit ...

Page 21: ...the exteri or wall and fix it onto the wall by saddle or equiva lent Tape the piping and connecting cable from down to up In order to prevent water from entering the room form a trap and tape the piping Fix the piping onto the wall with saddle or bracket In case of the outdoor unit is installed below position of the indoor unit In case of the outdoor unit is installed upper posi tion of the indoor...

Page 22: ...checkings prepare the running test as follows Connect compound gauges to the check joints at discharge and suction sides of the compressor Turn all switches OFF Turn the main switch ON Running test should be accomplished as follows Set operation switch at FAN and the fan will start Check to ensure that the fan sounds nor mal Next set it at COOL and the compressor will start Check to ensure that th...

Page 23: ...ns Indoor Fan Speed Selector To select the desired fan speed in two steps Low High Timer Setting Button and Lamps Oeration stops at ON Start Stop Button Operation will start when this button is pressed and stop when the button is pressed again Fan Operation Button and Lamp Cooling ON Button and Lamp Outdoor Unit Operation Lamp ...

Page 24: ...th valve cap 1 Air purging Open Closed Open Installation counter clockwise clockwise push pin Operation Open Open Closed with valve cap with valve cap 2 Pumping down Open Open Open transferring clockwise counter connected clockwise manifold gauge 3 Evacuation Open Open Open Servicing with charging cylinder 4 Gas charging Open Open Open Servicing with charging cylinder 5 Pressure check Open Open Op...

Page 25: ...lve to the open position and remove the cap from the 3 way gas side valve s service port Using the hexagonal wrench to press the valve core pin discharge for three seconds and then wait for one minute Repeat this three times Use torque wrench to tighten the service port nut Set the 3 way gas side valve to the back seat Mount the valve stem nuts to the 3 way liquid side valve and 3 way gas side val...

Page 26: ...arge hose Open the low pressure valve on the charge equipment slightly to purge air from the charge hose Set the 3 way liquid side valve to the closed position Operate the air conditioner at the cooling cycle and stop it when the gauge indicates 1 kg cm2g Immediately set the 3 way gas side valve to the closed position Do this quickly so that the gauge ends up indicating 3 to 5kg cm2g Disconnect th...

Page 27: ...urging the air use a torque wrench to tighten the flare nut on liquid side valve Check gas leakage Check the flare connections for gas leakage Discharge the refrigerant Close the valve on the gas cylinder and discharge the refrigerant until the gauge indicates 3 to 5kg cm2g Disconnect the charge set and the gas cylinder and set the 3 way liquid side and 3 way gas side valves to the open position B...

Page 28: ...ide on the charge set and discharge the refrigerant until the gauge indicates 0 kg cm2g If there is no air in the refrigerant cycle the pressure when the air conditioner is not running is higher than 1 kg cm2g discharge the refrigerant until the gauge indicates 0 5 to 1 kg cm2g In case of this it will not be necessary to apply an evacuation Discharge the refrigerant gradually if it is discharged t...

Page 29: ...Hg or less Close the valve Lo side on the charge set turn off the vacuum pump and confirm that the gauge needle does not move approximately 5 minutes after turning off the vacuum pump Disconnect the charge hose from the vacuum pump Vacuum pump oil If the vacuum pump oil gets dirty or depleted replenish as needed CLOSE Lo OPEN Vacuum pump Gas side Liquid side Indoor unit Outdoor unit Open 3 Way val...

Page 30: ...approximately 150g each time while operating the air conditioner in the cooling cycle however one time is not sufficient wait approximately 1 minute and then repeat the procedure pumping down pin Immediately disconnect the charge hose from the 3 way gas side valve s service port Stopping partway will allow the gas to be discharged If the system has been charged with liquid refrigerant while operat...

Page 31: ...ent of unit if the unit is beyond repair Satisfactory operation with temperature difference of inlet outlet air COOLING 7 10 C HEATING 15 17 C Check heat load rise at cooling operation Unexpected residue Added electrical utensil Check inside gas pressure Adjust refrigerant charge Malfunction of compressor Replacement of compressor Check of cold warm air cir culation for smooth flow Dirty indoor co...

Page 32: ...r Improper electric heater Replacement of electric heater Regular but fails to start Replacement of compressor Electric heater is not energized Loose terminal connection Improper wiring Irregular motor resistance Ω Irregular motor insulation Ω Replacement of compressor Drop of power voltage Capacitor check Replacement Compressor only fails to start Defect of compressor capacitor Check power source...

Page 33: ...er in case that the same power source is supplied to other equipment than the unit what and where trouble can be discovered by checking the operation of other equipment Measure it with a tester Make short circuit then measure it with a tester Check it with the eyes or tester Check it with the eyes or tester Repair a switch box and is relative instrument Replacement of fuse Request a power supplier...

Page 34: ...for compressor motor Compressor motor Compressor High pressure switch Electric circuit Defective contact magnetic coil troubled Troubled over heated layer short Troubled or over heated lock Troubled or defective contact or operating Defective connection or disconnection of the circuit for compressor Check it with the eyes on with a tester Check how it is insulated Groaned noise of motor Check it w...

Page 35: ...an Obstacle Air short circuit 1 Checking Checking In the event that difference between the saturating temperature corresponding to high pressure and the temperature of air discharged from the outdoor coil is more than 15 C incondensable gas may be blended Check it with a pressure gauge Confirm the wind blowing out Check it with eyes Open it properly Wash it by means of something like chemical wash...

Page 36: ...ct it Correct it Replenish it Repair the leakage spot Correct or clear the foreign bodies Cleaning 8 4 All the functions are performed normally but very noisily and much vibratively WHAT TROUBLED COMPLAINTS HOW TO CHECK REMEDY Compressor Blower Screws Checking Checking Checking Checking Remove the shipping bracket Replace the compressor Repair or replace it Clear the other material Repair Liquid r...

Page 37: ... or excessive air flow through the evaporator coil Refrigerant over charge Faulty discharge valve or suction valve of the compressor Discharge pressure is higher than standard Intake air extremely cold or insufficient air flow through the evaporator coil Refrigerant short charge or leakage Restricted liquid in the suction line 1 Check the operation of the outdoor motor 2 Check discharge and suctio...

Page 38: ...ine and the contactor Check the voltage and phase unbalance Add refrigerant repair leakage if any Check thermistor operation or any other cause for frequent stop and start operation See High Discharge Pressure or High Suction Pressure Check the voltage and phase unbalance Check the power supply line and the contact Check electric resistance among the compressor terminals and from the terminals to ...

Page 39: ... CN outunit and of Main P C B ON OFF S W ON Is the unit operating Istheinputpower AC220V AC240V atCOMP Magnetic coil Check the magnetic contactor of outdoor unit Is it Cooling mode Room temp Set temp Is the DC5V at 14 pin of IC1 MICOM Replacement ICO2M RY Comp Replacement MICOM Room temp set temp setting Select the cooling operation mode Check the wiring diagram ...

Page 40: ...erminal of RY1 coil of SUB PCB ASM Replacement IC03M Is the AC220V 240V between C and H of SUB P C B Replacement RY1 of SUB PCB Check the motor winding Replacement RY2 of SUB PCB IstheAC220V 240V between C and M of SUBP C B Is the DC12V at each terminal of RY2 of SUB PCB ASM Is the DC5V at 21 pin of MICOM Replacement MICOM and check the EVA Th ON OFF S W ON ...

Page 41: ...at Trans input terminal Is the AC12 18V at Trans 2nd Is the connector of Main Display correct Is the DC5V between PIN64 and PIN 32 of MICOM Replacement Main PCB ASM 1 Replacement IC03D 2 Replacement Main PCB ASM Check the connector of Main Display Replacement Trans 1 Check the electric connections 2 Check the fuse of Main PCB ASM ...

Page 42: ...9 Electronic Control Device 42 9 1 MAIN P C B ASSY ...

Page 43: ... 43 9 2 SUB P C B ASSY PWB 6870AQ2241 ASM 6871AQ2242 CN INPUT CN RELAY CN MOTOR FUSE 250V T10A RY1 HIGH RY2 MIDDLE RY3 LOW ...

Page 44: ...10 Schematic Diagram 44 Circuit and Troubleshooting ...

Page 45: ...11 Exploped View and Replacement Parts List 45 Indoor Unit 40 38 33 10 19 38 31 40 35 36 39 42 43 41 18 2 18 18 1 20 22 23 34 42 21 33 52 53 54 25 57 29 27 48 28 30 39 32 31 24 26 55 ...

Page 46: ... 46 14 17 10 19 29 1 13 11 8 1 15 12 8 9 20 22 5 6 7 2 4 3 2 1 16 ...

Page 47: ...R WHEEL ASM 2A00578Q 1 13 BLOWER WHEEL ASM 2A00578J 1 14 HOUSING ASM 2A00145A 2 15 CUT OFF 3A00420A 2 16 ORIFICE B 2A00137A 2 17 BARRIER B ASM 3A02402A 1 18 EVA ASM 2A01190C 1 18 1 EVA SUB ASM 2A01191C 1 18 2 DISTRIBUTOR CAPI ASM 3A02485R 1 19 HOLDER EVA 3A02364A 1 20 BRACKET SIDE R ASM 3A00470A 1 21 BRACKET SIDE L ASM 3A02366A 1 22 DRAIN PAN ASM 2A01173A 1 23 SUPPORT DRAIN PAN 3A02400P 1 24 CONTR...

Page 48: ...B ASM 6871AQ2163A 1 33 FRONT PANEL 2A01188A 1 34 COVER CONTROL ASM 3E92319B 1 35 DECO LINE L 2E92123A 1 36 GRILLE ASM 1A00292A 1 37 PLENUM GRILLE 3G00663W 6 38 SUPPORT VANE 2G00147B 12 39 LOUVER VERTICAL 3A02372A 8 40 GROLLE FRAME 2E92118A 2 41 SYNCHRONOUS MOTOR 2H01102A 1 42 LINK VERTICAL 3A02345A 1 43 CAM 3A01947A 1 ...

Page 49: ... 49 Outdoor Unit 4 1 4 2 4 4 4 3 12 8 ...

Page 50: ...92A 1 12 2 BOARD CONTROL 3500AP2591A 1 12 3 MAGNATIC CONTACTOR 2A01031C 1 12 4 PROTECTION RELAY 2A00999H 1 12 5 TERMINAL BLOCK 3A00493A 1 12 6 SH CAPACITOR 2H00841J 2 12 8 TERMINAL BLOCK 4G00103A 1 13 REBBER MOUNTING 4022AP9183A 4 14 BRACKET 4H01811C 4 15 BUSHING 4830AP4182A 1 16 SUPPORT VALVE 4980AP2621A 1 17 VALVE SERVICE 2A00469E 1 18 VALVE SERVICE 2A00468D 1 19 COVER TUBING 3550AP2844P 1 20 SU...

Page 51: ... 1 PANEL ASSY FRONT 3721AP2913P 1 34 2 PANEL ASSY FRONT 3721AP2913Q 1 35 COVER ASSY CONTROL 3551AP7047Z 1 36 PANEL INSTALL U 3720AP3810P 1 37 BRACKET INSTALL L 3720AP3814P 1 39 BRACKET F P 4810AP7078A 1 40 COVER FAN 3550AP3912A 1 41 HUB FAN 3250AP3964A 2 43 HIGH PRESSURE SWITCH 6600AG3057A 1 44 TUBE ASSY DISCHARGE 5211A30104B 1 45 TUBE ASSY CONDENSER 5211A30105A 1 ...

Page 52: ...P No 3828A30074W April 2000 Printed in Korea ...

Reviews: