background image

Operation and settings

 17

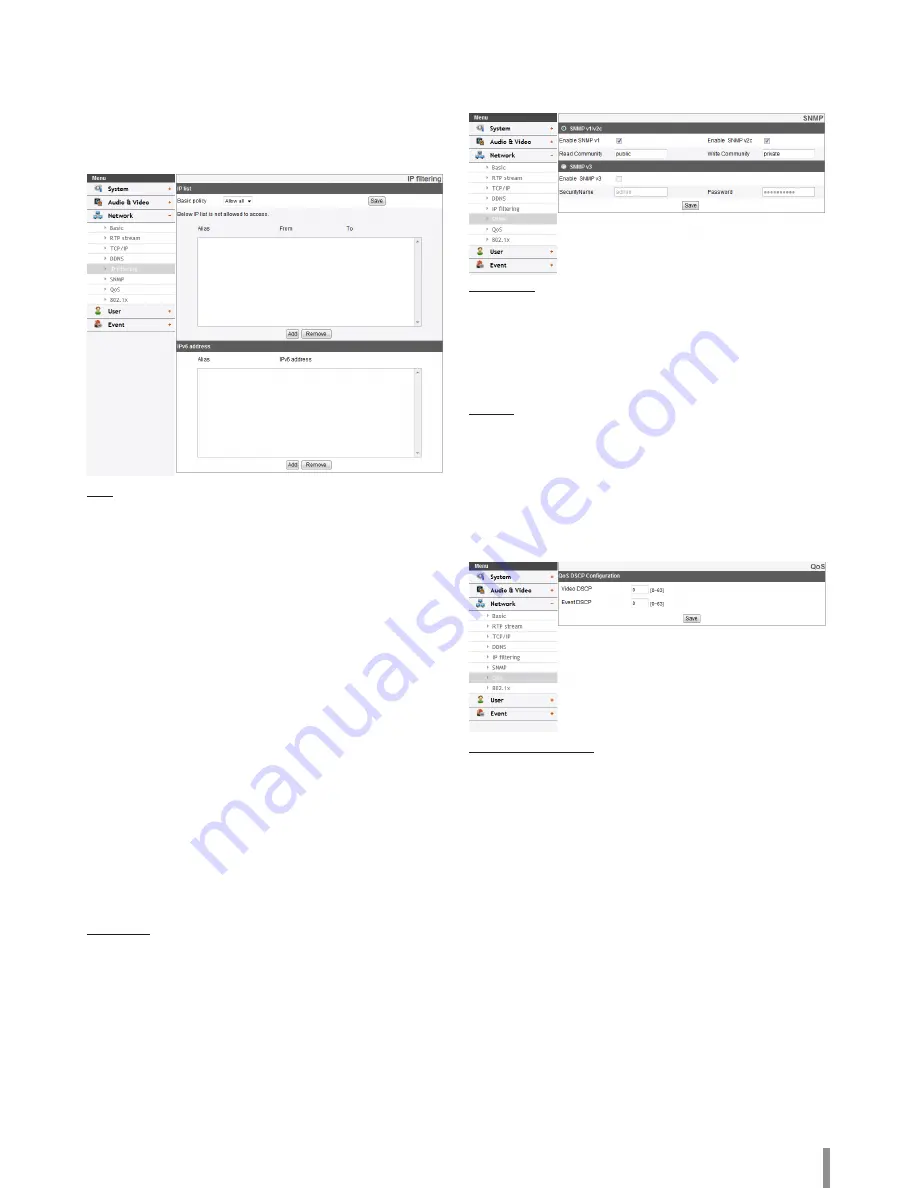
IP filtering

The access of the IP addresses in the list are allowed or denied 

according to the choice made in the drop-down list of the Basic 

policy option. The administrator can add up to 10 IP address entries 

to the list (a single entry can contain multiple IP addresses). The 

users from these IP addresses need to be specified in the user list 

with the appropriate access rights. The IP list is to control the access 

permission of clients by checking the client IP address. 

IP list


> Basic policy: Select the basic policy type. 

 - Allow all: Allow all the IP address basically, but the IP 

addresses in the list are denied.

 - Deny all: Deny all the IP address basically, but the IP 

addresses in the list are allowed. It needs at least one IP 

address to activate this function.

•  Save: Click this button to confirm the settings.
•  Add: Click this button to add the IP address.

1.   Click the [Add] button. 
2.   Set the IP options.

 - Alias: Enter the alias.
 - From: Enter the start IP address for the IP filtering. 
 - To: Enter the end IP address for the IP filtering. 

Note:

If you want to deny or to allow a range of IP addresses, enter 

the start IP address to “From” and the end IP address to “To”. 

You can also add an IP address by entering the same IP 

address to “From” and “To”.

3.   Click the [Save] button.
4.   Repeat the steps 1 to 3 to add additional IP address.

•  Remove: Click this button to delete the IP address.

1.  Select the alias from the list.
2.  Click the [Remove] button. The IP address will be deleted.

IPv6 address

•  Add: Click this button to add the IP address.

1.   Click the [Add] button. 
2.   Set the IP address option. 

 - Alias: Enter the alias.
 - IPv6 address: Enter the IP address for IP filtering. 

3.  Click the [Save] button.
4.  Repeat the steps 1 to 3 to add additional IPv6 address.

•  Remove: Click this button to delete the IPv6 address.

1.  Select the alias from the list.
2.  Click the [Remove] button. The IPv6 address will be deleted.

SNMP

The Simple Network Management Protocol (SNMP) is an application 

protocol to exchange the management information of network 

devices. 

SNMP v1/v2c


> Enable SNMP v1/v2c: Selects when SNMP is allowed access 

to this device.


> Read Community: Specifies the SNMP management 

community in which you want to read this system.


> Write Community: Specifies the SNMP management 

community in which you want to write this system.

SNMP v3


> Enable SNMP v3: Selects when SNMP v3 is allowed access to 

this device. It supports authentication and encryption.


> SecurityName: Type the security name for the SNMP. 


> Password: Type the password for the SNMP.

•  Save: Click this button to confirm the settings.

QoS

You can specify network Quality of Service (QoS) settings.

QoS DSCP Configuration


> Video DSCP: Enter the priority of Video for DSCP 

(Differentiated Service Code Point) Quality of Service.


> Event DSCP: Enter the priority of Event for DSCP Quality of 

Service.

•  Save: Click this button to confirm the settings.

Summary of Contents for LND3110R

Page 1: ...OWNER S MANUAL Network Camera Please read this manual carefully before operating your set and retain it for future reference MODELS LND3110R LNU3110R LND3210R LNU3210R LND3220R LNU3220R 1501 V3 0 ...

Page 2: ...P device 5 LG Smart Web Viewer Overview 6 Configuration menu overview 7 Configuring the LG Network Camera Device 7 Accessing the Configuration menu 7 System settings 8 Audio Video settings 10 Network settings 14 User settings 18 Event settings 19 Reference 23 Troubleshooting 23 OPEN SOURCE SOFTWARE NOTICE 24 Specifications 25 ...

Page 3: ...how to install and manage the LG Network Camera in your networking environment Some knowledge of networking environments would be beneficial to the reader Note that design and specification of this unit may change from the manual as quality and improvement without prior notice Should you require any technical assistance please contact authorized service center Introduction ...

Page 4: ...G Smart Web Viewer Program on your computer Please set your browser zoom level to 100 The Layouts and the Live view pages may differ with different OS Operating Systems and Web Browsers Care needs to be taken not to run any other applications when the Client Program is running as it may cause memory shortage When you set on 30 fps in mobile applications may be degraded the frame rate depending on ...

Page 5: ...e authentication dialog appears on the screen 3 3 Enter the user name and password Note that the default administrator user name and password are admin Note Default password must be changed for security after initial connection 3 4 Click the OK button and then the LG Smart Web Viewer is displayed in your browser Note You can also access the LG Smart Web Viewer as shown below 3 1 Start your Web bro...

Page 6: ...nt option The user gets more sharp reception on the live view window Note This feature only affects the live view window Click to save the current image in JPEG format on your computer 1 Click the Snapshot button and then the Snapshot window is displayed 2 Click the Save button in the Snapshot window 3 Enter the file name JPEG format and select the folder to save it 4 Click the Save button to conf...

Page 7: ...f menu items The configuration images are different from each model Main Menu Sub Menu System Version Date Time Maintenance Log Report Language Audio Video Camera Stream Network Basic RTP stream TCP IP DDNS IP filtering SNMP QoS 802 1x User Basic Event Event server Motion detect Smart Analytics Triggered Event Scheduled Event Configuring the LG Network Camera Device The features and options of the...

Page 8: ...ce Save Click this button to confirm the settings Maintenance System reboot Click the Reboot button to restart the IP device It takes some minutes for the IP device to start again Backup Restore Backup To take a backup all of the settings If necessary it make possible to return to a backup configuration 1 Click the Backup button 2 Click the Save button 3 Follow the instructions on the browser to s...

Page 9: ...e the log information of system View report Click this button to display the report of the system Download Click this button to see the report information of system Note The downloaded file is a UNIX type If you open the file in Microsoft Note pad it will display the text as if the file contained no line breaks at all Language Language list Select a language for the LG Smart Web Viewer configurati...

Page 10: ... IP device back to original factory settings Exposure BLC Camera s backlight compensation feature helps alleviate issues of visibility in high contrast areas Dynamic Range Enhancer Adjusts the contrast of the image to provides bright and clear images AGC If the images are too dark change the maximum AGC value to make the images bright Brightness Adjust the brightness of images Shutter Speed Select...

Page 11: ...r Temp If the Mode option set to ATW this option is displayed Click to select the option Indoor Adjust the white balance according to the indoor environment Outdoor Adjust the white balance according to the outdoor environment Default Click this button to restore the IP device back to original factory settings Day Night Mode Select Mode option on the Day Night menu then select the following mode A...

Page 12: ...o portions is clearly distinguished If you set the sharpness value to higher the image outline becomes sharp If you set to lower value the image outline becomes dim Privacy Mask Edit When you click this button the other 3 buttons appear to set a privacy mask area 1 Click the Add button The privacy mask window is displayed You can add the 5 windows maximum for privacy mask area 2 Click the edge or ...

Page 13: ...e rate will decrease because of narrow bandwidth So you need to set or change the Bit rate to high value Stream quality If the Quality option set to VBR this option is displayed Select the stream quality from the drop down box the camera supports five types Highest High Medium Low and Lowest Save Click this button to confirm the settings LND3210R LNU3210R LND3220R LNU3220R only Resolution HD Displ...

Page 14: ...t number automatically Note If you select On UPNP Status External IP Web Port and RTSP Port options are deactivated UPNP Status When you use the router that is supported UPNP function you can set the port forwarding automatically by using the Smart Port Setting UPNP Status shows connected status of router External IP When you connect the router that is supported UPNP function this option is displa...

Page 15: ...nsmission of the data to the specified equipment happens on a network specifying a single address RTP multicast When enabled it reduces the transmission load on the camera by making the computer of the same segment network receive the same transmission data When multicast option is checked then select Video Port number Audio Port number and Data port number IPv4 address Set the IP address for RTP ...

Page 16: ...P address Secondary DNS server Enter the Secondary DNS server address that backups the Primary DNS IPv6 address status Enable Click the check box if you want to use the IPv6 address Mode Manual Select this option when you set a fixed IP address manually Basic Select this option to allow IPv6 address assignment based on the Mac address With this setting the IP address is assigned automatically DHCP...

Page 17: ... IP address Remove Click this button to delete the IP address 1 Select the alias from the list 2 Click the Remove button The IP address will be deleted IPv6 address Add Click this button to add the IP address 1 Click the Add button 2 Set the IP address option Alias Enter the alias IPv6 address Enter the IP address for IP filtering 3 Click the Save button 4 Repeat the steps 1 to 3 to add additional...

Page 18: ... user with various access rights 1 Click the Add button User setting dialog is displayed 2 Enter the new User ID and Password Should have a minimum of 4 characters and preferably a combination of alphanumeric 3 To confirm the password retype the password that you typed in the Password box 4 Select the authority from the drop down list to provide the access rights to each user and then click the Sa...

Page 19: ...ternal event is sent to the FTP server periodically To add the FTP server 1 Click the Add button FTP server setting window is displayed 2 Set the FTP server options Alias Type the FTP Server name to upload the image files Address Enter the FTP server s IP address Port Enter the port number The default FTP port is 21 User ID Type the user name for the Folder shared in the FTP server Password Type t...

Page 20: ...button Motion detect Preview You can preview the motion detection window on the preview window General Sensitivity Enter the sensitivity to detect an object in motion Save Click this button to confirm the settings Note Motion detect function may not normal operate as installation environment How to set the motion detect window 1 Click the Add button The motion detect window is displayed You can ad...

Page 21: ...ent Schedule 1 Select the Trigger event and click the Edit button Event schedule window is displayed 2 Set the options Trigger Display the selected trigger event and the current state of trigger Current state of trigger is Displayed to On or Off Time Sets the weekday Start Finish Pre alarm Post alarm and Ignore interval time options Action Selects the options This occurs when the event runs FTP Vi...

Page 22: ...erver JPEG Upload the image or send the e mail to the FTP server Send Image per Base File Name and Suffix setting are available Note You can select through drag of Activation Time table that is possible to select according to weekday and time It uses the Master 1st stream when the FTP JPEG file is transferred If always checkbox next to FTP JPEG is checked FTP JPEG is always enable regardless of th...

Page 23: ...al to the local network Firewall Protection Check for the internet firewall with the system administrator either he has to do port forwarding or modify the DMZ function on the router Default router needed Check if you need configure the router settings Sporadic network performance Network Switches or hubs used may be of the lower configuration and the load on this may not meet the required conditi...

Page 24: ...browser s cache may be resolved this issue 1 Open Internet Options in browser Tools menu and click the Delete Files button in the second entry Internet temporary files 2 Check the other settings that should not be changed If the browser you re using or a page you re viewing is displaying problems try to clear the browser s cache If that doesn t fix the problem try to clear the browser s cookies OP...

Page 25: ...24 Multi Streaming Up to 2 Video Analytics Motion detection Tampering alarm Event Event Notification Email FTP Pre Event Buffering Support Network Ethernet RJ 45 10 100 BASE T Security Password Protection HTTPS SSL TLS IP filtering IEEE 802 1X Open Protocol ONVIF 2 2 Profile S PSIA 1 1 Protocol IPv4 and IPv6 TCP UDP HTTP HTTPS RTP RTSP DHCP ICMP QoS UPnP IPv4 FTP SMTP NTP ARP SNMPv1 v2c v3 DDNS LG...

Page 26: ... to 2 Video Analytics Motion detection Tampering alarm Event Event Notification Email FTP Pre Event Buffering Support Network Ethernet RJ 45 10 100 BASE T Security Password Protection HTTPS SSL TLS IP filtering IEEE 802 1X Open Protocol ONVIF 2 2 Profile S PSIA 1 1 Protocol IPv4 and IPv6 TCP UDP HTTP HTTPS RTP RTSP DHCP ICMP QoS UPnP IPv4 FTP SMTP NTP ARP SNMPv1 v2c v3 DDNS LG Connections Up to 10...

Page 27: ...Up to 7 ROI Region of Interest Up to 4 Video Analytics Motion detection Tampering alarm Event Event Notification Email FTP Pre Event Buffering Support Network Ethernet RJ 45 10 100 BASE T Security Password Protection HTTPS SSL TLS IP filtering IEEE 802 1X Open Protocol ONVIF 2 2 Profile S PSIA 1 1 Protocol IPv4 and IPv6 TCP UDP HTTP HTTPS RTP RTSP DHCP ICMP QoS UPnP IPv4 FTP SMTP NTP ARP SNMPv1 v2...

Page 28: ...egion of Interest Up to 4 Video Analytics Motion detection Tampering alarm Event Event Notification Email FTP Pre Event Buffering Support Network Ethernet RJ 45 10 100 BASE T Security Password Protection HTTPS SSL TLS IP filtering IEEE 802 1X Open Protocol ONVIF 2 2 Profile S PSIA 1 1 Protocol IPv4 and IPv6 TCP UDP HTTP HTTPS RTP RTSP DHCP ICMP QoS UPnP IPv4 FTP SMTP NTP ARP SNMPv1 v2c v3 DDNS LG ...

Page 29: ...erest Up to 4 Video Analytics Motion detection Tampering alarm Event Event Notification Email FTP Pre Event Buffering Support Network Ethernet RJ 45 10 100 BASE T Security Password Protection HTTPS SSL TLS IP filtering IEEE 802 1X Open Protocol ONVIF 2 2 Profile S PSIA 1 1 Protocol IPv4 and IPv6 TCP UDP HTTP HTTPS RTP RTSP DHCP ICMP QoS UPnP IPv4 FTP SMTP NTP ARP SNMPv1 v2c v3 DDNS LG Connections ...

Page 30: ...Video Analytics Motion detection Tampering alarm Event Event Notification Email FTP Pre Event Buffering Support Network Ethernet RJ 45 10 100 BASE T Security Password Protection HTTPS SSL TLS IP filtering IEEE 802 1X Open Protocol ONVIF 2 2 Profile S PSIA 1 1 Protocol IPv4 and IPv6 TCP UDP HTTP HTTPS RTP RTSP DHCP ICMP QoS UPnP IPv4 FTP SMTP NTP ARP SNMPv1 v2c v3 DDNS LG Connections Up to 10 Integ...

Page 31: ......

Reviews: