background image

DirectCD

TM 

v2.5b(s)

Installation

9

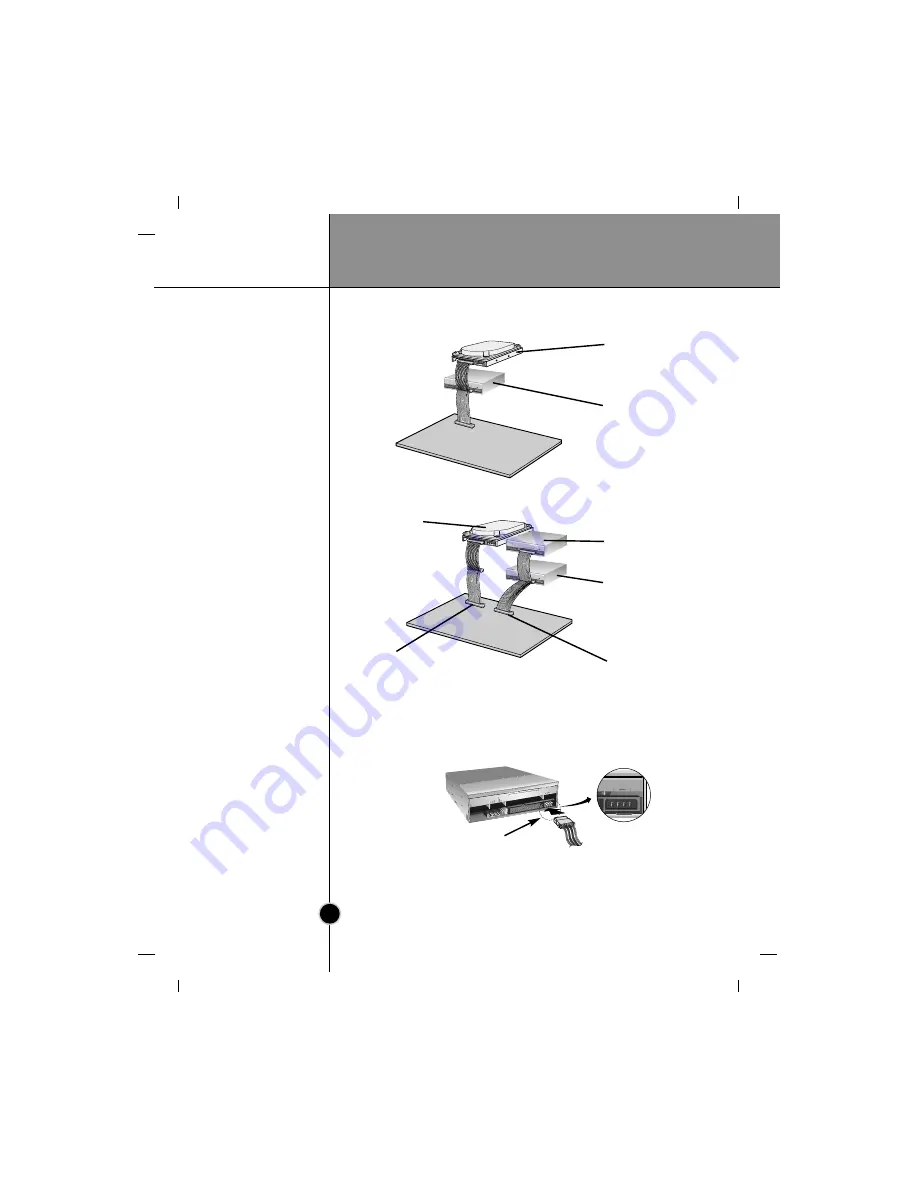
To Install as a

Slave Drive

Connecting

the Power

Connector

To install the drive as a Slave, change the jumper setting on the rear
panel to SL.

DIGITAL

ANALOG

INTERF

ACE

POWER

D

R

C S M
S L A

G L

G

39

1

+5

+12

GND

40

2

AUDIO

AUDIO

Master drive
(Booting hard disk)

Slave drive
(Super Multi DVD
Drive)
(Jumper set to
Slave)

DIGITAL

ANALOG

INTERFA

CE

POWER

D

R

C S M
S L A

G L

G

39

1

+5

+12

GND

40

2

AUDIO

AUDIO

DIGITAL

ANALOG

INTERFACE

POWER

D

R

C S M
S L A

G L

G

39

1

+5

+12

GND

40

2

AUDIO

AUDIO

Master drive
(Booting hard disk)

Primary connector

Slave drive
(Super Multi DVD
Drive)
(Jumper set to
Slave)

Secondary
connector

Master drive
(Other IDE drive)

- OR -

Connect the power cable from the computer’s power supply to the socket
on the drive unit, fitting the connector firmly into the power in connector.
If there is no spare power cable available in the computer, you will have
to purchase a splitter cable of a suitable type.

AUDIO O

UT

SELECT

IDE  INTERFACE  CONNECTOR

INPUT

DC

39
40

1
2

5V GN

D 12V

R GND

 L

C.SEL

SLAVE

MASTE

R

5V

GND

12V

CD INPUT

Beveled edge up

NOTE 

: Improper connection may damage the drive and void the

warranty. Generally, the power connector can only fit one way.

Summary of Contents for GSA-4040B

Page 1: ...GSA 4040B Super Multi DVD Drive English Deutsch Français Italiano Español Português ...

Page 2: ...inst harmful interference in a residential installation This equipment generates uses and can radiate radio frequency energy and if not installed and used in accordance with the instructions may cause harmful interference to radio communications However there is no guarantee that interference will not occur in a particular installation If this equipment does cause harmful interference to radio or ...

Page 3: ...cs with the following mark This unit uses CD R discs with the following mark This unit uses CD RW discs with the following mark This unit uses High Speed CD RW discs with the following mark This unit uses Ultra Speed CD RW discs with the following mark WARNING Only drives bearing the logo Compact Disc ReWritable Ultra Speed can write or erase Ultra Speed CD RW media Ultra Speed CD RW Media may be ...

Page 4: ...Controls 5 Installing the Drive 6 Device Drivers 11 How to Use the Discs 12 Troubleshooting 13 Specifications 14 Microsoft and Windows are trademarks registered in the United States and other countries by the Microsoft Corporation The company names and product names written in this manual are trademarks or registered trademarks of the respective companies ...

Page 5: ... R 16X max Writing CD RW 4X max Writing DVD R DVD R 3X max Writing DVD RAM 2X max Writing DVD RW 2 4X Writing DVD RW 32X max Reading CD ROM CD R 24X max Reading CD RW 12X max Reading DVD ROM single 8X max Reading DVD ROM dual 8X max Reading DVD R RW DVD R RW DVD VIDEO 3X Reading DVD RAM Writing speed depends highly on capabilities of discs As a result for highspeed rewrite it supports max 8x or ma...

Page 6: ...ssive dust mechanical vibration direct sunlight We recommend using the drive in a horizontal or vertical position Do not use it in tilted position Don t move the drive suddenly from a cold place to a warm one or raise the room temperature suddenly Condensation may occur causing abnormal operation Make sure to remove the disc before moving the drive The disc may become damaged causing data loss Be ...

Page 7: ...ver Software before using this unit Please uninstall any previous CD burning software you may have loaded on your PC in order to prevent possible compatibility issues Once you have installed the supplied software you may if you wish begin to reinstall previous software taking note for errors System Environment This unit can be operated in the system environment explained here Pentium III 700MHz or...

Page 8: ... configuration takes effect after power on reset 4 IDE Interface Connector Connect to the IDE Integrated Device Electronics Interface using a 40 pin flat IDE cable NOTE Do not connect or disconnect the cable when the power is on as this could cause a short circuit and damage the system Always turn the power OFF when connecting or disconnecting this cable 5 Power Connector 4 Drive activity indicato...

Page 9: ... Make sure all peripheral devices of the computer and the computer itself are turned off and then remove the cover Refer to the manual for the computer for details about removing the cover NOTE There may be sharp edges inside the computer so take care to avoid injury 1 Remove the 51 4 drive bay panel from the computer Refer to the manual for the computer for details 2 Insert the drive unit into th...

Page 10: ... IDE INTERFACE CONNECTOR INPUT DC 39 40 1 2 5V GND 12V R GND L C SEL SLAVE MASTER R GND L C SEL SLAVE MASTER 39 40 UDIO OUT SELECT CS Cable Select CSEL SL Slave MA Master NOTE Only one jumper should be installed on the jumper connector If more than one jumper is installed the drive may malfunction or be damaged Master Slave setting is determined by jumper installation on the Jumper Connector The f...

Page 11: ...n set differently To install the drive as a Master the jumper can be left as supplied from the factory DIGITAL ANALOG INTERFAC E POWER D R C S M S L A G L G 39 1 5 12 GND 40 2 AUDIO AUDIO Master drive Booting hard disk Primary connector Secondary connector Master drive Super Multi DVD Drive Jumper left as Master Motherboard OR DIGITAL ANALOG INTERFAC E POWER D R C S M S L A G L G 39 1 5 12 GND 40 ...

Page 12: ...ND 40 2 AUDIO AUDIO Master drive Booting hard disk Primary connector Slave drive Super Multi DVD Drive Jumper set to Slave Secondary connector Master drive Other IDE drive OR Connect the power cable from the computer s power supply to the socket on the drive unit fitting the connector firmly into the power in connector If there is no spare power cable available in the computer you will have to pur...

Page 13: ...CONNECTOR INPUT DC 39 40 1 2 5V GND 12V R GND L C SEL SLAVE MASTE R Pin1 Red edge If the computer is using a sound card the drive is connected to the sound card with an audio cable The supplied analog audio cable fits most sound cards or one can be purchased at a local computer store Refer to the manual for the sound card for detailed information regarding this connection R GND L C SEL SLAVE MASTE...

Page 14: ...ers html In order to ensure normal drive operation please check the following The drive is displayed in Windows 98 ME Control Panel System Device Manager CD ROM Windows 2000 XP Control Panel System Hardware Device Manager DVD CD ROM drives 32 bit is displayed in Control Panel System Performance If the drive is not recognized by your computer please check the following items If a indicator is displ...

Page 15: ...re that allows the CD to be ejected manually if this becomes necessary such as failure of the drive or a power outage NOTE Don t use this feature except in an emergency 1 Turn the power to OFF 2 Poke a fine tipped object such as a straightened heavy duty paper clip into the small hole above the eject button The front door will pop open and the disk tray will come partway out 3 Pull the front door ...

Page 16: ... operate while writing to the disc Is there enough free space on the CD R RW DVD R RW DVD R RW and DVD RAM disc Does writing fail even using the simulation test Is the disc loaded in the drive with the read write surface facing the right direction label up Is the drive installed in the correct orientation Was the drive or disc moved from a low temperature environment to a high temperature environm...

Page 17: ...s PIO Mode 4 MULTI DMA Mode 2 33 3 Mbytes s Ultra DMA Mode 2 CD ROM 125msec Typical DVD ROM 145msec Typical DVD RAM 165msec Typical 2 Mbytes 100000 Power On Hours Duty Cycle 10 0 7 Vrms at 47 kohm Typical Temperature 5 C to 45 C Humidity 15 to 85 R H Temperature 30 C to 60 C Humidity 10 to 90 R H 5 75 x1 63 x7 27 146 x 41 3 x 184 7 mm without front bezel Less than 2 1lbs 0 94Kg DC 5V DC 12V Items ...

Page 18: ... keep your discs from becoming damaged 1 When not in use remove discs from the drive 2 Keep discs in the packaging supplied with them and out of direct sunlight and away from heat sources Excessive vibration or a sudden jolt to the drive during operation may cause a malfunction Avoid exposing the drive to sudden changes in temperature as it may cause condensation to collect inside the drive Copyri...

Reviews: