background image

English

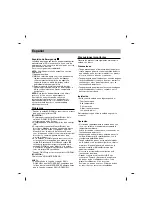
How to Use the Discs

When using CD-ROM discs, CD-R discs or CD-RW discs,
don’t attach any stickers or labels to the discs. Using discs with
them attached not only causes read and write errors, but data
on the disc may be lost due to damage to the disc itself. The
Discs in this unit operate at a very high speed! DO NOT use
damaged, cracked or warped discs. The drive’s optical unit
may be damaged if they break. DO NOT use non-standard
discs. NON-standard discs may not play or store data properly.
Non-standard discs are any discs that are not the standard 12
cm CD type discs. This includes Sony Walkman™ discs, 
non-circular discs including promotional, business card discs,
and other unusual discs.

Read Speed Control for CD-R Data CD

The basic default reading speed for CD-R disc media in this
drive is 40X. The Read Speed Control will allow you to select
the maximum read speed (52X) for CD-R media, simply by
pressing the eject button. Note that this function is only 
available with a CD-R data disc.

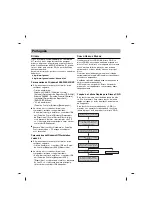
To enable 52X CD-R read speed, follow the chart below:

Flow Chart

The LED indicator turns on for 3 seconds
The 52X maximum read speed for this CD-R disc has been
enabled.
Ejecting this disc or turning off the PC will disable the 52X
maximum read speed function.
The drive will default back to the 40X CD-R read speed.

CAUTION:

The quality of CD-R data disc varies significantly from brand to
brand (or brandless), as well as disc condition used over time.
A disc that is poorly balanced or that may have cracks in it
greatly increases the chance of disc failure or disc shatter
when being read back at speeds higher than 40X, possibly
causing damage to the drive.
Closely inspect discs you plan to use in the drive for any
abnormalities or cracks.
If you hear strange noise or sounds from the drive during 
operation, this could be a sign of an unbalanced or damaged
disc and it should be removed immediately.
LG Electronics does not warranty drive damage caused by
faulty or shattered discs.

Emergency Eject 

This drive has a feature that allows the CD to be ejected 
manually if necessary in an emergency, such as failure of
the drive or a power outage.

NOTE:

Don’t use this feature except in an emergency.

1) Turn the power to OFF.

2) Poke a fine-tipped object (such as a straightened

heavy duty paper clip) into the small hole above the
eject button. The front door will pop open and the disk
tray will come partway out.

3) Pull the front door to open it all the way, then grip the

disc tray between thumb and forefinger and gently pull
it straight out.

NOTE:

This feature is a last measure to be used only in

an emergency. Using it excessively will cause malfunction.
If you cannot get a good grip on the disc tray with your
fingers, use a steel binder clip or spring clamp to pull it out.

Troubleshooting

* When the CD-ROM drive does not work with the hard

disk drive in primary IDE channel.

(SOLUTION)

1. Check the CD-ROM drive Master/Slave Jumper setting.

The CD-ROM drive must be set to the Slave mode.

2. Check to be sure your hard disk Interface type is IDE

type.

3. Check your hard disk Master/Slave Jumper setting.

Some old-version IDE type hard disks were set to
Master Only mode. In that case, contact your hard disk
company and change your hard disk jumper setting to
master mode.

4. If the CD-ROM drive does not work with above methods,

you may need a secondary IDE card.
If you use the secondary IDE card, you should set the 
CD-ROM drive jumper to the master mode if the CD-
ROM drive is the first device you are connecting to the
secondary IDE card.

* When the CD-ROM drive does not install in OS/2 warp.

(SOLUTION)

1. Select NON-LISTED IDE CD.

* CD-ROM drive is not present in Windows 3.1 or 3.11 or

DOSSHELL.

(SOLUTION)

1. When the WIN or DOSSHELL command lines are 

present in your AUTOEXEC.BAT, make sure that the
MSCDEX.EXE command line appears before the WIN
or the DOSSHELL command lines.

D

Open the Disc Tray

(Push Eject /

button)

(Put CD-R disc on Tray) 

(Push Eject /

button)

(Push and hold the eject button for more
than 3 seconds)

Load CD-R Disc

Close Disc Tray

Initialize 52X READ

Summary of Contents for GCR-8522B

Page 1: ...Cavetto di alimentazione Cavetto di interfaccia IDE Cavetto di uscita segnale audio AL O R G L C S M S L A 39 40 ANALOG AUDIO CS SL MA C D CS Cable Select CSEL SL Slave MA Master CS Cable Select CSEL SL Slave MA Master CS sélection de câble CSEL SL esclave MA maître CS Selezione automatica CSEL SL Configurazione Slave MA Configurazione Master CS Selección de Cable CSEL SL Esclavo MA Maestro CS sel...

Page 2: ...rticularly those including Video playback may require an considerably increased specification PC to give acceptable results Location and Function of Controls Front Panel 1 Disc Tray 2 Drive activity indicator 3 Emergency Eject Hole 4 Stop Eject Button Rear Panel 1 Digital Audio Output Connector 2 Analog Audio Output Connector 3 Jumper Connector This jumper determines whether the drive is configure...

Page 3: ... position B When using a Secondary IDE port You can also connect CD ROM drive to the Secondary IDE port and set its jumper to Master 5 When the installation of the drive unit is complete replace the computer cover 6 Reconnect the computer power cord and turn on the computer Device Drivers When using Windows 95 98 2000 ME XP or Window NT Workstation Ver 4 0 the installation of any software driver o...

Page 4: ...ot warranty drive damage caused by faulty or shattered discs Emergency Eject This drive has a feature that allows the CD to be ejected manually if necessary in an emergency such as failure of the drive or a power outage NOTE Don t use this feature except in an emergency 1 Turn the power to OFF 2 Poke a fine tipped object such as a straightened heavy duty paper clip into the small hole above the ej...

Page 5: ...drive In case a foreign object enters the drive please consult the dealer where the drive was purchased Don t interrupt the electric power while the drive is operating When connecting two IDE devices to the Primary or Secondary connectors make sure that the two devices are not configured as both Master or both Slave If they are both set the same Windows may fail to run or recognize the drives Engl...

Page 6: ...r lnstallation eines Laufwerks sind im Handbuch lhres Systems angegeben 3 Verbinden Sie einen freien Netzstecker in lhrem PC mit dem Netzanschluß an der Rückseite des CD ROM Laufwerks Verbinden Sie einen freien IDE Anschlußstecker in lhrem PC mit dem IDE Interface Sockel des Laufwerks HINWEIS Der rote Streifen am IDE Kabelrand entspricht dem Stift 1 des IDE lnterface am CD ROM Laufwerk Besitzen Si...

Page 7: ...n Systemsteuerung SCSI Adapter Geräte das Symbol müssen Sie den korrekten IDE Controller Treiber beim Hersteller lhres PCs oder der Systemplatine beschaffen Umgang mit den CDs Kleben Sie keinesfalls Etiketten oder Aufkleber auf Ihre CD ROMs CD Rs oder CD RWs Beim Einsatz von beklebten CDs können nicht nur Lese und Schreibfehler auftreten sondern die auf der CD gespeicherten Daten aufgrund der Besc...

Page 8: ...rd OS 2 Warp nicht vom CD ROM Laufwerk installiert Lösung 1 Wählen Sie NON LISTED IDE CD Warnung 1 Wenn Sie WIN oder DOSSHELL Kommando in lhre AUTOEXEC BAT einfügen wollen vergewissern Sie sich ob die MSCDEX EXE Datei vor dem Aufruf WIN oder DOSSHELL steht Wichtige Sicherheitshinweise Beachten Sie beim Einsatz des CD ROM Laufwerks oder beim Umgang mit CDs folgende Hinweise Sicherheitshinweise Der ...

Page 9: ...cteur Reportez vous au manuel d utilisation de votre unité centrale sur la méthode d installation d un lecteur 3 Branchez un connecteur d alimentation libre du PC dans le connecteur d alimentation sur l arrière du lecteur de CD ROM Branchez un connecteur IDE libre du PC dans le connecteur d interface IDE du lecteur NOTE Le bord rouge du câble IDE correspond à la broche 1 de l interface IDE sur lec...

Page 10: ...ants si l ordinateur ne reconnaît pas le périphérique Si l indicateur apparaît en regard du contrôleur IDE sous panneau de configuration adaptateur SCSI périphériques contacter le fabricant du PC ou celui de la carte mère afin d obtenir le pilote de contrôleur IDE approprié Utilisation des disques Ne coller aucune étiquette sur les CD ROM CD R et CD RW De telles étiquettes risquent en effet non se...

Page 11: ...AVERTISSEMENT 1 Si vous voulez ajouter la ligne de commande WIN ou DOSSHELL dans votre fichier AUTOEXEC BAT veillez à les placer après la ligne de commande MSCDEX EXE Avertissement Les instructions ci dessous doivent être observées lors de toute manipulation du lecteur graveur comme des disques Précautions Le fabricant du présent équipement décline toute responsabilité en cas de perte de données o...

Page 12: ...ve dotare di un apposito cavo sdoppiato Collegare il cavo piatto standard IDE a 40 conduttori alla presa che si trova sul retro del drive accertandosi che il relativo connettore sia inserito a fondo e che il conduttore con l isolante di colore rosso sia collegato al piedino numero 1 Importante ll cavetto di interfaccia IDE non è fornito in dotazione e deve quindi essere acquistato separatamente Se...

Page 13: ...il controller IDE compaia tra quelli disponibili in Pannello di controllo Adattatori SCS Periferiche Se il driver non viene visto dal computer ed elencato tra le risorse di sistema si devono effettuare i seguenti controlli Se in Pannello di controllo il simbolo si deve contattare il produttore del PC o della scheda madre per ottenere l appropriato controller IDE Istruzioni sull uso dei CD Evitare ...

Page 14: ...ONE 1 Selezionare NON LISTED IDE CD Letteri IDE non in elenco ATTENZIONE 1 Se si desidera aggiungere la riga del comando WIN o DOSSHELL in AUTOEXEC BAT ci si assicuri che la riga del coman0 do MSCDEX EXE appai prima della riga del comando WIN oppure DOSSHELL Avvertenze importanti Si raccomanda di seguire scrupolosamente le seguenti avvertenze Precauzioni Il produttore non può offrire alcuna garanz...

Page 15: ...ROM Consulte las instrucciones del manual del usuario que explican cómo instalar la unidad CD ROM 3 Inserte un conector de corriente vacante del ordenador al enchufe de corriente en la parte trasera de la unidad CD ROM Enchufe un conector IDE vacante del ordenador al enchufe IDE en la parte trasera de la unidad CD ROM NOTA La franja roja del cable IDE debe concordar con el pin 1 del conector IDE d...

Page 16: ...trol adaptador SCSI dispositivos Si su ordenador no reconoce la unidad rogamos compruebe los elementos siguientes Si se visualiza un indicador en el controlador IDE en paneles de control adaptador SCSI dispositivos deberá ponerse en contacto con el fabricante de su PC o con el fabricante de la placa madre y obtener el programa de gestión apropiado del controlador IDE Cómo Utilizar los Discos Cuand...

Page 17: ... primer dispositivo que tiene conec tado a la tarjeta IDE secundaria Cuando OS 2 Warp no reconozca el lector CD ROM SOLUCION 1 Seleccione NON LISTED IDE CD AVISO 1 Cuando añada la línea de comando WIN o DOSSHELL en el AUTOEXE BAT asegúrese que la línea de comando MSCDEX EXE aparece antes que la línea de comando WIN o DOSSHELL Precauciones Importantes Observe las precauciones siguientes al manejar ...

Page 18: ...tação de 4 pinos e o cabo de interface IDE de 40 pinos na parte traseira do drive CD ROM Notas Se não houver cabo de alimentação sobres salente disponível no computador você deverá adquirir um cabo com derivação de tipo adequado A extremidade vermelha do cabo IDE corresponde ao pino 1 da interface IDE no drive CD ROM Obs um cabo IDE não é fornecido e se necessário deverá ser adquirido separadament...

Page 19: ...vos Se o drive não for reconhecido pelo seu computador verifique os seguintes items Se um indicador é exibido no controlador IDE em Painel de Controle Adaptador SCSI Dispositivos você precisará contatar o fabricante do seu PC ou o fabricante da placa principal e obter o driver controlador IDE adequado Como Usar os Discos Quando usar discos CD ROMs discos CD R ou discos CD RW não coloque nenhuma et...

Page 20: ...o que você está conectando a essa placa Quando o drive CD ROM não instala o OS 2 Warp SOLUÇÃO 1 Selecione NON LISTED IDE CD O drive CD ROM não está presente no Windows 3 1 ou 3 11 ou DOSSHELL SOLUÇÃO 1 Quando as linhas de comando do WIN ou DOSSHELL estão presentes no seu AUTOEXEC BAT certifique se de que a linha de comando MSCDEX EXE apareça antes das linhas de comando de WIN ou DOSSHELL Precauçõe...

Page 21: ...s d incendie et d électrocution PERICOLO Il dispositivo di lettura e scrittura utilizzato in questo masterizzatore utilizza un raggio laser che se osservato da vicino può danneggiare la vista Evitare di smontare il coperchio dell apparecchio Al fine di prevenire eventuali folgorazioni evitare di smontare l apparecchio All interno dell apparecchio non sono presenti parti che richiedono manutenzione...

Page 22: ... atende aos requisitos sobre as interferências rádios das DIRECTIVAS EEC 89 336 EEC 93 68 EEC e 73 23 EEC CLASS 1 LASER PRODUCT KLASSE 1 LASER PRODUKT LUOKAN 1 LASER LAITE KLASS 1 LASER APPARAT CLASE 1 PRODUCTO LÁSER CLASSE 1 PRODOTTO LASER VARNING OSYNLIG LASERSTRÄLNING NÄR DENNA DEL ÄR ÖPPNAD STRÄLEN ÄR FARLIG CAUTION INVISIBLE LASER RADIATION WHEN OPEN AVOID EXPOSURE TO BEAM VORSICHT Unsichtbar...

Page 23: ...ency energy and if not installed and used in accordance with the instructions may cause harmful interference to radio communications However there is no guarantee that interference will not occur in a particular installation If this equipment does cause harmful interference to radio or television reception which can be determined by turning the equipment off and on the user is encouraged to try to...

Page 24: ...tion la totalité de ce guide afin de pouvoir maîtriser toutes les possibilités de ce produit Italiano Nel ringraziarvi per avere acquistato questo prodotto vi raccomandiamo di leggere attentamente le seguenti istruzioni e di conservare questo manuale per eventuali consultazioni future Español Rogramos lea detenidamente todo este manual para aprovechar al máximo todas las características y funcione...

Page 25: ...discs from the drive 2 Keep discs in the packaging supplied with them and out of direct sunlight and away from heat sources Excessive vibration or a sudden jolt to the drive during operation may cause a malfunction Avoid exposing the drive to sudden changes in temperature as it may cause condensation to collect inside the drive Copyright 2003 LG Electronics U S A Inc 1000 Sylvan Ave Englewood Clif...

Reviews: