background image

Appendix

33

Appendix

6

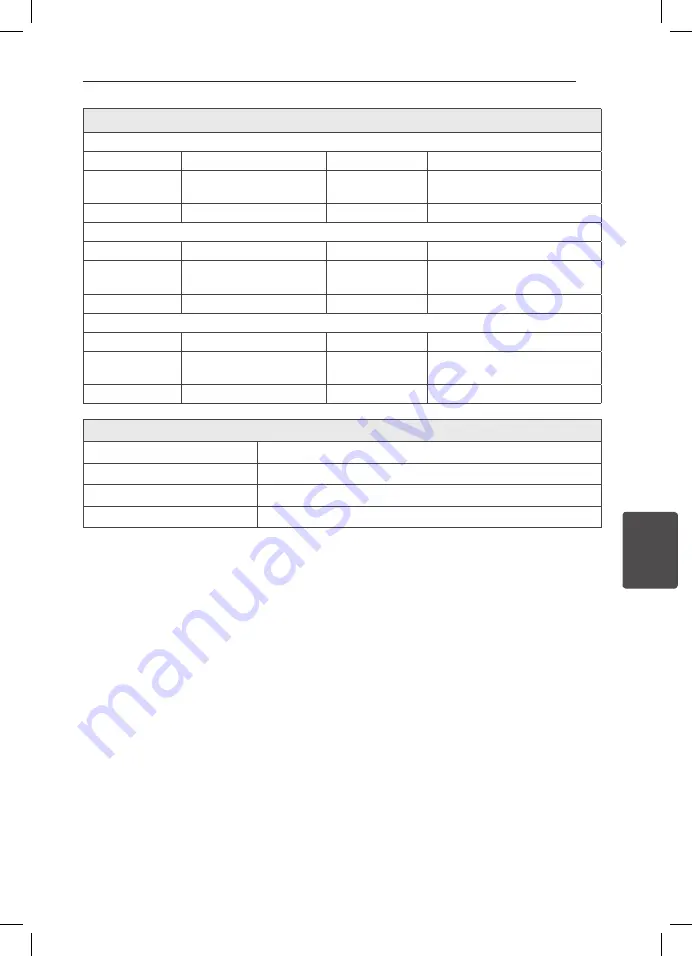
Speakers (BH9630WY)

Front speaker (Left/ Right) (S93T4-FL/S93T4-FR)
Type

2 Way 3 speaker

Max. Input power

480 W

Impedance Rated 3 Ω

Net Dimensions  
(W x H x D)

300 mm X 1350 mm X 300 mm

Input Power

240 W

Net Weight

6 kg

Rear speaker (Left/ Right) (S93T4-S)
Type

2 Way 3 speaker

Max. Input power

390 W

Impedance Rated 3 Ω

Net Dimensions  
(W x H x D)

300 mm X 1350 mm X 300 mm

Input Power

195 W

Net Weight

6.6 kg

Subwoofer (S93T2-W)
Type

1 Way 1 speaker

Max. Input power

460 W

Impedance Rated 3 Ω

Net Dimensions  
(W x H x D)

307 mm X 366 mm X 307 mm

Input Power

230 W

Net Weight

8.5 kg

Wireless receiver (W3-2)

Power requirements

Refer to main label on the wireless receiver.

Power consumption

Refer to main label on the wireless receiver.

Dimensions (W x H x D)

60 mm X 220 mm X 175 mm

Net Weight (Approx.)

0.9 kg


y

Design and specifications are subject to change without notice.

BH9630TW-MX.BPERLLK_BPANLLK_SIMPLE_ENG.indd   33

13. 4. 16.   �� 10:39

Summary of Contents for Cinema 3D Sound Blu-ray BH9630TW

Page 1: ... carefully before operating your set and retain it for future reference BH9630TW BH9630TW S93T2 FL FR S S93T2 W T2 W3 2 BH9630TW BH9630TW S93T4 FL FR S S93T2 W T2 W3 2 BH9630WY BH9630WY S93T4 FL FR S S93T2 W T2 W3 2 ENGLISH BH9630TW MX BPERLLK_BPANLLK_SIMPLE_ENG indd 1 13 4 16 10 38 ...

Page 2: ...pecified herein may result in hazardous radiation exposure CAUTION concerning the Power Cord To disconnect power from the mains pull out the mains cord plug When installing the product ensure that the plug is easily accessible This device is equipped with a portable battery or accumulator Safety way to remove the battery or the battery from the equipment Remove the old battery or battery pack foll...

Page 3: ...old with the apparatus When a cart is used use caution when moving the cart apparatus combination to avoid injury from tip over 13 Unplug this apparatus during lightning storms or when unused for long periods of time 14 Refer all servicing to qualified service personnel Servicing is required when the apparatus has been damaged in any way such as power supply cord or plug is damaged liquid has been...

Page 4: ...tem Setting 22 Initial Setup 24 Settings 24 Adjust the setup settings 24 Resolution setting 4 Operating 25 Home Menu Display 25 Using HOME menu 25 Using the Smart Share 26 Playing the Linked Devices 26 Playing a disc 26 Playing a file on disc USB device 27 Basic operations for video and audio content 27 On Screen Display 27 To control video playback 27 To control photo view 5 Troubleshooting 28 Tr...

Page 5: ...m r y y Discs such as movies that can be purchased or rented y y Movie mode and finalized only y y Supports the dual layer disc also o Finalized AVCHD format y u i y y DVD R RW discs that contain Movie Music or Photo files y y ISO 9660 JOLIET UDF and UDF Bridge format DVD RW VR 12 cm r VR mode and finalized only Audio CD 12 cm t Audio CD CD R RW 12 cm y u i y y CD R RW discs that contain Movie Mus...

Page 6: ...srt txt SAMI smi SubStation Alpha ssa txt MicroDVD sub txt SubViewer 1 0 sub SubViewer 2 0 sub txt TMPlayer txt DVD Subtitle System txt Audio files File Location File Extension Sampling Frequency Bitrate Note Disc USB mp3 wma wav m4a DRM free flac within 32 48 kHz WMA within 16 48 kHz MP3 within 32 192 kbps WMA within 32 320 kbps MP3 Some wav files are not supported on this player DLNA mp3 wma wav...

Page 7: ...t mode INFO MENU m Displays or exits On Screen Display Direction buttons Selects an option in the menu PRESET Selects programme of Radio TUNING Tunes in the desired radio station ENTER b Acknowledges menu selection BACK Exits the menu or returns to the previous screen TITLE POPUP Displays the DVD title menu or BD ROM s popup menu if available DISC MENU Accesses menu on a disc d Colored R G Y B but...

Page 8: ... buttons before using y y Do not press the touch buttons hard to make it work If you apply too much strength it can damage the sensor of the touch buttons y y Touch the button that you want to work in order to operate the function correctly y y Be careful not to have any conductive material such as metallic object on the touch buttons It can cause malfunctions Caution Supplied Accesorries Remote c...

Page 9: ...anel a AC power cord b AUX L R INPUT c OPTICAL IN d WIRELESS connector e Antenna Connector f USB Port for connecting an USB keyboard or mouse g HDMI IN 1 2 h HDMI OUT TO TV i LAN port BH9630TW MX BPERLLK_BPANLLK_SIMPLE_ENG indd 9 13 4 16 10 38 ...

Page 10: ...se Speaker Screw 1 Attach the pole to the base by rotating the pole Step 1 Front 2 Draw the speaker wire through the inside of the pole Step 2 3 Attach the speaker to the pole then secure the connection with a supplied screw Step 3 BH9630TW MX BPERLLK_BPANLLK_SIMPLE_ENG indd 10 13 4 16 10 38 ...

Page 11: ... wire marked black goes in to the terminal marked minus and the other wire goes in to the terminal marked plus Step 4 Bottom of base Be careful that the speaker does not fall down Otherwise it may result in the speaker malfunctioning and causing personal injury and or property damage Caution BH9630TW MX BPERLLK_BPANLLK_SIMPLE_ENG indd 11 13 4 16 10 38 ...

Page 12: ... A Subwoofer S93T2 W The position of the subwoofer is not so critical because low bass sounds are not highly directional But it is better to place the subwoofer near the front speakers Turn it slightly toward the center of the room to reduce the wall reflections B D E E F A A G C A B A Unit y y Be careful to make sure children not to put their hands or any objects into the speaker duct Speaker duc...

Page 13: ...minal marked minus and the other wire goes in to the terminal marked plus Color Speaker Position Grey Rear right Rear right Blue Rear left Rear left Connecting the AC power cords Connect the AC power cords to the AC connector on the back of the wireless front left and right speakers Connect the AC power cord to the AC connector on the back of the wireless subwoofer BH9630TW MX BPERLLK_BPANLLK_SIMP...

Page 14: ... not insert other than the Wireless TX dedicated for this unit into the WIRELESS connector This unit might be damaged or it may not be removed easily y y If there is a strong electromagnetic wave product nearby interference may occur Put the unit wireless receiver wireless speakers wireless subwoofer and main unit away from there y y It takes a few seconds and may take longer for the Wireless TX w...

Page 15: ... jack on the player to the HDMI jack on a HDMI compatible TV or monitor Rear of the unit TV HDMI cable Set the TV s source to HDMI refer to TV s owner s manual Antenna connection Connect the supplied antenna for listening to the radio Rear of the unit After connecting the FM wire antenna be sure to fully extend it Note BH9630TW MX BPERLLK_BPANLLK_SIMPLE_ENG indd 15 13 4 16 10 39 ...

Page 16: ...utput jacks of your component TV VCR etc Rear of the unit White Red OPTICAL IN connection You can enjoy the sound from your component with a digital optical connection through the speakers of this system Connect the optical output jack of your component into the OPTICAL IN jack on the unit And then select the OPTICAL option by pressing FUNCTION Or press OPTICAL TV SOUND to select directly You can ...

Page 17: ... OUT jack of your component set top box digital satellite receiver video game machine etc Rear of the unit y y You cannot change the video resolution in the HDMI IN 1 2 mode Change the video resolution of the connected component y y If the video output signal is abnormal when your personal computer is connected to HDMI IN 1 2 jack change the resolution of your personal computer to 480p 720p 1080i ...

Page 18: ... port to the corresponding port on your Modem or Router using a commercially available LAN or Ethernet cable y y When plugging or unplugging the LAN cable hold the plug portion of the cable When unplugging do not pull on the LAN cable but unplug while pressing down on the lock y y Do not connect a modular phone cable to the LAN port y y Since there are various connection configurations please foll...

Page 19: ...ed to the unit Advanced Setting If you want to set the network settings manually use W S to select Advanced Setting on the Network Setting menu and press ENTER b 1 Use W S to select Wired and press ENTER b 2 Use W S A D to select the IP mode between Dynamic and Static Normally select Dynamic to allocate an IP address automatically If there is no DHCP server on the network and you want to set the I...

Page 20: ...ion This adjustment can be done from the Settings menu Adjust the NETWORK setting as follow Setting up the access point or the wireless router is required before connecting the player to the network Preparation Before setting the wireless network you need to connect the broadband internet to the wireless home network set the access point or wireless router note the SSID and security code of the ne...

Page 21: ...he Network Setting menu and press ENTER b 1 Use W S to select Wireless and press ENTER b AP List Scans all available access points or wireless routers within range and display them as a list Network name SSID Your access point may not be broadcasting its network name SSID Check your access point settings through your computer and either set your access point to broadcast SSID or manually enter the...

Page 22: ...4 All available networks are displayed on the screen Use W S to select Wired Network or desired SSID of wireless network and press ENTER b If you have security on your access point you need to input the security code as necessary 5 Use W S A D to select the IP mode between Dynamic and Static Normally select Dynamic to allocate an IP address automatically 6 Select Next and press ENTER b to apply ne...

Page 23: ...aker automatically when TV is turned on TV and this unit should be connected with optical cable Press W to move and press A D to select On or Off Select Next and press ENTER b 11 Check all the settings that you have set in the previous steps Press ENTER b while Finish is highlighted to finish the initial setup settings If there is any settings to be changed use W S A D to select 1 and press ENTER ...

Page 24: ... select a desired setting and press ENTER b to confirm your selection Resolution setting The player provides several output resolutions for HDMI OUT jack You can change the resolution using Settings menu 1 Press HOME 2 Use A D to select the Settings and press ENTER b The Settings menu appears 3 Use W S to select DISPLAY option then press D to move to the second level 4 Use W S to select the Resolu...

Page 25: ...the unit d My Apps Displays the My Apps screen e Input Changes input mode f Settings Adjusts the system settings g Search Searches for desired LG Apps and other content h Displays Sign In menu Using the Smart Share You can play video photo and audio content on the unit by inserting a disc connecting an USB device or using home network DLNA 1 Press HOME to display the home menu 2 Select Smart Share...

Page 26: ...of discs Note Playing a file on disc USB device yui This player can play video audio and photo files contained in the disc or USB device 1 Insert a data disc in the disc slot or connect an USB device When you connect the USB device on the HOME menu the player plays an audio file contained in the USB storage device automatically If the USB storage device is containing various types of files a menu ...

Page 27: ...es of content in a folder together In this case press C or V to go to the previous or next content with same type On Screen Display You can display and adjust various information and settings about the content To control video playback eroy You can control playback and set options while watching videos During playback press INFO MENU m a Progress bar Displays the current position and total playing...

Page 28: ...files y y The files are not recorded in a format that the unit can play y y The unit does not support the codec of the video file The remote control does not work properly y y The remote control is not pointed at the remote sensor of the unit y y The remote control is too far from the unit y y There is an obstacle in the path of the remote control and the unit y y The batteries in the remote contr...

Page 29: ... broadband service speed may not be fast enough to stream video services Contact your Internet Service Provider ISP and increase the broadband speed is recommended Media servers are not displayed on the device list y y The firewall or anti virus software on your media server is running Turn off the firewall or anti virus software running on your media server y y The player is not connected to the ...

Page 30: ...s have been made please visit http www lg com or contact LG Electronics customer care center Open Source Software Notice To obtain the corresponding source code under GPL LGPL and other open source licenses please visit http opensource lge com All referred license terms warranty disclaimers and copyright notices are available to download with the source code BH9630TW MX BPERLLK_BPANLLK_SIMPLE_ENG ...

Page 31: ...L IN OPTICAL 3 V p p Optical jack x 1 MIC IN 6 3 mm jack Tuner FM Tuning Range 87 5 to 108 0 MHz or 87 50 to 108 00 MHz Amplifier Power output 3 Ω RMS THD 10 Total 1100 W Front 240 W x 2 Rear 195 W x 2 Sub Woofer 230 W Active System Laser Semiconductor laser wavelength 405 nm 650 nm Signal system Standard NTSC color TV system LAN port Ethernet jack x 1 10BASE T 100BASE TX Wireless LAN internal ant...

Page 32: ...Dimensions W x H x D 307 mm X 366 mm X 307 mm Input Power 230 W Net Weight 8 5 kg Speakers BH9630TW Front speaker Left Right S93T4 FL S93T4 FR Type 2 Way 3 speaker Max Input power 480 W Impedance Rated 3 Ω Net Dimensions W x H x D 300 mm X 1350 mm X 300 mm Input Power 240 W Net Weight 6 kg Rear speaker Left Right S93T4 S Type 2 Way 3 speaker Max Input power 390 W Impedance Rated 3 Ω Net Dimensions...

Page 33: ...50 mm X 300 mm Input Power 195 W Net Weight 6 6 kg Subwoofer S93T2 W Type 1 Way 1 speaker Max Input power 460 W Impedance Rated 3 Ω Net Dimensions W x H x D 307 mm X 366 mm X 307 mm Input Power 230 W Net Weight 8 5 kg Wireless receiver W3 2 Power requirements Refer to main label on the wireless receiver Power consumption Refer to main label on the wireless receiver Dimensions W x H x D 60 mm X 220...

Page 34: ...aining the unit The unit is a high tech precision device If the optical pick up lens and disc drive parts are dirty or worn the picture quality could be diminished For details please contact your nearest authorized service center Notes on discs Handling discs Do not touch the playback side of the disc Hold the disc by the edges so that fingerprints do not get on the surface Never stick paper or ta...

Page 35: ...BH9630TW MX BPERLLK_BPANLLK_SIMPLE_ENG indd 35 13 4 16 10 39 ...

Page 36: ...ormation on the advanced features is located on the CD ROM provided in an electronic version To read these files you will need to use a Personal Computer PC equipped with a CD ROM drive BH9630TW MX BPERLLK_BPANLLK_SIMPLE_ENG indd 36 13 4 16 10 39 ...

Reviews: