background image

18

Outdoor Unit

Refrigerant piping installation

To Outdoor Unit

Sealed Piping

A

A

B

A

B

1. Use the following materials for refrigerant piping.

• Material: Seamless phosphorous deoxidized copper pipe
•  Wall thickness : Comply with the relevant local and national regulations for the designed pressure

3.8MPa. We recommend the following table as the minimum wall thickness. 

2. Commercially available piping often contains dust and other materials. Always blow it clean with a dry inert

gas.

3. Use care to prevent dust, water or other contaminants from entering the piping during installation.

4. Reduce the number of bending portions as much as possible, and make bending radius as big as possible.

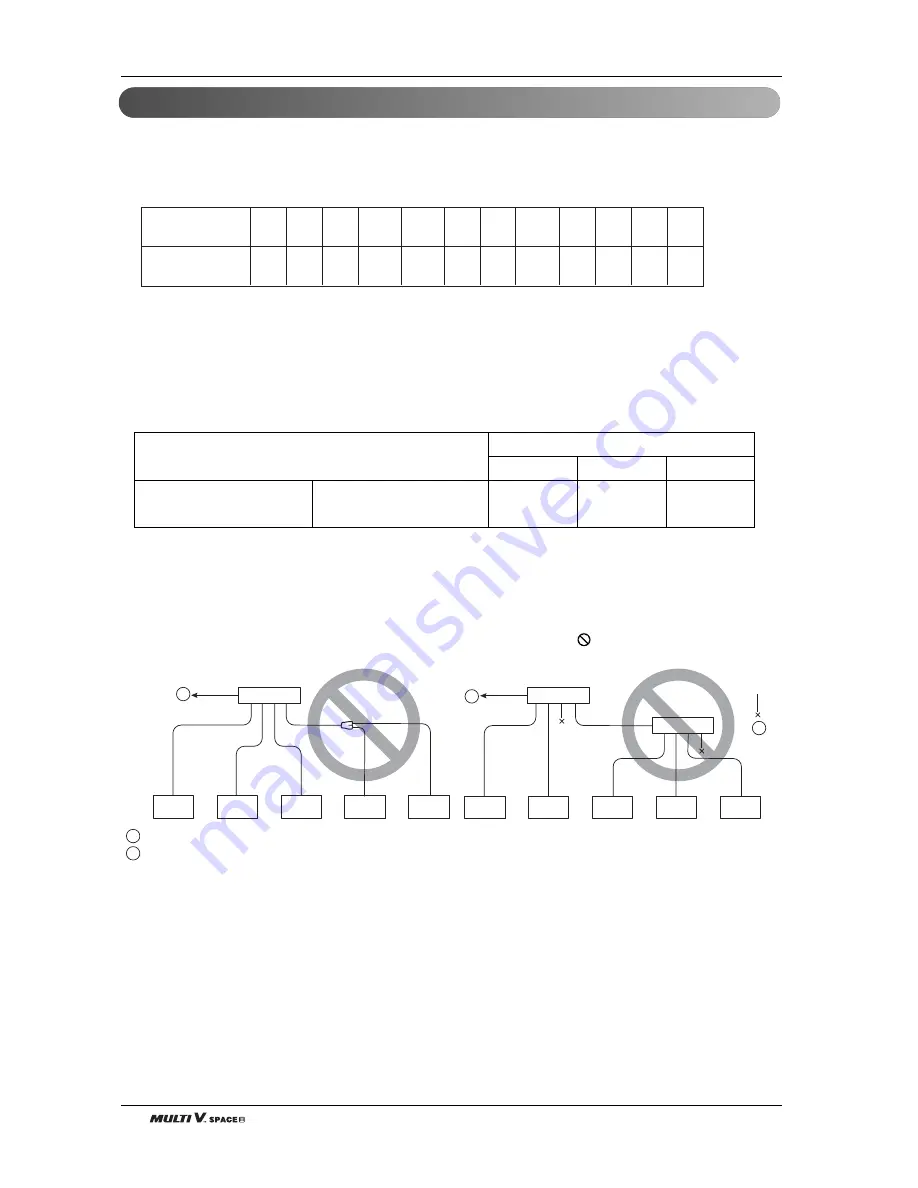
5. Always use the branch piping set shown below, which are sold separately.

6. If the diameters of the branch piping of the designated refrigerant piping differs, use a pipe cutter to cut

the connecting section and then use an adapter for connecting different diameters to connect the piping.

7. Always observe the restrictions on the refrigerant piping (such as rated length, difference in height,  and

piping diameter).
Failure to do so can result in equipment failure or a decline in heating/cooling performance.

8. A second branch cannot be made after a header.  (These are shown by     .)

9. The Multi V will stop due to an abnormality like excessive or insufficient refrigerant. At such a time, always

properly charge the unit. When servicing, always check the notes concerning both the piping length and
the amount of additional refrigerant.

10

. Never perform a pump down. This will not only damage the compressor but also deteriorate the

performance.

11

. Never use refrigerant to perform an air purge. Always evacuate using a vacuum pump.

Caution

ARBLN01621

ARBLN03321

ARBL054

ARBL057

ARBL1010

Y branch

Header

4 branch

7 branch

10 branch

0.99

22.2

1.1

31.8

1.21

34.9

1.35

38.1

1.43

41.3

0.99

28.58

0.99

25.4

0.99

19.05

0.99

15.88

0.8

12.7

0.8

9.52

0.8

6.35

Minimum

thickness [mm]

Outer diameter

 [mm]

Summary of Contents for ARUN50LL2

Page 1: ...rds by authorized personnel only Please retain this installation manual for future reference after reading it thoroughly your set and retain it for future reference P NO MFL67798003 www lg com MODELS ARUV Series ARUN Series Original instruction ENGLISH PORTUGUESE MAGYAR БЪЛГАРСKN SRPSKI HRVATSKI SVENDKA ҚАЗАҚ ТІЛІ ITALIANO ESPAÑOL FRANÇAIS DEUTSCH ΕΛΛΗΝΙΚΆ ČEŠTINA NEDERLANDS POLSKI LIMBA ROMÂNĂ ...

Page 2: ...ion Process 7 Outdoor units Information 8 Environment friendly Alternative Refrigerant R410A 9 Select the Best Location 9 Installation Space 10 Lifting method 12 Installation 13 Refrigerant piping installation 17 Electrical Wiring 35 Test Run 48 Caution For Refrigerant Leak 56 Installation guide at the seaside 58 ...

Page 3: ...ire may result Ask the dealer or an authorized technician to install the air conditioner Improper installation by the user may result in water leakage electric shock or fire Always ground the product There is risk of fire or electric shock Always intstall a dedicated circuit and breaker Improper wiring or installation may cause fire or electric shock For re installation of the installed product al...

Page 4: ...rom being exceed ed Should the refrigerant leak and cause the safety limit to be exceeded harzards due to lack of oxy gen in the room could result Use a vacuum pump or Inert nitrogen gas when doing leakage test or air purge Do not compress air or Oxygen and Do not use Flammable gases Otherwise it may cause fire or explosion There is the risk of death injury fire or explosion n Operation Do not dam...

Page 5: ...ing the unit in a hospital com munication station or similar place provide surfficient protection against noise The inverter equipment private power generator high frequency medical equipment or radio com munication equipment may cause the air condition er to operate erroneously or fail to operate On the other hand the air conditioner may affect such equipment by creating noise that disturbs medic...

Page 6: ...p the power switch turned on during the operational season Do not touch any of the refrigerant piping during and after operation It can cause a burn or frostbite Do not operate the air conditioner with the panels and guards removed Rotating hot or high voltage parts can cause injuries Do not directly turn off the main power switch after stopping operation Wait at least more than 5 minutes before t...

Page 7: ...o be responsible for switch settings Determination of division work The vacuum pump used must have a capacity of reaching at least 5 torr more than 1 hour Vacuum drying Recharge correctly as calculated in this manual and record the amount of added refrigerant Additional charge of refrigerant Make sure there are no gaps left between the facing materials used on the ceiling Fit facing panels Run eac...

Page 8: ...pes mm inch ARUN50LR2 ARUN50LL2 5 UV 5 2 0 8 200 750x1 790x650 29 5x70 5x25 6 9 52 3 8 15 88 5 8 ARUN60LR2 ARUN60LL2 6 UV 5 2 0 9 200 750x1 790x650 29 5x70 5x25 6 9 52 3 8 19 05 3 4 ARUN80LR2 ARUN80LL2 8 UV 6 4 0 13 200 750x1 790x650 29 5x70 5x25 6 9 52 3 8 19 05 3 4 should be connected with 2 series indoor unit only Ex ARNU07GSEA2 n Heat Pump Model HP Equivalent horsepower Chassis Refrigerant Pro...

Page 9: ...s 2 Performance of heating will be reduced and preheat time of the indoor unit may be lengthened in case of installing the outdoor unit in winter at following location 1 Shade position with a narrow space 2 Location with much moisture in neighboring floor 3 Location with much humidity around 4 Location where water gathers since the floor is not even The refrigerant R410A has the property of higher...

Page 10: ...er drain outlet is required to discharge rain water on the bottom of the outdoor unit room or condensation water to possibly generate when operating The recommended Specification of louver Multi V Space should be installed in the special outdoor room with soundproofing walls 500 UV 1150 UV1 995 Min 884 5 650 Door Width UV 900 UV1 745 100 Min 100 Min Min 1605 5 90 1024 723 Anchor Bolt 660 750 137 9...

Page 11: ... come in contact with snow directly If snow piles up and freezes on the air suction hole the system may malfunction Don t install the suction hole and discharge hole of the outdoor unit facing to the seasonal wind W H N Air Flow Rate Q Discharge Area Ad Discharge air velocity Air Flow Rate Q Suction Area As Suction air velocity Ad As Af X 100 ho h θ θ E O R 120 Recommended Effective Opening Ratio ...

Page 12: ...nsportation because they are dangerous Do not touch heat exchanger fins with your bare hands Otherwise you may get a cut in your hands Tear plastic packaging bag and scrap it so that children cannot play with it Otherwise plastic packaging bag may suffocate children to death When carrying in Outdoor Unit be sure to support it at four points Carrying in and lifting with 3 point support may make Out...

Page 13: ...e done in a wide area Pipe and wiring space in case of piping and wiring on the floor surface H Beam support Concrete base support G Foundation bolt executing method 200 Nut 75 75 200 Spring washer Frame Anti vibration materials Four bolt are required 3 thread ridges H Beam Concrete base 100 WARNING Be sure to install unit in a place strong enough to withstand its weight Any lack of strength may c...

Page 14: ...ng tool as shown below Firmly hold copper tube in a bar or die as indicated dimension in the table above 4 Check n Compare the flared work with figure below n If flare is noted to be defective cut off the flared section and do flaring work again Main cause of gas leakage is defect in flaring work Carry out correct flaring work in the following procedure Pipe A mm Gas Liquid Gas Liquid 5 6 19 100 1...

Page 15: ...fter all the piping has been connected use nitrogen to perform a gas leak check Tightening torque CAUTION Always use a charge hose for service port connection After tightening the cap check that no refrigerant leaks are present When loosening a flare nut always use two wrenches in combination When connecting the piping always use a spanner and torque wrench in combination to tighten the flare nut ...

Page 16: ...t However if it is operated for a long time in high humid atmosphere dew point tempera ture more than 23 C water drops are liable to fall In this case add heat insulation material according to the following procedure Heat insulation material to be prepared EPDM Ethylene Propylene Diene Methylene over 120 C the heat resistance temperature Add the insulation over 10mm thickness at high humidity envi...

Page 17: ...both the pipe and the valve are in a straight line Cut both the pipe and the valve with a cutter to suit the length Don t cut the length of less than 70mm CLOSE OPEN Pipe joint auxiliary parts Securely perform brazing with a nitrogen blow into the service valve port Releasing pressure 0 02 MPa or less Flare nut Loose or tighten flare nut by using the wrench with both ends Coat the flare connection...

Page 18: ...ting section and then use an adapter for connecting different diameters to connect the piping 7 Always observe the restrictions on the refrigerant piping such as rated length difference in height and piping diameter Failure to do so can result in equipment failure or a decline in heating cooling performance 8 A second branch cannot be made after a header These are shown by 9 The Multi V will stop ...

Page 19: ...g pipes and break equipment 12 Always insulate the piping properly Insufficient insulation will result in a decline in heating cooling perfor mance drip of condensate and other such problems 13 When connecting the refrigerant piping make sure the service valves of the Outdoor Unit is completely closed the factory setting and do not operate it until the refrigerant piping for the Outdoor and Indoor...

Page 20: ...door unit connecting pipe Outdoor unit capacity type Liquid pipe Gas pipe mm inch mm inch 5HP Ø9 52 3 8 Ø15 88 5 8 6 8HP Ø9 52 3 8 Ø19 05 3 4 10HP Ø9 52 3 8 Ø22 2 7 8 Indoor unit capacity kW Btu h Liquid pipe Gas pipe mm inch mm inch 5 6 19 100 Ø6 35 1 4 Ø12 7 1 2 16 0 54 000 Ø9 52 3 8 Ø15 88 5 8 Indoor unit capacity kW Btu h Liquid pipe Gas pipe mm inch mm inch 5 6 19 100 Ø6 35 1 4 Ø12 7 1 2 16 0...

Page 21: ...igerant piping system Example 5 Indoor Units connected Ⓐ Outdoor Unit Ⓑ 1st branch Y branch Ⓒ Indoor Units L150m l 40m H 50m h 15m Ú Total pipe length A B C D a b c d e 300m Longest pipe length Equivalent pipe length A B C D e 150m A B C D e 175m Longest pipe length after 1st branch B C D e 40m Difference in height Outdoor Unit Indoor Unit H 50m 40m Outdoor unit is lower than Indoor Units Differen...

Page 22: ...after 1st branch f 40m Difference in height Outdoor Unit Indoor Unit H 50m 40m Outdoor unit is lower than Indoor Units Difference in height Indoor Unit Indoor Unit h 15m L l H h Assume equivalent pipe length of Y branch to be 0 5m that of header to be 1m calculation purpose Indoor Unit should be installed at lower position than the header WARNING Pipe length after header branching a f It is recomm...

Page 23: ...ulation purpose Indoor Unit should be installed at lower position than the header Longest pipe length Equivalent pipe length A B b 150m A B b 175m Longest pipe length after 1st branch B b 40m Difference in height Outdoor Unit Indoor Unit H 50m 40m Outdoor unit is lower than Indoor Units Difference in height Indoor Unit Indoor Unit h 15m L l H h Ú Refrigerant pipe diameter from branch to branch B C...

Page 24: ... x 0 061 B x 0 061 C x 0 061 a b c d e x 0 022 CF 40 x 0 061 20 x 0 061 20 x 0 061 10 x 5 x 0 022 0 CF 5 98 kg a ø6 35 10m b ø6 35 10m c ø6 35 10m d ø6 35 10m e ø6 35 10m u Special condition In case of the No of CST TQ TR RAC SE ARTCOOL SF models are over than 50 of the connected indoor units when the total No of connected indoor units are over than 50 of the max connectable indoor units n Additio...

Page 25: ...t 2 Reconfirmation of Outdoor Unit capacity and piping length 3 Reduction of the amount of refrigerant 4 Installation of 2 or more security device alarm for gas leakage Change Indoor Unit type installation position should be over 2m from the floor Wall mounted type Cassette type Adoption of ventilation system choose ordinary ventilation system or building ventilation system Limitation in piping wo...

Page 26: ...1 Line Distribution 2 Vertical Distribution Ensure that the branch pipes are attached vertically 3 The others Header 1st 1st 1st Main pipe Distribution 2nd 2nd 3rd 3rd main pipe distribution 1st 3rd 3rd main pipe distribution 2nd Distribution Method ...

Page 27: ... unit A B C Ensure that the branch pipes are attached horizontally or vertically see the diagram below When the number of pipes to be connected is smaller than the number of header branches install a cap to the unconnected branches The indoor unit having larger capacity must be installed closer to Ⓐ than smaller one If the diameter of the refrigerant piping selected by the procedures described is ...

Page 28: ...e insulated with the insulator in each kit Joints between branch and pipe should be sealed with the tape included in each kit Any cap pipe should be insulated using the insulator provided with each kit and then taped as described above B Pinched pipe Horizontal plane View from point B in the direction of the arrow Insulate the header using the insulation material attached to the branch pipe kit as...

Page 29: ... D22 2 I D28 58 O D25 4 I D22 2 O D19 05 O D19 05 I D22 2 I D25 4 70 80 110 I D9 52 I D12 7 5 3 6 D I 2 5 9 D I I D9 52 I D12 7 I D6 35 I D12 7 332 321 74 376 404 96 471 517 125 416 444 96 371 394 83 I D34 9 O D31 8 I D22 2 O D22 2 I D28 58 I D31 8 O D19 05 I D28 58 120 90 120 130 120 110 70 O D15 88 I D9 52 I D12 7 O D12 7 I D6 35 I D9 52 I D15 88 I D19 05 I D22 2 I D22 2 I D19 05 I D15 88 I D12 ...

Page 30: ...9 52 ID9 52 ID6 35 ID6 35 ID12 7 120 150 75 60 6 360 500 ID19 05 ID15 88 ID12 7 ID15 88 ID12 7 120 OD19 05 ID15 88 ID12 7 120 150 60 6 360 500 75 ID6 35 ID9 52 ID12 7 120 150 75 60 6 360 500 ID28 58 ID19 05 ID15 88 ID15 88 ID12 7 120 OD28 58 ID25 4 ID22 2 120 150 60 6 360 500 75 ID6 35 ID9 52 ID12 7 ID9 52 ID6 35 80 OD12 7 ID9 52 120 150 75 60 9 540 680 ID28 58 ID19 05 ID15 88 ID15 88 ID12 7 120 1...

Page 31: ...ization During this test set DIP switch as Vacuum Mode Note If the ambient temperature differs between the time when pressure is applied and when the pressure drop is checked apply the following correction factor There is a pressure change of approximately 0 1 kgf cm2 0 01 MPa for each 1 C of temperature difference Correction Temp at the time of pressurization Temp at the time of check X 0 1 For e...

Page 32: ...ate it again with the vacuum pump for 1hr to 100 7kPa vacuum drying If the system cannot be evacuated to 100 7kPa within 2 hrs repeat the steps of vacuum break and its drying Finally check if the vacuum gauge does not rise or not after maintaining the system in vacuum for 1 hr Vacuum pump Liquide pipe Gas pipe WARNING If the primary charging is not performed after vacuum wet air may go into the ou...

Page 33: ...Master main PCB DIP switch ON No 11 14 Vacuum mode setting ODU V V OPEN Main EEV SC EEV OPEN IDU EEV OPEN ODU power reset Press the black button Main PCB 5 sec Main PCB SW01S Main PCB SW02B Main PCB SW01V ODU operation stops during vacuum mode Compressor can t operate Vacuum mode setting method Vacuum mode cancellation method Master main PCB DIP switch OFF No 11 14 Power reset Vacuum mode cancella...

Page 34: ...f heat insulation material with a finishing tape Power lines E D D B A C Be sure to give insulation work to refrigerant piping by covering liquid pipe and gas pipe separately with enough thickness heat resistant polyethylene so that no gap is observed in the joint between indoor unit and insulating material and insulating materials themselves When insulation work is insufficient there is a possi b...

Page 35: ...c engineers do electric work using special circuits in accordance with regulations and this installation manual If power supply circuit has a lack of capacity or elec tric work deficiency it may cause an electric shock or fire 1 Follow ordinance of your governmental organization for technical standard related to electrical equipment wiring regulations and guidance of each electric power company 2 ...

Page 36: ...n outdoor unit and indoor units through the terminal block When the central control system is connected to the outdoor unit a dedicated PCB must be connected between them When connecting communication line between outdoor unit and indoor units with shielded wire connect the shield ground to the earth screw WARNING The temperature sensor for outdoor air should not be exposed to direct sunlight Prov...

Page 37: ...y side Note 1 The figures are based on assumed length of parallel cabling up to 100m For length in excess of 100m the figures will have to be recalculated in direct proportion to the additional length of line involved 2 If the power supply waveform continues to exhibit some distortion the recommended spacing in the table should be increased If the lines are laid inside conduits then the following ...

Page 38: ... Follow ordinance of your governmental organization for technical standard related to electrical equipment wiring reg ulations and guidance of each electric power company Make sure to use specified wires for connections so that no external force is imparted to terminal connections If con nections are not fixed firmly it may cause heating or fire Make sure to use the appropriate type of overcurrent...

Page 39: ...igure below For wiring use the designated power wire and connect firmly then secure to prevent outside pressure being exerted on the terminal block Use an appropriate screwdriver for tightening the terinal screws A screwdriver with a small head will strip the head and make proper tighterning impossible Over tightening the terminal screws may break them u Precautions when laying power wiring Round ...

Page 40: ...B A B A Power supply 1 Phase 50Hz 220 240V Power supply switch Switch Pull Box Installer Option u Example Connection of Communication Cable 1 50Hz WARNING Indoor Unit ground Lines are required for preventing electrical shock accident in current leakage communication disorder by noise effect and motor current leakage without connection to pipe Don t install an individual switch or electrical outlet...

Page 41: ...DRY2 GND 12V INTERNET B A B A Power supply 1 Phase 50Hz 220 240V Power supply switch Switch Pull Box Installer Option 2 60Hz WARNING Indoor Unit ground Lines are required for preventing electrical shock accident in current leakage communication disorder by noise effect and motor current leakage without connection to pipe Don t install an individual switch or electrical outlet to disconnect each of...

Page 42: ...erformed without the bad contact of the dip switch or not n Checking the setting of the unit The number is sequentially appeared at the 7 segment in 5 seconds after applying the power This number represents the setting condition model code total capacity 2 25 model type 1 1 255 model code 2 6 10HP HP numbers 3 No display cooling only 2 heat pump 4 25 normal 5 ARUV series 70 ARUN series 170 Example...

Page 43: ...3 4 5 6 7 ON 1 2 3 4 5 6 7 ON 1 2 3 4 5 6 7 8 9 10 11 12 13 14 1 2 3 4 5 6 7 ON 1 2 3 4 5 6 7 ON 1 2 3 4 5 6 7 8 9 10 11 12 13 14 1 2 3 4 5 6 7 ON 1 2 3 4 5 6 7 ON 1 2 3 4 5 6 7 8 9 10 11 12 13 14 1 2 3 4 5 6 7 ON 1 2 3 4 5 6 7 ON 1 2 3 4 5 6 7 8 9 10 11 12 13 14 Cool Heat selector 1 2 3 4 5 6 7 ON 1 2 3 4 5 6 7 ON 1 2 3 4 5 6 7 8 9 10 11 12 13 14 1 2 3 4 5 6 7 ON 1 2 3 4 5 6 7 ON 1 2 3 4 5 6 7 8 ...

Page 44: ... 3 4 5 6 7 8 9 10 11 12 13 14 1 2 3 4 5 6 7 ON 1 2 3 4 5 6 7 ON 1 2 3 4 5 6 7 8 9 10 11 12 13 14 1 2 3 4 5 6 7 ON 1 2 3 4 5 6 7 ON 1 2 3 4 5 6 7 8 9 10 11 12 13 14 1 2 3 4 5 6 7 ON 1 2 3 4 5 6 7 ON 1 2 3 4 5 6 7 8 9 10 11 12 13 14 1 2 3 4 5 6 7 ON 1 2 3 4 5 6 7 ON 1 2 3 4 5 6 7 8 9 10 11 12 13 14 1 2 3 4 5 6 7 ON 1 2 3 4 5 6 7 ON 1 2 3 4 5 6 7 8 9 10 11 12 13 14 Night Silent Operation Pump Out ARU...

Page 45: ...V Auto addressing SW01V Data confirm CAUTION In replacement of the indoor unit PCB always perform auto address setting again If power supply is not applied to the indoor unit operation error occurs Auto addressing is only possible on the main PCB Auto addressing has to be performed after 3 minutes to improve communication u The Procedure of Automatic Addressing Auto addressing setting end Numbers ...

Page 46: ...d Indoor Unit number with a wired remote control To control several sets of Indoor Units into a group set the group ID from 0 to F for this purpose Terminal block on the main PCB SODU IDU INTERNET DRY1 DRY2 B A B D A C GND 12V B A B A Group recognizing the simple central controller No 0 group 00 0F No 1 group 10 1F No 2 group 20 2F No 3 group 30 3F No 4 group 40 4F No 5 group 50 5F No 6 group 60 6...

Page 47: ...utdoor Unit Mode Change Fan Cooling Back Heating Outdoor Unit GND GND GND Cool Heat Selector Installation and Connection n Without Cool Heat Selector Installation and Connection In case try to set mode without Cool Heat Selector and try to use other switch except from LG Outdoor Cool Heat Selector in field Connect signal terminal block as below figure and description How to set mode without Cool H...

Page 48: ...ulation resistance Check if high low pressure common pipe liquid pipe and gas pipe valves are fully opened NOTE Be sure to tighten caps Check if there are any problems in automatic addressing or not Check and confirm that there are no error messages in the display of indoor units or remote controls and LED in outdoor units Checks Before Test Run CAUTION Preheat of compressor Start preheat operatio...

Page 49: ... Low pressure error or discharge temper ature error Motor insulation broken Strainer clogged Oil leakage Motor insulation failure R S T misconnection Motor failure bad ventilation around outdoor heat exchanger Bad connector contact Coil failure EEV clogged EEV clogged Check resistance between terminals and chassis Change strainer Check oil amount after opening oil port Check resistance between ter...

Page 50: ...ng installation 2 In case the function is not used set the dip S W OFF and reset the power 3 If ODU RPM changes cooling capacity may go down Main PCB Power Reset Setting the Fan Max RPM Setting Complete Dip S W No 12 14 ON Master ODU SW01S Master ODU SW01B SW01V SW02V Note 1 Max RPM setting method 1 time 1 time 1 time Red button Black button 9 Operation hr 3 times 3 2 times 2 8 9 8 9 8 450 ESP 400...

Page 51: ... 1 Select appropriate RPM referencing noise table 1time 1time 1time 1time 1time 1time 1time 1time 1time Red button Black button 9 10 5 12 9 10 5 12 9 10 5 12 Operation hr 8 6 5 5 8 6 5 5 8 6 5 5 380 ESP 380 ESP 380 ESP 340 ESP 340 ESP 340 ESP 300 ESP 300 ESP 300 ESP 1time 2times 3times 4time 5times 6times 7times 8times 9times 1 2 3 4 5 6 7 8 9 Judgment hr Fan Max RPM Setting Step ARUN50 60LL2 R2 1...

Page 52: ...ck button Main PCB 5 sec Main PCB SW01S Main PCB SW02B Main PCB SW01V ODU operation stops during vacuum mode Compressor can t operate Vacuum mode setting method Vacuum mode cancellation method Master main PCB DIP switch OFF No 11 14 Power reset Vacuum mode cancellation Power Reset DIP switch setting Static pressure compensation mode setting method Static pressure compensation mode cancellation met...

Page 53: ...nverter Compressor IPM Fault Inverter Board Input Over Current RMS of Outdoor Unit Outdoor Unit Inverter Compressor DC link Low Voltage Outdoor Unit High Pressure Switch Outdoor Unit Input Voltage High Low Voltage Outdoor Unit Inverter Compressor Start Failure Air temperature sensor of indoor unit is open or short Inlet pipe temperature sensor of indoor unit is open or short Failing to receive wir...

Page 54: ...f Outdoor Unit Inverter PCB Restriction of Outdoor Unit System is turned off by outdoor unit DC Voltage Over Charging Outdoor Unit Inverter Compressor Fault OR Drive Fault Outdoor Unit Inverter Compressor High Discharge Temperature Outdoor Unit Constant Speed Compressor High Discharge Temperature High Pressure of Outdoor Unit Low Pressure of Outdoor Unit Outdoor Unit Inverter Compressor CT Sensor ...

Page 55: ...Units Outdoor Unit Fan Inverter PCB Temperature is Over 95 C Outdoor Unit Fan PCB Heat Sink Temperature Sensor open or short Outdoor Unit 3 Phase Power unbalance Outdoor Unit Fan CT Sensor Error Outdoor Unit Fan DC Link High Voltage Error Outdoor Unit Fan Over Current Error Outdoor Unit Fan Start Failure Error Outdoor Unit Main PCB EEPROM Error Outdoor Unit Fan PCB EEPROM Error Outdoor Unit Fan PC...

Page 56: ...edure of limiting concentration Limiting concentration is the limit of Freon gas concentration where immediate measures can be taken with out hurting human body when refrigerant leaks in the air The limiting concentration shall be described in the unit of kg m3 Freon gas weight per unit air volume for facilitating calculation Limiting concentration 0 44kg m3 R410A Outdoor unit No 1 system Flow of ...

Page 57: ...ed with mechanical ventilator Reducing the outdoor refrigerant qty Pay a special attention to the place such as a basement etc where refrigerant can stay since refrigerant is heavier than air Outdoor unit Indoor unit Smallest room R410A Refrigerant concentration kg m3 Total amount of replenished refrigerant in refrigerant facility kg Capacity of smallest room where indoor unit is installed m3 In c...

Page 58: ...dust or salt particles stuck on the heat exchanger by using water CAUTION Multi V Space should be installed in the special outdoor room with soundproofing walls Product information Product Name Air conditioner Model Name The A weighted sound pressure emitted by this product is below 70 dB The noise level can vary depending on the site The figures quoted are emission level and are not necessarily s...

Page 59: ...esentative LG Electronics Inc EU Representative Krijgsman 1 1186 DM Amstelveen The Netherlands Manufacturer LG Electronics Inc Changwon 2nd factory 84 Wanam ro Seongsan gu Changwon si Gyeongsangnam do KOREA ...

Reviews: