background image

D

VR 

(DIGIT

AL 
VIDEO 

RECORDER)

88

DVR (DIGITAL VIDEO RECORDING)

On playing the recorded program, repeat a section 

MODE

LIVE TV

INPUT

SIM

PLINK

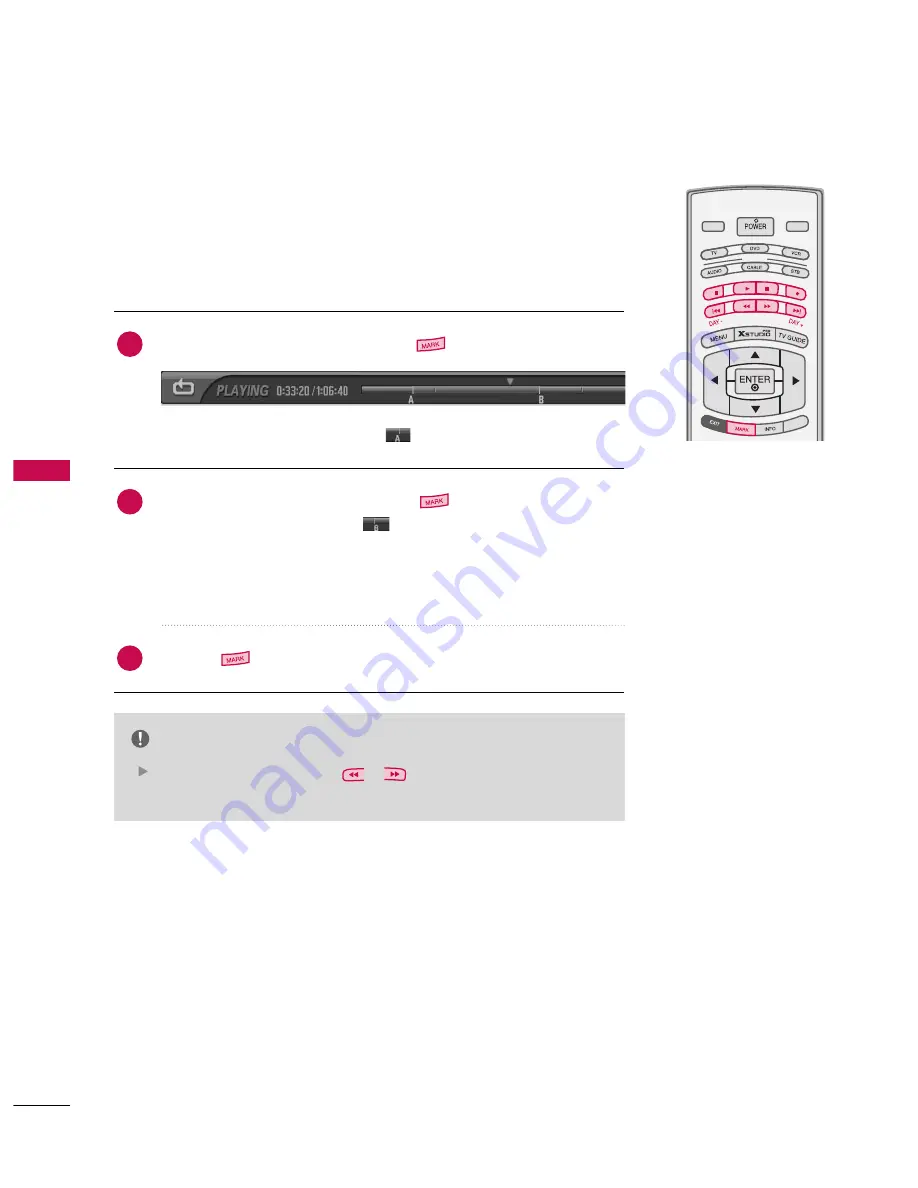
You can set the recording to repeat the same section.

At the point you wish to start, press the

button.

The following symbol will appear: 

.

At the point you wish to finish, press the

button.

The following symbol appears:

.

Repeatedly play the marked section.

You can not make sections of less than 5 seconds.

The progress bar for the repeated section will be shown in blue.

Press the

button to stop playing the repeat section.

NOTE

It is possible to search using (

/

). 

Pause to edit a section while repeating.

2

3

1

Summary of Contents for 60PB4D

Page 1: ...o ow we er r s sa av vi in ng g g gu ui id de el li in ne es s i is ss su ue ed d b by y t th he e U U S S E En nv vi ir ro on nm me en nt ta al l P Pr ro ot te ec ct ti io on n A Ag ge en nc cy y E EP PA A w ww ww w l lg gu us sa a c co om m w ww ww w l lg g c ca a Please read this manual carefully before operating your set Retain it for future reference Record model number and serial number of t...

Page 2: ... modifications not expressly approved by the party responsible for compliance could void the user s authority to operate the equipment CAUTION Do not attempt to modify this product in any way without written authorization from LG Electronics Unauthorized modification could void the user s authority to operate this product The lightning flash with arrowhead symbol within an equilateral triangle is ...

Page 3: ... they exit from the apparatus Only use attachments accessories specified by the manufacturer Unplug this apparatus when unused for long periods of time Important safety instructions shall be provided with each apparatus This information shall be given in a separate booklet or sheet or be located before any operating instructions in an instruction for installation for use and supplied with the appa...

Page 4: ...sulation are dangerous Any of these conditions could result in electric shock or fire Periodically examine the cord of your appliance and if its appearance indicates dam age or deterioration unplug it discontinue use of the appliance and have the cord replaced with an exact replacement part by an authorized servicer Protect the power cord from physical or mechanical abuse such as being twisted kin...

Page 5: ...n EZ Scan 41 Add Delete Channel Manual Scan 42 Channel Editing 43 Brief Info 44 Input Source Selection 45 Auto Link 46 SimpLink 47 Input Label 49 DTV Signal Strength 50 TV GUIDE ON SCREENTM SYSTEM Setup of TV Guide On ScreenTM 51 Functions of TV Guide On ScreenTM 55 Overview 55 Screen Components Panel Menu 56 Listings 58 Search 59 Recorded program list 63 Schedule 65 Change Setup 66 Record 70 Remi...

Page 6: ...ereo SAP Broadcast Setup 1 12 TV Speakers On Off Setup 1 13 Audio Language 1 14 On Screen Menus Lanaguage Selection 1 15 Caption Text 1 16 Caption Option 1 1 8 TIME SETTING Clock Setting 1 19 Auto On Off Timer Setting 121 Sleep Timer Setting 122 Auto Shut off Setting 123 PARENTAL CONTROL RATINGS Set Password Lock System 124 Channel Blocking 127 Movie TV Rating 128 External Input Blocking 131 APPEN...

Page 7: ...f Deployment access cards also called CableCARDs that allow users to plug the cable directly into an HDTV set and enjoy HDTV and digi tal cable without having to use a separate set top box is a trademark of SRS Labs Inc TruSurround XT technology is incorporated under license from SRS Labs Inc A Digital Video Recorder DVR is a device that empowers you to control what you watch when you watch it It ...

Page 8: ...icture feature allows you to view your PC and video images simultaneously Versatile The light weight and thin size makes it easy to install your plasma display in a variety of locations where conventional TVs do not fit The Plasma TV Manufacturing Process a few minute colored dots may be present on the Plasma TV screen The Plasma TV is composed of 0 9 to 2 2 million cells A few cell defects will n...

Page 9: ...compliance for the product 2 Wall brackets 2 TV brackets F Fo or r 6 60 0 i in nc ch he es s 2 TV Bracket Bolts 2 Wall brackets F Fo or r 4 42 2 5 50 0 i in nc ch he es s 2 eye bolts Slightly wipe stained spot on the exterior only with the polishing cloth for the product exterior if there is stain or fingerprint on surface of the exterior Do not wipe roughly when removing stain Please be cautions ...

Page 10: ...ENU This menu is a contents guide In HOME Menu you can enter the recorded list of DVR TV Guide Schedule of the TV Guide Manual Record of DVR or TV Menu MODE LIVE TV DAY DAY INPUT SIMPLINK TV Guide p p 5 51 1 DVR p p 7 76 6 ...

Page 11: ...cloth If a polishing cloth is included with your product use it Remote Control Sensor POWER Button TV GUIDE Button INPUT Button MENU Button VOLUME F F G G Buttons CHANNEL E E D D Buttons Power Standby Indicator Illuminates red in standby mode When the TV is turned on the indicator blinks white and then illuminates white before the picture is dis played FRONT PANEL CONTROLS ...

Page 12: ... from an S VIDEO device RS 232C IN CONTROL SERVICE PORT Connect to the RS 232C port on a PC RGB IN Connect the monitor output from a PC to the appropriate input port Power Cord Socket For operation with AC power Caution Never attempt to operate the TV on DC power PREPARATION 11 S VIDEO Input Provides better picture quality than the video input AUDIO Input Connections are available for listening to...

Page 13: ...brackets and bolts to tighten the product to the wall as shown in the picture Insert the eye bolts and tighten them securely in the upper holes Secure the wall brackets with the bolts not provided as parts of the product must purchase separately on the wall Match the height of the bracket that is mounted on the wall to the holes in the product Ensure the eye bolts or brackets are tightened securel...

Page 14: ... Hold the CABLE MANAGEMENT with both hands and pull it backward as shown Connect the cables as necessary To connect an additional equipment see the External equipment Connections section 1 2 Install the CABLE MANAGEMENT as shown 3 CABLE MANAGEMENT ...

Page 15: ...cepts a VESA compliant mounting interface pad optional There 4 threaded holes are available for attaching the bracket G G Screw length needed depends on the wall mount used For further information refer to the VESA Wall Mounting Instruction Guide NOTE 400mm 600mm ...

Page 16: ...P PEDESTAL INSTALLATION For proper ventilation allow a clearance of 4inches on all four sides from the wall CAUTION Ensure adequate ventilation by following the clearance recommendations 4 inches 4 inches 4 inches 4 inches ...

Page 17: ...CABLE IN CABLE IN ANTENNA IN CABLE IN CABLE IN 2 Cable 3 Using both cable and antenna Multi family Dwellings Apartments Connect to wall antenna socket Single family Dwellings Houses Connect to wall jack for outdoor antenna Outdoor Antenna VHF UHF Wall Antenna Socket RF Coaxial Wire 75 ohm Bronze Wire Be careful not to bend the bronze wire when connecting the antenna Cable TV Wall Jack Antenna Cabl...

Page 18: ... screen contact your cable ser vice provider Cable CARD To improve the picture quality in a poor signal area please purchase a signal amplifier and install properly If the antenna needs to be split for two TV s install a 2 Way Signal Splitter If the antenna is not installed properly contact your dealer for assistance Antenna UHF Signal Amplifier VHF This TV supports CableCARDTM technology from Mot...

Page 19: ...E EX XI IT T button to return to TV viewing The Cable sub menu displays when inserting the CableCARDTM to the TV The CableCARDTM type is Motorola Scientific Atlanta SA or SCM etc The OSD On screen display is different from your TV according to your CableCARDTM type In this manual the OSD On Screen Display may be different from your TV s because it is just example to help the TV operation CableCARD...

Page 20: ...ovider know the CableCARDTM ID and Host ID If your cable TV service provider registers the CableCARDTM ID and Host ID you can watch premium or high value channel If you are subscribed to them If you registered with the cable TV service provider you can watch premium or high value channel without a message If the certificates don t match between the TV and the CableCARDTM the OSD On screen display ...

Page 21: ...the CableCARDTM After a few minutes about 2 3 minutes the TV receives a new cable channel list Occasionally more time will be needed 2 1 EZ Scan G Manual Scan Channel Edit DTV Signal Main Input Sub Input Input Label Set ID EZ Scan Manual Scan Channel Edit G DTV Signal Main Input Sub Input Input Label Set ID Selection G or leads you to the EZ scan screen Selection G or leads you to the channel edit...

Page 22: ...en receiving an emergency message the message is displayed on the screen as shown or the channel is changed to one that maintains the emergency message When the broadcast is complete the TV returns to the channel you were viewing E Em me er rg ge en nc cy y A Ac ct ti io on n N No ot ti if fi ic ca at ti io on n H Hu ur rr ri ic ca an ne e w wi il ll l b be e c co om mi in ng g 2 1 ...

Page 23: ...gital set top box to the C CO OM MP PO ON NE EN NT T I IN N V VI ID DE EO O 1 1 jacks on the set Match the jack colors Y green PB blue and PR red Connect the audio output of the digital set top box to the C CO OM MP PO ON NE EN NT T I IN N A AU UD DI IO O 1 1 jacks on the set 2 How to use Turn on the digital set top box Refer to the owner s manual for the digital set top box Select C CO OM MP PO O...

Page 24: ...box Refer to the owner s manual for the digital set top box Select R RG GB B D DT TV V input source with using the I IN NP PU UT T button on the remote control When connecting HDMI cable Connect the digital set top box to H HD DM MI I D DV VI I I IN N 1 1 or 2 2 jack on the set No separated audio connection is necessary 1 How to connect 2 How to use Turn on the digital set top box Refer to the own...

Page 25: ...M MI I D DV VI I I IN N 1 1 jack on the set Connect the audio output of the digital set top box to the A AU UD DI IO O R RG GB B D DV VI I jack on the set 1 How to connect Turn on the digital set top box Refer to the owner s manual for the digital set top box Select H HD DM MI I1 1 D DV VI I input source with using the I IN NP PU UT T button on the remote control 2 How to use 2 1 ...

Page 26: ... NE EN NT T I IN N V VI ID DE EO O1 1 jacks on the set Match the jack colors Y green PB blue and PR red Connect the audio outputs of the DVD to the C CO OM MP PO ON NE EN NT T I IN N A AU UD DI IO O1 1 jacks on the set 1 How to connect 2 How to use Turn on the DVD player insert a DVD Select C CO OM MP PO ON NE EN NT T 1 1 input source with using the I IN NP PU UT T button on the remote control If ...

Page 27: ... input source with using the I IN NP PU UT T button on the remote control If connected to A AV V I IN N 2 2 select A AV V2 2 input source Refer to the DVD player s manual for operating instructions When connecting HDMI cable Connect the HDMI output of the DVD to the H HD DM MI I D DV VI I I IN N1 1 or 2 2 jack on the set No separated audio connection is necessary 1 How to connect 2 How to use Sele...

Page 28: ...used the fixed images on the sides of the screen may remain visible on the screen L R S VIDEO VIDEO OUTPUT SWITCH ANT IN ANT OUT Wall Jack Antenna Connect the RF antenna out socket of the VCR to the A An nt te en nn na a socket on the set Connect the antenna cable to the RF antenna in socket of the VCR 1 How to connect Set VCR output switch to 3 or 4 and then tune TV to the same channel number Ins...

Page 29: ... I IN NP PU UT T button on the remote control If connected to A AV V I IN N 2 2 select A AV V2 2 input source If you have a mono VCR con nect the audio cable from the VCR to the A AU UD DI IO O L L M MO ON NO O jack of the set NOTE When connecting with an S Video Connect the S VIDEO output of the VCR to the S S V VI ID DE EO O input on the set The picture quality is improved compared to normal com...

Page 30: ...colors Video yellow Audio Left white and Audio Right red 1 How to connect 2 How to use Select A AV V1 1 input source with using the I IN NP PU UT T button on the remote control If connected to A AV V I IN N 2 2 input select A AV V2 2 input source Operate the corresponding external equipment 1 AV IN 2 L L MONO MONO R AUDIO AUDIO VIDEO VIDEO S VIDEO L R VIDEO i e 42 50 inches ...

Page 31: ...ther rate or adjust the brightness and contrast on the VIDEO menu until the picture is clear If the refresh rate of the PC graphic card can not be changed change the PC graphic card or consult the manufacturer of the PC graphic card NOTE AUDIO RGB OUTPUT When connecting D sub 15 pin cable Connect the RGB output of the PC to the R RG GB B P PC C D DT TV V jack on the set Connect the PC audio output...

Page 32: ...essary NOTE AUDIO UDIO DVI PC OUTPUT AUDIO Connect the DVI output of the PC to the H HD DM MI I D DV VI I I IN N 1 1 jack on the set Connect the PC audio output to the A AU UD DI IO O R RG GB B D DV VI I jack on the set 1 How to connect Turn on the PC and the set Select H HD DM MI I1 1 D DV VI I input source with using the I IN NP PU UT T button on the remote control 2 How to use 2 1 ...

Page 33: ...ed with HDMI DVI Input output TV SET Resolution 480p 720p 1080i and TV SET Display fit EIA CEA 861 B Specification to Screen If not refer to the Manual of HDMI DVI Source Devices or contact your service center If the HDMI DVI Source Device is not connected to the Cable or if there is a poor cable connec tion No signal is displayed in the HDMI DVI Input In this case that Video Resolution is not sup...

Page 34: ... 60 31 48 077 72 18 46 875 75 00 48 363 60 00 56 476 70 06 60 023 75 02 47 776 59 870 47 720 59 799 Resolution 720x400 1360x768 640x350 RGB PC mode only 640x350 720X400 640x480 800x600 1024x768 Supported Display Specifications RGB HDMI DTV Horizontal Vertical Frequency KHz Frequency Hz 31 47 60 31 47 59 94 45 00 60 00 44 96 59 94 33 75 60 00 33 72 59 94 Resolution 720x480p 1280x720p 1920x1080i 128...

Page 35: ...lso change P Ph ha as se e This function allows you to remove any horizontal noise and clear or sharpen the image of char acters In HDMI DVI PC mode PHASE is not available Press the A AD DJ JU US ST T button and then use D D or E E button to select P Po os si it ti io on n S Si iz ze e or P Ph ha as se e Press the E EN NT TE ER R button and then use D D E E or F F G G button to make appropriate ad...

Page 36: ...U UT T jacks Set the TV Speaker option Off in the AUDIO menu G G p p 1 11 13 3 See the external audio equipment instruction manual for operation 1 How to connect Connect one end of the optical or coaxial cable to the TV s O OP PT TI IC CA AL L or C CO OA AX XI IA AL L port of D DI IG GI IT TA AL L A AU UD DI IO O O OU UT T Connect the other end of the optical or coaxial cable to the digital audio ...

Page 37: ...nu Enters or exits a Panel Menu in the TV Guide On Screen system Displays the TV Guide On Screen system p p 5 51 1 Enter to the mode Navigate the on screen menus and adjust the system settings to your preference Clear all on screen displays and return to TV viewing from any menu Enter the selected functions p p 8 84 4 Enter the selected functions p p 4 44 4 See a list of AV devices connected to TV...

Page 38: ...mages p p 9 92 2 Select MTS sound Mono Stereo and SAP analog mode Change the audio language DTV mode Adjust the factory preset picture depend on the viewing environment Compare the Daylight Normal Night Time and User1 or2 on the screen p p 9 96 6 Select the appropriate type of sound for type of program Select closed caption p p 1 11 16 6 In DTV CADTV modes p p 1 11 17 7 Installing Batteries Open t...

Page 39: ... standby mode press the or ON OFF I IN NP PU UT T C CH H D D or E E button on the TV or press the P PO OW WE ER R I IN NP PU UT T L LI IV VE E T TV V C CH H D D or E E N Nu um mb be er r 0 0 9 9 button on the remote control Select the viewing source by using the I IN NP PU UT T button on the remote control This TV is programmed to remember which mode it was last set to even if you turn the TV off ...

Page 40: ...l number Press the V VO OL L D D or E E button to adjust the volume If you want to switch the sound off press the M MU UT TE E but ton You can cancel the Mute function by pressing the M MU UT TE Eor V VO OL L D D or E E button APM CC FLASHBK SIMPLINK Adjust the volume to suit your personal preference MODE LIVE TV DAY DAY INPUT SIMPLINK 2 3 1 1 ...

Page 41: ...lightly from what is shown in this manual SETUP VIDEO OPTION LOCK TIME EZ Scan Manual Scan Channel Edit DTV Signal Main Input Sub Input Input Label Set ID EZ Picture Color Temperature XD Advanced Video Reset 2 1 CABLE AUDIO Audio Language EZ SoundRite EZ Sound Balance 0 TV Speaker BBE Audio Language EZ SoundRite EZ Sound Balance TV Speaker BBE SA CableCARD CP Screen G SA CableCARD Diag Screen SA C...

Page 42: ... TE EN NN NA A and C CA AB BL LE E Automatically finds all channels available through antenna or cable inputs and stores them in memory on the channel list Run EZ Scan again after any Antenna Cable connection changes A password is required to gain access to EZ Scan menu if the Lock System is turned on EZ Scan Manual Scan Channel Edit DTV Signal Main Input Sub Input Input Label Set ID EZ Scan Manua...

Page 43: ...al l S Sc ca an n Press the G G button and then use D D or E E button to select TV DTV CATV and CADTV Press the G G button and then use D D or E E button to select channel number you want to add or delete Press the E EN NT TE ER R button to add or delete for the channel number Press E EX XI IT T button to return to TV viewing or press M ME EN NU U button to return to the previous menu MODE LIVE TV...

Page 44: ...default channel list created from the EZ Scan channel search you can create two different types of channel lists in memory custom list and favorite channel list A custom list can be created by toggling each channel on or off with ENTER but ton The channels in the Custom List are displayed in black and the channels deleted from the Custom List are displayed in gray Once a channel is highlighted you...

Page 45: ...me Present time Program information Banner information M Mu ul lt ti il li in ng gu ua al l Press the SAP button to select your choice C Ca ap pt ti io on n Press the CC button to select wanted Closed caption Screen Ratio of Input Signal 4 3 Screen Ratio of Input Signal 16 9 Resolution of Input Signal 720x480i Resolution of Input Signal 720x480p Resolution of Input Signal 1280x720p Resolution of I...

Page 46: ... TU UP P menu Press the G G button and then use D D or E E button to select M Ma ai in n I In np pu ut t Press the G G button and then use D D or E E button to select the source Antenna Cable AV1 AV2 Component1 Component2 RGB DTV or RGB PC HDMI1 DVI HDMI2 To toggle RGB DTV and RGB PC select RGB DTV or RGB PC and press G G button Press E EX XI IT T button to return to TV viewing or press M ME EN NU...

Page 47: ...ink AV 2 Press the I IN NP PU UT T button and then displays the connected external equipment list on the screen Press the E EN NT TE ER R button to change the main input to the active external equipment Use the D D or E E button to select the main input source MODE LIVE TV DAY DAY INPUT SIMPLINK You can also select M Ma ai in n I In np pu ut t in the S Se et tu up p menu A An nt te en nn na a C Ca...

Page 48: ...use D D or E E button to select S Si im mp pL Li in nk k Press the G G button and then use D D or E E button to select O On n Press E EX XI IT T button to return to TV viewing or press M ME EN NU U button to return to the previous menu 4 2 3 1 Timeshift Mode Aspect Ratio Caption Text Caption Option Language ISM Method Low Power HDD Format SimpLink G Off On NOTE G G When operating the external devi...

Page 49: ...S SC C p pl la ay yb ba ac ck k Select and play discs When multiple discs are available the titles of the discs are conveniently dis played at the bottom of the screen V VC CR R p pl la ay yb ba ac ck k Play and control the connected VCR H HD DD D R Re ec co or rd di in ng gs s p pl la ay yb ba ac ck k Play and control recordings stored in HDD A Au ud di io o O Ou ut t t to o H HT T s sp pe ea ak ...

Page 50: ... E E button to select the source AV1 AV2 Component1 Component2 RGB HDMI1 DVI or HDMI2 Press the D D or E E button to select the label Press E EX XI IT T button to return to TV viewing or press M ME EN NU U button to return to the previous menu MODE LIVE TV INPUT DAY DAY SIMPLINK EZ Scan Manual Scan Channel Edit DTV Signal Main Input Sub Input Input Label G Set ID EZ Scan Manual Scan Channel Edit D...

Page 51: ... EN NU U button to return to the previous menu DTV SIGNAL STRENGTH This feature displays the DTV signal levels being received and indicates whether you need to adjust your antenna or digital cable input The higher the signal strength the less likely you are to experience picture degradation DTV Signal This function is only available when the input signal is DTV or CADTV MODE LIVE TV INPUT DAY DAY ...

Page 52: ...istings and lineups in your area which are updated several times a day Once you set up the TV according to manufacturer s instructions you are ready to set up the TV Guide On Screen system NOTE The TV Guide On Screen system provides listings for cable ready and digital cable services as well as over the air broadcast It does not provide listings for satellite services ...

Page 53: ...the Welcome Screen Press E EN NT TE ER R button to begin Setup Remind me to set up later returns you to watching TV Don t remind me again returns you to watching TV and stops the reminder screen from appearing upon power On Welcome Screen The TV Guide On Screen system s Welcome Screen appears By pressing the T TV V G Gu ui id de e button When you power On your TV if you previously skipped Set up T...

Page 54: ...ng the number keys on the remote or using the D D or E E button to display a num ber and then the F F or G G button to move to another field Press E EN NT TE ER R button to display Screen 3 O Op pt ti io on n 2 2 If you selected Canada in Screen 1 you can see the Postal Code screen You input characters by using the D D or E E button and then the F F or G G button to move to another field Press E E...

Page 55: ...ou must select Yes in this screen to receive a channel lineup and listings NOTE The TV Guide On Screen system receives program listings data through your cable or over the air video signal In order to receive regular program list ings please remember to do the following 1 Turn OFF your TV when it is not in use Do not unplug the power cord 2 If you have more than one Cable system in your area you m...

Page 56: ...llowing features Eight days of show listings today plus seven days Icons that indicate show rating stereo HDTV new episode etc Intuitive up down left right navigation using your remote control Set shows to Record Schedule show Reminders Search shows by category e g Movies Sports Children etc Search for shows based on keywords or alphabetically by title Direct tuning to a channel Streamlined System...

Page 57: ...t Service displayed Tile Displays show title Highlight Indicates an active tile INFO Box Provides information for a highlight ed item INFO Button Indicates you can cycle through the various Info Box sizes Channel Logo Identifies network Record Remind Icons Indicates a show is set to Record or set as a Reminder Panel Ad Location where show or product spe cific information appears and also where Pan...

Page 58: ... adjacent options unless the highlight is on an odometer where these arrows change the odometer choice Pressing E EN NT TE ER R button from an odometer or number entry box moves the highlight to the default com mand button of that Panel Menu for example Schedule Recording Pressing E EN NT TE ER R button from a highlighted command button executes the action and closes the Panel Menu e g Schedule Re...

Page 59: ...is always the first Service displayed in the Guide With Listings highlighted press the INFO button to display a Help screen Press the INFO button again to close the screen NOTE There may be times when the TV Guide On Screen system could display partial or no program listings The reasons for this include Program schedule information was not provided to TV Guide On Screen The transmission of the pro...

Page 60: ...ovies Search lets you find shows alphabetically by category Movies Sports Children Educational News Variety Series HDTV or by Keyword With Search highlighted press the INFO button to display a Help screen Press the INFO button again to close the screen Category Search Example Movies 1 ...

Page 61: ...ptions menu from which you can set frequency when automatically power On and auto tune the TV Cancel Closes the menu changes no information and returns to the highlighted show Use the E E button to highlight a subcategory for exam ple All Press E EN NT TE ER R button to display a list of all Movies orga nized by date and time Highlight a show and press E EN NT TE ER R button to watch if on now or ...

Page 62: ...select a category to search e g All HDTV Children Sports etc When finished use the E E button to highlight Enter Keyword Highlight Enter Keyword and press E EN NT TE ER R button The keyboard is displayed Use the D D E E F F G G button to highlight a character and press E EN NT TE ER R button to display it When complete high light Done and press E EN NT TE ER R button Keyword search lets you enter ...

Page 63: ...w A list of all matching shows for that keyword is displayed You can highlight a show and press E EN NT TE ER R button to dis play all airings You can then highlight a specific listing and press E EN NT TE ER R to watch if On now or the M ME EN NU U button to display the Episode Options menu From the Episode Options menu choose to set a record ing a reminder or tune to the channel as previously de...

Page 64: ...ded shows are listed without listing every recorded episode see example in Screen A List Displays a complete list of every recorded episode for a show see example in Screen B In Sort By use the F F or G G buttons to choose between Title Shows are displayed in alphabetical order see example in Screen A Date Shows are displayed by date and time with most recent date and time first see example in Scr...

Page 65: ...t Highlight a specific episode and press the M ME EN NU U button to display the Episode Options menu To view an episode you can do one of the following Highlight an episode and press E EN NT TE ER R button to view it now Go to Service Bar Close the menu changes no informa tion and returns to the Recordings Service Bar Play from beginning View the episode from the begin ning in TV Mode Delete Episo...

Page 66: ...le Service Bar Tune to channel Exits the TV Guide On Screen system and tunes to the highlighted show Set Recording Opens a menu from which you can set a recording for the show Remind is not cancelled Set Reminder Opens a menu from which you can set a Reminder for the show Record is not cancelled Delete Recording Removes the recording from the Schedule after a Confirm screen Delete Reminder Removes...

Page 67: ...System Settings This option appears after you have completed the initial Guide Setup process Press E EN NT TE ER R button to display the Confirming Your Settings screen You can see your current settings Choose one of the options press E EN NT TE ER R button and fol low the on screen instructions Change Setup After you initially complete Guide Setup you can make changes to Guide settings in the fol...

Page 68: ... button A Grid Options menu is displayed Highlight Go Back to Setup to close the menu change no information and return to the Setup Service Bar Or make changes and when finished press E EN NT TE ER R button to highlight Done Press ENTER button again to close the menu and accept the changes Highlight Cancel to close the menu change no informa tion and return to the highlighted channel Change Channe...

Page 69: ...n Screen system Auto Guide when the TV is powered On Choices are On and Off Default Off Highlight General Defaults and press the M ME EN NU U button to display the General Defaults menu Highlight Go to Service Bar to close the menu change no information and return to the Setup Service Bar When finished press E EN NT TE ER R button to highlight Done Press E EN NT TE ER R button again to close the m...

Page 70: ... ef fa au ul lt ts s Remind Defaults lets you set defaults for the following Power On the TV if Off when a Reminder is scheduled Choices are Yes and No Default No Automatically tune the TV to the channel TV must be On when a Reminder is scheduled Choices are Yes and No Default No When to display the reminder screen choices are 30 se conds to 15 minutes early to 30 seconds to 15 minutes late to On ...

Page 71: ...ule or change Record settings for a show in Schedule There are 3 ways to set a show to Record Once Records the show one time Regularly Records the show every time the show airs on the same channel and starts at the same time Weekly Records the show each time the show airs on the same day of the week on the same channel and starts at the same time Cancel no icon displayed Does not record The proper...

Page 72: ...ge no informa tion and return to the highlighted show Highlight the Schedule Service label and press M ME EN NU U button to display the Schedule Options menu Highlight New Manual Recording and press E EN NT TE ER R but ton to display the Record Options menu Current information i e date start and end times chan nel input is displayed Use the D D E E F F G G button to move through the options Use th...

Page 73: ...tune Select one of these options Record anyway This show will override an existing show set to Record or auto tune Don t record this show Cancel the Recording Highlight the Frequency option and use the F F or G G button to choose between Once Daily Weekly and Off as follows Once Records the time channel input recorder combi nation one time Daily Records the time channel input recorder combi nation...

Page 74: ...ault 1 min early When finished press E EN NT TE ER R button to highlight Schedule Reminder Press E EN NT TE ER R button again to close the menu You can see a Remind icon for the selected frequency next to the show title Highlight Cancel to close the menu change no information and return to the highlighted show Remind You can set a show Reminder in Listings Search and Schedule or change Reminder se...

Page 75: ...on and use the F F or G G but ton to choose among Once Daily Weekly and Off as fol lows Power On the TV if the TV is Off when a Reminder is scheduled Choices are Yes and No Default No Automatically tune the TV to the channel TV must be On when a Reminder is scheduled Choices are Yes and No Default No Manual Reminder Once Sets a show reminder for the time channel input combination one time Daily Re...

Page 76: ...o close the menu You can see a Remind icon for the selected frequency next to the input and channel number Highlight Cancel to close the menu change no information and return to the highlighted show If more than 2 reminders are set for the same time arrows appear on the Reminder screen Use the D D or E E button to view the shows NOTE Based on your option settings a notification screen will appear ...

Page 77: ... automatically record live TV and make it available for reviewing at any time With Timeshift turned on you may pause and rewind nor mal TV viewing at any time without missing any of the live broadcast While simplink function is using Timeshift function is not operated in HDMI1 DVI or HDMI2 mode Press the M ME EN NU U button and then use D D or E E button to select the O OP PT TI IO ON N menu Press...

Page 78: ... The total storage space of the hard disk is 160 GB 10GB minimum is reserved for Timeshift When turning power on it may take up to 3 mi nutes to initialize the HDD The Timeshift function will not initiate for a copy protected program Because an analog broadcast is transferred to a digital signal video that contains rapid movement may show cross stripes This happens when the analog signal is compre...

Page 79: ...ton to jump about 8 seconds backward During playback press the P Pa au us se e button Still screen is displayed Repeatedly press the P Pa au us se e button to advance frame by frame Press the P Pa au us se e button and then the F FF F button for slow motion as showing the When using the F F or G G button during playback the cursor can be viewed on the screen Press the P PL LA AY Y button to return...

Page 80: ...ching on the main screen Analog or Digital broadcast This function records the currently displayed channel 1 10 0m mi in n 2 20 0m mi in n 3 30 0m mi in n 4 40 0m mi in n 5 50 0m mi in n 1 1h hr r 1 10 0m mi in n 2 20 0m mi in n 3 30 0m mi in n 4 40 0m mi in n 5 50 0m mi in n 1 1h hr r N No o C Ch ha an ng ge e While recording if you press the button fewer than 10 seconds this message is displayed...

Page 81: ...ted programs on progressing Timeshift If you press Record while watching a broadcast with content protected program using the Timeshift function recording begins from that point If you record for a long time in a state of the Analog signal is weak remained recording time may be short The extra recording time added to the existing setting equals the final recording time After adjusting the recordin...

Page 82: ...ch Record When changing to the channel being recorded in Watch Record the screen is changed to Instant Record state or Reserved Record state NOTE CAUTION When a digital broadcast is being recorded another digital broadcast cannot be watched if you turn the power off on recording this message is displayed as shown below If you selects Yes recording stops and then power is off If you selects No reco...

Page 83: ...ATV CADTV AV1 AV2 Component1 2 Note If the TV Guide On Screen is Setup only for antenna CATV and CADTV are not available and if the TV Guide On Screen is Setup only for cable TV and DTV are not available C Ch ha an nn ne el l Select either the current channel or a scanned channel D Da at te e You can select a date up to one month in the future S St ta ar rt t T Ti im me e E En nd d T Ti im me e En...

Page 84: ...ess the button to display H HO OM ME E menu Use the D D or E E button to select the R Re ec co or rd de ed d T TV V and then use the E EN NT TE ER R or G G button MODE LIVE TV INPUT DAY DAY SIMPLINK Screen Components Folder List Current page Total pages Marked thumbnail photo number Direct Buttons Usable HDD 1 ...

Page 85: ...ove or delete from the list A is displayed next to the thumbnail photo if an item is marked Recorded program Selection and PopUp Menu The thumbnail recorded list is shown above DAY DAY SIMPLINK Create Create new folder Delete Delete folder except My TV Rename Edit folder name except My TV Use the D D E E F F G G and E EN NT TE ER R button to edit folder name Move the cursor to OK and press the E E...

Page 86: ...riate thumb nail photo then press the E EN NT TE ER R button to open the pop up menu Repeatedly press E EX XI IT T button to return to TV viewing or press button to return to the H HO OM ME E menu P Pl la ay y Begin playback of selected recorded program M Ma ar rk k A Al ll l mark all recorded programs on the screen U Un nm ma ar rk k A Al ll l Change marked recorded programs to unmarked recorded ...

Page 87: ...r of program run time Indicates current playback position Using the remote control You can shift playback to any point within the recorded program When playing press the R RE EW W o or r F FF F button Press to speed up Pressing these buttons repeatedly increases the fast forward reverse speed Press the or button to move back and forth within the current program Press the button to jump about 20 se...

Page 88: ...gram This is normal and does not indicate a problem When saving the content of the edited section delete the portion not selected When power fails during editing the program may not be saved or edited Press the S ST TO OP P button after checking the recording list You can edit up to 10 programs You must select at least 10 seconds for the edit ed portion to be saved MODE LIVE TV INPUT SIMPLINK Edit...

Page 89: ...start press the button The following symbol will appear At the point you wish to finish press the button The following symbol appears Repeatedly play the marked section You can not make sections of less than 5 seconds The progress bar for the repeated section will be shown in blue Press the button to stop playing the repeat section NOTE It is possible to search using Pause to edit a section while ...

Page 90: ...I IT T button to return to TV viewing or press M ME EN NU U button to return to the previous menu MODE LIVE TV INPUT DAY DAY SIMPLINK If you select Y Ye es s the Recorded List Recording will be deleted Even if you selects Y Ye es s the DVR may not function if there are problems with the hard drive 2 3 4 1 Timeshift Mode Aspect Ratio Caption Text Caption Option Language ISM Method Low Power HDD For...

Page 91: ...ture Mode PIP lets you view 2 different inputs sources on your TV screen at the same time One source will be large and the other source will show a smaller inset image Twin Picture mode splits the screen into two images allowing two picture sources to be shown on the TV screen at the same time Each source is given half the screen TV 2 0 PIP Off WATCHING PIP PICTURE IN PICTURE POP PICTURE OUT OF PI...

Page 92: ...ub Picture Sources DTV CADTV Analog TV CATV AV1 and AV2 TV CATV AV1 AV2 Component1 Component2 RGB PC RGB DTV DTV CADTV Analog TV CATV AV1 and AV2 HDMI1 DVI HDMI2 TV Program selection for PIP Press the P PI IP P button Select the Antenna or Cable option on the Sub input menu or with the P PI IP P I IN NP PU UT T button Use the P PI IP PC CH H P PI IP PC CH H button to select a channel for the sub p...

Page 93: ...ources for the main picture can t be used to swap the main and sub pictures Main Picture Sub Picture Adjusting Main and Sub Picture Sizes for Twin Picture Use the D D E E F F G G button to change main and sub picture sizes in Twin Picture mode If screen is adjusted to the maximum size the large screen is filled with entire screen vertically as shown SWAP PIP Twin Picture 1 1 SWAP Main Picture Sub ...

Page 94: ...n pictures in P PO OP P mode When watching TV CATV TV DTV or CATV CADTV Sub pictures are scanned However when watching DTV CADTV only TV CATV Sub pictures are scanned Press the E EX XI IT T button to cancel POP mode Use POP to search the programs of all the memorized channels one by one on the 3 PIP screen display while the main picture source remains the current channel The pictures of all the pr...

Page 95: ...ade off between alteration and screen coverage Cinema Zoom Choose Cinema Zoom when you want to enlarge the picture in correct proportion Note When enlarging or reducing the picture the image may become distorted This feature lets you choose the way an analog picture with a 4 3 aspect ratio is dis played on your TV When you receive an analog picture with a 4 3 aspect ratio on your 16 9 TV you need ...

Page 96: ...eset value in the EZ Picture menu based on the program category D Da ay yl li ig gh ht t N No or rm ma al l N Ni ig gh ht t T Ti im me e Settings are preset for optimum picture quality at the factory and are not adjustable In the U Us se er r 1 1 and U Us se er r 2 2 modes only user can directly adjust the contrast brightness color sharpness tint You can also use the V VI ID DE EO O menu to adjust...

Page 97: ...the D D E E F F G G button to navigate 4 EZ Pictures By pressing the E EN NT TE ER R button you can select the desired mode Allows you to select your preferred picture mode after compar ing the four different picture Daylight Normal Night Time User 1 and User 2 settings FLASHBK APM CC Daylight Normal User 1 Night Time EXIT Navigate Select Exit NOTE While operating the 4 split any button except A A...

Page 98: ...a at tu ur re e Press the M ME EN NU U button and then use D D or E E button to select the V VI ID DE EO O menu Press the G G button and then use D D or E E button to select C Co ol lo or r T Te em mp pe er ra at tu ur re e Press the G G button and then use D D or E E button to select either C Co oo ol l M Me ed di iu um m W Wa ar rm m or U Us se er r Press E EX XI IT T button to return to TV view...

Page 99: ...ne es ss s C Co ol lo or r S Sh ha ar rp pn ne es ss s o or r T Ti in nt t Press the G G button and then use F F or G G button to make appropriate adjustments Press E EX XI IT T button to return to TV viewing or press M ME EN NU U button to return to the previous menu Adjust the picture appearance to suit your preference and viewing situations MODE LIVE TV INPUT DAY DAY SIMPLINK 2 3 4 5 6 1 EZ Pic...

Page 100: ...utton to select R Re ed d G Gr re ee en n or B Bl lu ue e Press the G G button and then use F F or G G button to make appropriate adjustments The adjustment range of R Re ed d G Gr re ee en n or B Bl lu ue e is 20 20 Press E EX XI IT T button to return to TV viewing or press M ME EN NU U button to return to the previous menu MODE LIVE TV INPUT DAY DAY SIMPLINK Red 0 E E EZ Picture Color Temperatur...

Page 101: ... to the natural colors X XD D N No oi is se e Removing the noise up to the point where it does not damage the original picture 2 Use the D D or E E button to select O On n or O Of ff f Press E EX XI IT T button to return to TV viewing or press M ME EN NU U button to return to the previous menu XD is LG Electronics unique picture improving technology to display a real HD source through an advanced ...

Page 102: ...ct O On n or O Of ff f Press E EX XI IT T button to return to TV viewing or press M ME EN NU U button to return to the previous menu MODE LIVE TV INPUT DAY DAY SIMPLINK Set up the TV for the best picture appearance for viewing movies When you operate Cinema 3 2 Pull Down Mode or Cinema Correction Mode the TV will adjust 24 fps video from movies to 30 fps video for display This function is only ava...

Page 103: ... to o L Lo ow w or H Hi ig gh h A Au ut to o Realizing the black level of the screen and set it to High or Low automatically L Lo ow w The reflection of the screen gets darker H Hi ig gh h The reflection of the screen gets brighter Press E EX XI IT T button to return to TV viewing or press M ME EN NU U button to return to the previous menu Adjusting the contrast and the brightness of the screen us...

Page 104: ... Vi id de eo o R Re es se et t Press the G G button to reset the Video menu options to original values MODE LIVE TV INPUT DAY DAY SIMPLINK Use to quickly reset all the Video menu options to their original factory preset values EZ Picture Color Temperature XD Advanced Video Reset G EZ Picture Color Temperature XD Advanced Video Reset Selection G or resets to the factory settings default 2 3 1 ...

Page 105: ...permanent image on the screen the image will move once per 2 minutes Left Right Upside Downside Right Left Downside Upside I In nv ve er rs si io on n Inversion will automatically invert the plasma display panel color every 30 minutes Press E EX XI IT T button to return to TV viewing or press M ME EN NU U button to return to the previous menu MODE LIVE TV INPUT DAY DAY SIMPLINK A frozen still pict...

Page 106: ...s the G G button and then use D D or E E button to select O On n or O Of ff f When you select On the screen darkens Press E EX XI IT T button to return to TV viewing or press M ME EN NU U button to return to the previous menu MODE LIVE TV INPUT DAY DAY SIMPLINK 2 3 4 1 Timeshift Mode Aspect Ratio Caption Text Caption Option Language ISM Method Low Power G HDD Format SimpLink Timeshift Mode Aspect ...

Page 107: ...LER EZ SOUNDRITE Press the M ME EN NU U button and then use D D or E E button to select the A AU UD DI IO O menu Press the G G button and then use D D or E E button to select E EZ Z S So ou un nd dR Ri it te e Press the G G button and then use D D or E E button to select O On n or O Of ff f Press E EX XI IT T button to return to TV viewing or press M ME EN NU U button to return to the previous men...

Page 108: ... D button repeatedly to select the appropriate sound setup as shown below N No or rm ma al l S St ta ad di iu um m N Ne ew ws s M Mu us si ic c T Th he ea at te er r and U Us se er r your own settings Press E EX XI IT T button to return to TV viewing PRESET SOUND SETTINGS EZ SOUND FLASHBK APM CC You can also adjust EZ Sound in the A AU UD DI IO O menu 2 1 Audio Language EZ SoundRite EZ Sound G Bal...

Page 109: ...utton to select U Us se er r Press the G G button and then use D D or E E button to select the desired sound option T Tr re eb bl le e B Ba as ss s or F Fr ro on nt t S Su ur rr ro ou un nd d MODE LIVE TV INPUT DAY DAY SIMPLINK Adjust the sound to suit your taste and room situations 2 3 4 1 Audio Language EZ SoundRite EZ Sound Balance TV Speaker BBE Selection G or leads you to the detailed setting...

Page 110: ...utton to return to TV viewing or press M ME EN NU U button to return to the previous menu front Surround 3D EchoSound System S SR RS S T Tr ru uS Su ur rr ro ou un nd d X XT T Takes advantage of any multi channel format without needing to add extra speakers or equipment Dialog clarity bass enrichment and the addition of stereo audio enhancement produces an immersive sound experience from standard ...

Page 111: ... A AU UD DI IO O menu Press the G G button and then use D D or E E button to select B Ba al la an nc ce e Press the G G button and then use F F or G G button to make appropriate adjustments Press E EX XI IT T button to return to TV viewing or press M ME EN NU U button to return to the previous menu 2 3 4 1 L R Balance 0 Audio Language EZ SoundRite EZ Sound Balance TV Speaker BBE Audio Language EZ ...

Page 112: ...ton and then use D D or E E button to select O On n or O Of ff f Press E EX XI IT T button to return to TV viewing or press E EN NT TE ER R button to return to the previous menu BBE High Definition Sound restores clarity for better speech intelligibility and musical realism MODE LIVE TV INPUT DAY DAY SIMPLINK 2 3 4 1 Audio Language EZ SoundRite EZ Sound Balance TV Speaker BBE G Off On Audio Langua...

Page 113: ...d is automatically received if the broadcast is only in Mono even though Stereo or SAP has been selected Select Mono if you want to listen to the mono sound in remote areas during stereo SAP broadcasting Stereo or SAP can be received in Analog channel Use the S SA AP P button to select your desired MTS mode in analog signal Each time you press the S SA AP P button Mono Stereo or SAP appear in turn...

Page 114: ... Sp pe ea ak ke er r Press the G G button and then use D D or E E button to select O On n or O Of ff f Press E EX XI IT T button to return to TV viewing or press M ME EN NU U button to return to the previous menu Turn the TV speakers off if using external audio equipment Feature turns the TV Speakers option On or Off 2 3 4 1 Audio Language EZ SoundRite EZ Sound Balance TV Speaker G BBE Off On Audi...

Page 115: ...utton to select the A AU UD DI IO O menu Press the G G button and then use D D or E E button to select A Au ud di io o L La an ng gu ua ag ge e Press the G G button and then use D D or E E button to select English Spanish or French Press E EX XI IT T button to return to TV viewing or press M ME EN NU U button to return to the previous menu Audio Language G EZ SoundRite EZ Sound Balance TV Speaker ...

Page 116: ... O OP PT TI IO ON N menu Press the G G button and then use D D or E E button to select L La an ng gu ua ag ge e Press the G G button and then use D D or E E button to select your desired language From this point on the on screen menus will be shown in the selected language Press the E EX XI IT T button to return to TV viewing or press M ME EN NU U to return to the previous menu The menus can be sh...

Page 117: ... ti io on n T Te ex xt t Analog Broadcasting System Captions Select a caption mode for displaying captioning information if provided on a program Analog caption displays information at any position on the screen and is usually the program s dialog Text displays information usually at the bottom position and is used for a data service generally not program related Caption Text if provided by the br...

Page 118: ...Press E EX XI IT T button to return to TV viewing or press M ME EN NU U button to return to the previous menu MODE LIVE TV INPUT DAY DAY SIMPLINK Digital Broadcasting System Captions Choose the language you want the DTV CADTV Captions to appear in Languages can be chosen for digital sources only if they are included on the program 2 3 4 1 Timeshift Mode Aspect Ratio Caption Text G Caption Option L...

Page 119: ...words T Te ex xt t C Co ol lo or r Choose a color for the text T Te ex xt t O Op pa ac ci it ty y Specify the opacity for the text color B Bg g B Ba ac ck kg gr ro ou un nd d C Co ol lo or r Select a background color B Bg g B Ba ac ck kg gr ro ou un nd d O Op pa ac ci it ty y Select the opacity for the background color E Ed dg ge e T Ty yp pe e Select an edge type E Ed dg ge e C Co ol lo or r Sele...

Page 120: ...E button to select your viewing area time zone U S A E Ea as st te er rn n C Ce en nt tr ra al l M Mo ou un nt ta ai in n P Pa ac ci if fi ic c A Al la as sk ka a or H Ha aw wa ai ii i Canada E Ea as st te er rn n C Ce en nt tr ra al l M Mo ou un nt ta ai in n P Pa ac ci if fi ic c N Ne ew w F F l la an nd d or A At tl la an nt ti ic c Press the G G button and then use D D or E E button to select ...

Page 121: ...ed use the D D or E E button to set the year date and time options Press E EX XI IT T button to return to TV viewing or press M ME EN NU U button to return to the previous menu MODE LIVE TV INPUT DAY DAY SIMPLINK If the current time setting is wrong reset the clock manually When you set up the TV Guide On Screen system the Manual Clock menu is not available 2 3 4 1 Auto Clock Manual Clock G Off Ti...

Page 122: ...Press the G G button and then use D D or E E button to select O On n To cancel O On n O Of ff f t ti im me er r function select O Of ff f Press the G G button and then use D D or E E button to set the hour Press the G G button and then use D D or E E button to set the minutes O On nl ly y O On n t ti im me er r Press the G G button and then use D D or E E button to select the channel at turn on Pr...

Page 123: ...ted To check the remaining minutes before the TV turns off press the T TI IM ME ER R button once To cancel the Sleep Timer press the T TI IM ME ER R button repeatedly to select O Of ff f FLASHBK APM CC The Sleep Timer turns the TV off at the preset time Note that this setting is cleared when the TV is turned off You can also set up the Sleep Timer in the TIME menu You can also set up the Sleep Tim...

Page 124: ...to select A Au ut to o O Of ff f Press the G G button and then use D D or E E button to select O On n or O Of ff f Press E EX XI IT T button to return to TV viewing or press M ME EN NU U button to return to the previous menu MODE LIVE TV INPUT DAY DAY SIMPLINK 2 3 4 1 Auto Clock Manual Clock Off Timer On Timer Sleep Timer Auto Off G Auto Clock Manual Clock Off Timer On Timer Sleep Timer Auto Off O...

Page 125: ...ng stations Most television programs and television movies can be blocked by TV Rating and or Individual Categories Movies that have been shown at the theaters or direct to video movies use the Movie Rating System MPAA only Ratings for Television programs including made for TV movies TV G General audience TV PG Parental guidance suggested TV 14 Parents strongly cautioned TV MA Mature audience only...

Page 126: ...changed password has been memorized Press E EX XI IT T button to return to TV viewing or press M ME EN NU U button to return to the previous menu Change the password by inputting a new password twice 2 3 1 Lock System Set Password G Block Channel Movie Rating TV Rating Children TV Rating General Input Block New Confirm Lock System Set Password Block Channel Movie Rating TV Rating Children TV Ratin...

Page 127: ... IT T button to return to TV viewing or press M ME EN NU U button to return to the previous menu Enables or disables the blocking scheme you set up previously DAY DAY SIMPLINK 2 3 1 Lock System G Set Password Block Channel Movie Rating TV Rating Children TV Rating General Input Block Off On Lock System Set Password Block Channel Movie Rating TV Rating Children TV Rating General Input Block Lock Sy...

Page 128: ...ton to select a channel and then use the E EN NT TE ER R button to block or unblock it Press E EX XI IT T button to return to TV viewing or press M ME EN NU U button to return to the previous menu 2 3 4 1 Lock System Set Password Block Channel G Movie Rating TV Rating Children TV Rating General Input Block Selection G or leads you to the block channel screen Lock System Set Password Block Channel ...

Page 129: ...D or E E to select G G P PG G P PG G 1 13 3 R R N NC C 1 17 7 or X X G General audiences PG Parental guidance suggested PG 13 Parents strongly cautioned R Restricted NC 17 No one 17 and under admitted X Adult only Blocking Off Permits all programs Press E EX XI IT T button to return to TV viewing or press M ME EN NU U button to return to the previous menu G G If you set PG 13 G and PG movies will ...

Page 130: ...e er ra al l Press the G G button and then use the D D or E E button to select A Ag ge e D Di ia al lo og gu ue e L La an ng gu ua ag ge e S Se ex x or V Vi io ol le en nc ce e Press the G G button and then use the D D or E E button to select block options Age applies to TV G TV PG TV 14 TV MA Dialogue sexual dialogue applies to TV PG TV 14 Language adult language applies to TV PG TV 1 4 TV MA Sex...

Page 131: ... to select E E G G 8 8 a an ns s 1 13 3 a an ns s 1 16 6 a an ns s 1 18 8 a an ns s or B Bl lo oc ck ki in ng g O Of ff f E Exempt G General 8 ans General Not convenient for little children 1 3 ans Not convenient for children of 1 3 years and younger 16 ans Not convenient for children of 1 6 years and younger 18 ans This programs is only for adults Blocking Off Permits all programs Press E EX XI I...

Page 132: ... to select O On n or O Of ff f on the each source Press E EX XI IT T button to return to TV viewing or press M ME EN NU U button to return to the previous menu 2 3 4 1 Lock System Set Password Block Channel Movie Rating TV Rating Children TV Rating General Input Block G AV1 On AV2 On Component1 Off Component2 On RGB Off HDMI1 DVI On HDMI2 Off Lock System Set Password Block Channel Movie Rating TV ...

Page 133: ...ly Activate any function to restore the brightness of the picture Check for local interference such as an electrical appliance or power tool Station or cable product experiencing problems tune to another station Station signal is weak reorient antenna to receive weaker station Check for sources of possible interference Check antenna Change the direction of the antenna TROUBLESHOOTING T Th he e o o...

Page 134: ...tion A change in ambient humidity or temperature may result in an unusual noise when the product is turned on or off and does not indicate a fault with the product Picture OK No sound Unusual sound from inside the product No output from one of the speakers Adjust resolution horizontal frequency or vertical frequency Check the input source Work the Auto configure or adjust clock phase or H V positi...

Page 135: ...enu and verify that the show is listed as a Reminder Highlight the show under Listings and do the following Press the Menu key on the remote Use the down arrow to highlight Edit Reminder and press E EN NT TE ER R Verify the Auto Tune option reads Yes The TV must be On at the scheduled time for Auto Tune Check the Schedule menu and verify that the show is listed as a Reminder Highlight the show und...

Page 136: ...ter and a little fabric softener or dish washing detergent Wring the cloth until it s almost dry and then use it to wipe the screen Make sure the excess water is off the screen and then let it air dry before you turn on your TV Cleaning the Cabinet To remove dirt or dust wipe the cabinet with a soft dry lint free cloth Please be sure not to use a wet cloth Extended Absence If you expect to leave y...

Page 137: ...D D 60PB4DT UB Power requirement Television System Program Coverage External Antenna Impedance Operating Temperature Range Operating Humidity Range Storage Temperature Range Storage Humidity Range 44 5x30 2x12 2 inches 1 130 0x768 1x310 4 mm 44 5x28 1x3 3 inches 1 130 0x715 0x85 0 mm 75 8 pounds 34 4kg 68 0 pounds 30 8kg AC100 240V 50 60Hz NTSC M ATSC 64 256 QAM VHF 2 13 UHF 14 69 CATV 1 135 DTV 2...

Page 138: ...ously at the same time for two seconds the currently selected device button is illuminated If you don t press any button for 20 seconds the light on the mode button will be turned off In that case you have to repeat from step 2 Enter the appropriate code from the code table on the following pages When pressing the button the light blinks at a time If the device turned off the programming is succes...

Page 139: ...39 MGA 045 046 059 MINOLTA 013 020 MITSUBISHI 013 020 045 046 049 051 059 061 151 MTC 034 040 MULTITECH 024 034 NEC 012 023 039 043 048 NORDMENDE 043 OPTONICA 053 054 PANASONIC 066 070 074 083 133 140 145 PENTAX 013 020 031 033 063 PHILCO 031 034 067 PHILIPS 031 033 034 054 067 071 101 PILOT 101 PIONEER 013 021 048 PORTLAND 108 PULSAR 072 QUARTZ 01 1 014 QUASAR 033 066 075 145 RCA 013 020 033 034 ...

Page 140: ... 017 TEXSCAN 029 TOCOM 039 040 056 TOSHIBA 100 UNIKA 007 014 024 UNITED CABLE 004 053 UNIVERSAL 005 007 014 024 026 027 032 035 VIEWSTAR 012 015 018 086 087 088 089 ZENITH 100 1 14 060 093 ALPHASTAR DSR 123 AMPLICA 050 BIRDVIEW 051 126 129 CHANNEL MASTER 013 014 015 018 036 055 CHAPARRAL 008 009 012 077 CITOH 054 CURTIS MATHES 050 145 DRAKE 005 006 007 010 01 1 052 1 12 1 16 141 DX ANTENNA 024 046...

Page 141: ...INTOSH 049 MCS 104 MEMOREX 107 NAD 046 ONKYO 013 040 041 047 048 056 057 132 133 140 OPTIMUS 158 PANASONIC 007 033 064 1 13 142 220 241 251 PENNEY 104 PHILIPS 026 1 12 143 PIONEER 039 042 043 063 065 091 093 094 1 15 123 127 250 QUASAR 1 13 RCA 080 RCX 092 REALISTIC 103 106 SAMSUNG 124 145 146 182 193 194 195 203 204 244 245 246 SANSUI 01 1 135 138 144 SANYO 019 083 234 SCOTT 106 186 SHARP 031 032...

Page 142: ...C5 C6 C7 D0 D1 D2 D3 D4 D5 D6 D7 Lead code Low custom code High custom code Data code Data code Repeat code Tf 4 5 ms 9 ms 2 25 ms 9 ms 0 55 ms 0 56 ms 1 12 ms 0 56 ms 2 24 ms Tf Tf Tf 108ms 455KHz Bit 0 Bit 1 1 How to Connect Connect your wired remote control to the Remote Control port on the TV 2 Remote Control IR Codes Output waveform Single pulse modulated with 37 917KHz signal at 455KHz T1 Tc...

Page 143: ...R C Button B2 GO TO PREV R C Button B3 GO TO NEXT R C Button A9 TV GUIDE R C Button 92 APM R C Button 7C X STUDIO R C Button 7D MARK R C Button 7E SIMPLINK R C Button 9E LIVE TV R C Button 0B INPUT R C Button 08 POWER R C Button Power On Off 79 RATIO R C Button 0E TIMER R C Button 10 19 Number Key 0 9 R C Button 4C Dash R C Button 1A FLASHBK R C Button 09 MUTE R C Button 02 VOL D D R C Button 03 V...

Page 144: ...roduct s functions externally Connect the serial port of the control device to the RS 232C jack on the product back panel Note RS 232C connection cables are not supplied with the product PC Type of Connector D Sub 9 Pin Male No Pin Name 1 No connection 2 RXD Receive data 3 TXD Transmit data 4 DTR DTE side ready 5 GND 6 DSR DCE side ready 7 RTS Ready to send 8 CTS Clear to send 9 No Connection ...

Page 145: ... to Real Data Mapping 1 p p 1 14 47 7 Set ID DAY DAY SIMPLINK Communication Parameters Baud rate 9600 bps UART Data length 8 bits Parity None Stop bit 1 bit Communication code ASCII code Use a crossed reverse cable RS 232C Configurations 7 Wire Configurations Standard RS 232C cable PC PDP RXD 2 3 TXD TXD 3 2 RXD GND 5 5 GND DTR 4 6 DSR DSR 6 4 DTR RTS 7 8 CTS CTS 8 7 RTS D Sub 9 D Sub 9 3 Wire Con...

Page 146: ...gram low 01 Power k a 0 1 02 Input Select k b 0 9 03 Aspect Ratio k c 04 Screen Mute k d 0 1 05 Volume Mute k e 0 1 06 Volume Control k f 0 64 07 Contrast k g 0 64 08 Brightness k h 0 64 09 Color k i 0 64 10 Tint k j 0 64 1 1 Sharpness k k 0 64 12 OSD Select k l 0 1 13 Remote Control Key Lock 14 PIP Twin k n 0 1 2 5 k m m a m b 0 1 m c key code x b x y 0 1 15 PIP Position k q 0 3 16 Treble k r 0 6...

Page 147: ...e as command Set ID use the small character if set ID is 10 it will send the 0 a Data use the small character if data is 0xab it will send the a b OK use the large character in this model TV will send the echo CR LF with ack mes sage When it send the power on ack message it will be like below Ex ka 01 01 CR LF a 01 OK01x CR LF C Co om mm ma an nd d1 1 C Co om mm ma an nd d2 2 S Se et t I ID D D Da...

Page 148: ...e off Picture on Data 1 Screen mute on Picture off Acknowledgement d Set ID OK NG Data x 0 05 5 V Vo ollu um me e M Mu ut te e C Co om mm ma an nd d2 2 e e To control volume mute on off You can also adjust mute using the MUTE button on remote control Transmission k e Set ID Data Cr Data 0 Volume mute off Volume on Data 1 Volume mute on Volume off Acknowledgement e Set ID OK NG Data x 0 06 6 V Vo o...

Page 149: ...4 POP Scan Acknowledgement n Set ID OK NG Data x 1 15 5 P PI IP P P Po os siit tiio on n C Co om mm ma an nd d2 2 q q To select sub picture position for PIP Transmission k q Set ID Data Cr Data 0 Right down on screen Data 1 Left down on screen Data 2 Left up on screen Data 3 Right up on screen Acknowledgement q Set ID OK NG Data x 1 16 6 T Tr re eb blle e C Co om mm ma an nd d2 2 r r To adjust tre...

Page 150: ... control the low power function on off Transmission j q Set ID Data Cr Data 0 low power off 1 low power on Acknowledgement q Set ID OK NG Data x 2 26 6 O Or rb biit te er r T Tiim me e S Se et tt tiin ng g C Co om mm ma an nd d2 2 r r To adjust orbiter operation time term Transmission j r Set ID Data Cr Data Min 1 Max FE transmit by Hexadecimal code Unit Second Acknowledgement r Set ID OK NG Data ...

Page 151: ... Set ID OK Data0 Data1 Data2 Data3 Data4 x a Set ID NG Data0 x 2 29 9 C Ch ha an nn ne ell A Ad dd d D De ell C Co om mm ma an nd d m m b b To add and delete the channels Transmission m b Set ID Data Cr Data 0 Channel Delete Data 1 Channel Add Acknowledgement b Set ID OK NG Data x 3 30 0 K Ke ey y C Co om mm ma an nd d m m c c To send IR remote key code Transmission m c Set ID Data Cr s Data Key c...

Page 152: ......

Reviews: