100
Using the PC
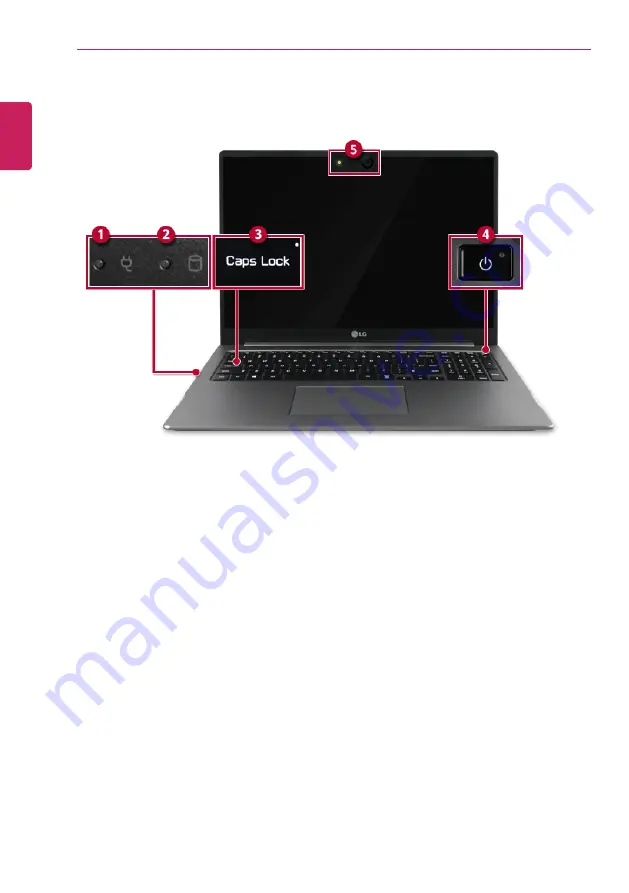
Operation Status Lamps
1
AC Adapter Lamp
•
On: The AC adapter is connected.
•
Off: The AC adapter is not connected.
If you try to turn on the system that has entered the Hibernates mode or been turned off
after a low-battery alarm, the system will not be turned on but the AC Adapter lamp will
blink three times. If this is the case, connect the AC adapter and charge the battery
sufficiently before using the product.
2
Storage Device (HDD, SSD, eMMC) Indicator Lamp
•
When the PC accesses the storage device, the indicator lamp turns on.
Do not turn off the power forcibly while the storage device indicator lamp is on or blinking.
Doing so may damage the disk or its data.
3
Caps Lock
Lamp
•
On: When the
Caps Lock
is activated
•
Off: When the
Caps Lock
is deactivated
4
Power Lamp
•
On: The system is on and running by the AC adapter or battery.
•
Off: When the system is turned off or in Hibernate mode
•
Blinking: The system is in the standby mode.
ENGLISH
Summary of Contents for 17U70P Series
Page 23: ...Instruction Safety Information 23 Regulatory Notices ENGLISH ...
Page 24: ...24 Instruction Safety Information ENGLISH ...
Page 25: ...Instruction Safety Information 25 ENGLISH ...
Page 26: ...26 Instruction Safety Information ENGLISH ...
Page 27: ...Instruction Safety Information 27 ENGLISH ...
Page 28: ...28 Instruction Safety Information ENGLISH ...
Page 29: ...Instruction Safety Information 29 ENGLISH ...
Page 30: ...30 Instruction Safety Information ENGLISH ...
Page 31: ...Instruction Safety Information 31 ENGLISH ...
Page 32: ...32 Instruction Safety Information ENGLISH ...
Page 33: ...Instruction Safety Information 33 ENGLISH ...
Page 34: ...34 Instruction Safety Information ENGLISH ...
Page 35: ...Instruction Safety Information 35 ENGLISH ...
Page 36: ...36 Instruction Safety Information ENGLISH ...
Page 37: ...Instruction Safety Information 37 ENGLISH ...
Page 38: ...38 Instruction Safety Information ENGLISH ...
Page 39: ...Instruction Safety Information 39 ENGLISH ...
Page 40: ...40 Instruction Safety Information ENGLISH ...
Page 41: ...Instruction Safety Information 41 ENGLISH ...
Page 42: ...42 Instruction Safety Information ENGLISH ...
Page 43: ...Instruction Safety Information 43 ENGLISH ...
Page 44: ...44 Instruction Safety Information ENGLISH ...
Page 45: ...Instruction Safety Information 45 ENGLISH ...
Page 46: ...46 Instruction Safety Information ENGLISH ...
Page 47: ...Instruction Safety Information 47 ENGLISH ...
Page 48: ...48 Instruction Safety Information ENGLISH ...
Page 49: ...Instruction Safety Information 49 ENGLISH ...
Page 50: ...50 Instruction Safety Information ENGLISH ...
Page 51: ...Instruction Safety Information 51 ENGLISH ...
Page 52: ...52 Instruction Safety Information ENGLISH ...
Page 53: ...Instruction Safety Information 53 ENGLISH ...
Page 54: ...54 Instruction Safety Information ENGLISH ...
Page 55: ...Instruction Safety Information 55 ENGLISH ...
Page 56: ...56 Instruction Safety Information ENGLISH ...
Page 69: ...Using Windows 10 69 3 The selected app is added to the Start menu or taskbar ENGLISH ...
Page 72: ...72 Using Windows 10 3 Click the New Desktop tile ENGLISH ...
Page 74: ...74 Using Windows 10 6 The screen is toggled to the selected app or desktop ENGLISH ...
Page 81: ...Using Windows 10 81 ENGLISH ...
Page 132: ...132 Using the PC 2 When the Settings screen appears select Devices ENGLISH ...
Page 136: ...136 Using the PC 3 Select Network Internet Status Change Adapter Options ENGLISH ...
Page 141: ...Using the PC 141 3 Select the Access Point you want to connect to and press Connect ENGLISH ...
Page 154: ...154 Using Software 1 Select the All List Update needed menu item ENGLISH ...
Page 159: ...Using Software 159 1 Press the icon on the taskbar ENGLISH ...
Page 184: ...184 Using Software ENGLISH ...
Page 186: ...186 Using Software 3 Press OK to complete the setup ENGLISH ...
Page 190: ...190 Restoring the System 1 Select Keep my files ENGLISH ...
Page 193: ...Restoring the System 193 1 Select Remove everything ENGLISH ...
Page 219: ...Setup and Upgrade 219 2 Select System Display ENGLISH ...
Page 223: ...FAQ 223 2 Select System Display ENGLISH ...
Page 228: ...228 FAQ 1 Select Keep my files ENGLISH ...
Page 231: ...FAQ 231 1 Select Remove everything ENGLISH ...
Page 239: ...FAQ 239 3 Select the Access Point you want to connect to and press Connect ENGLISH ...


