background image

Chapter 9    

Tools


75


Alarm Clock


Your phone comes with a built-in alarm clock that has multiple alarm


capabilities.


Viewing an Alarm


1.  Press  

> Tools > Alarm/Morning Call

.


• 

Shortcut: 

From standby mode, press the naviga- 

tion key left to directly access the Alarm.


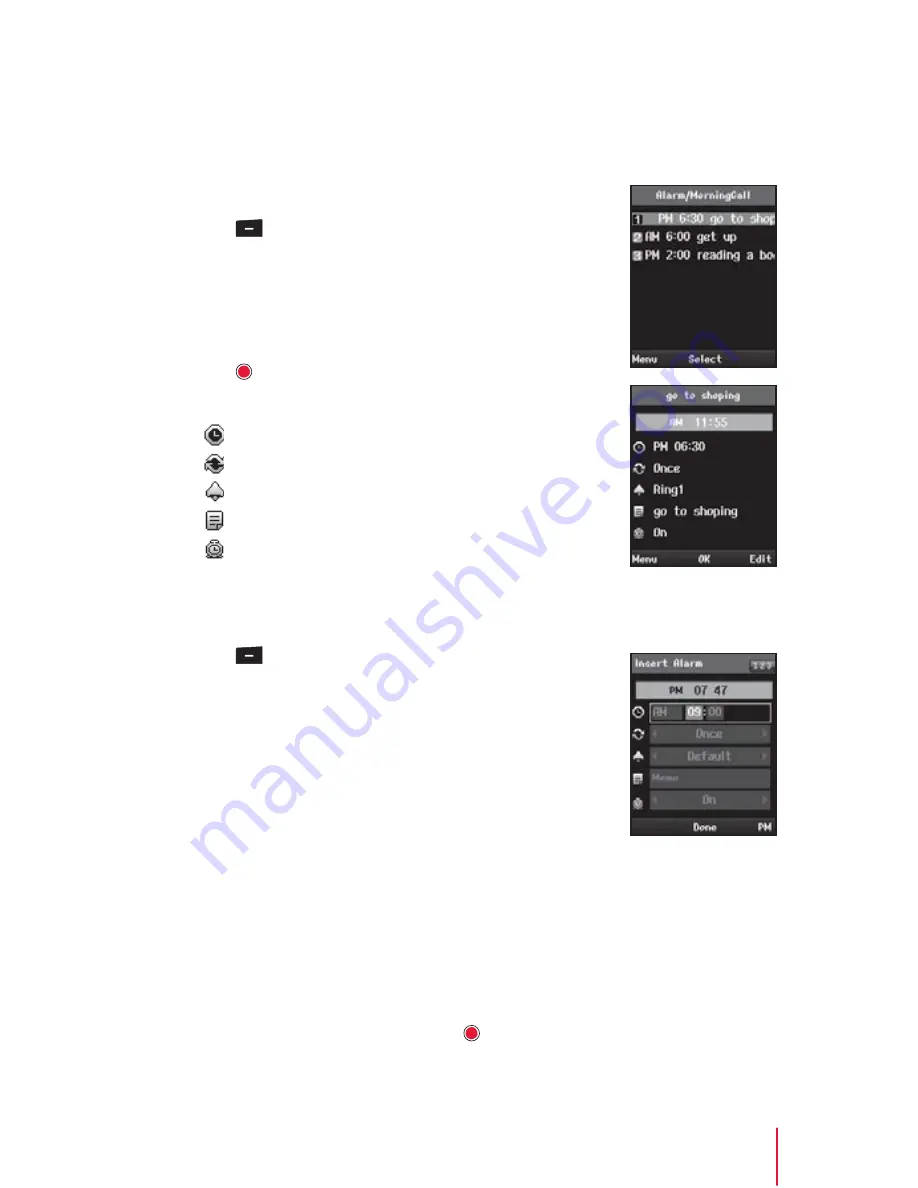
2.  The list of saved alarm clocks will be displayed. 

Scroll through the list and select one.


3.  Press   to display an alarm details.


4.  The alarm clock contains:


•  

Time 

- The time for the alarm.


•  

Repeat 

- For recurring the alarm.


•  

Ring 

- The ring tone for the alarm.


•  

Memo 

- The title you assigned to the alarm.


•  

Indicator 

- The indicator for the alarm setting.


Setting an Alarm


You can set a time for the alarm including its title.


1.  Press  

> Tools > Alarm/Morning Call

.


2.  Press the 

New 

(right softkey) to add a new alarm.


3.  Select a time for the alarm by highlighting the 

time field.


• 

Using the keypad, set the alarm time and press 
right softkey to select either 

"am" 

or 

"pm"

.


4.  Select a repeating status for the alarm by high- 

lighting the repeat field.


• 

Press the navigation key left or right to select Once, Mon~Wed, 
Mon~Fri, Mon~Sat, Except holiday, and Everyday.


5.  Select a ring type for the alarm by highlighting the ring field.


• 

Use the navigation key to scroll through available alarm ring.


6.  Enter a title for the alarm by highlighting the 

Memo

.


• 

Enter the alarm title and press     . (See "Entering Text" on page 18.)


Summary of Contents for WIT-400H

Page 1: ... user guide provides you with all the information you need to get the most from your phone Please refer to the important safety informations section on page 1 4 to learn about information that will help you safely use your phone ...

Page 2: ...thority to operate the equip ment The Manufacturer is not responsible for any radio or television interfer ence caused by unauthorized modification of this device or the substitution or attachment of connecting cables and equipment other than those specified by the manufacturer It is the responsibility for the user to correct any interference caused by such unauthorized modification substitution o...

Page 3: ...tions For further information contact your Local Industry Canada office European Union Declarations of Conformity LG Ericsson Co Ltd declares that the equipment specified in this document bearing the CE mark conforms to the European Union Radio and Telecom munications Terminal Equipment Directive R TTE 1999 5 EC including the Electromagnetic Compatibility Directive 2004 108 EC and Low Voltage Dire...

Page 4: ......

Page 5: ...ne 7 Display Screen 10 Chapter 2 Getting Started 13 Battery and Charger 13 Turning Your Phone On and Off 16 Navigating Through Menus and Options 17 Entering Text 18 Headset with Mic 21 Phone Carrying 22 Registration 24 Range 25 Signal Strength 25 Access Point Probing 25 Caller ID 25 Cleaning Phone 25 Phone s Menu 26 ...

Page 6: ...nge Mode 34 Using Keypad Lock Keyguard 35 Calling Emergency Numbers 36 Chapter 4 Phone Book 37 About Phone Book Contacts 37 Add New 38 Search Phonebook 40 Caller Groups 42 Speed Dials 45 Delete All 47 My Number 47 Chapter 5 Sound 49 Alert By 49 Ring Tone 49 Ring Tone Volume 50 Power On Tone 50 Power Off Tone 50 Key Tone 51 Key Tone Volume 51 Effect Sound 51 ...

Page 7: ... Menu Style 54 Backlight 55 Font Type 55 Language 55 Chapter 7 Call History 57 Call History 57 Call Duration 58 Settings 59 Chapter 8 Messages 61 Receiving Message 61 Writing Text Message 61 Inbox 62 Outbox 63 Draft 63 Templates 64 Spam Message 64 Message Settings 66 Voice Message 67 Chapter 9 Tools 69 Schedule 69 ...

Page 8: ...ng 83 Chapter 11 Settings 85 Profile Settings 85 SIP Setting 89 Provisioning Setting 90 Wireless LAN Setting 90 Security 90 Wireless LAN Status 91 Network Information 91 Phone Version 91 Reset Settings 92 Time Setting 92 Appendix A Software Upgrade 93 Network Configuration for Upgrade 93 WEB Server Settings 94 Starting Upgrade 94 Appendix B Emergency Code 97 ...

Page 9: ... Registration 97 Appendix C Useful Information 101 Before Service Inquiry 101 Troubleshooting 104 Specification 105 Caring for the Battery 107 Open Source Software Notice 108 Caring for the Environment by Recycling 109 Indexs 111 ...

Page 10: ......

Page 11: ...duct If not the product would not function or its lifetime could be shortened Avoid installing the product towards the direct ray of the sun or in locations exposed to direct sunlight on carpets or cushions If not the phone could be damaged or fire or electric shock could be caused Avoid installing the product in dusty locations If not sand could be intruded into the phone and fire electric shock ...

Page 12: ... plug pin and insert the power plug tightly into power receptacle If not fire or electric shock could be caused Do not use a damaged or loosened plug and do not modify or damage the power cord Fire or electric shock could be caused Do not connect a multiple number of cords into a single power connector Fire or electric shock could be caused Do not touch the power plug with wet hands and grasp the ...

Page 13: ...dity store it in a room at 0 40 Deformation or explosion could be caused Do not let children or pets suck or bite the battery Putting the bat tery into mouth is harmful for human body Should a child swallow the battery consult a physician as soon as possible If you detect smokes or a strange smell while using the phone or charging the battery unplug the power cord and contact the service center Us...

Page 14: ...ct defects could be caused Avoid using the phone where there is a gas leakage If there is a gas leakage do not touch the phone phone cord and receptacle with hands and open the window for ventilation Flames may cause explosion resulting in fire or burn injury When the charging contacts are wet with water or stained with foreign materials use the product after wiping them with dry towel Using it in...

Page 15: ...al outlet to charge the battery Travel Adapter Use to charge the battery without Charger Headset Use the built in microphone to talk Lithium Ion Li Ion Battery 3 7V 950mAh Quick Start Guide All you need to know to get going Wrist Strap Attaches to carry your phone Optional Belt Clip Not included CAUTION Use only LG Ericsson approved items with your phone Failure to do this may damage the phone and...

Page 16: ......

Page 17: ...iliar with your new Wireless IP Phone Phone Layout 1 15 2 16 18 17 3 19 4 10 5 11 6 12 20 13 7 8 14 9 21 This phone has an internal antenna Avoid touching the antenna area unneces sarily while the antenna is transmitting or receiving Contact with the antenna affects communication quality ...

Page 18: ...reen 5 System Key allows you to use qick access system menu 6 Send key allows you to place or receive calls or use call hisyorys 7 Alphanumeric Keypad lets you enter numbers characters and navigate within menus Press and hold keys from 1 to 9 for speed dialing 8 Manner Mode allows you to ativate the vibration mode from standby mode 9 Mic lets you transmit your voice 10 Right Softkey 2 lets you acc...

Page 19: ...sed to scroll up or down to navi gate through the different menu options 19 Headset Jack allows you to plug in a mono headset for conve nient hands free conversations 20 Battery Cover push the back cover downward to remove it 21 Charger Jack allows you to plug in your travel adapter to your phone first open the external charger jack cover 1A standby mode is whe the phone is ready for use No menu i...

Page 20: ...ccessed via the left and right soft keys The label on the bottom of the display just above each key indicates its current function The following list gives a brief description of all showig status icons of your phone You will see this kind of icon at the top of the screen 1 shows your current signal RSSI level 1 The more lines you have the stronger your signal means your phone is not registered wi...

Page 21: ...unning out battery indicates starting low battery indicates full battery indicates charging low battery 1A RSSI Received Signal Strength Indication is a value representing the received radio signal strength of both the phone and the access point You can see RSSI level icon while the phone is operating 2An access point AP is device that allow wireless communication devices to connect to the network...

Page 22: ...us related to Call History This icon refers to the menus related to Messages This icon refers to the menus related to Tools for user s conve nience This icon refers to the menus related to Systems that provides a user with variety of keyphone features This icon refers to the menus related to Settings of your phone State Displays The phone will show both items on the display screen if the caller s ...

Page 23: ...our phone will overheat catch fire or explode resulting in serious bodily injury death or property damage When the battery reaches 10 of its capacity your phone makes a sound and displays a message When there are approximately four minutes of talk time left the phone sounds an audible alert and then turns off Installing and Removing the Battery Always turn off your phone before installing or repla...

Page 24: ...ntil you hear a click to lock the cover into place Battery cover To remove the battery 1 Make sure the power is off so that you do not lose any stored num bers or messages 2 Use your thumb press down battery release hook on the back of your phone and remove the battery from the phone WARNING Do not handle a damaged or leaking Li Ion battery as you can be burned Note The battery has limited a lifes...

Page 25: ...compatible accessory may damage the phone Charging LED Connector jack Electrical outlet 2 Charge the battery by placing the phone on the charger With the approved Li Ion battery you can recharge the battery before it becomes completely run down As the battery is being charged while the power is on a charging icon appears on the display screen After the battery has been fully charged a full battery...

Page 26: ...rom LG Ericsson Turning Your Phone On and Off Turning Your Phone On Press and hold for approximately two seconds After the powering on animation the phone tries to lock the ac cess point As your phone connects to the access point you see an Antenna and RSSI level icon on the display screen it means all procedures for initial setup are completed Your screen still remains icon the phone searchs for ...

Page 27: ...hlight the menu you want and press 3 When the menu item you want is displayed press to select the highlighted option to go to the previous menu to scroll through the list of options to return to standby mode Pressing the CorrespondingNumber You can quickly select a desired menu by pressing corresponding number instead of navigating through menus with navigationkey When the phone is switched on and...

Page 28: ...o enter lower case letters ABC to enter upper case only 123 to enter numbers by pressing the numbers on the keypad 3 When you entering the text press and choose one of the follow ing options Common Terms to enter preprogrammed messages see page 20 Search Phonebook to find saved entries see page 38 Symbol to enter symbols see page 20 Smiley to enter emoticons see page 20 Cancel to cancel writing Us...

Page 29: ...the next space after two seconds or when you enter a character on a different key Characters scroll in the following order Key Sequence in upper case Sequence in lower case A B C 2 a b c 2 D E F 3 d e f 3 G H I 4 g h i 4 J K L 5 j k l 5 M N O 6 m n o 6 P Q R S 7 p q r s 7 T U V 8 t u v 8 W X Y Z 9 w x y z 9 Using 123 Mode The 123 Mode enables you to enter numbers in a text messages a telephone num...

Page 30: ...ble you to enter punctuation and other symbols When you entering the text insert a space between the text and also force a line break at a specific location in the text message 1 Select the Symbols mode 2 To insert a space move the cursor where you want to insert a space and press 3 To force a line break move the cursor where you want to break a line and press 4 To enter a symbol press the appropr...

Page 31: ...set jack Inserting anything except for headset provided by general maker may cause severe damage the phone Plug in the headset to make or answer a phone call Callers hear you through the headset microphone Even though the headset is plugged incoming call ring tone is heard through the speaker not through the headset Cover Headset plug Mic button Headset jack Refer to below tables press the mic but...

Page 32: ...to switch back to the first call or to switch between secend call Only when the Call Waiting is activated End the current call Press and hold for about two seconds Phone Carrying Using theWrist Strap Carry your phone with the wrist strap that included in your package This polyester carrying strap attaches easily to your phone To connect the wrist strap Thread the small loop of the wrist strap thro...

Page 33: ...indicated below then tighten the screw that provided with the belt clip Place the belt clip align the screw on the back of the phone and push it up hard until the belt clip is firmly secured CAUTION Keep the protective cover for future use Paper clip Screw Belt clip option Screw hole Protective cover To remove the belt clip To release the belt clip use your thumb push down on the unlock button loc...

Page 34: ... part of the 802 11b compliant wireless network The phone should have the same SSID as the one configured within an access point To setup an SSID See Profile Settings on page 85 1An SSID Service Set Identifier is the name of a wireless local area network WLAN A wireless phone on a WLAN must use the same SSID in order to com municate with each other iPECS Setup iPECS IP Address The phone must be pr...

Page 35: ...more bars shown the better the signal strength If the phone is out of range of your access point Out of range will be displayed on the screen If you go out of access point range the connection will be lost When in range again you can reconnect Access Point Probing The phone has an ability to detect all reachable access points Your phone s display shows a list of the SSIDsconfigured in the access p...

Page 36: ...er household cleaners household polish aerosol sprays solvents alcohol ammonia benzene thinner or abrasives to clean the phone as this will damage the product Phone s Menu To view the Main Menu options their respective submenus refer to the follow table it shows the avilable menu structure and indicates the number assigned to each menu option For more information about using phone s menu see Navig...

Page 37: ...ing Note 3 3 Idle Clock 3 4 Time Date Form 3 5 Dialing Font 3 6 Menu Style 3 7 Backlight 3 8 Font Type 3 9 Language 4 Call History 4 1 Call History 4 2 Call Duration 4 3 Settings 5 Messages 5 1 Write Message 5 2 Inbox 5 3 Outbox 5 4 Draft 5 5 Templates 5 6 Spam Message 5 7 Message Settings 5 8 Voice Message 6 Tools ...

Page 38: ...Time 6 6 Timer 7 System 7 1 Push To Talk 7 2 Call Forward 7 3 DND 7 4 Call Waiting 8 Phone Setting 8 1 Profile Setting 8 2 SIP Setting 8 3 Provisioning Setting 8 4 Wireless LAN Setting 8 5 Security 8 6 Wireless LAN Status 8 7 Network Information 8 8 Phone Version 8 9 Reset Settings 8 10 Time Setting ...

Page 39: ...If you make a mistake while dialing press to erase the numbers The phone icon is shown on the display screen while trying to connect During the conversation press the side volume key on the left side of the phone to control the volume level 3 Press when you are finished The display screen birefly shows call duration time HH MM SS To redial your last outgoing call press and hold You can connect a p...

Page 40: ...ress Phone Book Search Phonebook Shortcut From standby mode press Search right softkey to ac cess the Search Phonebook 2 Select the entry you want to call and press to dial the entry s default phone number or To dial another number from the entry select the name and press and then select a number with which you wish to call and press Dialing From Call History The Call History contains the numbers ...

Page 41: ...ss and hold the second digit for approximately two seconds Redialing the Last Number This feature lets you redial the last number dialed from your phone 1 In standby mode 2 Press and hold The last dialed number will automatically redial If the headset is plugged in press and hold Mic button on the headset for about two seconds Dialing Options When you enter numbers in standby mode you will see a v...

Page 42: ...eaker not through the headset If the incoming call is from a number stored in your Phone Book the entry s name is displayed The caller s phone number may also be displayed if available AnsweringOptions When incoming a call is ringing the following options are displayed on the screen To select an option press the corresponding softkey Menu to display the options Hold Reject to mute the ring tone of...

Page 43: ... display a list of available To select an option highlight it and press The following options may be available End to end a call Mute on or Mute off to mute your microphone or to unmute the microphone if itwas muted earlier The option Mute is used to prevent the other party from hearing your voice but allows you to hear the other party Main menu to display the main menu of some of the phone such a...

Page 44: ...ansferring a call Screened Transfer 1 From an active call press once or press Menu left softkey to select Hold and press The present call is placed on hold showing Hold On on your screen 2 Enter the destination number to which the call is to be transferred and press 3 When the recipient answers announce the caller and then press Transfer right softkey to complete the transfer and end a call Using ...

Page 45: ...n the standby mode To release the lock mode 1 Press to choose Unlock 2 Enter your security code as it is a required field and then press However the phone will automatically lock up again after 10 seconds unless you change lock phone setting to Off The preset code is 0000 you can change it to the security code of your choice Refer to Security on page 90 Using Keypad Lock Keyguard You can use the k...

Page 46: ...e able to download updates of the phone software through the provisioning process from the system Refer to Provisioning Setting on page 90 Making Emergency Calls From call lock state Enter the official emergency call number for your present location for example 000 and then press to dial From phone or Keypad lock state 1 Press SOS Right softkey to display emergency call number list 2 Select the em...

Page 47: ...is is the name of the person whose contact addresses information is stored in the entry Personal Bell You can assign a ring tone to each entry This is the sound your phone makes when you receive phone calls or call notifications from any of the numbers stored in the entry of your Phone Book Number 1 5 Each number must be assigned one of the fol lowing contact types to be used default number After ...

Page 48: ...ts type are required for all contact entries Other information is optional You may enter the information in any order by scrolling through the entry details Creating a Contacts Entry 1 Press Phone Book Add New 2 To assign the name to the new entry Select Name field and enter the name The name of an contact entry can contain up to 32 characters Your phone can store up to 500 contact entries which c...

Page 49: ...en you highlight a ring type a sample ring tone will sound 10 To store a homepage to the number Select Homepage field and enter the homepage address Press Menu left softkey to select an options Symbol Emoticon or Cancel and then press 11 To store a home address to the number select Home Addr field and enter the home address and then press 12 To store a organization to the entry select Organization...

Page 50: ...ly the search operation is performed by entering a name in the field 1 Press Phone Book Search Phonebook Shortcut From standby mode press Search right softkey to access the Search Phonebook 2 Either highlight an entry or enter the first letter of a name in the Name field You can find the name you entered or the nearest match or Press Menu left softkey to display the options select one of the follo...

Page 51: ...o save the new number or To assign a speed dial number select Menu Speed dial Complete the process press to change default numbers to an entry 8 Select a number you want to set as a default and press Editing an Entry 1 Press Phone Book Search Phonebook 2 Select an entry you wish to edit 3 Press Menu left softkey to display the options 4 Select Edit and press 5 Follow the applicable instructions in...

Page 52: ...A sample ring tone will sound as you highlight each option 6 Press to assign the ring tone The ring icon appears on the right side of the assigned group If the personal and group ring tone are assigned to the number at the same time personal ring will sound when a call from that contact address Changing a RingTone 1 Press Phone Book Caller Groups 2 Scroll to view ring tones assigned to the group a...

Page 53: ...for default groups 1 Press Phone Book Caller Groups 2 From the caller groups select one 3 Press Menu left softkey to display the options Press Change right softkey to directly access the edit mode 4 Select Edit and press 5 To edit a name to the group change the name us ing the keypad 6 Press to save Deleting a Group You can delete a group except for default groups 1 Press Phone Book Caller Groups ...

Page 54: ...ss Menu left softkey to display the options ExcludingGroup Members You can exclude group members from the caller group 1 Press Phone Book Caller Groups 2 From the caller groups select one and press 3 Select desired entry and press Menu left softkey to display the op tions 4 Select Exclude member and press 5 Select Yes to confirm and press Deleting Group Members You can delete group members from th...

Page 55: ...Book entries will be displayed 4 Select an entry for which you wish to assign a speed dial location If an entry has more than one number stored press the navigation key left or right to select a contact type Only numbers in your Phone Book can be as signed as speed dial numbers If you attempt to assign an already associated phone number with a new speed dial location Already assigned message will ...

Page 56: ...er 1 Press Phone Book Speed Dials 2 Select a speed dial number you wish to change 3 Press Option left softkey to display the options 4 Select Change and press 5 Select Yes to confirm and press 6 Scroll up or down to find an desired entry and select one 7 Press to apply the new speed dial number Removing a Speed Dial Number You can remove assighed speed dial to a phone number either each one or all...

Page 57: ...s Phone Book Delete all 2 Select Delete all and press 3 Select Yes to delete all saved entries from Phone Book and press My Number 1 Press Phone Book My Number 2 Your phone number will be displayed read the giving information 3 Press to return to the previous menu ...

Page 58: ......

Page 59: ...und or vibrate as you highlight 3 Press to assign the current ringer Standby mode will display alert indicator depending on which mode the alert is currently in Refer to Status Icons on page 10 The vibration option allows you to be notified of calls with a vibra tion instead of an audible alert Ring Tone You can set the ring tone to identify for incoming call The phone supports 5 different ring to...

Page 60: ...ct a category and press 3 Use the navigation key to scroll through the power on tone A power on tone will sound as you highlight each option No sound allows you to mute turning your phone on Set Default directly set a power on tone to default 4 Press to assign a power on tone Power Off Tone You can set the switch off effect that sounds when the phone is turned off 1 Press Sound Power off Tone 2 Se...

Page 61: ...on key choose a volume level and press The volume level is set at you will not hear any keypad tone when you press keys regardless of the key tone you have set Tip You can adjust the key tone volume in standby mode by using the side volume key on the left side of the phone Effect Sound You can set the confirmation tone that sounds when a function is set 1 Press Sound Effect Sound 2 Select Yes to c...

Page 62: ......

Page 63: ...e navigation key to scroll through the image and select one The name field shows you file name 3 Press to assign an image If you choose an Analog the current time will be displayed on the screen in analog mode Greeting Note File name field You can set your own custom greeting to display on the screen in standby mode 1 Press Display Greeting Note 2 Select one of the following options and press My N...

Page 64: ...rm 2 Using the navigation key select date type and press The factory default date format setting is YYYY MM DD it means the date will appear in year month and day order Dialing Font You can choose the dialing font and color when enter number for example when dialing or pre dialing 1 Press Display Dialing Font 2 Using the navigation key select a font size and color and then press Menu Style You can...

Page 65: ...duration 5 sec LCD brightness Normal User Settings LCD duration 5 sec 10 sec 20 sec 30 sec 1min or 3min LCD brightness Normal Bright or Brightest Note Long backlight settings such as 3Min and Brightest reduce the battery s talk and standby times Font Type You can choose the font type to display your phone s screen 1 Press Display Font Type 2 Select the font you want to use and press Language You c...

Page 66: ......

Page 67: ...e following information appears The name assigned to the number The contact type icon appears giving information about the call A Dialed call Indicates outgoing calls made from your phone A Received call Indicates received calls that were answered A Missed call Indicates missed calls A Rejected call Indicates rejected calls Viewing Call History In standby mode press to directly access the call his...

Page 68: ...ook Delete to delete the entry DeleteAll to delete all calls entries Tip You can also view the next or previous call history entry by press ing the navigation key left or right Making a Call From Call History If you need to make a call from the calls history 1 Press Call History Call History 2 Select an option and press 3 Select an entry to make a call its number and press Call Duration This menu ...

Page 69: ...r Mode 2 Select one of the following options and press Send Key to require to be pressed to answer all incoming calls Any Key to allow an incoming call to be answered by pressing any key CallVolume You can adjust the phone s volume settings to suit your needs and your environment 1 Press Call History Settings Call Volume 2 Using the navigation key choose a volume level and press You can adjust the...

Page 70: ......

Page 71: ... available in the message See Inbox on page 62 OK to go to the standby mode Delete to delete the current message Writing Text Message Message notification Compose a text message you wish to send it A single text message can be up to 80 characters 1 Press Messages Write Message Shortcut From standby mode press navigation key right to directly access the Messages 2 Select Contact me field It may alr...

Page 72: ...box to save a message as a draft Save option to select the option you prefer Save message will automatically be saved in the Outbox Not save message was sent but not saved in the Outbox 5 Press to send the message Inbox When you receive a message your phone notifies you with the icon at the top of your screen and it will remain on until there are no unread items in the Inbox 1 Press Messages Inbox...

Page 73: ...one of the fol lowing options and press Forward to send the selected message to another party Edit to edit message you want to change Keep to protect the message cannot be deleted Delete to delete the selected messages Draft While you are creating a message you can save it in Drafts before you send The draft messages are listed with the date of when the messages were saved 1 Press Messages Draft 2...

Page 74: ... then select Yes to delete the selected message Select No to cancel the deletion Adding a New Preset Message 1 Press Messages Templates 2 Press Add right softkey to add a new message 3 Compose your own preset message and press Your new preset message will be added to the end of the list Spam Message This menu will help you reduce or stop spam messages from reach ing your Inbox Viewing Spambox If y...

Page 75: ...e up to 20 Spam Number to be blocked Each number can use up to 30 dights in length RegisteringSpamText You can block specific messages receive by regis tering texts that block text messages containing certain phrases 1 Press Messages Spam Message Register Spam Text 2 Enter the text you want to block and press Your phone can save up to 10 Spam Text to be blocked Each text can contain up to 32 chara...

Page 76: ...y once 2 min to set your phone to alert you every two minutes Setting an Alert Sound You can select an alert tone which is played when a message is received You can select any one from 10 message alert tones 1 Press Messages Message Settings Alert Sound 2 Use the navigation key to scroll through the Melody An audible alert will sound as you highlight each Melody 3 Press to set an alert sound Setti...

Page 77: ...ived voice messages Old Message Once you have played the voice messages and saved it to the voice mailbox 3 Press and to return to standby mode Shows last message received time 4 Listen to your messages enter the voice mailbox number and press to access the system s voice mailbox 5 The following list outlines your phone s voice mailbox menu you can use your keypad to navigate through the menu Whil...

Page 78: ......

Page 79: ...holiday has been set indicates a schedule or anniversary have been set The follow ing icons are used to show the types of events saved to the date means a schedule and shows its number means an anniversary and shows its number Viewing an Events You can view the schedule by the month and also view the details of each event 1 Press Tools Schedule 2 Select the day for which you would like to view eve...

Page 80: ...event must have a subject and be stored to a date Other information is optional 1 Press Tools Schedule 2 Using the navigation key select the day to which you would like to add an event and Add right softkey 3 Select a time for the event by highlighting the time field Using the keypad or navigation key enter the start and end times for the event Current text input mode The time is based on a 12 hou...

Page 81: ...alarm tones 9 Press to store the event Deleting an Event In the monthly calender days with events scheduled are highlighted To delete past events 1 Press Tools Schedule 2 Press Menu left softkey to display the options 3 Select Delete and press 4 Select Delete Past to delete all past occurrences of the event and press 5 Select Yes to confirm and press or Select No to return to the previous menu To ...

Page 82: ...e options 4 Select Holiday and press 5 Select an holiday option and press Press the navigation key up or down to select On the day Weekly Monthly Yearly and Mutiple Settings 6 If you select Mutiple Settings enter a number for holiday by using the keypad and press The date corresponding to the assigned holiday is represented in scarlet in the monthly sched ule management screen Searchingan Event Yo...

Page 83: ...ss The cursor will then move to today s date Memo Your phone comes with a notepad that you can compose a note of up to 200 characters and store up to 30 memos Composing a Memo 1 Press Tools Memo Shortcut From standby mode press the naviga tion key down to directly access the Memo 2 Press Menu left softkey to display the options 3 Select Add and press 4 Type a memo using the keypad and press When e...

Page 84: ...revious menu and select a memo Deleting a Memo 1 Press Tools Memo 2 The list of saved memos will be displayed Scroll through the list and select one 3 Press Menu left softkey to display the options 4 Select Delete and press 5 Select Yes to delete the selected memo from the list and press or Select No to return to the previous menu Deleting All Memo 1 Press Tools Memo 2 Press Menu left softkey to d...

Page 85: ...dicator for the alarm setting Setting an Alarm You can set a time for the alarm including its title 1 Press Tools Alarm Morning Call 2 Press the New right softkey to add a new alarm 3 Select a time for the alarm by highlighting the time field Using the keypad set the alarm time and press right softkey to select either am or pm 4 Select a repeating status for the alarm by high lighting the repeat f...

Page 86: ...oftkey to display the options 4 Select Edit and press 5 Follow the applicable instructions in Setting an Alarm on page 75 to edit the alarm Deleting an Alarm 1 Press Tools Alarm Morning Call 2 The list of saved alarms will be displayed Scroll through the list and select one 3 Press Menu left softkey to display the options 4 Select Delete and press 5 Select Yes to delete the selected alarm from the...

Page 87: ... different locations 1 Press Tools World Time 2 Press Home right softkey to select a city to be as signed the home the local area in which you live 3 Press the navigation key left or right to scroll through different time zones The time zones will be shown a time difference between two cities based on your local area Timer Indicates your local area The timer can be used for various calendrical cal...

Page 88: ...ld 6 Press to save the counter To view a D day counter 1 Press Tools Timer 2 Select D day Counter and press 3 The list of saved counters will be displayed Scroll through the list and select one 4 Read the information about the counter To edit a D day counter 1 Press Tools Timer 2 Select D day Counter and press 3 The list of saved counters will be displayed Scroll through the list and select one 4 ...

Page 89: ... Select D day Counter and press 3 Press Menu left softkey to display the options 4 Select Delete All and press 5 Select Yes to delete all saved counter from the list and press or Select No to return to the previous menu Using the Stopwatch Your phone comes with a built in stopwatch 1 Press Tools Timer 2 Select Stopwatch and press 3 To use a Stopwatch Press Go OK key to start the stopwatch Press La...

Page 90: ......

Page 91: ...ystem Push to Talk 2 Use the navigation key to select one of the following and press the navigation key down Join Group to assign the phone to a PTT group Leave Group to release from the PTT group where your phone was assigned 2 Press the navigation key left or right to select a PTT group you wish to join from 0 to 9 and then press to set Any time you are joining the PPT group the phone displays t...

Page 92: ...e navigation key left or right to select one of the following call forwarding types and press the navigation key down Unconditional to redirect incoming calls imme diately to another phone number allowing you to receive and respond to calls Busy to redirect incoming calls to a pre desig nated phone number while the phone is busy No Answer to redirect incoming calls to a pre designated phone number...

Page 93: ...ting 2 Press the navigation key left or right to select On or Off and press To disconnect from current caller and answer waiting call 1 Hearing a beep in the earphone press to end your conversation with the current caller 2 When the bell rings press to answer the waiting call To place current caller on hold and answer waiting call 1 Hearing a beep in the earphone ask the current caller to wait and...

Page 94: ......

Page 95: ...Once you select the wireless LAN the profile entry is displays To use phone s default profile 1 Press Settings Profile Setting 2 Select SystemDefault Only default profile can be supported handover between the same SSID in the different access point 3 Press Menu left softkey and select Edit and then press 4 To edit the name to use for the default profile Select Profile Name field and enter a profil...

Page 96: ... or STATIC and then press IP Address must be within the same network area and all access point s IP address are within it too for supporting handover DHCP Dynamic Host Control Protocol is client provides a mechanism for allocating IP addresses dynamically so that addresses can be reused when hosts no longer need them STATIC is a number that is assigned to a phone by an Internet service provider to...

Page 97: ...ess LAN is encrypted Wireless LANs that do not use encryption do not have the lock icon Bar icon indicates the signal strength in different states of the network Right part on the screen shows the name of the network Note By default when the wireless LAN is switched on you can easily create profile after searching for the wireless LAN to connect 2 Use the navigation key to scroll through the profi...

Page 98: ...llows you to edit delete and change priority profiles To edit an existing profile 1 Press Settings Profile Setting 2 Select a profile you wish to edit 3 Press Menu left softkey to display the options 4 Select Edit and press 5 Involves the same steps as creating a new profile Follow the applicable instructions in To create a new profile on page 87 To delete a profile This menu allows you to remove ...

Page 99: ... Press Settings SIP Setting 2 Enter your security code and then press The preset code is 0000 use this you can access to the SIP setting menu any time 3 Enter your registered phone number from iPECS system 4 Enter a display name to be shown instead of your phone number Display name can be entered up to 12 characters long See Enter ing Text on page 18 5 Enter a password same as your registered phon...

Page 100: ...ireless LAN Setting 2 Enter your security code and press The preset code is 0000 use this you can access to the wireless LAN setting menu any time 3 Press the navigation key left or right to select a roaming level The higher the value of the roaming level can be found access point easily You are in network coverage your phone attempts to find a signal depending on the setting value 4 Press to appl...

Page 101: ...ettings Wireless LAN Status 2 Displays the wireless LAN MAC SSID Signal security and channel 3 Read the information provided on the phone s display and press to return to the previous menu Network Information This menu allows you to view the information on using the network configuration 1 Press Settings Network Information 2 Displays the IP address netmask gateway DNS1 and DNS2 The DNS2 property ...

Page 102: ...ecommend you to use this menu when displaying date and time is not correct Before time setting we recommend that all setting should be reset back to its original value because this may cause the time sorting problem such as call history message and so on And this menu could be shown depends on the system To set date and time via NTP NTP Network Time Protocol provides accurate and syncronised time ...

Page 103: ... not contain the new version of the software in its entirety Network Configuration for Upgrade Network upgrade configuration for your phone with a newer or bet ter version of the software is as below picture PC Wireless AP WIT 400H Ethernet cable Tip Place your Wireless AP close enough to the computer so that the cables will reach 1 Plug the Ethernet cable into the back of your computer and plug t...

Page 104: ...File Server ex Run hfs exe 3 Add file to upgrade 4 New image file is added Sever port Software image file Starting Upgrade 1 When your phone is boot up completely connect Wireless network 2 Press and key 3 Set the server IP port and file name Server IP IP address of Web server Server Port Web server port File Name New software image of WIT 400H ...

Page 105: ...opup will be displayed Select Yes to confirm and press to start upgrade or select No to return to the previ ous menu 5 The process has three steps as follows First step Software download Second step Apply new software to the flash Third step Reboot after upgrade ...

Page 106: ......

Page 107: ...y mode the display of your phone will show The time date day area and the bottom area displays the softkey menus labeled as Menu and Search 2 Press Menu Menu The Default Profile see note 4 can now be edited Enter the Profiles SSID Security and Network Information Use the Next key to move through pages and then Save Press From standby screen Menu and select DefaultProfile to active to connect to WL...

Page 108: ...r return to standby mode 15 LCD displays the phone number and the icon disappears when registered Confirm Emergency Emergency Representative Code see note 2 16 Confirm correct Emergency Code provisioning by locking the key pad From standby screen press for 2 seconds 17 In standby screen should now be showing Key Lock now press SOS right softkey Key The numbers from the iPECS s Emergency Table shou...

Page 109: ...ns that SOS in the standby screen will be displayed when it s phone lock or keypad lock state Note 3 For the iPECS call server refer to PGM443 WIT 400H Phone Number should match PGM443 ID Desired Number The WIT 400H Password should match PGM443 Password Note 4 The System Default Profile is the only profile that supports handover between different Access Points on the same SSID Registration with iP...

Page 110: ......

Page 111: ...rical outlet Refer to To install the charger on page 15 Check if the phone s battery is sufficiently charged referring to bat tery charge level icon on the screen in standby mode If the phone does not work after power on install the battery again and then restart your phone Refer to Installing and Removing the Battery on page 13 Press and hold for three seconds to turn on the phone Check if the op...

Page 112: ... Note Some times while using the phone suppose due to radio interference depending on various factors such as the mobile phone s network other access point can be a cause of your call will be dropped Check if you are using the phone an area with high electronical interface such as antenna or mobile phone Check if the distance between the access point and the phone is too long move closer to access...

Page 113: ...will have to set it up all over again to your liking Be sure to separately keep the input settings or important data The phone is too warm The phone may be heated when it used for a long time but this dose not affect the lifetime and performance of the phone The battery fully charged but battery icon still blinks Make sure that the battery is install correctly and clean the phone s charging contac...

Page 114: ...e registering is failed by network failure Please check the network status and IP configuration Out of range The phone is off from signaling area Please move to signaling area Disconnected by network failure The signaling is failed by network failure Please check network status IP is duplicated Please check the IP is used in other device User Info not reg istered Register failed Please check user ...

Page 115: ... 11g 1 2 5 5 6 9 11 12 18 24 36 48 and 54 Mbps VoIP protocol SIP Codec G 711 A U law G 729 Wired encryption TBD future IPsec Wireless encryption WEP Support Disabled 64bit 128bit WPA PSK WPA2 CCMP Compatible systems iPECS LIK Series All 50 100 300 600 iPECS CM iPECS SBG Wireless access protocol CSMA CA QoS IEEE 802 11e Other This phone can potentially occur radio interference while the phone is in...

Page 116: ...ors Dot 176 x 220 dot matrix Battery Specification Continuous standby time Approximately 50 hours Continuous talk time Approximately 3 hours Estimated charging time Approximately 5 hours Battery type Li Ion Lithium Ion 3 7V 950mAh Other Note Continuous standby time and continuous talk time depends on ambi ent wireless environment For example a used AP DTIM period setting battery status other wirel...

Page 117: ...cineration Keep the metal contacts on top of the battery clean Do not attempt to disassemble or short circuit the battery The battery may need recharging if it has not been used for a long period of time It is best to replace the battery when it no longer provides accept able performance It can be recharged hundreds of times before it needs replacing Do not store the battery in high temperature ar...

Page 118: ...ricsson com GPL License u boot bash linux busybox glibc wpa supplicant udhcpc ortp jpglib wget wireless Tools LG Ericsson offers to provide source code to you on CD ROM for a charge covering the cost of performing such distribution such as the cost of media shipping and handling upon e mail request to LG Ericsson at opensource lgericsson com This offer is valid for a period of three 3 years from t...

Page 119: ...product is covered by the European Directive 2002 96 EC 2 All electrical and electronic products should be disposed of sepa rately from the municipal waste stream via designated collection facilities appointed by the government or the local authorities 3 The correct disposal of your old appliance will help prevent po tential negative consequences for the environment and human health 4 For more det...

Page 120: ......

Page 121: ... 55 Battery 13 Charging 15 Installing 13 Battery Cover 9 C Calculator 77 Call Duration 58 Resetting 59 Viewing 58 Caller ID 25 Call History 57 Making a Call 58 Options 58 Viewing 57 Call Options 33 Call Volume 59 Charger Jack 9 Charging 15 Cleaning Phone 25 Clear Key 8 D Dialing Font 54 Display Screen 10 Display Informations 10 Main Menu 11 Main Menu Icons 12 State Displays 12 Status Icons 10 ...

Page 122: ... Jack 9 I Idle Clock 54 Important Safety Informa tions 1 K Key Functions 8 Key Tone 51 Key Tone Volume 51 L Language 55 Left Softkey 8 Lock Mode 9 35 M Main Menu Icons 12 Making Calls 29 Call History 30 Dialing Options 31 Finding Number 30 Last Number 31 Phone Book 30 Phone Number 29 Speed Dial 31 Manner Mode 8 34 Memo 73 Composing 73 Deleting 74 Deleting All 74 Menu Style 54 Messages Draft 63 Inb...

Page 123: ... Phone Book Contact Adding 38 Caller Groups 42 Deleting Entries 47 Searching Entries 40 Speed Dials 45 Storing Numbers Faster 40 Phone Carrying 22 Belt Clip 23 Wrist Strap 22 Phone Layout 7 Phone On and Off 16 Phone Off 16 Phone On 16 Phone s Menu 26 Phone Version 91 Power On Tone 50 Profile Settings 85 Connecting a Profile 88 Creating Profiles 85 Managing Profiles 88 Q Quickly Change Mode 34 Lock...

Page 124: ...59 One Minute Alert 59 Side Volume Key 9 Signal Strength 25 SIP Setting 89 90 Software Upgrade 93 Speaker 9 Specification 105 Speed Dials 45 SSID 24 See Network Name Strap Eyelet 9 System 81 Call Forward 82 Call Waiting 83 Do Not Disturb DND 83 Push to Talk 81 Invoking a PTT 82 Join Group 81 Leave Group 81 Receiving a PTT 82 T Talk key 8 Time Date Form 54 Timer 77 D Day Counter 78 D Day Finder 77 ...

Reviews: