background image

28

1

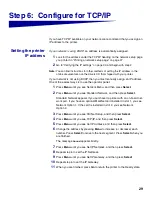
Press 

Menu

 until you see Utilities Menu, and then 

press 

Select

.

2

Press 

Menu

 until you see Print Net Setup, and then 

press 

Select

 to print the page.

The network setup page prints and the printer 
returns to Ready status.

3

Check the first section on the network setup page 
and confirm that Status is “Connected.”

Note:

If an optional MarkNet card is installed in slot 1, you 
see Print Net1 Setup. If the card is installed in slot 
2, you see Print Net2 Setup.

If Status is “Not Connected,” your LAN drop may not 
be active or your network cable may be malfunction-
ing. Consult your network support person, and then 
print another network setup page to verify that you 
are connected to your network.

Save the network setup page for use with later 
instructions.

4

See “Printing a menu settings page”.

Printing a menu settings page

Print the menu settings page to review the default printer 
settings and to verify that printer options are installed cor-
rectly. For more information about using the printer opera-
tor panel and changing menu settings, refer to the 
Lexmark T620/T622 Publications CD.

1

Press 

Menu

 until you see Utilities Menu, and then 

press 

Select

.

2

Press 

Menu

 until you see Print Menus, and then 

press 

Select

 to print the page.

The message 

Printing Menus

is displayed.

3

Verify that the options you installed are listed under 
“Installed Features.”

If an option you installed is not listed, turn the printer 
off, unplug the power cord, and reinstall the option.

4

Verify the amount of memory installed is correctly 
listed under “Printer Information.”

5

Verify that the paper trays are configured for the 
sizes and types of paper you loaded in the printer.

Summary of Contents for Optra T620n

Page 1: ...www lexmark com Setup Guide January 2001 Lexmark T620 and T622 ...

Page 2: ...y Solaris and the Solaris logo are trademarks or registered trademarks of Sun Microsystems Inc in the U S and other coun tries and are used under license Other trademarks are the property of their respective owners Copyright 2001 Lexmark International Inc All rights reserved UNITED STATES GOVERNMENT RESTRICTED RIGHTS This software and documentation are provided with RESTRICTED RIGHTS Use duplicati...

Page 3: ...ing the handholds Turn off the printer If your printer is already set up make sure the printer power is off and the power cord and any cables are unplugged before installing any options Options compatibility Options compatible with Lexmark T Family printers are labeled with a colored triangle Label locations are indi cated in the illustrations in this book Troubleshooting If you encounter a proble...

Page 4: ...rinter system board page 17 Install memory and option cards Load print material Attach cables Network printing page 24 Local printing page 25 Configure for TCP IP Network printing page 31 Local printing page 33 See page 29 1 2 4 5 6 3 See page 23 Verify setup See page 27 Printer flash memory page 19 Envelope feeder page 16 Print cartridge page 7 High capacity output stacker page 15 Finisher page 1...

Page 5: ...One high capacity output stacker or One output expander and one high capacity output stacker or One finisher and one output expander or One finisher and one 5 bin mailbox Attach up to Three optional drawers Attach up to Four optional drawers Output expander 5 Bin mailbox High capacity output stacker Finisher 2000 Sheet drawer 250 Sheet drawer 500 Sheet drawer Duplex unit Envelope feeder Lexmark T6...

Page 6: ...00 sheets of 20 lb paper The 2000 sheet drawer is packaged with a User s Guide that contains detailed instructions for instal lation setup and use including loading paper and removing paper jams When you have finished installing the 2000 sheet drawer install any other drawers or an optional duplex unit that you may have purchased Lexmark T Family label colored triangle ...

Page 7: ...ace the support unit on top of any previously installed paper drawers or the table or printer cabinet where you plan to use the printer The tab round peg and square holes on top of any drawer help you seat the support unit so the edges are aligned properly Make sure the support unit is securely in place 3 Attach another optional drawer a duplex unit or the printer To attach a drawer repeat steps 1...

Page 8: ...he duplex unit 1 Place the duplex unit on top of any installed paper drawers or the table or printer cabinet where you plan to use the printer The tab peg and holes on top of any drawer help you seat the duplex unit so the edges are aligned properly Make sure it is securely in place 2 Attach the printer See Setting up the printer on page 7 Lexmark T Family label Back cover Tab Round peg Square hol...

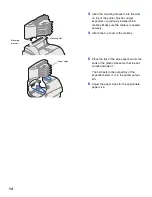
Page 9: ...when you set it down 1 Ask someone to help you lift the printer by the handholds and lower it onto the duplex unit optional drawer table or printer cabinet The tab round peg and square holes on top of any drawer or the duplex unit help you seat the printer so the edges are aligned properly Make sure the printer is securely in place 2 Remove the print cartridge packaging a Push the release latch an...

Page 10: ... slots on the print cartridge cradle Use the colored arrows inside the printer for placement e Guide the print cartridge down as it drops and snaps into place f Close the upper front door 3 Attach decals to the paper trays Decals showing the number 1 are on your printer and the standard input tray These decals keep the standard input tray paired with the printer Peel the decals from the sheet and ...

Page 11: ...y from the overlay 5 Attach the paper bail If you will be installing a finisher or 5 bin mailbox skip to step 6 a Remove the printer top cover and slide the plastic bracket onto the static brush holder Adjust the bracket so it is cen tered over the area where paper exits b Place the tips of the wire paper bail into the ends of the plastic bracket so that the bail curves downward c Replace the top ...

Page 12: ... of print material only Do not use it as a shelf excess weight may damage it 1 Remove the top cover or any previously installed output options from the printer Note The finisher must be positioned directly above the printer and below other output options It cannot be used with the high capacity output option 2 Insert the mounting brackets into the slots on top of the printer Make sure the finisher...

Page 13: ...iately otherwise the edges of the mounting brackets could damage tabletops or fab rics Warning The output expander tray is designed to hold the weight of print material only Do not use it as a shelf excess weight may cause it to disengage from the output expander 1 Remove the top cover from the printer fin isher or high capacity output stacker Note If you have purchased a finisher or a high capaci...

Page 14: ... the plastic bracket so that the bail curves downward The bail rests in the output tray of the expander below it or in the printer output bin Note Do not attach the paper bail unless you are mounting the output expander on the printer or another output expander 5 Slide the lower tabs on the tray into the lower slots on the output expander 6 Rotate the tray up until the upper tabs click into the up...

Page 15: ...s a shelf excess weight may damage it 1 Remove the top cover from the printer fin isher output expander or previously installed mailbox Note If you have purchased a finisher or a high capacity output stacker that output option must be installed directly on the printer before the mailbox 2 Slide the plastic bracket onto the static brush holder located on the bottom of the 5 bin mailbox Note If the ...

Page 16: ...x is seated securely 4 Attach the top cover to the mailbox 5 Place the tips of the wire paper bail into the ends of the plastic bracket so that the bail curves downward The bail rests in the output tray of the expander below it or in the printer output bin 6 Adjust the paper stops for the appropriate paper size Mounting bracket Mounting slot Paper stops ...

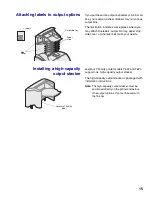
Page 17: ...ver or wherever best suits your needs Installing a high capacity output stacker Lexmark T Family printer models T622 and T620 support one high capacity output stacker The high capacity output stacker is packaged with installation instructions Note The high capacity output stacker must be positioned directly on the printer and before other output options It cannot be used with the finisher Side cov...

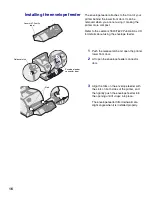
Page 18: ... using the envelope feeder 1 Push the release latch and open the printer lower front door 2 Lift open the envelope feeder connector door 3 Align the tabs on the envelope feeder with the slots on both sides of the printer and then gently push the envelope feeder into the opening until it snaps into place The envelope feeder tilts downward at a slight angle when it is installed properly Lexmark T Fa...

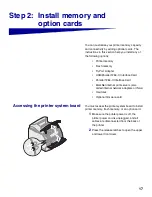
Page 19: ...ce Card Parallel 1284 C Interface Card MarkNet internal print servers also called internal network adapters or INAs Hard disk Optional firmware card Accessing the printer system board You must access the printer system board to install printer memory flash memory or an option card 1 Make sure the printer power is off the printer power cord is unplugged and all cables are disconnected from the back...

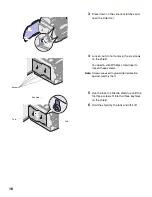
Page 20: ...e shield You need a small Phillips screwdriver to loosen these screws Note Screws are used to give added protection against memory theft 5 Use the tabs to slide the shield up until the top three screws fit into the three keyholes on the shield 6 Hold the shield by the tabs and lift it off Screws Keyhole Tab Tab ...

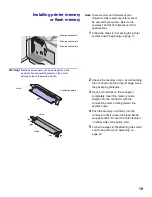
Page 21: ...memory option 2 Unpack the memory option Avoid touching the connection points along its edge Save the packaging materials 3 Open both latches on the connector completely Insert the memory option straight into the connector with the connection points pointing toward the system board 4 Push the memory card firmly into the connector until it snaps into place Make sure each latch fits over the notch l...

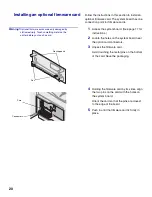
Page 22: ...uch a card 1 Access the system board See page 17 for instructions 2 Locate the holes on the system board near the option card connectors 3 Unpack the firmware card Avoid touching the metal pins on the bottom of the card Save the packaging 4 Holding the firmware card by its sides align the two pins on the card with the holes on the system board Orient the card so that the pins are closest to the ed...

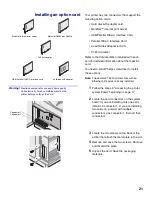
Page 23: ...easily damaged by static electricity Touch something metal on the printer before you touch the card 1 Follow the steps in Accessing the printer system board beginning on page 17 2 Locate the card connectors on the system board If you are installing only one card install it in connector 1 If you are installing two cards on a model with multiple connectors use connector 1 first and then connector 2 ...

Page 24: ...e shield and closing the doors After you have installed option cards on the printer system board follow these steps to reattach the shield and close the doors 1 Grasp the shield by the tabs and align the three keyholes on the shield with the top three screws Holding the shield by the tabs slide it down onto the screws Tighten all six screws 2 Close the side door 3 Close the upper and lower front d...

Page 25: ...20 T622 Publications CD for special paper loading instructions 4 Place the paper into the paper tray with the recommended print side face down for single sided printing and face up for duplex printing Do not fill paper above the paper capacity mark fill line 5 Pull the width guide tab and slide the width guide to the left until it lightly rests against the edge of the paper stack 6 Adjust the knob...

Page 26: ... add a Token Ring or 10Base2 Ethernet port to either printer model by installing an optional MarkNet internal print server To attach the printer to a network 1 Make sure the printer is turned off and unplugged 2 Connect the printer to a LAN drop or hub using standard cabling that is compatible with your network The printer automatically adjusts itself for the network speed Token Ring Ethernet 10Ba...

Page 27: ...ndard parallel port requires an IEEE 1284 compliant parallel cable We recommend Lexmark parallel cable part number 1329605 10 ft or 1427498 20 ft If you add a parallel port by installing an optional USB Parallel Interface Card you need a 1284 A C parallel cable such as Lexmark part number 43H5171 9 8 ft Note Some UNIX Linux and Macintosh computers also support USB connec tions Consult your compute...

Page 28: ...cable connections However only the Windows 2000 98 Me operating systems support USB cable connections To attach the printer to a computer 1 Make sure the printer computer and any other attached devices are turned off and unplugged 2 Connect the printer to the computer using a parallel or USB cable Use an IEEE 1284 compliant parallel cable to ensure that you can access all of your printer s functio...

Page 29: ...al tests the Ready message indicates the printer is ready to receive jobs If you see other messages on the display refer to the Lexmark T620 T622 Publications CD for instruc tions on clearing the message Click Printing and then click Understanding printer messages 3 Go to Printing a menu settings page on page 28 If you attached the printer to a network see Printing a network setup page Note You ca...

Page 30: ...use with later instructions 4 See Printing a menu settings page Printing a menu settings page Print the menu settings page to review the default printer settings and to verify that printer options are installed cor rectly For more information about using the printer opera tor panel and changing menu settings refer to the Lexmark T620 T622 Publications CD 1 Press Menu until you see Utilities Menu a...

Page 31: ... then press Select 2 Press Menu until you see Standard Network and then press Select Standard Network appears if you purchased a printer with an on board net work port If you have an optional MarkNet card installed in slot 1 you see Network Option 1 If the card is installed in slot 2 you see Network Option 2 3 Press Menu until you see Std Net Setup and then press Select 4 Press Menu until you see ...

Page 32: ... IP address ping xxx xxx xxx xx If the printer is active on the network you should receive a reply Configure for Pull Printing ImageQuick If your printer has an ImageQuick optional firmware card installed you can con figure for Pull Printing once an IP address has been assigned to your printer For detailed configuration instructions refer to the online documentation on the ImageQuick CD The ImageQ...

Page 33: ...ustom printer driver and a Lexmark network port provides enhanced functionality such as printer status alerts The following printer drivers are supported Windows system printer driver Lexmark T Family custom printer driver System drivers are built into Windows operating systems Custom drivers are available on the drivers CD Updated system and custom drivers are available on the Lexmark Web site at...

Page 34: ...ications A printer object icon must be created on the desktop of each network client using the LaserWriter 8 printer driver and the Lexmark T Family PostScript Printer Description PPD file Specific information about installing the printer on your AppleTalk network can be found in the online documentation on the drivers CD that shipped with your printer A Lexmark PPD Installer is provided in the do...

Page 35: ...om publications or on the drivers CD that shipped with your printer Non NDPS queue based For the latest information about Lexmark support for non NDPS queue based environments click View Documentation on the drivers CD and look for network printer installation This documentation is also available on the Lexmark Web site at www lexmark com publications Local printing The following instructions expl...

Page 36: ...est page to verify your printer is correctly set up UNIX Linux Your printer supports many UNIX platforms such as Sun Solaris and Linux Note The Sun Solaris package is located both on the drivers CD and on the Lex mark Web site at www lexmark com drivers Lexmark provides a printer driver package for each supported UNIX platform con taining all the necessary drivers and PPDs The user s guide contain...

Page 37: ......

Page 38: ...Lexmark with diamond design are trademarks of Lexmark International Inc registered in the United States and or other countries 2001 Lexmark International Inc 740 West New Circle Road Lexington Kentucky 40550 P N 11K3092 E C 1K0911 ...

Reviews: