Lexmark C3426dw User Manual Download Page 25

2

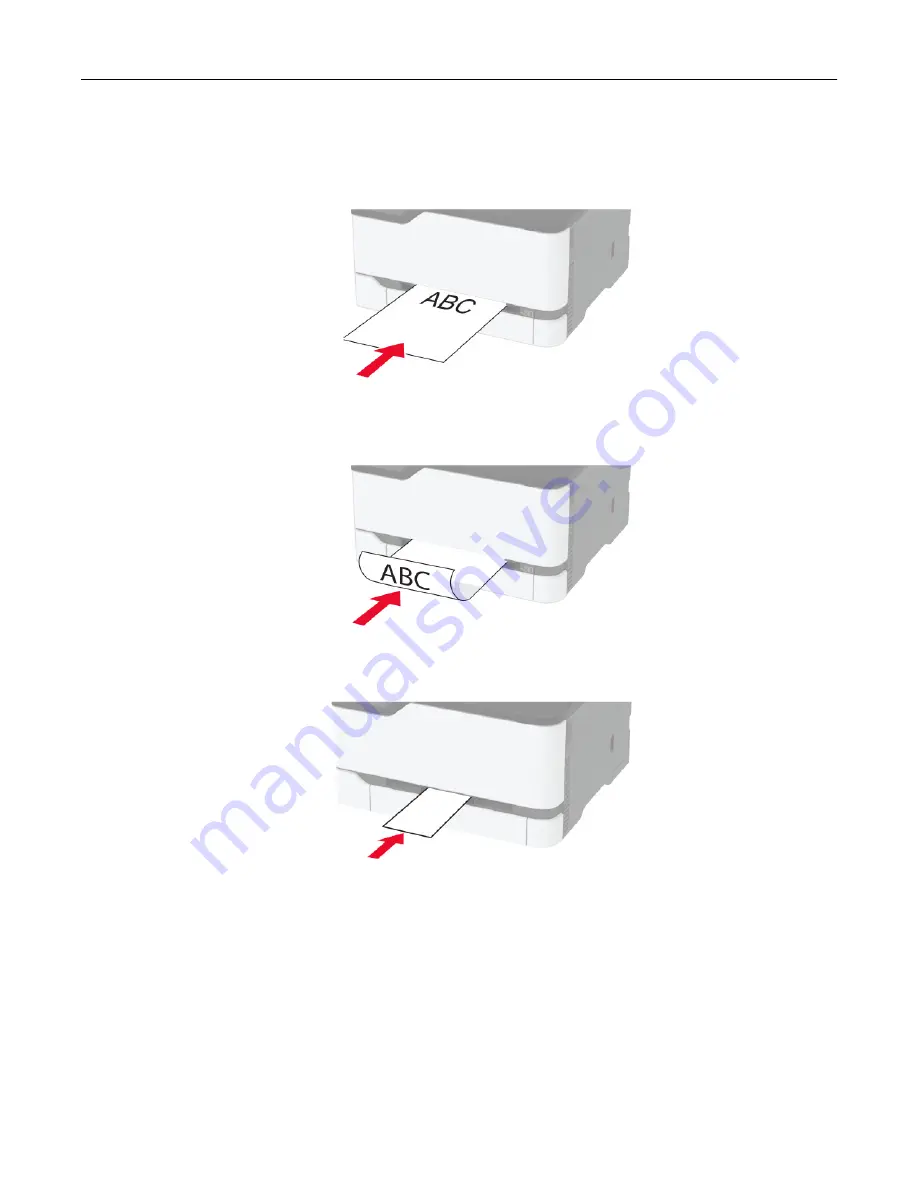
Load a sheet of paper with the printable side faceup.

Load letterhead with the printable side faceup and the top edge entering the printer first for one

sided

printing.

Load letterhead with the printable side facedown and the top edge entering the printer last for two

sided

printing.

Load envelope with the flap side down and against the right side of the paper guide.

3

Feed the paper until its leading edge gets pulled in.

Notes:

To avoid paper jams, do not force paper into the manual feeder.

Before loading another sheet, wait for a message to appear on the display.

Set up, install, and configure

25

Summary of Contents for C3426dw

Page 1: ...C2326 C3224 C3326 C3426 CS331 CS431 CS439 Printers User s Guide March 2021 www lexmark com Machine type 1500 Models 218 638 836 8c6 8c9...

Page 2: ...18 Attaching cables 19 Installing optional trays 19 Setting up and using the home screen applications 20 Loading paper and specialty media 22 Installing and updating software drivers and rmware 26 Net...

Page 3: ...noti cations 76 Setting up e mail alerts 76 Viewing reports 77 Ordering parts and supplies 77 Replacing parts and supplies 81 Cleaning printer parts 90 Saving energy and paper 95 Moving the printer t...

Page 4: ...Recycle and dispose 147 Recycling Lexmark products 147 Recycling Lexmark packaging 147 Notices 148 Index 161 Contents 4...

Page 5: ...s multioutlet extenders or UPS devices The power capacity of these types of accessories can be easily overloaded by a laser printer and may result in a risk of re property damage or poor printer perfo...

Page 6: ...printer has a caster base then carefully roll it to the new location Use caution when passing over thresholds and breaks in ooring If the printer does not have a caster base but is con gured with opt...

Page 7: ...print media and the heat may cause the media to release emissions You must understand the section in your operating instructions that discusses the guidelines for selecting print media to avoid the p...

Page 8: ...ark com idv Help information for using the printer software Help for Microsoft Windows or Macintosh operating systems Open a printer software program or application and then click Help Click to view c...

Page 9: ...nty included with the printer or go to http support lexmark com In other countries and regions See the printed warranty that came with the printer Product Information Guide See the documentation that...

Page 10: ...ary depending on your printer model 2 Standard bin 3 Manual feeder 4 Standard 250 sheet tray 5 Optional 250 sheet tray Note Supported only in some printer models Using the control panel Lexmark C3224...

Page 11: ...move between screens and menu options Decrease the numeric value of a setting 8 Power button Turn on or turn off the printer Note To turn off the printer press and hold the power button for ve seconds...

Page 12: ...and help ensure trouble free printing Always use new undamaged paper Before loading paper know the recommended printable side of the paper This information is usually indicated on the paper package Do...

Page 13: ...is either grain long running the length of the paper or grain short running the width of the paper For 60 162 g m2 16 43 lb paper grain long paper is recommended Fiber content Most high quality xerog...

Page 14: ...engraved printing process Avoid paper with rough or heavily textured surfaces Use inks that are not affected by the resin in toner Inks that are oxidation set or oil based generally meet these require...

Page 15: ...x 297 mm 8 5 x 11 69 in X X X Universal2 3 105 x 148 mm 4 13 x 5 83 in to 215 9 x 355 6 mm 8 5 x 14 in X X X 7 3 4 Envelope 98 4 x 190 5 mm 3 875 x 7 5 in 4 X 9 Envelope 98 4 x 225 4 mm 3 875 x 8 9 i...

Page 16: ...ftware application 3 Load narrow paper with the short edge entering the printer rst 4 The standard 250 sheet tray supports up to 5 envelopes at a time The optional 250 sheet tray supports up to 40 env...

Page 17: ...75 90 3 g m2 grain long 20 24 lb bond Heavy paper 90 3 100 g m2 grain long 24 1 26 lb bond Card stock 105 1 162 g m2 grain long 28 1 43 lb bond X Card stock 105 1 200 g m2 grain long 28 1 53 lb bond...

Page 18: ...ater or wet locations Make sure that air ow in the room meets the latest revision of the ASHRAE 62 standard or the CEN Technical Committee 156 standard Provide a at sturdy and stable surface Keep the...

Page 19: ...ess network adapter or the printer in the areas shown while actively printing Printer port Function 1 Ethernet port Connect the printer to a network 2 USB printer port Connect the printer to a compute...

Page 20: ...product and easily accessible 6 Turn on the printer Add the tray in the print driver to make it available for print jobs For more information see Adding available options in the print driver on page 2...

Page 21: ...PS make sure to use the host name instead of the IP address For example type myWebsite com sample pdf instead of typing 123 123 123 123 sample pdf Make sure that the host name also matches the Common...

Page 22: ...on guration Paper Size Type select a paper source For non touch screen printer models press to navigate through the settings 2 Set the paper size and type Con guring Universal paper settings 1 From th...

Page 23: ...ad faceup with the header toward the back of the tray for one sided printing Load letterhead facedown with the header toward the front of the tray for two sided printing Do not slide paper into the tr...

Page 24: ...ou are loading 5 Insert the tray If necessary set the paper size and paper type from the control panel to match the paper loaded Loading the manual feeder 1 Adjust the guide to match the size of the p...

Page 25: ...ntable side facedown and the top edge entering the printer last for two sided printing Load envelope with the ap side down and against the right side of the paper guide 3 Feed the paper until its lead...

Page 26: ...is included in the software installer package For Macintosh computers with macOS version 10 7 or later you do not need to install the driver to print on an AirPrint certi ed printer If you want custom...

Page 27: ...page correctly c Select a print driver and then click Next d Select Use the print driver that is currently installed recommended and then click Next e Type a printer name and then click Next f Select...

Page 28: ...ld Notes View the printer IP address on the printer home screen The IP address appears as four sets of numbers separated by periods such as 123 123 123 123 If you are using a proxy server then tempora...

Page 29: ...is not connected to the printer Using the wireless setup wizard in the printer Notes These instructions apply only to some printer models Before using the wizard make sure that the printer rmware is u...

Page 30: ...t a Wi Fi network and then type the network password 8 Tap Done Connecting the printer to a wireless network using Wi Fi Protected Setup WPS Note This feature is available only in some printer models...

Page 31: ...rom the control panel navigate to Settings Network Ports Wi Fi Direct For non touch screen printer models press to navigate through the settings 2 Con gure the settings Enable Wi Fi Direct Enables the...

Page 32: ...password Connecting a computer to the printer Before connecting your computer make sure that Wi Fi Direct has been con gured For more information see Con guring Wi Fi Direct on page 31 For Windows us...

Page 33: ...e control panel navigate to Settings Reports Network Network Setup Page For non touch screen printer models press to navigate through the settings 2 Check the rst section of the page and con rm that t...

Page 34: ...settings 2 Select Restore all settings Statement of Volatility Your printer contains various types of memory that can store device and network settings and user data Type of memory Description Volatil...

Page 35: ...may not support the send or share feature For more information see the documentation that came with the application 2 Select a printer 3 Print the document Printing from a mobile device using Mopria...

Page 36: ...nt Printing from a mobile device using Wi Fi Direct Note This feature is available only in some printer models Wi Fi Direct is a printing service that lets you print to any Wi Fi Direct ready printer...

Page 37: ...r reprinting Verify Job Expiration Set the expiration time that the printer prints a copy before printing the remaining copies Note Verify jobs print one copy to check if it is satisfactory before pri...

Page 38: ...IN select the print job Print For non touch screen printer models press to navigate through the settings Using the print driver 1 With a document open choose File Print 2 Select a printer and then fro...

Page 39: ...r control panel For touch screen printer models do the following 1 From the home screen touch Cancel Job 2 Select a job to cancel For non touch screen printer models press From the computer 1 Dependin...

Page 40: ...ct external network access Security2 Login Methods Certi cate Management Login Restrictions Con dential Print Setup Erase Temporary Data Files Miscellaneous Cloud Connector1 Enable Disable Connectors...

Page 41: ...M P M Time Zone GMT Con gure the printer date and time Date and Time Network Time Protocol Enable NTP On NTP Server Enable Authentication None Con gure the settings for Network Time Protocol NTP Notes...

Page 42: ...ages Note An asterisk next to a value indicates the factory default setting Remote Operator Panel Menu item Description External VNC Connection Don t Allow Allow Connect an external Virtual Network Co...

Page 43: ...tication No authentication required Device Initiated E mail None Device Userid Device Password NTLM Domain Con gure the e mail settings of the printer Note In some printer models this menu can be con...

Page 44: ...r loaded Error Prevention Page Protect Off On Set the printer to process the entire page into the memory before printing it Jam Content Recovery Jam Recovery Auto Off On Set the printer to reprint jam...

Page 45: ...ymous Data Collection Menu item Description Anonymous Data Collection Device Usage and Performance Information None Send printer usage and performance information to Lexmark Note Anonymous Data Send T...

Page 46: ...t Message Off Only for unknown sizes Always Display a message to select paper size and type after inserting the tray Tray Con guration A5 Loading Short Edge Long Edge Specify the page orientation when...

Page 47: ...printer to recognize and use the PPDS data stream Printer Emulations PS Emulation On Off Set the printer to recognize and use the PS data stream Printer Emulations Emulator Security Page Timeout 0 60...

Page 48: ...ffering as much functionality as possible despite known issues For example when set to On and the duplex motor is nonfunctional the printer performs one sided printing of the documents even if the job...

Page 49: ...Description Erase Printer Memory Printer Memory Last Sanitized Sanitize all information on nonvolatile memory Erase all printer and network settings Erase all shortcuts and shortcut settings Clear all...

Page 50: ...t Do Not Print Print blank pages that are included in a print job Collate Off 1 1 1 2 2 2 On 1 2 1 2 1 2 Keep the pages of a print job stacked in sequence particularly when printing multiple copies of...

Page 51: ...hole Page Set the printable area on a sheet of paper Note An asterisk next to a value indicates the factory default setting Setup Menu item Description Printer Language PCL Emulation PS Emulation Set...

Page 52: ...which held and con dential jobs are printed when Print All is selected Note An asterisk next to a value indicates the factory default setting Quality Menu item Description Print Mode Black and White C...

Page 53: ...color variations in the printed output Note An asterisk next to a value indicates the factory default setting PostScript Menu item Description Print PS Error On Off Print a page that describes the Pos...

Page 54: ...s Note Pitch refers to the number of xed space characters in a horizontal inch of type Orientation Portrait Landscape Reverse Portrait Reverse Landscape Specify the orientation of text and graphics on...

Page 55: ...ctory default setting assigned for each paper source Tray Renumber Restore Defaults Return all tray assignments to factory default values Print Timeout Disabled Enabled 90 Set the printer to end a pri...

Page 56: ...fault Source Tray x 1 Manual Paper Manual Envelope Set the paper source for all print jobs Paper Size Type Tray x 1 Manual Paper Manual Envelope Specify the paper size or paper type loaded in each pap...

Page 57: ...t height of the universal paper Feed Direction Short Edge Long Edge Set the printer to pick paper from the short edge or long edge direction Note Long Edge appears only when the longest edge is shorte...

Page 58: ...Print Server Start Reset all active network connections to the printer Note This setting removes all network con guration settings Network Job Timeout Disabled Enabled Set the time before the printer...

Page 59: ...ven time Start PIN Method connects the printer to a wireless network when a PIN on the printer is entered into the wireless settings of the access point Compatibility 802 11b g n 2 4GHz 802 11a b g n...

Page 60: ...bute IP addressing and con guration information dynamically to clients IPv4 Set Static IP Address IP Address Netmask Gateway Set the static IP address of your printer IPv6 Enable IPv6 On Off Enable IP...

Page 61: ...PS Auto On Off Set the printer to process Macintosh binary PostScript print jobs Notes On processes raw binary PostScript print jobs Off lters print jobs using the standard protocol Wi Fi Direct Menu...

Page 62: ...inter IPv6 Stateless Address Autocon guration Off On Set the network adapter to accept the automatic IPv6 address con guration entries provided by a router IPv6 DNS Address Specify the DNS server addr...

Page 63: ...cintosh binary PostScript print jobs Notes On processes raw binary PostScript print jobs Off lters print jobs using the standard protocol Energy Efficient Ethernet Off On Auto Reduce power consumption...

Page 64: ...ss Restricted Server List Specify an IP address for the TCP connections Notes This menu item appears only in some printer models Use a comma to separate each IP address You can add up to 50 IP address...

Page 65: ...tting SNMP Note This menu appears only in network printers or printers that are attached to print servers Menu item Description SNMP Versions 1 and 2c Enabled Off On Allow SNMP Set Off On Enable PPM M...

Page 66: ...hm DES AES 128 Con gure SNMP version 3 to install and update the printer security Note An asterisk next to a value indicates the factory default setting IPSec Note This menu appears only in network pr...

Page 67: ...k securely Note These menu items appear only when Base Con guration is set to Compatibility Proposed Authentication Method SHA1 SHA256 SHA512 IPSec Device Certi cate Specify an IPSec certi cate Note T...

Page 68: ...tor of the print job request LPD Trailer Page Off On Print a trailer page for all LPD print jobs Note A trailer page is the last page of a print job LPD Carriage Return Conversion Off On Enable carria...

Page 69: ...ault printer language Note If PCL SmartSwitch is off then the printer does not examine incoming data and uses the default printer language speci ed in the Setup menu PS SmartSwitch Off On Set the prin...

Page 70: ...bject and message of the noti cation e mail Message Note An asterisk next to a value indicates the factory default setting Security Login Methods Public Menu item Description Manage Permissions Functi...

Page 71: ...s Permissions Add Group Import Access Controls Function Access Administrative Menus Device Management All Users Import Access Controls Function Access Administrative Menus Device Management Admin Func...

Page 72: ...etting Con dential Print Setup Menu item Description Max Invalid PIN 2 10 0 Set the number of times an invalid PIN can be entered Notes A value of zero turns off this setting When the limit is reached...

Page 73: ...ow the storage of documents with the same le name Note An asterisk next to a value indicates the factory default setting Erase Temporary Data Files Menu item Description Stored in onboard memory Off O...

Page 74: ...ext to a value indicates the factory default setting Cloud Connector Menu item Description Enable Disable Connectors Enable a cloud service provider Reports Menu Settings Page Menu item Description Me...

Page 75: ...er Note This menu item appears only in network printers or printers connected to print servers Wi Fi Direct Connected Clients Print a page that shows the list of devices that are connected to the prin...

Page 76: ...ice Noti cations 3 From the Supplies menu click Custom Supply Noti cations 4 Select a noti cation for each supply item 5 Apply the changes Setting up e mail alerts Con gure the printer to send e mail...

Page 77: ...fe of the printer and its imaging components It can also affect warranty coverage Damage caused by the use of third party parts and supplies is not covered by the warranty All life indicators are desi...

Page 78: ...Y0 20N5HY0 Black 20N1HK0 20N2HK0 20N3HK0 20N4HK0 20N5HK0 Extra high yield Return Program print cartridges2 Cyan 20N1XC0 20N2XC0 20N3XC0 20N4XC0 20N5XC0 Magenta 20N1XM0 20N2XM0 20N3XM0 20N4XM0 20N5XM0...

Page 79: ...0K0 C3250K0 High yield Return Program print cartridges1 Cyan C331HC0 C332HC0 C333HC0 C334HC0 C335HC0 Magenta C331HM0 C332HM0 C333HM0 C334HM0 C335HM0 Yellow C331HY0 C332HY0 C333HY0 C334HY0 C335HY0 Blac...

Page 80: ...idges Item Part number Cyan C340X20 Magenta C340X30 Yellow C340X40 Black C340X10 Lexmark C2326 Regular print cartridges Item United States and Canada Europe Middle East Africa and Mexico Cyan 24B7495...

Page 81: ...supplies Replacing a print cartridge Note If the tray is extended then remove it before replacing a cartridge 1 Open the front door and then rmly push it down 2 Pull out the print cartridge tray Main...

Page 82: ...Damage Do not expose the underside of the print cartridge to direct light Extended exposure to light may cause print quality problems Warning Potential Damage Do not touch the underside of the print c...

Page 83: ...rint cartridge tray and then close the door Replacing the waste toner bottle 1 Remove the used waste toner bottle Note To avoid spilling the toner place the bottle in an upright position 2 Unpack the...

Page 84: ...3 Insert the new waste toner bottle Replacing the tray 1 Remove the used tray 2 Unpack the new tray 3 Insert the new tray Maintain the printer 84...

Page 85: ...e the used manual feeder 3 Unpack the new manual feeder 4 Insert the new manual feeder 5 Insert the tray Replacing the pick tires 1 Turn off the printer 2 Unplug the power cord from the electrical out...

Page 86: ...push it down 4 Pull out the print cartridge tray 5 To avoid stray toner contamination place a sheet of paper on the top of the print cartridge tray and then insert the print cartridge tray 6 Close the...

Page 87: ...7 Remove the tray 8 Remove the waste toner bottle Note To avoid spilling the toner place the bottle in an upright position 9 Position the printer on its side Maintain the printer 87...

Page 88: ...10 Remove the used pick tires 11 Unpack the new pick tires Note To avoid contamination make sure that your hands are clean Maintain the printer 88...

Page 89: ...nd then to the electrical outlet CAUTION POTENTIAL INJURY To avoid the risk of re or electrical shock connect the power cord to an appropriately rated and properly grounded electrical outlet that is n...

Page 90: ...rd bin 3 Remove any dust lint and pieces of paper around the printer using a soft brush or vacuum 4 Wipe the outside of the printer with a damp soft lint free cloth Notes Do not use household cleaners...

Page 91: ...e power cord to an appropriately rated and properly grounded electrical outlet that is near the product and easily accessible Cleaning the pick tires 1 Turn off the printer 2 Unplug the power cord fro...

Page 92: ...paper on top of the print cartridge tray and then insert the print cartridge tray 6 Close the front door 7 Remove the tray 8 Remove the waste toner bottle Note To avoid spilling the toner place the b...

Page 93: ...9 Position the printer on its side 10 Remove the pick tires 11 Apply isopropyl alcohol to a soft lint free cloth and then wipe the pick tires Maintain the printer 93...

Page 94: ...ay 17 Remove the paper and then insert the print cartridge tray 18 Close the front door 19 Connect the power cord to the printer and then to the electrical outlet CAUTION POTENTIAL INJURY To avoid the...

Page 95: ...o wake the printer from Hibernate mode press the power button The Embedded Web Server is disabled when the printer is in Hibernate mode Adjusting the brightness of the display Note This setting is ava...

Page 96: ...ring If the printer does not have a caster base but is con gured with optional trays or output options then remove the output options and lift the printer off the trays Do not try to lift the printer...

Page 97: ...r white pages on page 98 Dark print on page 99 Ghost images on page 101 Gray or colored background on page 102 Incorrect margins on page 103 Light print on page 104 Missing colors on page 106 Mottled...

Page 98: ...ical white lines on page 119 Repeating defects on page 120 Printing problems Print quality is poor Blank or white pages Note Before solving the problem print the Print Quality Test Pages From the cont...

Page 99: ...he problem is solved Dark print Note Before solving the problem print the Print Quality Test Pages From the control panel navigate to Settings Troubleshooting Print Quality Test Pages For non touch sc...

Page 100: ...he setting on the printer control panel Navigate to Settings Paper Tray Con guration Paper Size Type b Print the document Is the print too dark Go to step 4 The problem is solved Step 4 Check if the p...

Page 101: ...pending on your operating system specify the paper type from the Printing Preferences or Print dialog Notes Make sure that the setting matches the paper loaded You can also change the setting on the p...

Page 102: ...y or colored background Note Before solving the problem print the Print Quality Test Pages From the control panel navigate to Settings Troubleshooting Print Quality Test Pages For non touch screen pri...

Page 103: ...ct customer support The problem is solved Incorrect margins Note Before solving the problem print the Print Quality Test Pages From the control panel navigate to Settings Troubleshooting Print Quality...

Page 104: ...control panel navigate to Settings Troubleshooting Print Quality Test Pages For non touch screen printer models press to navigate through the settings Action Yes No Step 1 a Perform Color Adjust From...

Page 105: ...Go to step 4 The problem is solved Step 4 Check if paper has texture or rough nishes Are you printing on textured or rough paper Go to step 5 Go to step 7 Step 5 a Replace textured or rough paper wit...

Page 106: ...rint the Print Quality Test Pages From the control panel navigate to Settings Troubleshooting Print Quality Test Pages For non touch screen printer models press to navigate through the settings Action...

Page 107: ...f the paper size and paper type settings match the paper loaded Note Make sure that paper does not have texture or rough nishes Do the settings match Go to step 4 Go to step 3 Step 3 a Depending on yo...

Page 108: ...roblem is solved Paper curl Action Yes No Step 1 a Check if the paper loaded is supported Note If paper is not supported then load a supported paper b Print the document Is the paper curled Go to step...

Page 109: ...to Settings Paper Tray Con guration Paper Size Type For non touch screen printer models press to navigate through the settings b Print the document Is the paper curled Go to step 5 The problem is solv...

Page 110: ...rbs moisture due to high humidity Store paper in its original wrapper until you are ready to use it b Print the document Is the print crooked or skewed Go to step 3 The problem is solved Step 3 a Chec...

Page 111: ...support The problem is solved Text or images cut off Note Before solving the problem print the Print Quality Test Pages From the control panel navigate to Settings Troubleshooting Print Quality Test P...

Page 112: ...m is solved Step 3 a Open the front door and then rmly push it down b Pull out the print cartridge tray c Remove and then insert the print cartridges d Insert the print cartridge tray and then close t...

Page 113: ...ght is not supported then load a supported one b Print the document Does toner easily rub off Go to step 3 The problem is solved Step 3 a Load paper from a fresh package Note Paper absorbs moisture du...

Page 114: ...int density uneven Contact customer support The problem is solved Horizontal dark lines Notes Before solving the problem print the Print Quality Test Pages From the control panel navigate to Settings...

Page 115: ...humidity Store paper in its original wrapper until you use it b Print the document Do dark lines appear on prints Go to step 3 The problem is solved Step 3 a Open the front door and then rmly push it...

Page 116: ...or Print dialog Notes Make sure that the setting matches the paper loaded You can also change the setting on the printer control panel Navigate to Settings Paper Tray Con guration Paper Size Type b Pr...

Page 117: ...ark lines appear on prints Contact customer support The problem is solved Horizontal white lines Notes Before solving the problem print the Print Quality Test Pages From the control panel navigate to...

Page 118: ...tep 2 The problem is solved Step 2 a Open the front door and then rmly push it down b Pull out the print cartridge tray c Remove and then insert the print cartridges d Insert the print cartridge tray...

Page 119: ...ng Preferences or Print dialog Notes Make sure that the setting matches the paper loaded You can also change the setting on the printer control panel Navigate to Settings Paper Tray Con guration Paper...

Page 120: ...close the door e Print the document Do vertical white lines appear on prints Contact customer support The problem is solved Repeating defects Note Before solving the problem print the Print Quality Te...

Page 121: ...peating defects match any of the measurements Take note of the distance and then contact customer support Take note of the distance and then contact customer support Print jobs do not print Action Yes...

Page 122: ...print driver b Print the document Is the document printed The problem is solved Contact customer support Slow printing Action Yes No Step 1 Make sure that the printer cable is securely connected to t...

Page 123: ...en printer models press to navigate through the settings Heavier paper prints more slowly Paper narrower than letter A4 and legal may print more slowly b Print the document Is the printer printing slo...

Page 124: ...2 Load the correct paper size and paper type Step 2 a Depending on your operating system specify the paper size and paper type from the Printing Preferences or Print dialog Note You can also change th...

Page 125: ...is solved Go to step 3 Step 3 If you are printing from the Internet then the printer may be reading the multiple job titles as duplicates For Windows users a Open the Printing Preferences dialog b Fro...

Page 126: ...tep 4 Check if the printer is in Sleep or Hibernate mode Is the printer in Sleep or Hibernate mode Press the power button to wake the printer Go to step 5 Step 5 Check if the cables connecting the pri...

Page 127: ...lorer version 11 or later Microsoft Edge Safari version 6 or later Google ChromeTM version 32 or later Mozilla Firefox version 24 or later Is your browser supported Go to step 4 Install a supported br...

Page 128: ...Wi Fi network is selected Note Some routers may share the default SSID Are you connecting to the correct Wi Fi network Go to step 4 Go to step 3 Step 3 Connect to the correct Wi Fi network For more i...

Page 129: ...estern Europe Nordic countries Switzerland 2 Asia Paci c 3 Latin America 4 Rest of Europe Middle East Africa 5 Australia New Zealand 6 Invalid region 9 Note To nd the region settings of the printer an...

Page 130: ...then pressing twice then reset the supply usage counter For non touch screen printer models if the printer does not print after pressing and holding X and simultaneously for 15 seconds then reset the...

Page 131: ...ased damp bent or curled Flex fan and align the paper edges before loading Do not use paper that has been cut or trimmed by hand Do not mix paper sizes weights or types in the same tray Make sure that...

Page 132: ...rays 4 Door B 5 Door E Paper jam in the standard tray 1 Open door B CAUTION HOT SURFACE The inside of the printer might be hot To reduce the risk of injury from a hot component allow the surface to co...

Page 133: ...2 Remove the jammed paper Note Make sure that all paper fragments are removed 3 Close the door Troubleshoot a problem 133...

Page 134: ...per fragments are removed 6 Insert the manual feeder and the tray Paper jam in the optional tray 1 Open door B CAUTION HOT SURFACE The inside of the printer might be hot To reduce the risk of injury f...

Page 135: ...e the jammed paper Note Make sure that all paper fragments are removed 3 Close the door 4 Open door E 5 Remove the jammed paper Note Make sure that all paper fragments are removed Troubleshoot a probl...

Page 136: ...al tray 8 Remove the jammed paper Note Make sure that all paper fragments are removed 9 Insert the tray Paper jam in the standard bin Remove the jammed paper Note Make sure that all paper fragments ar...

Page 137: ...Paper jam in the manual feeder 1 Remove the tray and the manual feeder 2 Remove the jammed paper Note Make sure that all paper fragments are removed Troubleshoot a problem 137...

Page 138: ...HOT SURFACE The inside of the printer might be hot To reduce the risk of injury from a hot component allow the surface to cool before touching it 2 Remove the jammed paper from any of the following ar...

Page 139: ...Fuser area Troubleshoot a problem 139...

Page 140: ...Below the fuser area Duplex unit 3 Close the door Troubleshoot a problem 140...

Page 141: ...ss to navigate through the settings b Send the print job Does the envelope seal when printing Contact customer support The problem is solved Collated printing does not work Action Yes No Step 1 a From...

Page 142: ...is solved Go to step 2 Step 2 a From the control panel navigate to Settings Paper Tray Con guration Paper Size Type For non touch screen printer models press to navigate through the settings b Set the...

Page 143: ...s solved Step 2 a From the control panel navigate to Settings Paper Tray Con guration Paper Size Type For non touch screen printer models press to navigate through the settings b Set the correct paper...

Page 144: ...les RGB Image RGB Text RGB Graphics Vivid Produces brighter more saturated colors and may be applied to all incoming color formats sRGB Display Produces an output that approximates the colors displaye...

Page 145: ...e speci c to the type of object being printed text graphics or images It is also speci c to how the color of the object is speci ed in the software program RGB or CMYK combinations To apply a differen...

Page 146: ...2 The problem is solved Step 2 a From the control panel navigate to Settings Print Quality Advanced Imaging Color Balance For non touch screen printer models press to navigate through the settings b...

Page 147: ...These efficiencies result in fewer greenhouse emissions energy savings and natural resource savings Lexmark also offers recycling of packaging components in some countries or regions For more informat...

Page 148: ...the manufacturer intends to make these available in all countries in which it operates Any reference to a product program or service is not intended to state or imply that only that product program or...

Page 149: ...Mopria Alliance Inc in the United States and other countries Unauthorized use is strictly prohibited PCL is a registered trademark of the Hewlett Packard Company PCL is Hewlett Packard Company s desi...

Page 150: ...signi es speci c recycling programs and procedures for electronic products in countries of the European Union We encourage the recycling of our products If you have further questions about recycling...

Page 151: ...ed to return the cartridges are also recycled To return Lexmark cartridges for reuse or recycling do the following 1 Go to www lexmark com recycle 2 Select the product that you want to recycle Static...

Page 152: ...e hazardous The laser system and printer are designed so there is never any human access to laser radiation above a Class I level during normal operation user maintenance or prescribed service conditi...

Page 153: ...30 pages per minute then you can set the timeout only up to 60 minutes Setting the Sleep Mode Timeout to a low value reduces energy consumption but may increase the response time of the product Setti...

Page 154: ...exposure limits of the FCC and other regulatory agencies A minimum separation of 20 cm 8 inches must be maintained between the antenna and any persons for this device to satisfy the RF exposure requir...

Page 155: ...ntative is Lexmark International Technology Hung ria Kft 8 Lechner d n fasor Millennium Tower III 1095 Budapest HUNGARY A declaration of conformity to the requirements of the Directives is available u...

Page 156: ...smits in either the 2 4GHz 2 412 2 472 GHz in the UK or 5GHz 5 15 5 35 5 47 5 725 in the UK bands The maximum transmitter EIRP power output including antenna gain is 20dBm for both bands Federal Commu...

Page 157: ...s Lexmark part number 1021231 for parallel attach or 1021294 for USB attach Use of a substitute cable not properly shielded and grounded may result in a violation of FCC regulations Any questions rega...

Page 158: ...afety Regulations 2016 the Ecodesign for Energy Related Products and Energy Information Amendment EU Exit Regulations 2019 and the Restriction of the Use of Certain Hazardous Substances in Electrical...

Page 159: ...y service involves the exchange of a product or part the item replaced becomes the property of the Remarketer or Lexmark The replacement may be a new or repaired item The replacement item assumes the...

Page 160: ...nce of Lexmark or a Remarketer for this product under this limited warranty you may recover actual damages up to the limit set forth in the following paragraph Lexmark s liability for actual damages f...

Page 161: ...noti cations 76 con guring Universal paper 22 con guring Wi Fi Direct 31 connecting a computer to the printer 32 connecting mobile device to printer 32 connecting the printer to a wireless network 29...

Page 162: ...Accounts 71 Login Restrictions 72 LPD Con guration 68 Media Types 57 Menu Settings Page 74 Miscellaneous 73 Network 75 Network Overview 58 Noti cations 43 Out of Service Erase 49 PCL 54 PostScript 53...

Page 163: ...printer is not responding 126 printer location selecting 18 printer memory erasing 34 printer menus 40 printer messages Non Lexmark supply 129 Replace cartridge printer region mismatch 129 printer pa...

Page 164: ...roubleshooting print quality blank pages 98 crooked print 109 dark print 99 ghost images on prints 101 gray or colored background 102 horizontal dark lines 114 horizontal white lines 117 light print 1...

Reviews: