background image

44

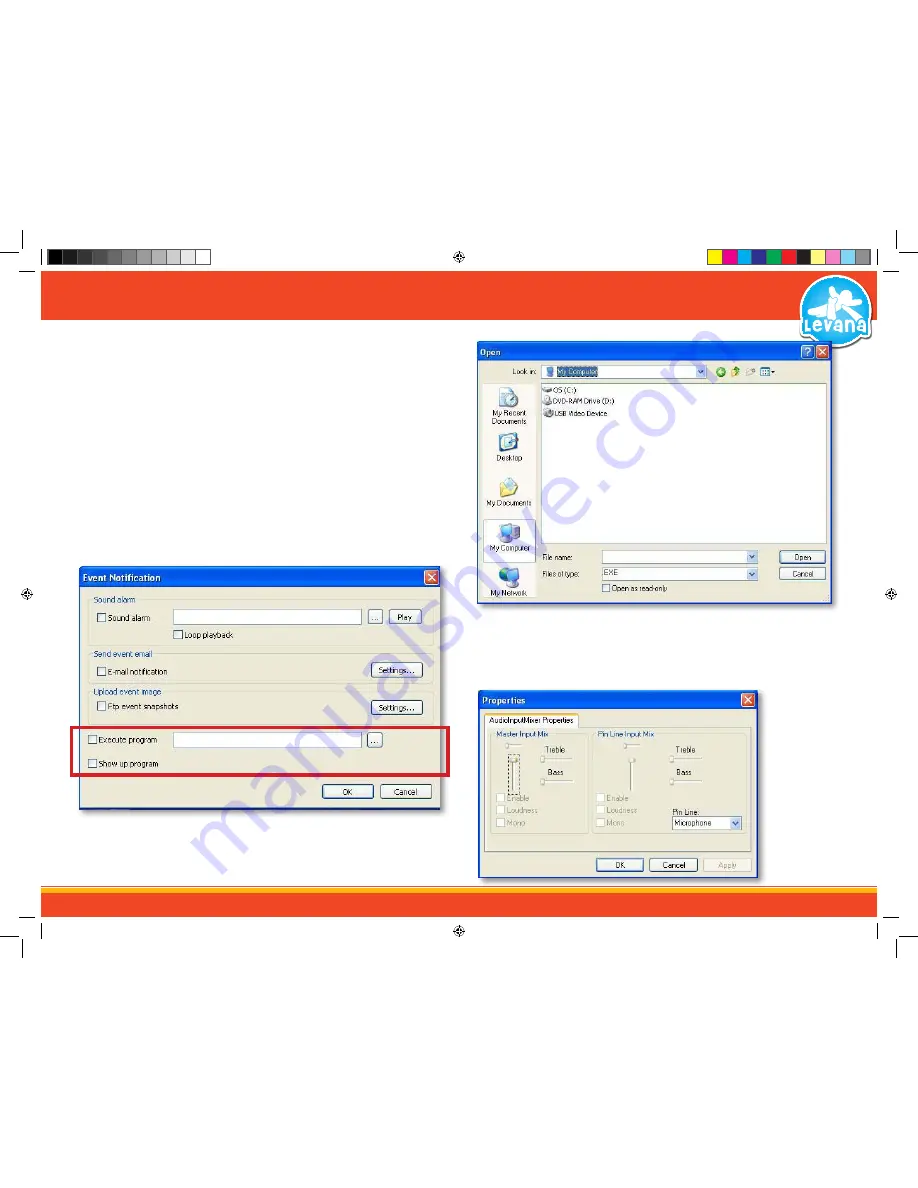
Execute program when motion is detected: 

This feature allows you to choose if another program on your computer will start up when motion is 

detected. Check the box next to Execute program to enable the program to be started when motion or 

noise is detected. 
1.  Select the program you would like to start by pressing the […] button and finding it in the 

browse screen. 

2.  Once you have selected the program from the browse screen select OK. 
3.  To save your settings and exit the screen select OK. To exit without saving select Cancel. 

Show up Program: 

This option allows you to decide if the watcher program will pop up (if minimized) when motion is 

detected. This is good to get your attention if there is motion or noise in a room.  To have the watcher 

program pop up when motion or noise is detected check the show up program box to enable it.  

Select OK to save and exit the screen and Cancel to exit without saving. 

STEP 8   - SOFTWARE - IN DEPTH 

Audio Capture Filter: 

As the LV-TW500 has a microphone built into it, the options to adjust sound are limited. You can only 

adjust the main master input volume; this allows you to set the volume of sound that plays through 

the software. To open the audio capture filter select “options”

” Audio Capture Filter.” 

Execute Program when motion is detected

Search for program to be executed

Audio Capture Filter menu 

LV-TW500 Manual.indd   44

14/10/2010   11:39:46 AM

Summary of Contents for LV-TW500

Page 1: ...1 Wireless Baby Camera Digital Model LV TW500 w Online Monitoring USERS MANUAL www myLevana com LV TW500 Manual indd 1 14 10 2010 11 37 15 AM ...

Page 2: ... warranty 5 This warranty does not cover the shipping cost insurance or any other incidental charges 6 You MUST call LEVANA before sending any product back for repair You will be sent a Return Authorization form with return instructions When returning the product for warranty service please pack it carefully in the original box with all supplied accessories and enclose your original receipt or cop...

Page 3: ...LIST 7 STEP 1 CAMERA SETUP 8 Setting up the Baby Camera 8 Using the Magnetic Base 9 Using Batteries 9 Using the Crib Mount 10 STEP 2 CONNECTINGTHE USB RECEIVER 10 STEP 3 INSTALLINGTHE DRIVERS FROMTHE CD 11 STEP 4 INSTALLINGTHE SOFTWARE FROMTHE CD 12 STEP 5 PAIRINGTHE CAMERA AND USB RECEIVER 13 STEP 6 THE BASICS 14 Watcher Software Buttons And Connections 15 ViewingYour BabyThrough the Computer 16 ...

Page 4: ... easily since no additional setup is required to enjoy this feature Stay Notified with Email Alerts Stay informed even when you aren t at home Set the camera to automatically send you an email when movement is detected in your baby s crib or room or when the camera loses power it s your choice You can always be aware of what is happening to your child and ensure that whomever is watching over your...

Page 5: ...o an outlet on a circuit different from that to which the receiver is connected Consult the dealer or an experienced radio TV technician for help FCC Label Compliance Statement This device complies with Part 15 of the FCC Rules Operation is subject to the following two conditions 1 This device may not cause harmful interference 2 This device must accept any interference received including interfer...

Page 6: ...off 7 Power Adapter Input Plug the power adapter into this area 8 Night Light Button Pressing this button turns on and off the night light and infrared LEDs on the camera This also allows you to pair the camera and USB receiver devices 9 Night Light The stars light up when the night light button is pressed 10 Battery Compartment Allows you to have your camera powered by 4 AAA batteries not include...

Page 7: ...00 4 Pairing Button This is the button you press to pair the camera to the USB receiver 8 STEPSTO USETHE LV TW500 Please follow the step by step instructions Step 1 Camera Setup Step 2 Connect the USB Receiver Step 3 Install the Drivers from the CD Step 4 Install the software from the CD Step 5 Pairing the camera and the USB Receiver Step 6 Knowing the Basics of the Software Step 7 Port Forwarding...

Page 8: ...ON position STEP 1 CAMERA SETUP Plug Camera In Turn Switch On Using the Night Light 1 Press the button on the camera labeled Light This activates the night lights onthecamera Thenightlightwillremainonuntilthebuttonispressedagain NOTE Wedonotrecommendusingbatterieswiththenightlight Thebatterylifewill belessthan2 5hourswiththenightlighton Using NightVision The camera has eight night vision LEDs so i...

Page 9: ...are red and blinking Upon startup the LED will be red NOTE Usenewbatteries Donotmixoldbatterieswithnewones Remove thebatteriesfromthecameraifyoudonotplantouseitforan extendedperiodoftime Batteries Using the Magnetic Base The camera has an innovative and convenient magnetic base that magnetically holds the camera securely This allows you to freely rotate the camera left right up and down with ease ...

Page 10: ...he crib by turning the knob clockwise 4 Angle the camera to your desired location and tighten the smaller white knob nearest to the camera to lock it into position STEP 2 CONNECTTHE USB RECEIVER Connecting USB Receiver 1 Remove the protective lid from the USB receiver 2 Connect the USB receiver into an open USB port on your computer 3 You will see a red LED light up on the receiver to show it is c...

Page 11: ... Computer 3 This will open up to a selection of software to be installed Double click the icon named DRIVERS and follow the installation guide 4 Once installation is complete you will be prompted to restart your computer 5 Once the computer has restarted the drivers will be properly installed onto your computer and you can continue to Step 3 and install the software If you are usingVista an instal...

Page 12: ...ouble click the icon named SecuExpress and follow the installation guide 5 The first screen gives you the installation options be sure to select the top option Install SecuExpress 6 Once installed a completion screen will appear asking if you would like to run SecuExpress 2 If not deselect the option and select finish If you would like to run the program automatically then select finish 7 The fina...

Page 13: ...uter press the camera selection button on the side to choose which camera number you want to pair The LED on top of the receiver will light up next to the camera number to be paired 2 Press and hold the camera selection button on the side of the USB receiver down The LED next to camera number that is pairing will begin to flash for 5 seconds 3 While the LED is flashing hold down the night light bu...

Page 14: ...ugh your computer Record sections of video footage and save them to your computer Watch recorded video footage Take a snapshot of the screen and save it to your computer Enable Disable motion detection recording View your baby on other computers in the house by using your IP address STEP 6 THE BASICS LV TW500 Manual indd 14 14 10 2010 11 38 06 AM ...

Page 15: ...e it to your computer For more information see the SNAPSHOT guide below 8 Record Pressing this allows you to record video playing and save it to your computer For more information see the RECORD ING guide below 9 Motion Detection Pressing this enables and disables mo tion detection 10 Date Time This indicates the date and time based on your computers settings 11 Viewing Screen This screen displays...

Page 16: ...ords the video only if motion is detected You can also choose if you would like to record audio or not with the recording mode Torecordvideo audiofootage 1 Click the Record button when the Record button is highlighted in blue the software is indicating that the footage being viewed on the screen is recording 2 To stop recording click on the Record button again 3 You can also start recording by sel...

Page 17: ... down menu 4 To save changes and exit the preferences box select OK To exit without saving select Cancel 5 Once you have set the Recording Mode to Event Recording the motion detection will automatically be activated 6 To enable motion detect to save footage click the record icon as well Ensure that both the running man and record icons are selected and highlighted blue on the main screen 7 To de a...

Page 18: ...ce the available storage space is used up check the Recycle Storage check box 5 The Record file length setting breaks up the file length into a number of minutes that you specify This can be used to delete sections of video that you no longer require It is suggested to leave this at the default value 5 minutes 6 To save changes and exit the preferences box select OK To exit without saving select C...

Page 19: ...e and select play or double click it 4 Scroll Bar You can skip back or ahead on the video by clicking and dragging the square along the bar 5 Playback Keys These buttons allow you to play pause stop fast forward and rewind the play back footage 6 Snap Shot Pressing this takes a photo of the recorded footage For more information see the SNAPSHOT guide 7 Video Speed You can adjust the speed that the...

Page 20: ...ayer s snapshot Savingthephoto 1 To save the photo select the save icon and a folder list will appear browse to the folder you would like to save the photo to name the photo and select save Addingfonttothephoto 1 If you would like to add the date and time the photo was taken select font 2 A font screen will appear for you to pick a font and font color that the date and time will be written on the ...

Page 21: ...me router See PORT FORWARDING Tofind theIPaddress 1 Go to your computer s start menu and select run If you are usingVista select theWindows Key and R and the run menu should appear 2 In the run menu type the letters cmd and select OK 3 In the black box that pops up type the word ipconfig and press enter 4 This should pop up your IP address Subnet mask and Default gateway 5 Write down the number ne...

Page 22: ...640 x 480 view All online viewing external remote and mobile will give you this option ONCEYOU HAVE SELECTEDTHE SCREEN SIZE THE ONLINE SOFTWAREWILL APPEAR Theonlineviewingscreenwilldisplaythefollowing 1 A live view of what the camera is recording 2 An option to pause and play the footage By pressing the bottom right stop button the footage will stop pressing the button again which will be a play b...

Page 23: ...fore you begin port forwarding you will need The USB receiver hooked up to your computer The watcher software installed and running The software ALWAYS needs to be running to view the footage online Your computer hooked up to a network router The brand and model number of your router this is usually located on the back or bottom of the router Your choice of Internet web browser Internet Explorer S...

Page 24: ...elect the Get Started button on this page 4 Another program will appear in a separate screen select the get started icon in the bottom left corner 5 Make sure the volume is at a reasonable listening level on your computer and follow the instructions given in the pop up window 6 Once you have completed port forwarding seeTESTING PORT FORWARDING There are two types of instructions available for port...

Page 25: ...warding you can select any type of system as the instructions for port forwarding are the very similar for all products 6 Follow the step by step instructions for your router on www portforward com the instructions will walk you through the port forwarding process from start to finish 7 Once you have completed port forwarding see theTESTING PORT FORWARDING STEP 7 PORT FORWARDING AND ONLINEVIEWING ...

Page 26: ... 80 7 Click the check button and scroll down 8 You will see a message that tells you that it can successfully see your port This means you have successfully port forwarded 9 If you receive an error message please view the troubleshooting guide If you re still having trouble you can always contact LEVANA s 24 7 support team NOTE www whatsmyip organdwww canyouseeme orgarenotaffiliatedwithLEVANA inan...

Page 27: ...ive footage from your baby camera from any computer with an internet connection By clicking the stop button in the bottom right corner of the viewing screen the footage will pause pressing the button again which will now be a play button will prompt the footage to play live again 6 Make sure you give your external IP address to people who would want to view the footage as well Aunts Uncles Grandma...

Page 28: ...l IP address in the search bar 2 You will get an option to select a screen size 3 Once you have selected your screen size the footage will play 4 Pressing the stop button in the bottom right corner will pause the footage pressing it again will play live footage MobileViewing with iPodTouch MobileViewing with BlackBerry MobileViewing with Nokia NOTE Theimagesaresimilartowhatthemobileviewingwilllook...

Page 29: ...te 3 Enter your preferred user name email address and password 4 Optional information can be left blank unless you would like to enter it 5 Read and agree to the Acceptable Use Policy AUP by checking the box and click Create Account 6 An account verification email will be sent to the email address you supplied You need to follow instructions in order to complete the account activation The next pag...

Page 30: ... type in the external IP address that you got earlier 8 Leave all of the other options as they are and click Create New Host 9 Follow on screen instructions to activate and view your free DDNS host name 10 Your dynamic DNS settings have been created STEP 7 PORT FORWARDING AND ONLINEVIEWING Select the Services Button Select Dynamic DNS Select Get Started Insert Host name Information VIEWINGYOUR CAM...

Page 31: ...o view the footage Itistellingmethatthepagecannotbedisplayed Port forwarding is not set up correctly Try visiting www myLEVANA com networking or www portforward com and follow the Port forwarding instructions again Port 80 is being blocked by your ISP Internet Service Provider Try changing the HTTP port to 2000 Port forwarding will need to be setup for the new port A DSL modem is preventing the co...

Page 32: ...32 STEP 8 SOFTWARE IN DEPTH LV TW500 Manual indd 32 14 10 2010 11 39 10 AM ...

Page 33: ...nces dialog box To open the preferences dialog box select Options Preferences ThePreferencesdialogboxallowsyouto Select the folder where you want to store the recorded data directions above in THE BASICS section Adjust the compression format Set the recording mode directions above in THE BASICS section Enable or disable password protection for online viewing Set a password Set an IP address change...

Page 34: ...uld like to use to compress the video footage 3 To save changes and exit the preferences box select OK To exit without saving select Cancel Toadjustthequality 1 Select the tab that is located along the quality adjustment bar 2 Click and while holding the tab down drag it along the bar The further along the bar the higher the quality of footage The higher the quality the more hard drive space will ...

Page 35: ...to password protection when the box is checked the password prompt will be set to on 2 In the type field next to the password protection input the password you would like to use 3 Make sure you tell this password to the people who would be viewing the footage online such as Grandma and Grandpa 4 To save changes and exit the preferences box select OK To exit without saving select Cancel STEP 8 SOFT...

Page 36: ...Password Put your email password in this is the password you use to access your email account From This is the email that the software will use to send you the alert emails This email has to be the one you set the user name and password for above To Input the email address where you want the alerts to be sent Subject Input the subject title you wish to be for every email alert you get e g Change I...

Page 37: ...l appear Select Finish in order to complete the installation process and open the program 5 You then enter the user name and password of the DynDNS account you set up earlier in the port forwarding process If you have not set up a DynDNS account the instructions are under the PORT FORWARDING section of the manual 6 You will now get an email each time your IP changes notifying you what your IP addr...

Page 38: ...the dialog box This setting is already set for you using default settings it is recommended to keep the default settings Tosetupremoteaccessconnections 1 Under video stream server check the box next to enable video server 2 SpecifyTCP port number Note The software remote has to have the sameTCP port number so that you can connect to this video server Therefore it is best to leave it at 81 3 Specif...

Page 39: ...ded or not as well as adjust how long the short motions should be A short motion would be something like a bee flying in front of the camera or a small movement from your baby To set ignore short motion put a check in the box then type how long a short motion should be from 1 to 60 seconds 6 Set Motion Detection The detect button will automatically detect the current motion in the room over 5 seco...

Page 40: ...ransparent Mask This option allows you to adjust whether or not the red motion mask is see through If you do not have this option selected the mask is a flat red and unable to be seen through 2 Show Grid This option allows you to select if a grid is shown when selecting which area detects or does not detect motion the grid works as a good reference 3 Clear All Selecting this will clear the screen ...

Page 41: ...laby play or record the sound of your voice on your computer to play if your baby starts to stir or cry 1 Check the box next to sound alarm to enable an alarm to be sounded when motion or noise is detected 2 Select the alarm or sound that you would like to play by selecting the box and finding it through the browse file make sure the audio file is WAV format 3 To test out that the sound you have s...

Page 42: ...l password in this is the password you use to access your email account From This is the email that the software will use to send you the alert emails This email has to be the one you set the user name and password for above To Input the email address where you want the alerts to be sent Subject Input the subject title you wish to be for every email alert you get e g Change IP address 4 Once the i...

Page 43: ... The host name of your FTP server This could be a full host name like ftp yourfileserver com or in IP address form such as 216 12 36 244 User name The user name you use to access the FTP server most FTP user names are case sensitive Password The password you use to access the FTP server most FTP passwords are case sensitive Number of Snapshots This is the number of snapshots you would like uploade...

Page 44: ...rogram will pop up if minimized when motion is detected This is good to get your attention if there is motion or noise in a room To have the watcher program pop up when motion or noise is detected check the show up program box to enable it Select OK to save and exit the screen and Cancel to exit without saving STEP 8 SOFTWARE IN DEPTH Audio Capture Filter As the LV TW500 has a microphone built int...

Page 45: ...ompleted To get to the video pin options select options Video Capture Pin Output Size Output size controls the size of the video screen that you see and the frame rate of the recorded video To change these settings select the scroll down menu then select a size you would like You can choose from 640 x 480 or 320 x 240 To lower the Frame Rate use the up arrow next to the frame rate The down arrow w...

Page 46: ...e The things you can view hide are the menu bar the status bar switch to full screen view and view the log files You can also decide if the watcher program is always on top and restore the window size with the view menu You can do many of these features with icons directly on the software To adjust the menu bar status bar always on top and view full screen open the view menu and click the option y...

Page 47: ...r remote connections as events make sure the boxes next to each of those options are checked To specify the number of logs you would like to view insert the number of logs in the type box at the bottom you have a choice of viewing 100 to 1000 logs When you are finished viewing the logs select close to close the log box Remote Connections As the LV TW500 is designed to be set up and viewed in a hom...

Page 48: ...corddatabase Refreshing the record database uploads the most recently recorded footage into the database To refresh the database select file update record DB BackinguprecordDatabase Backing up record database allows you to save the precious moments that you have captured to a safe spot on your computer or to a USB drive 1 Select file Backup record DB 2 A browse screen will appear navigate to the a...

Page 49: ...djust any settings for remote monitoring program right click the program and select options 4 If you to not have a Skype account you can download it for free online from www skype com download Toviewyourcamerafromanotherlocation 1 Make sure your Skype is open on the computer with the USB receiver connected to it 2 From another location log into a different Skype account and select to have a conver...

Page 50: ... vision does not turn on automatically in the dark you must manually turn on the night vision by pressing the light button ThevideoisplayingslowlywhenIamviewingitonline Check your Internet connection if your connection is slow the video will stream slowly Try opening the video the smaller screen option Try adjusting the quality of the video the lower the quality the faster the video will stream Th...

Page 51: ...peratingTemperature 14 F 104 F Operating Humidity 0 85 Camera Power Input DC 9V 600mA Power Adapter Input AC 220 240V 50Hz Dimensions 3 75 W x 4 25 H x 2 45 D Weight 2 lbs Number of Cameras Supported 1 Wireless Frequency 2 4 GHz Channel Frequencies 2408 6 2470 5MHz Motion Activated Alert By PC software Audio Activated Alert No Auto Scanning No Housing Material ABS plastic Housing Color White and R...

Page 52: ...52 LV TW500 Manual indd 52 14 10 2010 11 40 19 AM ...

Reviews: