background image

Bearing Lubrication

Below is a listing of approved lubrication.

The grease used should meet the requirements as shown in the chart above. The following amounts 

of grease should be used:

 4 ounces to completely exchange the grease throughout the hub

 1 1/2 - 3 ounces every (3) months or 1000 miles thereafter or as use requires

l

ubriCaTiOn

 S

peCifiCaTiOnS


Grease 


  Dropping Point 

230°C (446°F) Minimum

  Viscosity Index 

80 Mini-

mum 

Bearing Adjustment, Hub Installation, and Lubrication

Bearing adjustment is a very important part of achieving maximum bearing life and trouble-free service. Most bearing fail-

ures can be attributed to improper bearing adjustment, normally due to the bearings being adjusted too tight.
Once all of the necessary inspections have been performed and the units have been properly lubricated, the following 

procedure should be used for reinstallation of the hubs:

1.  Place the lubricated unit onto the same spindle from which it was removed. Make sure all of the components are 

reinstalled as they were removed.

2.  Place the flat washer onto the spindle followed by the bend-leg washer, followed by the castle nut.
3.  Finger-tighten the castle nut by hand without moving the hub.
4.  Bend the legs of the bend-leg washer to the channel of the castle nut to ensure the castle nut will not back off.
5.  The castle nut should be free to move with your fingers with only the bend-leg washer holding it in place and the 

hub should not have noticeable movement when pulled back and forth.

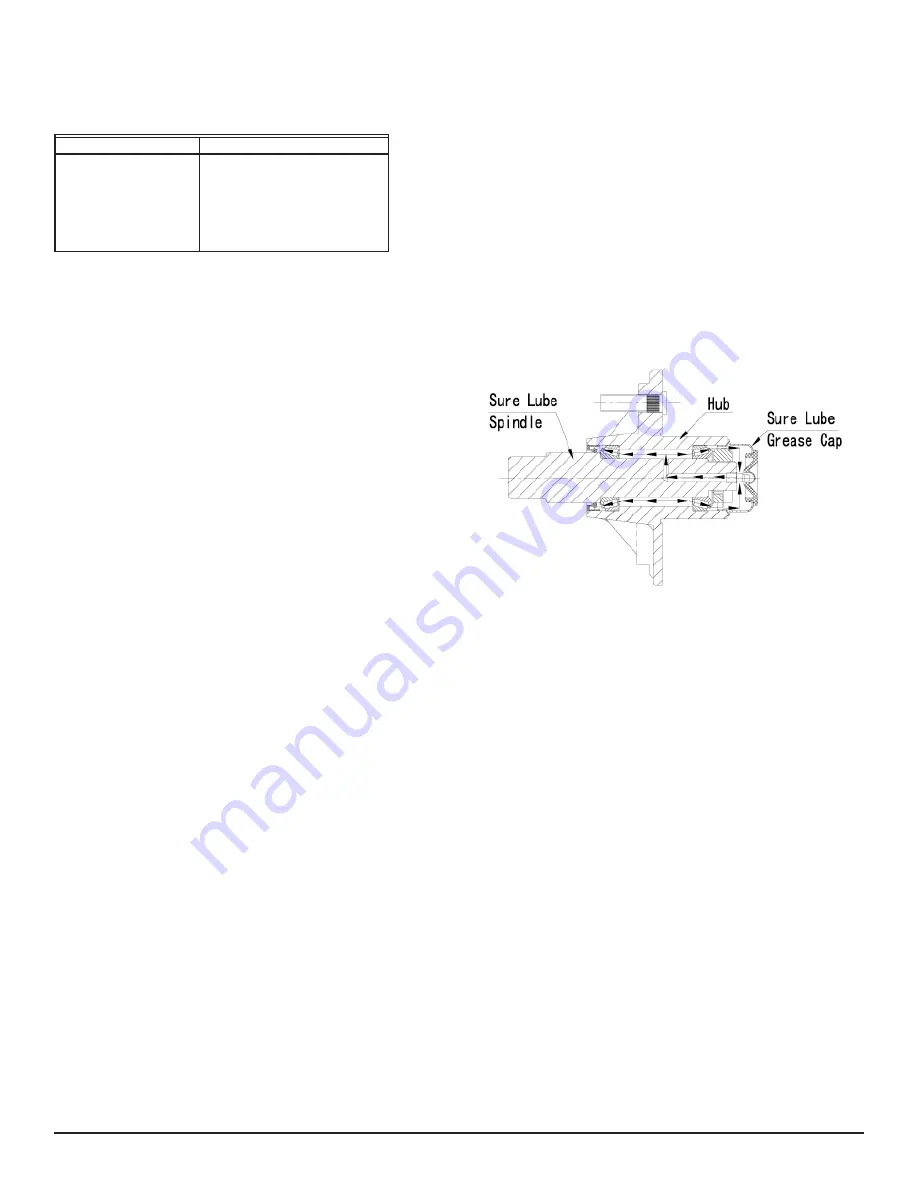
6.  After assembling the hub, the grease is pumped through the hub via the grease zert in the end of the grease cap, 

then through the hole in the spindle to the space between the two bearings. The final step is to reinstall the dust 

cap. 

Page 5 of 21

Summary of Contents for LittleGiant Trailer TLK864

Page 1: ...for continued reference LittleGiant Trailer TLK864 7 Torsion based related models User Assembly and Operation Manual Visit our website at www LetsGoAero com For Assistance please call 1 877 464 2376...

Page 2: ...sively worn safety cable damaged tail lights side running lights wire harness loose lug nuts loose hitch connection and any other condition that may affect its safe operation Check your maintenance sc...

Page 3: ...k the hub assembly and handle other maintenance items To reduce friction between the coupler and hitch ball apply a layer of heavy weight grease over the hitch ball Lubrication of the coupler should b...

Page 4: ...operating properly connect the trailer plug to your vehicle Proceed to test each of the lights and power leads using your 12v light tester Bearing Inspection Replacement The bearings should be inspec...

Page 5: ...he units have been properly lubricated the following procedure should be used for reinstallation of the hubs 1 Place the lubricated unit onto the same spindle from which it was removed Make sure all o...

Page 6: ...ust be mounted with the torsion arm and spindle trailing to the rear of the axle beam As Load is Applied to the Trailer the Torsion Arm Moves to Absorb the Shock Wheels and Tires Wheel Selection Wheel...

Page 7: ...r the first 50 miles and again at 500 mile intervals Check periodically thereafter to ensure that the proper torque values are maintained Wheels and Tires Inspection and Maintenance Wheels should be v...

Page 8: ...le 3 Months 6 Months 12 Months Refer to Required Intervals or or or Page 1000 Miles 3000 Miles 6000 Miles Hub Drum Rotor Inspect for abnormal wear Bearings Sure Lube Replenish grease Bearing Lube in t...

Page 9: ...Marker Light O L Bend Bolt On Light Brackets P License Plate Triangular Plate Q 4 Flat Wire Lighting Harness with Four Flat Connector R End Gates S 5 16 Snap Pins T 1 1 2 Wide End Gate Support L Brac...

Page 10: ...Ring Lock Washers II Wire Pad Holder with Adhesive JJ 5 16 Spring Nuts KK 1 2 Spring Nuts LL 5 16 x 2 Bolts MM 1 2 x 1 Bolts NN Spring Nut Holder OO Safety Cable Washers PP 5 16 x 1 Bolts QQ Pin Nut...

Page 11: ...Step 2 AA 1 2 X 3 Bolt 4 AA 1 2 Flat Washers 8 CC 1 2 Nylon Lock Nuts 4 Step 3 Spring Nut L Bracket Hardware JJ 5 16 Spring Nut 2 KK 1 2 Spring Nut 2 MM 1 2 X 1 Bolt 2 JJ 1 2 Lock Washer 2 BB 1 2 Flat...

Page 12: ...ly Fit Final Tightening occurs at Step 9 Final Tightening of 5 16 bolts should be to 15 foot lbs of torque Final Tightening of 1 2 bolts should be to 30 foot lbs of torque 2 Attach Frame Tubes to Axle...

Page 13: ...this hardware for Assembly Fit Final tighten later Insert the 5 16 X 2 Bolts and 5 16 Lock Washers through the top of the Frame Tubes to hold the Spring Nuts in place Wiring Slide the driver and pass...

Page 14: ...r Flat Washers for Safety Cable area as noted below Attach the A Frame Coupler D to one of the A Frame tubes and install the Safety Cable in the front hole of the coupler Install two 1 2 X 3 Bolt two...

Page 15: ...at this stage if it is necessary 5 16 X 1 Bolts Stainless Steel Flat Washers SS Split Ring Washers X 5 16 X 2 Bolts DD with Washers Lock Nuts 5 16 X 4 Bolts EE with Washers Lock Nuts 8 Install Side Pa...

Page 16: ...the Frame Tube Once the 3 hole and 5 hole U Tubes are secure reinstall the 5 16 X 4 Bolts Washers and Lock Nuts EE in the same manner Important Make sure that the floor panels are square with U Tubes...

Page 17: ...rs Use the pre drilled holes in the center of the floor panels and at front and rear center of panel locations as a guide to engage and tighten the self drilling fasteners though the floor panels and...

Page 18: ...ches as shown Use the Snap Pins to check the alignment of the latches Once the latches are aligned properly tighten the hardware 15 Wiring Routing and Connections Make sure that the solid yellow lead...

Page 19: ...ube Then press the light onto the base Self Drilling Screws Crimps Front Side Marker Light Page 19 of 21 CONNECTOR Attach tail lights to tail light brackets NOTE Tail light with GREEN WIRE on the curb...

Page 20: ...ing the existing holes in the Light bracket mount the license plate using hardware provided in Step 19 as shown in the driver s side of the trailer Page 20 of 21 Attach each fender as shown using 4 ca...

Page 21: ...ged for parts and labor 3 If any of the components of your trailer are found to be faulty due to defective material or workmanship they will be repaired at no charge and returned with transportation c...

Reviews: