background image

LST-WP1

EN

Default Accessories

Quality Assurance

Maintenance

· Spare 4000w heating element            · Anti-hot plate

· Steel brush                                           ·  Slotted screwdriver

· Phillips screwdriver                              · Allen wrench (M3, M4, M5, M6)

· Fuse 4A

· This product guarantees a 12-month shelf life from the day it is sold to consumers. 
We will be responsible for failures caused by material or manufacturing defects. We 
will repair or replace defective parts at our sole discretion to meet the warranty
requirements.
· The quality assurance does not include damage to wearing parts (heating elements, 
carbon brushes, bearings, etc.), damage or defects caused by improper handling or
maintenance, and damage caused by falling products. Irregular use and unauthorized
modification should not be covered by the warranty.

· It is strongly recommended to send the product to Lesite company or
authorized repair center for professional inspection and repair.
· Only original Lesite spare parts are allowed.

1

One year
warranty

Summary of Contents for LST-WP1

Page 1: ...Lesite Technology LST WP1 Roofing Hot Air Welder Manual ...

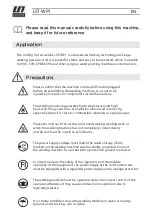
Page 2: ...when it is close to combustible materials or explosive gas Please do not touch the air duct and nozzle during welding work or when the welding machine has not completely cooled down and do not face the nozzle to avoid burns The power supply voltage must match the rated voltage 230V marked on the welding machine and be reliably grounded Connect the welding machine to a socket with a protective grou...

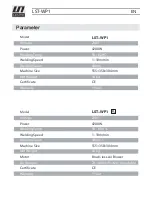
Page 3: ... Warranty 230V 4200W 50 620 1 10m min 40mm 555 358 304mm 38 kg CE 1 Year Model LST WP1 Voltage Power Welding Temp Welding Speed Welding Seam Machine Size Net Weight Motor Air Volume Certificate Warranty 230V 4200W 50 620 1 10m min 40mm 555 358 304mm 38 kg Brush less Air Blower 70 100 Infinitely Adjustable CE 1 Year BL MOTOR ...

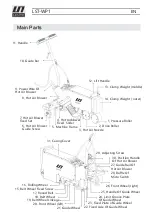
Page 4: ...t middle 12 Lift Handle 4 Hot Airblower Fixed Slider 31 Casing Cover 16 Rolling Wheel 15 Belt Wheel Fixed Screw 17 Round Belt 18 Belt Wheel 19 Belt Wheel Linkage 20 Front Wheel left 21 Guide Wheel 22 Fixed Axle Of Guide Wheel 23 Fixed Plate of Guide Wheel 24 Limit Groove Plate Of Guide Wheel 25 Handle Of Guide Wheel 26 Front Wheel right 28 Baffle Of Micro Switch 27 Guide Rail Of Hot Air Blower 30 ...

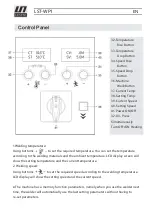
Page 5: ...rding to the welding temperature LCD display will show the setting speed and the current speed The machine has a memory function parameters namely when you use the welder next time the welder will automatically use the last setting parameters without having to re set parameters 32 Temperature Rise Button 33 Temperature Drop Button 34 Speed Rise Button 35 Speed Drop Button 36 Machine Walk Button 37...

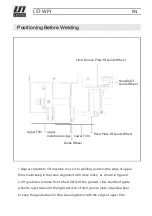
Page 6: ...ss handle to lift machine move it to welding position the edge of upper film should keep in the same alignment with drive roller as shown in figure 4 2 Lift guide bar to make front wheel left off the ground slide handle of guide wheel to right side until the right position of limit groove plate of guide wheel to keep the guide wheel in the same alignment with the edge of upper film ...

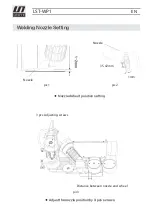
Page 7: ...P1 EN Welding Nozzle Setting Nozzle Nozzle pic1 Nozzle default position setting Adjust the nozzle position by 3 pcs screws pic2 pic3 35 42mm 1mm 1 2mm 3 pcs Adjusting screws Distance between nozzle and wheel ...

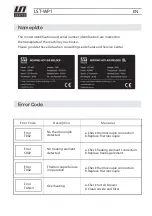
Page 8: ...vice Center Error Code Description Measures Error T002 Error S002 Error T002 Error FANerr No thermocouple detected No heating element detected Thermocouple failure in operation Overheating a Check thermocouple connection b Replace thermocouple a Check heating element connection b Replace heating element a Check thermocouple connection b Replace thermocouple a Check hot air blower b Clean nozzle an...

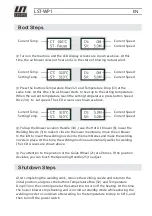
Page 9: ...the Hot Air Blower 8 lower the Welding Nozzle 3 to make it close to the lower membrane move the air blower to the left to insert the welding nozzle into the membranes and make the welding nozzle in place At this time the welding machine automatically walks for welding The LCD screens are shown above After completing the welding work remove the welding nozzle and return to the initial position and ...

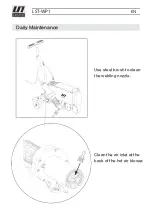
Page 10: ...LST WP1 EN Daily Maintenance Use steel brush to clean the welding nozzle Clean the air inlet at the back of the hot air blower ...

Page 11: ... or replace defective parts at our sole discretion to meet the warranty requirements The quality assurance does not include damage to wearing parts heating elements carbon brushes bearings etc damage or defects caused by improper handling or maintenance and damage caused by falling products Irregular use and unauthorized modification should not be covered by the warranty It is strongly recommended...

Page 12: ...FUZHOU LESITE PLASTICS WELDING TECHNOLOGY CO LTD Add 5 Jingpu Road Pushang Industry Park Cangshan Fuzhou 350007 Fujian China Tel 86 591 83818890 E mail info lesite com cn Web www lesiteweld com ...

Reviews: