


Before servicing the computer
Carefully read this topic before servicing the computer.
Disabling the built-in batteries
Before replacing any FRU, ensure that you have disabled the built-in batteries by doing the following:
1. Turn off the computer and disconnect the ac power adapter and all cables from the computer.
2. Turn on the computer. When the ThinkPad logo is displayed, press F1 continuously to enter the
ThinkPad Setup program.
3. Select
Config
➙
Power
. The
Power
submenu is displayed.
4. Select
Disable built-in battery
.
5. Click
Yes
in the Setup Warning window, then the computer turns off automatically. Wait three to five
minutes to let the computer cool.
The batteries will be automatically enabled when the ac power adapter is reconnected to the computer.
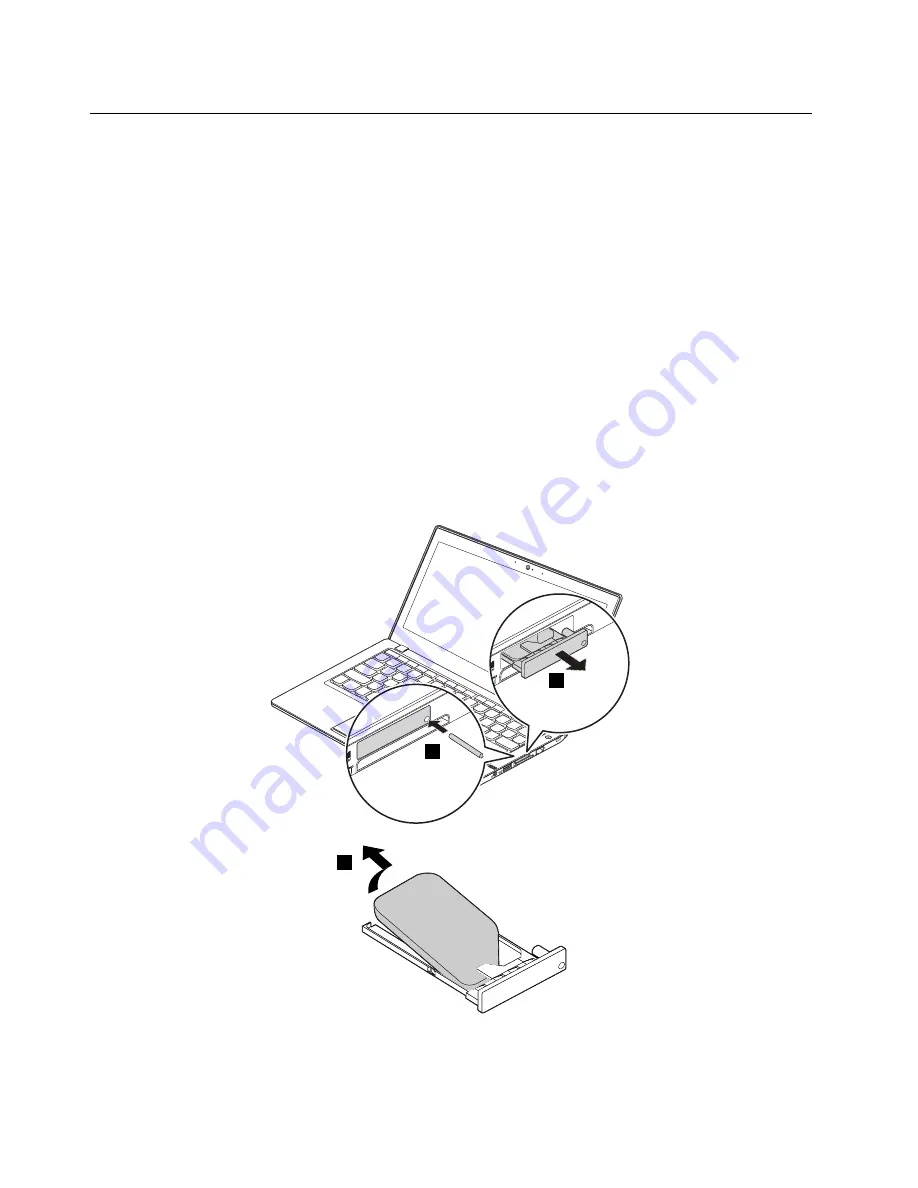
Removing the SIM card tray
Before you start the servicing, remove the SIM card tray with the installed SIM card or dummy SIM card
from the computer.
1
2
3
After you finish the servicing, ensure that you install the SIM card tray with the SIM card or dummy SIM
card back into the computer.
58
Hardware Maintenance Manual
Summary of Contents for Thinkpad X230s
Page 1: ...Hardware Maintenance Manual ThinkPad X230s ...
Page 6: ...iv Hardware Maintenance Manual ...
Page 11: ...DANGER DANGER DANGER DANGER DANGER Chapter 1 Safety information 5 ...
Page 12: ...6 Hardware Maintenance Manual ...
Page 13: ...PERIGO PERIGO PERIGO PERIGO PERIGO Chapter 1 Safety information 7 ...
Page 14: ...PERIGO PERIGO PERIGO DANGER DANGER 8 Hardware Maintenance Manual ...
Page 15: ...DANGER DANGER DANGER DANGER DANGER DANGER Chapter 1 Safety information 9 ...
Page 16: ...VORSICHT VORSICHT VORSICHT VORSICHT 10 Hardware Maintenance Manual ...
Page 17: ...VORSICHT VORSICHT VORSICHT VORSICHT Chapter 1 Safety information 11 ...
Page 18: ...12 Hardware Maintenance Manual ...
Page 19: ...Chapter 1 Safety information 13 ...
Page 20: ...14 Hardware Maintenance Manual ...
Page 21: ...Chapter 1 Safety information 15 ...
Page 22: ...16 Hardware Maintenance Manual ...
Page 23: ...Chapter 1 Safety information 17 ...
Page 24: ...18 Hardware Maintenance Manual ...
Page 28: ...22 Hardware Maintenance Manual ...
Page 46: ...40 Hardware Maintenance Manual ...
Page 50: ...44 Hardware Maintenance Manual ...
Page 58: ...52 Hardware Maintenance Manual ...
Page 62: ...56 Hardware Maintenance Manual ...
Page 71: ...4 5 6 7 7 7 7 Chapter 9 Removing or replacing a FRU 65 ...
Page 89: ...2 Removal steps of the LCD panel and LCD cable 1 1 Chapter 9 Removing or replacing a FRU 83 ...
Page 92: ...2 3 3 4 4 4 4 86 Hardware Maintenance Manual ...
Page 98: ...92 Hardware Maintenance Manual ...
Page 99: ......
Page 100: ...Part Number 0C10860_01 Printed in China 1P P N 0C10860_01 1P0C10860_01 ...


